
Hello guys, namaste !
Today we are going to see how to implement TinyMCE Editor in our react app. Tinymce is a RichText Editor based on JavaScript library.
Tinymce is fast and reliable way to integrate it with your existing codebase.
In this article , we start with a simple integration.
Creating a simple React project
- Use the Create React App package to create a new React project named tinymce-react-demo.
npx create-react-app@5.0.0 tinymce-react-demo
- Change to the newly created directory.
cd tinymce-react-demo
- Test the application using the Node.js development server.
npm run start
Installing the TinyMCE React component
- Install the tinymce-react package and save it to your package.json with --save.
npm install --save @tinymce/tinymce-react
Adding the Editor component to our project
- Open Our Blog Creation Form. (following create.js file created in previous part.) You can simply copy it from here.
create.js
import React , {useState} from "react";
import fb from "./firebase";
const DB =fb.firestore()
const Blogslist = DB.collection('blogs');

const CreateBlog = () => {

    const[title, SetTitle] = useState("");
    const[body, SetBody] = useState("");

    const submit =(e)=> {
        e.preventDefault();
        Blogslist.add ({
            Title: title,
            Body: body
        }).then((docRef)=> {
            alert("data successfully submit")
        }).catch((error) => {
            console.error("error:", error);
        });
    }
    return(
        <div>
            <form onSubmit={(event) => {submit(event)}}>
            <input type="text" placeholder="Title"
            onChange={(e)=>{SetTitle(e.target.value)}} required />

            <textarea  name="content" type="text" placeholder="write your content here"
            rows="10" cols="150" onChange={(e)=>{SetBody(e.target.value)}} required >
            </textarea>

            <button type="submit">Submit</button>
        </form>
        </div>
    );
};

export default CreateBlog;
- Now import Editor component in
create.jsfrom TinyMCE React library which we install.
import { Editor } from '@tinymce/tinymce-react';
- Now Replace the textarea field through Editor component.
Before Replace
<form onSubmit={(event) => {submit(event)}}>
    <input type="text" placeholder="Title"
    onChange={(e)=>{SetTitle(e.target.value)}} required />

    <textarea  name="content" type="text" placeholder="write your content here"
    rows="10" cols="150" onChange={(e)=>{SetBody(e.target.value)}} required >
    </textarea>

    <button type="submit">Submit</button>
</form>
After Replace
<form onSubmit={(event) => {submit(event)}}>
    <input type="text" placeholder="Title"
    onChange={(e)=>{SetTitle(e.target.value)}} required />

    <Editor
        textareaName='Body'
        initialValue="<p>This is the initial content of the editor.</p>"
        init={{
            height: 500,
            menubar: false,
            plugins: [
                'advlist autolink lists link image charmap print preview anchor',
                'searchreplace visualblocks code fullscreen',
                'insertdatetime media table paste code help wordcount'
            ],
            toolbar: 'undo redo | formatselect | ' +
            'bold italic backcolor | alignleft aligncenter ' +
            'alignright alignjustify | bullist numlist outdent indent | ' +
            'removeformat | help',
            content_style: 'body { font-family:Helvetica,Arial,sans-serif; font-size:14px }'
        }}
        onEditorChange={(newText) => SetBody(newText)}
    />

    <button type="submit">Submit</button>
</form>
- In Editor component we use somenew attr inside of textarea attr.
name -> textareaName
placeholder -> initialValue
onChange -> onEditorChange
- Now Our
Create.jsfile look like following.
import { Editor } from '@tinymce/tinymce-react';
import react, {useState} from 'react';
import fb from './firebase';
const db = fb.firestore()
const Blogs = db.collection('blogs');

const CreateBlog= () => {
    const [title , SetTitle] = useState("");
    const [body , SetBody] = useState("");

    const sub = (e) => {
        e.preventDefault();
        // Add data to the store
        Blogs.add({
            Title: title,
            Body: body,
            publish: false,
            published_on: fb.firestore.Timestamp.fromDate(new Date())
        })
        .then((docRef) => {
            alert("Data Successfully Submitted");
        })
        .catch((error) => {
            console.error("Error adding document: ", error);
        });
    }
    return (
    <div>
        <form onSubmit={(event) => {sub(event)}}>
        <input type="text" placeholder="Title"
            onChange={(e)=>{SetTitle(e.target.value)}} required />
        <Editor
            textareaName='description'
            initialValue="<p>This is the initial content of the editor.</p>"
            init={{
                height: 500,
                menubar: false,
                plugins: [
                  'advlist autolink lists link image charmap print preview anchor',
                  'searchreplace visualblocks code fullscreen',
                  'insertdatetime media table paste code help wordcount'
                ],
                toolbar: 'undo redo | formatselect | ' +
                'bold italic backcolor | alignleft aligncenter ' +
                'alignright alignjustify | bullist numlist outdent indent | ' +
                'removeformat | help',
                content_style: 'body { font-family:Helvetica,Arial,sans-serif; font-size:14px }'
              }}
            onEditorChange={(newText) => SetBody(newText)}
        />
        <button type="submit">Submit</button>
        </form>

    </div>

    );
}

export default CreateBlog;
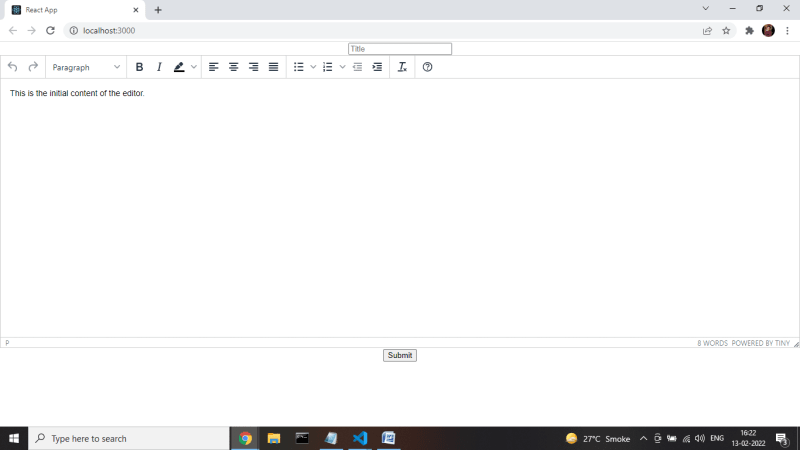
- Result
Show RichText in Templates
- open our Show.js file. (following show.js file created in previous part.) You can simply copy it from here.
Show.js
import React , {useState} from "react";
import { useParams} from 'react-router-dom';
import fb from "./firebase";
const DB =fb.firestore()
const Blogslist = DB.collection('blogs');

const BlogView = ()=> {
    const {id} = useParams();
    const[blogs, Setblogs] = useState([]);
    Blogslist.doc(id).get().then((snapshot) => {
        const data = snapshot.data()
        Setblogs(data);
    });
    return(
        <div>
            <p>Title : { blogs.Title}</p>
            <p>Body : { blogs.Body}</p>

        </div>
    );
};
export default BlogView;
result

- Now you can see our text is show in HTML format and we want to simply rendor our text in Non-HTML format. so will use
dangerouslySetInnerHTMLattr.
const body = blogs.Body;
<div  dangerouslySetInnerHTML={{__html: body}} />
- Now Our file look like following.
import React , {useState} from "react";
import { useParams} from 'react-router-dom';
import fb from "./firebase";
const DB =fb.firestore()
const Blogslist = DB.collection('blogs');

const BlogView = ()=> {
    const {id} = useParams();
    const[blogs, Setblogs] = useState([]);
    Blogslist.doc(id).get().then((snapshot) => {
        const data = snapshot.data()
        Setblogs(data);
    });
    const body = blogs.Body;
    return(
        <div>
            <p>Title : { blogs.Title}</p>
            <div  dangerouslySetInnerHTML={{__html: body}} />

        </div>
    );
};
export default BlogView;
result

That is it,
I hope you find this article useful.
Thanks for reading!


Oldest comments (2)
how did you uploaded files and images in tinymice
como usar para imágenes y videos?