Introduction
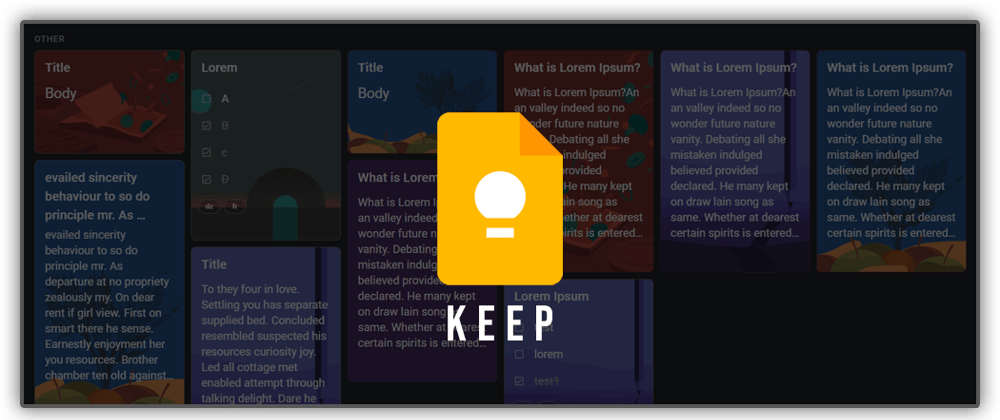
For those who don’t know Google keep, it’s a note-taking service offered by Google.
Because I frequently use this service, I decided to make a clone that follows the same design pattern and include most of its features.
This project is made with the help of :
Demonstration
Thanks to Vercel, you can play with the project online
Project structure
It follows a simple structure :

Disclaimer :
⚠ This is not a tutorial on how to make a clone of Google keep. Here i'll show you the techniques i used to solve problems i encountered while making this project.
Getting started
I divided my project to 5 components, we'll discuss two(2) of them :
- The
input component. - The
notes component.
The other three(3) are too simple to discuss.
Table Of Contents
1️⃣ The input component
--
Problem N°1
Watch the following video :
Solution to problem N°1
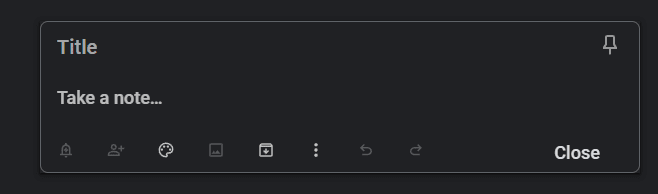
I created two (2) containers :
- The first one is just for the design, a placeholder
- The second one is where the users actually write their notes

Then i added a hidden attribute to the second container, so only the placeholder will be visible.

Now, when the user clicks on the placeholder, we call a method that :
Add a
hiddenattribute to theplaceholderRemove the
hiddenattribute from thesecond container

 notePhClick() {
    this.notePlaceholder.nativeElement.hidden = true;
    this.noteMain.nativeElement.hidden = false
 }
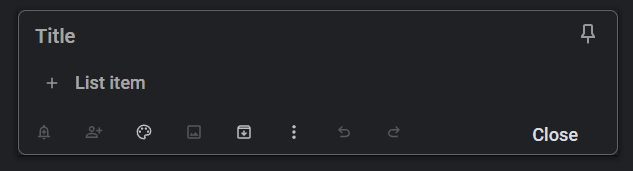
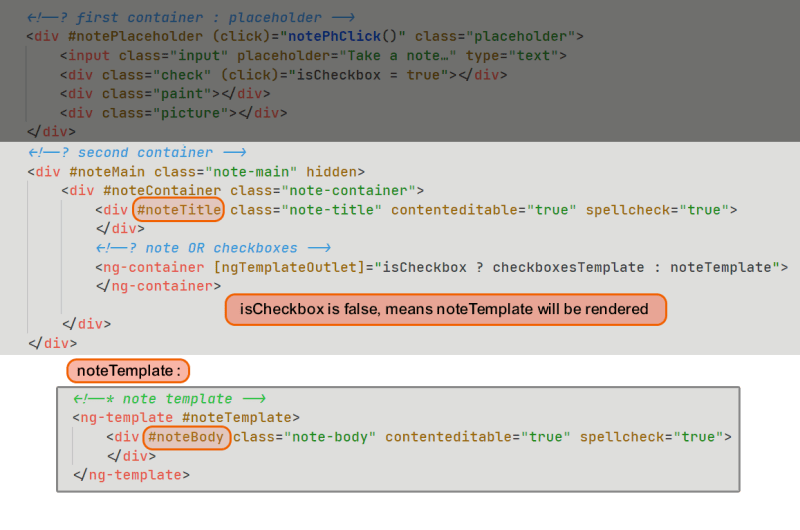
Now, inside the second container, i have a condition :
- What template should I render, the
note templateor thelist template.

So, i need to :
- First , create a new boolean
isCheckboxand set it to false :
isCheckbox = false
- Second, inside my
second containerI need to check ifisCheckboxis true, i render thelist template, else thenote template:
<div #noteMain class="note-main">
  <div *ngIf="isCheckbox">
    <!-- list content -->
  </div>
  <div *ngIf="!isCheckbox">
    <!-- note content -->
  </div>
</div>
ℹ This approach works fine, but i prefer using ngTemplateOutlet and have a cleaner code :
<div #noteMain class="note-main" hidden>
  <ng-container
    [ngTemplateOutlet]="isCheckbox ? checkboxTemplate : noteTemplate"
  >
  </ng-container>
</div>
And create two ng-template each one contains the proper HTML :

So, if isCheckbox is true checkboxTemplate will be rendered, else noteTemplate will be rendered.
✳ This also mean, when the user clicks on the placeholder (and not the check icon) noteTemplate will be rendered. So, we should have :
✳ But when the user clicks on the check icon, we need to change isCheckbox to true :

And because of the Event bubbling, notePhClick() will be called, as a result, checkboxTemplate will be rendered (because isCheckbox = true) :
❔ What about the autofocus you may ask ? simple :
- Inside
notePhClick()we add a condition andfocus()the right element
 notePhClick() {
    this.notePlaceholder.nativeElement.hidden = true;
    this.noteMain.nativeElement.hidden = false
    //
    if (this.isCheckbox) this.noteBody.nativeElement.focus()
    else this.cboxBody.nativeElement.focus()
 }
Now, for the last part of this problem : closing the note when clicking outside.
The solution is to listen to mousedown event :
- If the click is outside note box, hide
noteMainand shownotePlaceholder. The opposite of what we did earlier :
 notePhClick() {
    // we add the following :
    document.addEventListener('mousedown', (event: Event) => {
      let el = this.noteMain.nativeElement as any
      if (!(el).contains(event.target)) {
        // if the click is outside `el` (means outside the note box) do :
        this.notePlaceholder.nativeElement.hidden = false
        this.noteMain.nativeElement.hidden = true
      }
    })
  }
Problem N°2
Watch the following video :
Solution to problem N°2
First, let's create a tooltip, for that, i used PopperJs.
ℹ Note : for those wondering what's a tooltip :
By reading PopperJs Docs :

So i need two things :
- A
button: needs no further explanation. - A
tooltip div: the tooltip shown in the picture above is too simple to discuss, so i'm going to show you how i managed to create the colors & backgrounds tooltip.
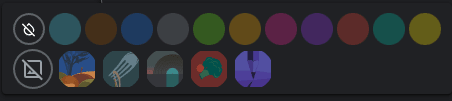
To create this tooltip :
➖ First, I need a list of colors & backgrounds, so i created two enums (you can also get this done with only simple objects) :
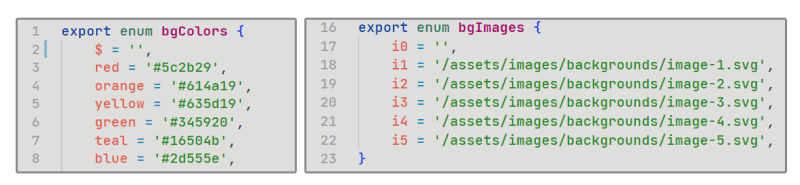
➖ Second, I need to iterate over my enum using *NgFor. And because I have an object and not an array, i need to add the keyvalue pipe :
<!-- tooltip div -->
<div #colorMenuTt hidden>
  <div class="first-row">
    <!-- first row : colors -->
    <ng-container *ngFor="let color of bgColors | keyvalue">
      <div
        [style.background-color]="color.value"
        (click)="changeColor(color.value)"
      ></div>
    </ng-container>
  </div>
  <div class="second-row">
    <!-- first row : backgrounds -->
    <ng-container *ngFor="let image of bgImages | keyvalue">
      <div
        [style.background-image]="'url('+image.value+')'"
        (click)="changeImage(image.value)"
      ></div>
    </ng-container>
  </div>
</div>
<!-- We will discuss changeImage() & changeColor() later -->
⚠ Note : notice the hidden attribute, we don't need this div to be visible, until we need it to be.
--
✳I have my button, I have my tooltip div, I can now create a new tooltip using PopperJs :
- On the button element
 I need to bind a click event that calls a method, this method needs two parameters : a reference to this same
 button& to thetooltip div
<!-- colorMenuTt : reference to the tooltip div we created just above  -->
<div
  #colorMenuTtBtn
  (click)="openTooltip(colorMenuTtBtn,colorMenuTt)"
  class="color"
></div>
The method in question :
  openTooltip(button: HTMLDivElement, tooltipEl: HTMLDivElement) {
    // first, we need to remove the `hidden` attribute from the tooltip div
    this.tooltipEl.nativeElement.hidden = false;
    // then we call PopperJs
    createPopper(button, tooltipEl)
  }
ℹ Note : If you want the tooltip to close (or hide) when the user clicks away, you need to listen to mousedown event like we did earlier, and re-add the hidden attribute to the tooltip div. So, the method will look like this :
  openTooltip(button: HTMLDivElement, tooltipEl: HTMLDivElement) {
    this.tooltipEl.nativeElement.hidden = false
    createPopper(button, tooltipEl)
    //
    document.addEventListener('mousedown', (event: Event) => {
      let el = this.tooltipEl.nativeElement as any
      if (!(el).contains(event.target)) {
        this.tooltipEl.nativeElement.hidden = true
      }
    })
  }
✳ Now, let's retrieve what the user typed. And we start with :
1️⃣ Simple note (not the one with checkboxes)
To retrieve what the user typed, i need to add two template variables, one for the note title, and one for the note body (#noteTitle, #noteBody).
Now, with the help of ViewChild & innerHTML (because it's a div, not an input), i can retrieve what the user typed by executing the following method :
  saveNote() {
    let noteObj = {
      noteTitle: this.noteTitle.nativeElement.innerHTML,
      noteBody: this.noteBody.nativeElement.innerHTML
    }
    // we call another method to save this object on the database or whatever
    this...save(noteObj)
  }
⚠ So, it needs to be called every time the user closes the note, To do that, we need to add it to notePhClick(), inside the callback of the event listener :
  notePhClick() {
    //...
    document.addEventListener('mousedown', (event: Event) => {
      let el = this.noteMain.nativeElement as any
      if (!(el).contains(event.target)) {
        // ⚠ we add it here ⚠
        this.saveNote()
      }
    })
  }
TLDR : when the user clicks outside the note box, the callback function inside notePhClick() event listener calls saveNote().
2️⃣ List note (the one with checkboxes)

When the user clicks on the new list icon, isCheckbox becomes true and this time, checkboxTemplate will be rendered.
Before starting, I need first to create a new array :
 interface CheckboxI {
    done: boolean,
    data: any,
    id: number
}
checkBoxes: CheckboxI[] = []
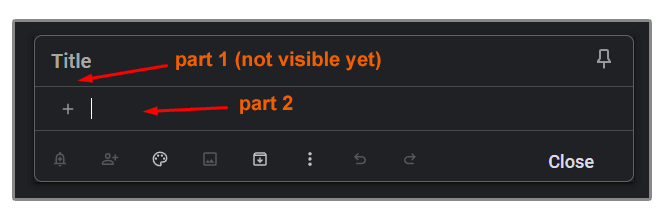
After that, inside checkboxTemplate I have the following :
<!-- ------------- part 1 ------------- -->
<!-- looping through the array we just created -->
<ng-template #checkboxesTemplate>
  <ng-container *ngFor="let cb of checkBoxes">
    <!-- the check icon https://i.imgur.com/ANXf4Po.png -->
    <div
      [class.done]="cb.done"
      class="cbox-icon"
      (click)="cb.done = !cb.done"
    ></div>
    <!-- the checkbox content -->
    <div>
      <div
        [innerHTML]="cb.data"
        class="cbox-note"
        contenteditable="true"
        spellcheck="true"
      ></div>
    </div>
  </ng-container>
  <!-- ------------- part 2 ------------- -->
  <div
    #cboxPh
    (keydown.enter)="addCheckBox(cboxPh,$event)"
    class="cbox-note"
    contenteditable="true"
    spellcheck="true"
  ></div>
</ng-template>
➖ If you take a look at part 1 , you notice that we are looping through checkBoxes array, and because the latter is empty (we didn't push anything there yet), part 1 will render nothing.
➖ About part 2, this part is just an area where the user can type the content of the checkbox, and when he presses the Enter key, addCheckBox() method will be called, and pushes a new object to checkBoxes array
addCheckBox() method :
  addCheckBox(el: HTMLDivElement, $event: Event) {
    $event.preventDefault() // otherwise a line break will be added
    let value = el.innerHTML // we retrieve the entered value
    el.innerHTML = ''
    // we push the entered data
    this.checkBoxes.push({
      done: false,
      data: value,
      id: this.checkBoxes.length
    })
  }
ℹ After pushing a new checkbox this is the result :

✳ Finally, To save this array, we need to add it to noteObj :
  saveNote() {
    let noteObj = {
      //...
      isPinned: this.isPinned,
      isArchived: this.isArchived,
      isDeleted: this.isDeleted,
    }
    // we call another method to save this object on the database or whatever
    this...save(noteObj)
  }
ℹ Note : The simple note and the list note share the same title div. This means whether we have a note or a list, we retrieve the title from the same element.
✳ Now, retrieving the background color/image.
I recorded a video showing you how i did it :
And the last part of this problem : Checking if the note is pinned, archived or deleted :
- Simple, I need to create 3 new variables,
isPinned = false,isArchived = false,isDeleted = false
And when the user wants to pin/delete/archive the note, I change the corresponding variable to true
Ex : this.isPinned = true
So, noteObj will look like this :
saveNote() {
  let noteObj = {
    //...
    isPinned: this.isPinned,
    isArchived: this.isArchived,
    isDeleted: this.isDeleted,
    //save to db
    this...save(noteObj)
  }
}
✅ Some useful notes :
➖ If you want to avoid saving empty notes, you need to check if :
- the note title ain't empty, or the note body ain't empty, or if there's any checkbox
- if any of the above conditions is truthy, save the note, else do nothing.
  saveNote() {
    let noteObj = {
      //...
    }
    if (noteObj.noteTitle.length || noteObj.noteBody.length || this.checkBoxes.length) {
      // if any of the conditions is truthy, save the note
      this...save(noteObj)
    }
  }
➖ Every time the user creates a note, you need to reset all the variables and entered data to the default values. Otherwise, when you try to create a new note, you find it already filled.
reset() {
  this.noteTitle.nativeElement.innerHTML = ''
  this.checkBoxes = []
  // ....
}
➖ If you want to have a masonry layout for your notes, I advise you to check Bricks.js
🎉 Congratulations. we just finished discussing the logic behind input component.
2️⃣ The note component
--
Problem N°1
Please watch the following video :
Solution to problem N°1
I need to create two containers, one for the pinned notes and the other for the other notes, and inside it, i need to loop through :
-
pinned notesinside the first container -
other notesinside the second container
This means i also need two arrays one for each container. So when retrieving notes from the database, i need to separate them with the help of filter() :
    pinnedNotes:NoteI[] = []
    otherNotes:NoteI[] = []
    //
    notes() {
      this.Notes.notesList$.subscribe({
        next: (notes: NoteI[]) => {
          this.pinnedNotes = notes.filter(x => x.pinned === true).reverse()
          this.otherNotes = notes.filter(x => x.pinned === false).reverse()
        }
      })
    }
Now, my HTML should look like this :
<section>
  <p>pinned</p>
  <ng-container *ngFor="let note of pinnedNotes">
    <!-- ⚠ notice the property & style binding  -->
    <div
      class="note-main"
      [ngStyle]="{'background-color':note.bgColor,'border-color':note.bgColor,'background-image' : note.bgImage}"
    ></div>
    <div class="note-title">
      <span [innerHTML]="note.noteTitle"></span>
    </div>
    <!-- and so on ... -->
  </ng-container>
</section>

<section>
  <p>other</p>
  <ng-container *ngFor="let note of otherNotes">
    <div
      class="note-main"
      [ngStyle]="{'background-color':note.bgColor,'border-color':note.bgColor,'background-image' : note.bgImage}"
    ></div>
    <div class="note-title">
      <span [innerHTML]="note.noteTitle"></span>
    </div>
    <!-- and so on ... -->
  </ng-container>
</section>
⚠ The code inside first container and the second container is exactly the same, and repeating the same code is not a good practice.
The solution here is to use ngTemplateOutlet with ngTemplateOutletContext.
So, we should have :
<div>
  <p>pinned</p>
  <!-- here we pass pinnedNotes to noteTemplate -->
  <ng-container
    [ngTemplateOutlet]="noteTemplate"
    [ngTemplateOutletContext]="{notes:pinnedNotes}"
  >
  </ng-container>
</div>

<div>
  <p>other</p>
  <!-- and here we pass otherNotes to noteTemplate -->
  <ng-container
    [ngTemplateOutlet]="noteTemplate"
    [ngTemplateOutletContext]="{notes:otherNotes}"
  >
  </ng-container>
</div>
<!-- -- Templates -- -->

<!-- let-notes="notes" ◀ notes array passed from ngTemplateOutletContext -->
<ng-template #noteTemplate let-notes="notes">
  <ng-container *ngFor="let note of notes">
    <ng-container *ngFor="let note of otherNotes">
      <!-- ⚠ notice the property & style binding  -->
      <div
        class="note-main"
        [ngStyle]="{'background-color':note.bgColor,'border-color':note.bgColor,'background-image' : note.bgImage}"
      ></div>
      <div class="note-title">
        <span [innerHTML]="note.noteTitle"></span>
      </div>
      <!-- and so on ... -->
    </ng-container>
  </ng-container>
</ng-template>
✳ So, every time the user adds a new note, pinned or not, it will be rendered on the proper container.
❔ What if the user unpin or pin a saved note ?
ℹ For that, every time the user clicks on the pin icon, you should update the isPinned key of this note on the database :
  togglePin(noteId: number, pinned: boolean) {
    pinned = !pinned
    // call a method that updates your note on your database
    this...updateKey({ isPinned: pinned } , noteId)
  }
And, of course, on every change, you need to refresh pinnedNotes & otherNotes.
(Because i'm using DexieJs, the latter has a method that triggers whenever detects a change)
And the same thing goes for the other properties, like isArchived ...
Problem N°2
Please watch the following video :
Solution problem N°2
According to this video, clicking on a note opens a modal, from this modal we can edit this note. So inside note component, we need to add multiple methods that take care of every action the user can perform, for example :
- A method for pinning/unpinning a note
- A method that changes the background color/image
- A method that saves the note when closed
- ....
😓 Seems like we are repeating what we have already done on the input component.
✅ The solution here is kinda simple :
Please watch the following video :
ℹ TLDR : Inside input component, we have a variable by the name of isEditing decorated with Input() and set to false by default:
@Input() isEditing = false
Inside notes component, we created a modal, this modal opens every time we click on a note, inside it, we added input component as child and pass isEditing to input component as true.
With the help of *ngIf, input component initiate every time the modal opens.
<div #modalContainer class="modal-container">
  <div #modal class="modal">
    <app-input [isEditing]="true" *ngIf="isModalOpen"></app-input>
  </div>
</div>
When the modal opens, input component will be initiated, and a method there will be executed. This method changes the values of title, body, background image... which are empty by default to the ones of the clicked note. Its like we are about to create a new note, but the title, body, and background are already filled by some data.
And when it comes to saving the note, and because isEditing is true, we update the note instead of creating a new one.
✳ I guess we finished, so 🎉🎉
⚠ Important note : The code & logic I demonstrated on this post are not 100% identical to the ones of the project, for the simple reason that I wanted to simplify every step I explained, so most of the interested readers won't have a bad time.
I still have a feeling that i missed or skipped some parts, but thats okay because you can always find the source code on github.


Latest comments (0)