In the initial stages, Django web development starts really simple. The application has to respond only to HTTP requests.
But quickly, the application takes more responsibility for processing requests. Now, a distinction has to be made between the tasks that need to happen immediately and the tasks that can be executed eventually.
Operations that must happen instantly are called request-time operations. Operations that can happen eventually are known as background tasks.
While request-time operations are completed in a single response/request cycle, background tasks are more time-consuming.
Django Development: The Common Background Tasks
There are several tasks in Django for web development which are not instantaneous. Some of them include:
- Sending emails for confirmation or execution
- Performing data analysis
- Extracting information from various sources
- Exporting documents into different formats
These tasks are not essential in Django development and can be executed gradually as time passes by. Since they are slow, they can’t be executed in the response/request cycle in Django web framework.
On top of that, there might be a need to retire these tasks at least once. Background tasks have to be executed on schedule.
Django Development: Implementing Celery
Celery is widely used for background task processing in Django web development. With a simple and clear API, it integrates seamlessly with the Django ecosystem.
Celery is an asynchronous task queue/job queue based on distributed message passing. It is focused on real-time operation, but supports scheduling as well.
It is a python development package with features that enable us to implement:
- Time-consuming operations in an asynchronous manner.
- Periodic operations in a cron-esque manner.
- To call external API’s.
Practical example of Celery include -
To perform certain tasks to be run in future, like calling an external API every hour or need to send emails on a specific day.
Whenever a time-consuming process needs to be performed, celery can be used to perform that task in the background, as resources become available, so that your application can continue to respond to client requests. This skips the wait of the end-user for the process to complete.
Suppose we want to send emails from our Django web application using celery.
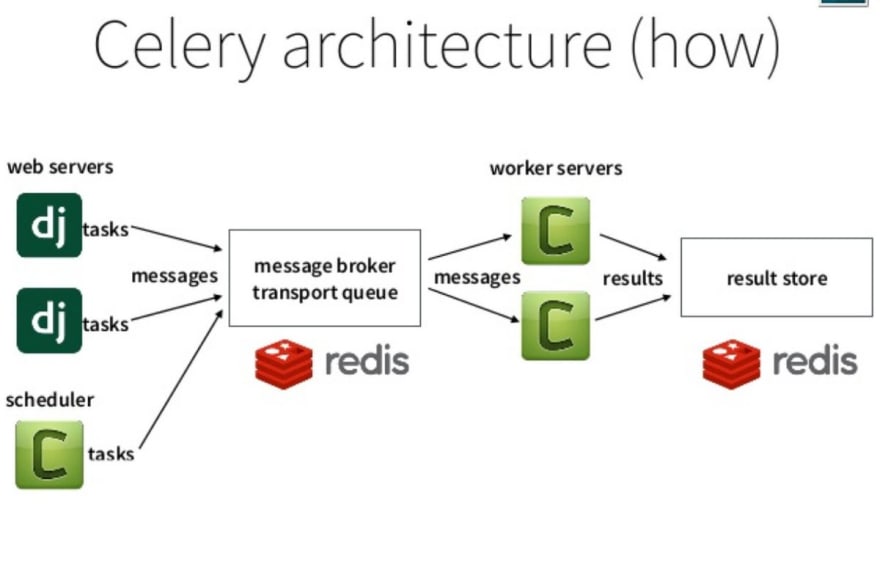
At that time Celery communicates via messages, usually using a broker, to mediate between clients and workers.
Several Brokers that can be used are Redis, RabitMQ, SQS etc.. These are used to send the task (perform email send) to the Workers and Workers perform those tasks.
Hence, the server gives a quick response to the user and an email is sent via background process using celery.
Implementation of Celery using Redis as broker and Django Framework:
We have a project called VoiceChat, and we want to send an approval email(Non-Periodic Task ) to the user who has requested to sign up. Here, we have sent mail through celery and Delete Messages on Aws and database (Periodic Task ) using celery.
In this, we have a Virtual environment named chat_venv. Inside that, we will install celery and redis as a broker.
pip install celery==4.3.0
pip install redis==3.2.0
Our project structure is like this
    VoiceChat/
     | - - manage.py
     | - - requirements.txt
      |--templates
      |--voicechatproject/
      |  |-- __init__.py
      |  |-- celery.py
      |  |-- settings.py
      |  |-- wsgi.py
      |  |-- urls.py
      |--request_access/
      |  |-- migrations/
      |  |-- __init__.py
      |  |-- tasks.py
      |  |-- views.py
      |  |-- signals.py
      |  |-- tokens.py
      |  |-- urls.py
      |  |-- models.py
      |--message/
      |  |-- migrations/
      |  |-- __init__.py
      |  |-- tasks.py
      |  |-- views.py
      |  |-- signals.py
      |  |-- tokens.py
      |  |-- urls.py
      |  |-- models.py
In voicechatproject/settings.py, we have added the following code.
In voicechatproject/celery.py, we have written the following code.
In voicechatproject/init.py we have the following code.
Thus, here we have done initial setup for celery and now we need to write the tasks which are to be performed.
A. Non Periodic Task
Here we will send an email through celery
In request_access/tasks.py we have written the following code.
Now this task are called in request_access/signals.py
Thus, here the delay method is used to place the task in the queue and returns a promise that can be used to monitor the status and get the result when it's ready.
Here the delay method calls the specific task described in task.py in order to send the email.
B. Periodic Task
Here we will delete messages on aws and in the database.
Now to perform periodic tasks, we have written message/tasks.py where we will delete the message on aws and in database with the following code.
Now in order to delete messages from aws we have used boto3 in a periodic function where the periodic task is called by celery on every minute which identifies the message. Within periodic tasks, we have called other non-periodic tasks to delete messages from the database and in aws.
In that, a word called Crontab is used where we have defined the periodic task to run every minute but you can also call periodic task on different crontab for that you can refer here
Run the Celery through terminal
In order to run celery we have used Redis as a broker and we have installed it using the following command.
$ sudo apt update
$ sudo apt install redis-server
Now in order to run the celery task, we need to first fire up the Redis server using the below command in the shell.
$ redis-server
You can test that Redis is working properly by typing this into your terminal:
$ redis-cli ping
If using the above command we should get PONG as a result.
Now we need to start the worker and scheduler in the terminal.
    $ celery -A voicechatproject worker -l info
    $ celery -A voicechatproject beat -l info
Deploy celery part in Django
You can deploy your django web development project as per the following link, and you would like to run the worker process through celery as follows.
We need an SSH for it to run, so enter the following command in the shell
$ sudo apt-get install supervisor
After this we need to create the configuration files to the “/etc/supervisor/conf.d/” directory on the remote server inorder to inform the supervisor
In our case, we need to create two configuration files - one for the Celery worker and one for the Celery scheduler.
So, we have created a local directory in our project root “VoiceChat” by name “Supervisor”.
In that folder we have created 2 configuration files namely ‘voicechatproject_worker.conf’ for celery worker and ‘voicechatproject_scheduler.conf’ for celery beat scheduler.
Now in voicechatproject_worker.conf we have written the following code.
In voicechatproject_scheduler.conf we have written the following code.
Basically, these supervisor configuration files tell the supervisor how to run and manage our ‘programs’ (as they are called by supervisord).
Now just copy these files to the remote server in the “/etc/supervisor/conf.d/” directory.
We also need to create the log files that are mentioned in the above scripts on the remote server:
$ touch /var/log/celery/voicechatproject_worker.log
$ touch /var/log/celery/voicechatproject_beat.log
Finally, run the following commands to make Supervisor aware of the programs - e.g., voicechatproject_celery_worker and voicechatproject_celery_beat:
$ sudo supervisorctl reread
$ sudo supervisorctl update
Run the following commands to stop, start, and/or check the status of the program:
Voicechatproject_celery_worker
voicechatproject_celery_worker
$ sudo supervisorctl stop
$ sudo supervisorctl start voicechatproject_celery_worker
$ sudo supervisorctl status voicechatproject_celery_worker
Conclusion
Celery is extremely useful in Django development for background task processing. It allows you to keep time-consuming and non-immediate tasks outside the request time.
Celery is also a useful package to execute long-running tasks in the background with the help of workers. It enables you to focus on the important tasks and keep the non-essential tasks in the background.
I hope that this blog serves as a good introduction to implementing Celery in Django web development and helps you save time on background task processing.


Top comments (0)