
Overview
In the article, we will deploy a simple Golang service on elastic cloud compute (EC2) in AWS. As we deploy the application as a docker image, we can run almost any application inside a docker container in the similar way.
We won’t deploy a highly available and reliable project. The goal of the article is to get familiar with terraform as infrastructure as a code (IaaC) tool and how to deploy a simple application to AWS.
All the code can be found in the GitHub repository. We are going to use it to go through the terraform code in other sections of the article.
Simple server
We are not going to dive deep into the application For the creation we will use the simplest gin API server.
router.GET("/", server.CounterHandler)
router.GET("/health", server.HealthHandler)

// HealthHandler returns a success message with code 200 when the server is running
func (s *Server) HealthHandler(ctx *gin.Context) {
    ctx.JSON(200, gin.H{"success": true})
}

// CounterHandler calculates number of requests and return a json with counter number
func (s *Server) CounterHandler(ctx *gin.Context) {
    counter := atomic.AddInt64(&s.counter, 1)

    ctx.JSON(200, gin.H{"counter": counter})
}The implementation of handlers
Configure environment
Before starting to provision the infrastructure we need to set up all tools we are going to use: AWS account, terraform, and docker.
Create an AWS account
If you don’t have an account on AWS you need to create one first. You can find the instruction in the official AWS guide.
Create a role for the terraform with permissions
It’s highly bad practice to use a root AWS user for anything except critical account management tasks, so we are going to create a new user inside the AWS account that terraform will use for the creation of the infrastructure. It can be done via identity and access management (IAM) service.
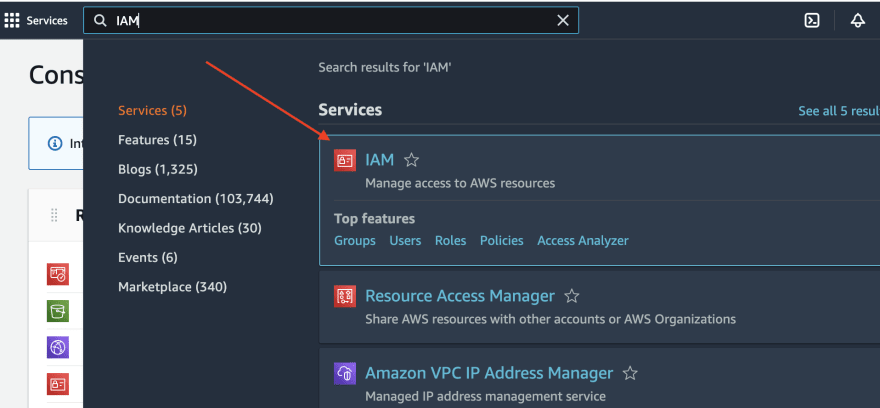
After that, we can create a new user.

Provide a User name and choose only programmatic access for the user, as it will be used only via terraform.

Add admin group to the user using search so terraform can provision all resources.
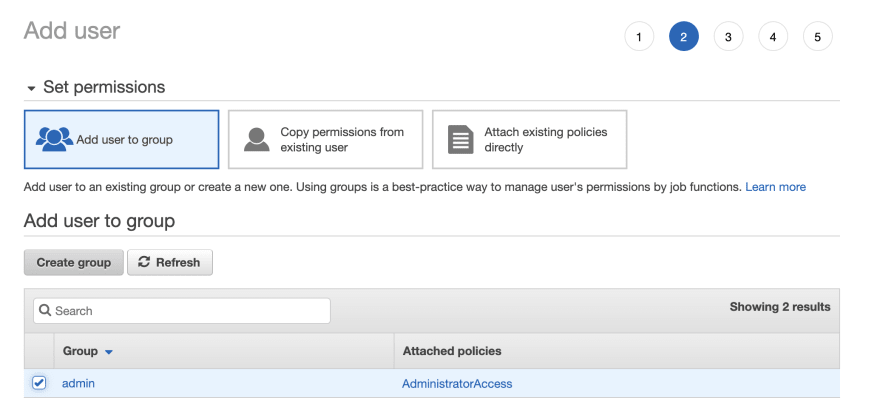
Note: One of the security best practices is the least privilege principle, when only necessary permissions should be provided to each service and user. In the example, for simplicity, we provide full admin control to the user to keep it simple.
For step 3, where we set tags, we can set project: go-example or something similar. Tags in AWS are mostly used for filtering and grouping resources and gathering analytics, like costs.
Step 4 is validation, where we can check all the data.
During step 5 we need to store the Access key ID and Secret access key. They will provide us with programmatic access to the AWS account.

Note: We will see the secret access key only once so it should be stored in a durable and secure place.
Create ~/.aws/config and ~/.aws/credentials to use profiles
To use the AWS profile we need to configure it. The AWS configuration is stored in the ~/.aws directory and consists of two important files:
~/.aws/config - stores the AWS configuration. We will store the profile with the name go-example in the config file, and it should be like this:
[profile go-example]
region=eu-central-1
output=json
~/.aws/credentials - stores credentials for profiles. We should create the file and copy access and secret keys.
[go-example]
aws_access_key_id=<ACCESS_KEY>
aws_secret_access_key=<SECRET_KEY>
Install terraform
We will use Terraform for deployment. To install terraform follow the official instruction.
Tip: For more real project usage it’s more convenient to use https://github.com/tfutils/tfenv, as it can manage multiple versions of Terraform for many projects.
Docker
To build docker images we need to install docker using official instruction.
Set up the infrastructure
There are several possibilities to deploy an application on AWS: using AWS Elastic Beanstalk, AWS Elastic container service (ECS), or directly on an EC2 instance. We are going to use the last approach and deploy the application on the system and for simplicity wrap it with a docker.
We are going to
- Set up a virtual private cloud (VPC), Internet gateway (IG), network access control list (NACL), and security groups to protect network access to our instance.
- Create a docker image for our application and upload the image to the elastic container registry (ECR), which is an AWS registry for images (similar to the Docker hub).
- Set up an EC2 instance and use run our application as a docker inside it.
In this case, we can manage versions of the application. With ECR it’s easier to use ECS, as a container management system. But we are going to set up the EC2 instance, as a virtual machine, and run an app as a docker container inside it.
Note: ECR is not in the free tier, so you will pay several cents per month for the usage.
Set up network
We are going to create a new VPC with an Internet gateway and one subnet, a basic security group, and NACL. The network will be simple as we are trying to avoid complexity here. The security group will allow connection only to the application port (80), while NACL will allow all the traffic for the subnet.
Note: There is a better practice to keep the network traffic inside AWS for better security and access management. It can be done using the VPC endpoint - a private connection, that allows traffic between AWS services not to leave the AWS network. We are not going to create a VPC endpoint to allow internal connection to ECR, so we are going to download the docker image via the internet. For the production system, better to keep the connection private to improve security.
All the network setup can be found in [network.tf](http://network.tf) file in the Github repo. First, we need a new VPC resource with a defined CIDR block.
resource aws_vpc main {
  cidr_block = "10.0.0.0/20"
}
VPC is an logically isolated virtual network. Here we can set up different subnets, that can be public or private, and manage traffic as we need. VPC doesn't have an access to the Internet. As we expect incoming traffic from the Internet we need an Internet gateway (IG).
resource aws_internet_gateway gateway {
  vpc_id = aws_vpc.main.id
}
There is only a default route table initially in the VPC. To provide an access to the internet via IG we need to add a route table and associate it with the VPC. In this case, all the traffic that is not local (in our case, not 10.0.0.0/20) we need to route to IG.
resource aws_route_table public {
  vpc_id = aws_vpc.main.id

  route {
    cidr_block = "0.0.0.0/0"
    gateway_id = aws_internet_gateway.gateway.id
  }
}

resource aws_main_route_table_association main {
  route_table_id = aws_route_table.public.id
  vpc_id         = aws_vpc.main.id
}
We will have only one EC2 instance in the example, so we are going to create one subnet in one availability zone (AZ) - for AWS it is similar to one big data center in a particular region. To provide a network routing in the subnet we also need to make an association with the router main we created before.
resource aws_subnet main {
  vpc_id = aws_vpc.main.id
  cidr_block = "10.0.0.0/24"
  map_public_ip_on_launch = true
  availability_zone = "us-east-1a"
}

resource aws_route_table_association main {
  subnet_id      = aws_subnet.main.id
  route_table_id = aws_route_table.public.id
}
By default, all traffic inside the created subnet will be denied (terraform updates the default VPC during creation) and we need to update the default NACL to allow incoming and outgoing traffic and associate it with the subnet.
resource aws_default_network_acl main {
  default_network_acl_id = aws_vpc.main.default_network_acl_id

  ingress {
    protocol   = -1
    rule_no    = 100
    action     = "allow"
    cidr_block = "0.0.0.0/0"
    from_port  = 0
    to_port    = 0
  }

  egress {
    protocol   = -1
    rule_no    = 100
    action     = "allow"
    cidr_block = "0.0.0.0/0"
    from_port  = 0
    to_port    = 0
  }
}

resource aws_network_acl_association main {
  network_acl_id = aws_default_network_acl.main.id
  subnet_id = aws_subnet.main.id
}
Security group allows stateful connection to AWS services, in our case to the future instance. The ingress rule (for incoming connections) should allow HTTP (TCP) traffic to port 80 and egress traffic (as we are going to pull docker image).
resource aws_security_group public {
  name = "public-sg"
  vpc_id = aws_vpc.main.id

  ingress {
    from_port = local.application_port
    to_port   = local.application_port
    protocol  = "tcp" // allows only tcp trafic for the provided port

    cidr_blocks = ["0.0.0.0/0"]
  }

  egress {
    from_port = 0
    to_port   = 0
    protocol  = "-1" // allows all outgoing traffic from the instance

    cidr_blocks = ["0.0.0.0/0"]
  }
}
Note: Security groups can only allow some traffic and they are stateful (for example, if the request was made the response will pass without any additional rules). NACL can deny traffic and they are stateless (for example, if the request was made we need separate rules for both incoming and outgoing traffic).
Create a docker image
We are going to wrap our application with docker and create a docker image. To store this image we need an image repository. AWS has a service ECR for that purpose, that we are going to create and use for the application. We need to allow ECR actions that are described in aws_iam_policy_document to manage docker images.
resource aws_ecr_repository go_server {
  name = local.service_name
  image_tag_mutability = "IMMUTABLE"

  image_scanning_configuration {
    scan_on_push = true
  }
}

data aws_iam_policy_document ecr_policy {
  statement {
    effect = "Allow"
    principals {
      identifiers = ["*"]
      type        = "*"
    }

    actions = [
      "ecr:GetDownloadUrlForLayer",
      "ecr:BatchGetImage",
      "ecr:BatchCheckLayerAvailability",
      "ecr:PutImage",
      "ecr:InitiateLayerUpload",
      "ecr:UploadLayerPart",
      "ecr:CompleteLayerUpload",
      "ecr:DescribeRepositories",
      "ecr:GetRepositoryPolicy",
      "ecr:ListImages",
      "ecr:DeleteRepository",
      "ecr:BatchDeleteImage",
      "ecr:SetRepositoryPolicy",
      "ecr:DeleteRepositoryPolicy"
    ]
  }
}

resource aws_ecr_repository_policy go_server {
  repository = aws_ecr_repository.go_server.name
  policy = data.aws_iam_policy_document.ecr_policy.json
}
For the docker management, we are going to use terraform module kreuzwerker/docker. It provides us an opportunity to build and upload docker image to a docker repository.
We can create a terraform provider that will manage the authentication to ECR
data aws_ecr_authorization_token go_server {
  registry_id = aws_ecr_repository.go_server.registry_id
}

provider docker {
  registry_auth {
    address  = split("/", local.ecr_url)[0]
    username = data.aws_ecr_authorization_token.go_server.user_name
    password = data.aws_ecr_authorization_token.go_server.password
  }
}
To build the image from docker file we need a separate docker_registry_image resource, that will build the image and upload it to ECR.
resource docker_registry_image go_example {
  name = "${local.ecr_url}:v1"

  build {
    context    = "${path.module}/../app/."
    dockerfile = "app/Dockerfile"
    no_cache   = true
  }

  depends_on = [aws_ecr_repository.go_server]
}
Set up the app in EC2
Before creating an instance and running docker container inside it we need to allow the EC2 instance to pull the image from the repository. AWS has identity and access management service (IAM) to control all access between AWS services. To allow EC2 to pull images from ECR we need to create a separate IAM role - an identity that has particular permissions.
data aws_iam_policy_document assume_role_ec2_policy_document {
  statement {
    effect = "Allow"
    principals {
      identifiers = ["ec2.amazonaws.com"]
      type        = "Service"
    }

    actions = [
      "sts:AssumeRole"
    ]
  }
}

resource aws_iam_role role {
  name               = "application-role"
  assume_role_policy = data.aws_iam_policy_document.assume_role_ec2_policy_document.json
}
To provide permission to pull docker image we need to create an IAM policy and attach it to the role we created.
// policy allows only ecr:ecr:BatchGetImage action for all resources that have such permission.
data aws_iam_policy_document ecr_access_policy_document {
  statement {
    effect = "Allow"
    actions = [
      "ecr:BatchGetImage",
    ]

    resources = ["*"]
  }
}

resource aws_iam_policy ecr_access_policy {
  name = "ecr-access-policy"
  policy = data.aws_iam_policy_document.ecr_access_policy_document.json
}

resource aws_iam_policy_attachment ecr_access {
  name       = "ecr-access"
  roles      = [aws_iam_role.role.name]
  policy_arn = aws_iam_policy.ecr_access_policy.arn
}
For the EC2 instance, we need to create a profile with this role.
resource aws_iam_instance_profile profile {
  name = "application-ec2-profile"
  role = aws_iam_role.role.name
}
To create an EC2 instance we need to know the amazon machine image (AMI) id, which is a virtual machine where the application will be run. For that purpose, we are going to use ubuntu-20.04 image.
data aws_ami ubuntu {
  most_recent = true

  filter {
    name   = "name"
    values = ["ubuntu/images/hvm-ssd/ubuntu-focal-20.04-amd64-server-*"]
  }

  filter {
    name   = "virtualization-type"
    values = ["hvm"]
  }

  owners = ["099720109477"] # Canonical
}
After that, we are ready to create an EC2 instance. The instance defines resources for the virtual machine. t2.micro type provides 1 vCPU, and 1 GB of RAM, available for a free tier and is enough for the simple application.
Initial script is provided in user_data - script that is run during the initializations of the EC2 instance, where we install docker, pull the app image, and run it.
resource aws_instance application {
  ami                         = data.aws_ami.ubuntu.id
  instance_type               = "t2.micro"
  vpc_security_group_ids      = [aws_security_group.public.id]
  subnet_id                   = aws_subnet.main.id
  associate_public_ip_address = true
  iam_instance_profile        = aws_iam_instance_profile.profile.name

  user_data = <<EOF
#!/bin/bash
sudo apt-get update
sudo apt-get install -y pt-transport-https ca-certificates curl gnupg lsb-release software-properties-common
curl -fsSL https://download.docker.com/linux/ubuntu/gpg | sudo apt-key add -
sudo add-apt-repository "deb [arch=amd64] https://download.docker.com/linux/ubuntu `lsb_release -cs` test"
sudo apt-get update
sudo apt-get install -y docker-ce docker-ce-cli containerd.io
sudo gpasswd -a $USER docker
newgrp docker

echo ${data.aws_ecr_authorization_token.go_server.password} | docker login --username=${data.aws_ecr_authorization_token.go_server.user_name} --password-stdin ${aws_ecr_repository.go_server.repository_url}

docker run -p ${local.application_port}:${local.application_internal_port} -d --restart always ${docker_registry_image.go_example.name}
EOF

  depends_on = [aws_internet_gateway.gateway]
}
To get the IP address of the created server we can create a terraform output.
output application_ip {
  value       = aws_instance.application.public_ip
  description = "Application public IP"
}
Provision resources
Before creating the resources we described in terraform file we need to initialize terraform first to install the necessary modules. From the root directory of the repo run:
terraform -chdir=iaac init
To create the resources we need to run apply and terraform will manage all the resource.
terraform -chdir=iaac apply
Before applying terraform provides a plan of changes (diff or resources it is going to do). We can go through the plan and see all the changes, and after that type yes to apply them. In the output, we will see created resources information and output with IP of the application, like:
Apply complete! Resources: 17 added, 0 changed, 0 destroyed.

Outputs:

application_ip = "44.204.255.51"
After several minutes the application can be accessed via application_ip.
To destroy all resources we need to run destroy command:
terraform -chdir=iaac destroy
Note: Terraform will create all the resources and save state terraform.tfstate and terraform.tfstate.backup. For production system state files are usually stored remotely in a durable place, like S3. In such a case multiple developers can update the environment and keep the terraform state consistent.
Аfterword
I wrote the article to share the experience of managing infrastructure via IaaC and best practices for building and deploying applications. To help with choosing topics that would be more valuable to write about share what would be an interesting improvement of the current application deployment:
- Add persistent layers to the application, like database and object storage.
- Scaling the server for high availability.
- Adding frontend deployment.
- More basic details about technologies that were used.
All tips of how to improve the content are valuable and helpful 😇
Want to check more articles or don't miss other similar articles? 📩 Subscribe to my blog.


Oldest comments (0)