
Written by Denis Hilt✏️
What is virtual scrolling and why do we need it? Imagine you have a dataset of 100,000 or more items you want to display as a scrollable list without pagination. Rendering that many rows would pollute the DOM, consume too much memory, and degrade the app’s performance.
Instead, you want to show the user only a small portion of data at a given time. Other items should be emulated (virtualized) via top and bottom padding elements, which are empty but have some height necessary to provide consistent scrollbar parameters. Each time the user scrolls out of the set of visible items, the content is rebuilt: new items are fetched and rendered, old ones are destroyed, padding elements are recalculated, etc.
That’s the virtual scrolling core principle in a nutshell. In this tutorial, we’ll go over the basics and learn how to create a reusable React component to solve the simplest virtual scrolling issues.
You can view the complete demo repository on my GitHub, and I’ve synced an app in CodeSandbox to play with it in runtime.

Part 1: Infrastructure
While there are myriad use cases and requirements associated with virtual scrolling, today we’ll focus on understanding the core principles and building a small component to satisfy some very basic requirements. Let’s define the conditions to start:
- The number of items in the dataset we want to virtualize is known and fixed
- The height of a single row is constant
- A synchronous data flow from our app to the scroller component is guaranteed
A first step toward any interface development can be to imagine how it could be used in the end. Let’s say we already have a component named VirtualScroller . To use it, we’ll need to do three things:
- Pass virtualization settings
- Provide a data flow mechanism
- Define the row template
<VirtualScroller settings={SETTINGS} get={getData} row={rowTemplate}/>
Settings
We could provide settings as a set of separate HTML attributes, but instead we’ll define a single static object. Its fields should determine the desired behavior and reflect the initial conditions. Let’s start with minimal values (we can always increase maxIndex to 100,000).
const SETTINGS = {
  minIndex: 1,
  maxIndex: 16,
  startIndex: 6,
  itemHeight: 20,
  amount: 5,
  tolerance: 2
}
amount and tolerance require special attention. amount defines the number of items we want to be visible in the viewport. tolerance determines the viewport’s outlets, which contains additional items that will be rendered but invisible to the user. The diagram below represents the selected values of the SETTINGS object and the animated gif demonstrates how the initial state can change while scrolling.


The colored window contains real data rows (from 4 to 12 initially). The dark blue area represents a visible part of the viewport; its height is fixed and equal to amount * itemHeight. The light blue outlets have real but invisible rows because they are out of the viewport. White areas above and below are two empty containers; their height corresponds to virtualized rows that we don’t want to be present in the DOM. We can calculate the initial number of virtual rows as follows.
(maxIndex - minIndex + 1) - (amount + 2 * tolerance) = 16 - 9 = 7
Seven breaks into three virtual rows at the top and four virtual rows at the bottom.
The image changes each time we scroll up and down. For example, if we scroll to the very top (zero) position, the visible part of the viewport will have between one and five rows, the bottom outlet will have between six and seven rows, the bottom padding container will virtualize between eight and 16 rows, the top padding container will accept zero height, and the top outlet will not be present. The logic of such transitions is discussed below, and we’ll get to the VirtualScroller component in part two.
Data flow
We defined the get property and passed it to the VirtualScroller component with the getData value. What is getData? It’s a method that provides a portion of our dataset to VirtualScroller. The scroller will request the data via this method, so we need to parameterize it with the appropriate arguments. Let’s call it offset and limit.
const getData = (offset, limit) => {
  const data = []
  const start = Math.max(SETTINGS.minIndex, offset)
  const end = Math.min(offset + limit - 1, SETTINGS.maxIndex)
  if (start <= end) {
    for (let i = start; i <= end; i++) {
      data.push({ index: i, text: `item ${i}` })
    }
  }
  return data
}
The getData(4, 9) call means we want to receive nine items started from index 4. This particular call correlates with the diagram above: 4 to 12 items are needed to fill the viewport with outlets on start. With the help of Math.min and Math.max, we’ll restrict a requested data portion to fall within the dataset boundaries defined by the max/min index settings. This is also where we generate items; one item is an object with index and text properties. index is unique because these properties will take part in the row template.
Instead of generating items, we can request data from somewhere else, even from a remote source. We could return Promise to handle async data source requests, but for now we’ll focus on virtualizing rather than data flow to keep the implementation as simple as possible.
Row template
A very simple template that just displays the text property might look like this:
const rowTemplate = item =>
  <div className="item" key={item.index}>
    { item.text }
  </div>
The row template depends on the app’s unique needs. The complexity may vary, but it must be consistent with what getData returns. The row template’s item must have the same structure as each data list item. The key property is also required because VirtualScroller creates lists of rows and we need to provide a stable identity to the elements.
Let’s take another look:
<VirtualScroller settings={SETTINGS} get={getData} row={rowTemplate}/>
We’ve successfully passed the three things we wanted to pass to the VirtualScroller. This way, VirtualScroller does not have to know anything about the data it is dealing with. This information will come from outside the scroller via the get and row properties, which is key to the component’s reusability. We could also treat the agreement on the scroller properties we just set up as our future component API.
Part 2: Virtual scroll component
Now that half the work is done, on to phase two: building a virtual scroll component to satisfy the API we developed in the previous section. This might sound a little bit like how to draw an owl, but I promise, we really are halfway there.
Render
Going back to the image from the previous section, it seems obvious that we’ll need the following DOM elements:
- A viewport element with constrained
heightandoverflow-y: autostyle - Two padding elements with no content but with dynamic
heights - A list of buffered
dataitems wrapped with row templates
render() {
  const { viewportHeight, topPaddingHeight, bottomPaddingHeight, data } = this.state
  return (
    <div className='viewport' style={{ height: viewportHeight }}>
      <div style={{ height: topPaddingHeight }}></div>
      { data.map(this.props.row) }
      <div style={{ height: bottomPaddingHeight }}></div>
    </div>
  )
}
This is what the render method might look like. Four state properties reflect the requirements we set up for the DOM structure: three heights and the current portion of data. Also, we see this.props.row, which is simply the row template passed from the outside, so data.map(this.props.row) will render a list of current data items in accordance with our API. We need to define the state props before we add scrolling.
State
Now it’s time to initialize the inner component’s state. Let’s try to implement a pure function returning the initial state object based on the settings object discussed in part one. Along with the four state properties we put in render, we’ll need some other properties for scrolling so we won’t be surprised when the state object has a bit more props than needed for render. Having said that, our primary goal for this part is to force the initial picture to be drawn by the first render.
const setInitialState = ({
  minIndex, maxIndex, startIndex, itemHeight, amount, tolerance
}) => {
  // 1) height of the visible part of the viewport (px)
  const viewportHeight = amount * itemHeight
  // 2) total height of rendered and virtualized items (px)
  const totalHeight = (maxIndex - minIndex + 1) * itemHeight
  // 3) single viewport outlet height, filled with rendered but invisible rows (px)
  const toleranceHeight = tolerance * itemHeight
  // 4) all rendered rows height, visible part + invisible outlets (px)
  const bufferHeight = viewportHeight + 2 * toleranceHeight
  // 5) number of items to be rendered, buffered dataset length (pcs)
  const bufferedItems = amount + 2 * tolerance
  // 6) how many items will be virtualized above (pcs)
  const itemsAbove = startIndex - tolerance - minIndex
  // 7) initial height of the top padding element (px)
  const topPaddingHeight = itemsAbove * itemHeight
  // 8) initial height of the bottom padding element (px)
  const bottomPaddingHeight = totalHeight - topPaddingHeight
  // 9) initial scroll position (px)
  const initialPosition = topPaddingHeight + toleranceHeight
  // initial state object
  return {
    settings,
    viewportHeight,
    totalHeight,
    toleranceHeight,
    bufferHeight,
    bufferedItems,
    topPaddingHeight,
    bottomPaddingHeight,
    initialPosition,
    data: []
  }
}
Let’s take a look at the updated image:
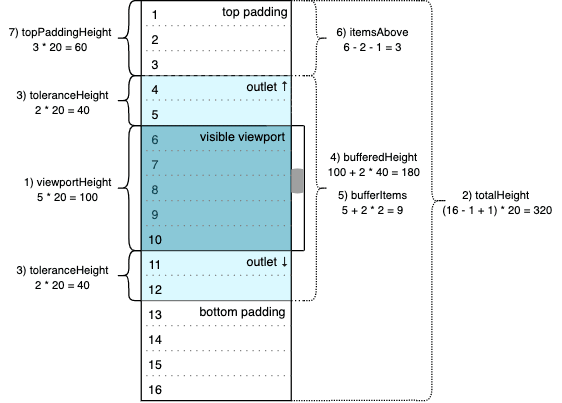
Calculations (8) and (9) are not on the diagram. The scroller would not have any items in the buffer on initialization; the buffer remains empty until the first get method call returns a non-empty result. That’s also why we see an empty array [] as the data state property initial value. So the viewport should contain only two empty padding elements initially, and the bottom one should fill all the space that remains after the top one. Thus, 320 – 60 = 260 (px) would be the initial value of bottomPaddingHeight in our sample.
Finally, initialPosition determines the position of the scrollbar on start. It should be consistent with the startIndex value, so in our sample the scrollbar position should be fixed at the sixth row, top coordinate. This corresponds to 60 + 40 = 100 (px) value.
Initialization
The initialization of the state is placed in the scroller component constructor, along with the creation of the viewport element reference, which is necessary to manually set the scroll position.
constructor(props) {
  super(props)
  this.state = setInitialState(props.settings)
  this.viewportElement = React.createRef()
}
This enables us to initialize our viewport with two padding elements in which cumulative height corresponds to the volume of all the data we are going to show/virtualize. Also, the render method should be updated to assign the viewport element reference.
  return (
    <div className='viewport'
         style={{ height: viewportHeight }}
         ref={this.viewportElement}
    > ... </div>
  )
Right after the first render is done and the padding elements are initialized, set the viewport scrollbar position to its initial value. The DidMount lifecycle method is the right place for that.
componentDidMount() {
  this.viewportElement.current.scrollTop = this.state.initialPosition
}
Scroll event handling
Now we have to handle scrolling. runScroller will be responsible for fetching data items and adjusting padding elements. We’ll implement that momentarily, but first let’s bind it with the scroll event of the viewport element on render.
  return (
    <div className='viewport'
         style={{ height: viewportHeight }}
         ref={this.viewportElement}
         onScroll={this.runScroller}
    > ... </div>
  )
The DidMount method is invoked after the first render is done. Assigning the initialPosition value to the viewport’s scrollTop property will implicitly call the runScroller method. This way, the initial data request will be triggered automatically.
There’s also the edge case in which the initial scroll position is 0 and scrollTop won’t change; this is technically relevant to a situation where minIndex is equal to startIndex. In this case, runScroller should be invoked explicitly.
componentDidMount() {
  this.viewportElement.current.scrollTop = this.state.initialPosition
  if (!this.state.initialPosition) {
    this.runScroller({ target: { scrollTop: 0 } })
  }
}
We need to emulate the event object, but scrollTop is the only thing the runScroller handler will deal with. Now we have reached the last piece of logic.
Scroll event handler
runScroller = ({ target: { scrollTop } }) => {
  const { totalHeight, toleranceHeight, bufferedItems, settings: { itemHeight, minIndex }} = this.state
  const index = minIndex + Math.floor((scrollTop - toleranceHeight) / itemHeight)
  const data = this.props.get(index, bufferedItems)
  const topPaddingHeight = Math.max((index - minIndex) * itemHeight, 0)
  const bottomPaddingHeight = Math.max(totalHeight - topPaddingHeight - data.length * itemHeight, 0)

  this.setState({
    topPaddingHeight,
    bottomPaddingHeight,
    data
  })
}
runScroller is a class property of the scroller component (see also this issue I created in the tc39 repo) that has access to its state and props via this. It makes some calculations based on the current scroll position passed as an argument and the current state destructured in the first line of the body. Lines 2 and 3 are for taking a new portion of the dataset, which will be a new scroller data items buffer. Lines 4 and 5 are for getting new values for the height of the top and bottom padding elements. The results go to the state and the render updates the view.
A few words on the math. In accordance with the API we developed in part one, the get method does require two arguments to answer the following questions.
- How many items should be requested (
limitargument, which isbufferedItems)? - What index should be the first in the result array (
offsetargument, which isindex)?
The index is calculated bearing in mind the top outlet, which results in the subtraction of the toleranceHeight value that was set before. Dividing by itemHeight leaves us with a number of rows before the index that we want to be first in the buffer. The addition of minIndex converts the number of rows to the index. Scroll position (scrollTop) can take place in the middle of random row and, in this way, may not be a multiple of itemHeight. That’s why we need to round the result of the division — index must be an integer.
The height of the top padding element is being taken via a number of rows before the index is multiplied by the known height of the row. The Math.max expression ensures that the result is not negative. We may shift this protection to the index step (say, index cannot be less than minIndex), but the result would be the same. It’s also worth noting that we already put such a restriction inside getData implementation.
The height of the bottom padding element takes into account the height of new items retrieved for the scroller buffer (data.length * itemHeight). I don’t believe it can be negative in this implementation, but we won’t worry about that for now. The logic is pretty basic, and we are trying to focus on the approach itself. As a result, some details might not be 100 percent perfect.
Summary
The history of virtual scroll engineering in frontend development dates back to the early 2010s, possibly earlier. My personal virtually scrolling journey started in 2014. Today, I maintain two Angular-universe repos — angular-ui-scroll and ngx-ui-scroll — and I used React to develop this simple demonstration.
The VirtualScroller component we just implemented can virtualize a fixed-size dataset, assuming the row height is constant. It consumes data using a special method that the developer is responsible for implementing. It also accepts the template and static settings properties that impact the view and behavior.
This article does not profess to be a source of absolute truth; it’s just an approach, one of many possible solutions suited for the simplest case. There are lots of all-inclusive solutions built on top of this or that framework, including React, but they all have their limitations and none truly cover all possible requirements.
Your ability to effectively apply the virtual scrolling technique is bolstered by the option to build a solution from scratch.
Speaking of requirements, what other developments could we propose to make our implementation even better?
- Check all input parameters, throw meaningful errors
- Default settings — Why should a common lib user think about
tolerance? - Cache — Do not request the same data twice
- Allow infinite dataset —
minandmaxindexes can be unknown - Asynchronous data flow — The scroller has to wait for data before updating the state
- Dynamic datasource settings — For example, we decided that the datasource is ready to provide 100 more items, so why not to increase
maxIndex? - Dynamic viewport settings — We may want to change the height of the viewport on-flight
- Unfix row height — One of the most challenging requirements if we do not force the app developer to provide both the items and their corresponding height
- Give the app access to some read-only data — How many items currently in buffer, as well as first/last visible items, is the scroller loading (if an async datasource)?
- Provide methods to manipulate scroller runtime — Remove or add items on demand (without scrolling), reload the viewport, scroll to border, scroll to specific index, reload to index
- New settings — Scroll event latency (do not trigger the scroller logic too often), reverse option (scrolling top results in index increase), no clip option (virtual scrolling turns into an infinite one)
- Allow horizontal scrolling mode
- Animation hooks
That is by no means a complete list, and most of the features above have their own edge cases, various implementation methods, and performance and usability issues. And let’s not even get started about testing.
Also, each individual mouse, touchpad, phone, and browser could potentially behave differently, especially in the field of inertia. Sometimes I just want to cry. But for all the frustration associated with virtual scrolling, it’s also really fun and rewarding to develop. So get started today, and help carry the banner of virtual scrolling into a new age!
Full visibility into production React apps
Debugging React applications can be difficult, especially when users experience issues that are difficult to reproduce. If you’re interested in monitoring and tracking Redux state, automatically surfacing JavaScript errors, and tracking slow network requests and component load time, try LogRocket.

LogRocket is like a DVR for web apps, recording literally everything that happens on your React app. Instead of guessing why problems happen, you can aggregate and report on what state your application was in when an issue occurred. LogRocket also monitors your app's performance, reporting with metrics like client CPU load, client memory usage, and more.
The LogRocket Redux middleware package adds an extra layer of visibility into your user sessions. LogRocket logs all actions and state from your Redux stores.
Modernize how you debug your React apps — start monitoring for free.
The post Virtual scrolling: Core principles and basic implementation in React appeared first on LogRocket Blog.


Top comments (2)
Quick Question about the virtual scroll list.
What do you recommend if we have multiple items per "row"?
Should the item height change.
I am using a flex wrapped container and there can be 3 items in a single row.
Virtual list is something, I think should be HTML element instead of everyone re-inventing it.
But nevermind we still lack the dialog element