
If you’re like me, then you’ve struggled with configuring Webpack for your React app. Create-react-app (CRA) ships with Webpack already under the hood, but usually we would need to add more configurations as our app grows. Luckily for us, we can create a webpack.config.js file and put our Webpack configurations in there.
In this article, we will cover:
- Generic configurations for our app
- Configurations specific to production and development only
- Bundling and minifying of scripts and stylesheets
- Optimizations such as code-splitting and lazy-loading

Prerequisites
To set up this configuration, we need:
- Basic knowledge of Javascript and ES6 to ES8 syntax
- Basic knowledge of React
💡Code to be run in the terminal will be written like
$ npm install
Why do we need Webpack?
Webpack is a widely used bundler for javascript applications, with great support and an excellent team maintaining it. Also, it’s quite easy to set up.
Webpack ships with a couple of packages for us:
- webpack-cli : The command line tool that gives us access to some Webpack commands
- webpack-dev-server : A client-side server with the ability to live reload solely for development purposes
- html-webpack-plugin : This will generate and update the HTML templates for our application
- HMR-plugin : A plugin to enable hot module reloading of our application
And so much more. Webpack has a lot of plugins to simplify our development process as much as possible. We’ll use more of these Webpack plugins as we progress.
Why do we need Babel?
The current version of React uses ES6 to ES8 syntax. We need Babel to compile the code written in those syntaxes back to code the browser can understand. Babel is there to ensure backward compatibility, awesome right? We can write our code in the newer cleaner syntaxes and have Babel worry about the rest.
First, we have to set up our app and install a couple of dev dependencies.
Set up
To start, run the following command in your terminal:
$ create-react-app webpack-configs$ cd webpack-configs
If you don’t have create-react-app (CRA) installed, no worries! It ships with node now, so go ahead and run the following command to set up the app:
$ npx create-react-app webpack-configs$ cd webpack-configs
Now, start up the application:
$ npm run start
Now open your app directory in your favorite text editor and delete the CSS and SVG files in the src directory. Likewise, open src/App.js and delete everything in it, we want it empty for now. Go into the src/index.js and delete the imports of CSS and SVG files.
// src/App.js
// Empty file
// src/index.js

 import React from 'react';
 import ReactDOM from 'react-dom';
 import App from './App';
 import * as serviceWorker from './serviceWorker';

  ReactDOM.render(, document.getElementById('root'));

  // If you want your app to work offline and load faster, you can change
 // unregister() to register() below. Note this comes with some pitfalls.
 // Learn more about service workers: http://bit.ly/CRA-PWA
 serviceWorker.unregister();
devDependencies are dependencies for development ONLY! So everything we are going to install next will be as a devDependency.
Installing Webpack and Babel
To setup Webpack and Babel, first we need to install them and some of the plugins they require for initial setup. Run the following command in your terminal:
$ npm i -D webpack webpack-cli webpack-dev-server html-webpack-plugin @babel/core @babel/preset-env babel-loader @babel/preset-react babel-plugin-transform-class-properties babel-plugin-transform-es2015-modules-commonjs
Once that is done, open your package.json file and add the following to your scripts:
// package.json
...
  "scripts": {
    ...
    "webpack": "webpack",
    "webpack-dev-server": "webpack-dev-server",
    "dev": "npm run webpack-dev-server -- --env.mode development",
    "prod": "npm run webpack -- --env.mode production"
}
Now save it, go back to your terminal and we will try to test the newly added code.
Run:
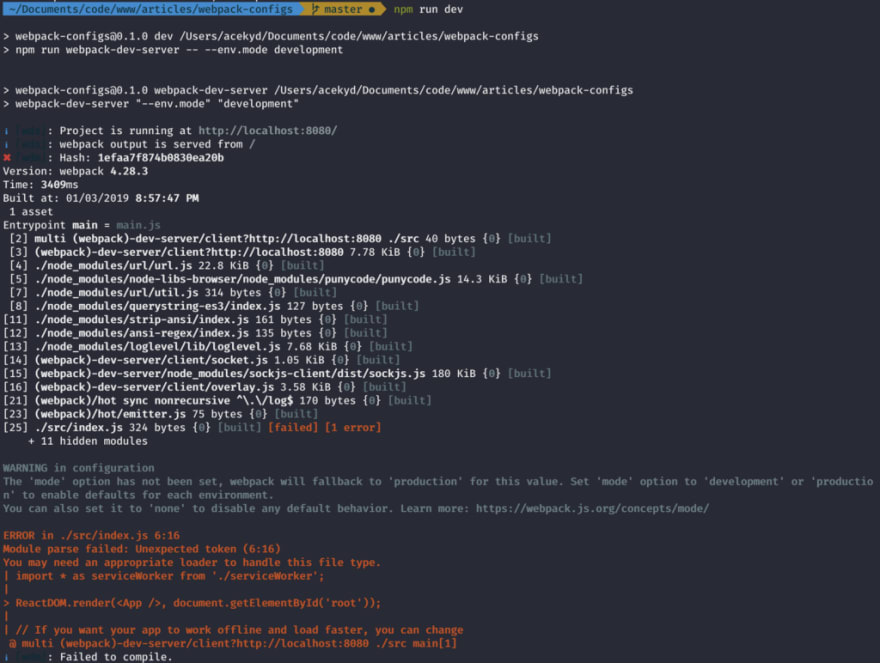
$ npm run dev
Our app breaks, but it’s not a bad error message because it is telling us what we did wrong.
The script we added to our package.json is trying to run Webpack configuration. But no environment mode has been set, so it breaks.
Configuring webpack.config.js and .babelrc files
Let’s write the configurations for webpack.config.js file and our .babelrc file.
Configuring Babel
In the root folder, create a .babelrc file to hold all of the configurations. Run the following command in your terminal:
$ touch .babelrc
Open the file and add the code shown below:
// .babelrc

{
    "presets": [
        "@babel/preset-react",
        [
            "@babel/preset-env",
            {
                "targets": {
                    "browsers": "last 2 versions"
                },
                "modules": false,
                "loose": false
            }
        ]
    ],
    "plugins": [
        "transform-class-properties"
    ],
    "env": {
        "test": {
            "plugins": [
                "transform-es2015-modules-commonjs"
            ]
        }
    }
}
If you recall, we installed two Babel presets. These presets are what we added in the file so Babel can read them.
What the presets do:
- “babel-preset-env” tells Webpack to compile all syntax to ES5 (which browsers understand)
- “babel-preset-react” adds support for jsx syntax
- “transform-es2015-modules-commonjs” and “transform-class-properties” are there for backward compatibility
We also need a file to hold our generic Webpack configurations for our app. In your terminal, run:
$ touch webpack.config.js
Add this configuration to the file:
// webpack.config.js

const path = require("path");
const HtmlWebpackPlugin = require("html-webpack-plugin");

module.exports = ({ mode } = { mode: "production" }) => {
    console.log(`mode is: ${mode}`);

    return {
            mode,
            entry: "./src/index.js",
            output: {
                publicPath: "/",
                path: path.resolve(__dirname, "build"),
                filename: "bundled.js"
            },
            plugins: [
                new HtmlWebpackPlugin({
                    template: "./public/index.html"
                }),
            ]
        }
};
Let’s break down the code in the webpack.config.js file above. Webpack takes an object or a function that returns an object in its configuration. We’re going to use the function, so we can pass our environment variables into our config file. This will tell Webpack which environment’s configuration to run.
An example of the function would look something like this:
module.exports = ({ mode } = { mode: "production" }) => {}
And if we fail to pass an env to let Webpack know which mode to work with, it defaults to production.
So the function returns an object of properties. Properties returned include:
- mode : Tells Webpack what mode we are currently in.
- entry : We also set an entry file which is going to be the index.js because that is the top file in your react application. It renders out the app to the DOM, so you want to go in from here so Webpack can travel down every other component.
- output : Tells Webpack what to call the folder and the bundled javascript. This is happening behind the scenes without adding this configuration. But, with the configuration, we can override it.
- plugins : Used with Webpack to achieve what loaders cannot. Some plugins are external and some are within Webpack like the HMR plugin.
Configuring Webpack to load jsx and static files
After our initial build, we had some errors thrown by Webpack. Let’s add the configurations to tell Webpack how to handle those errors. To do this, we have to install a few devDependencies.
To install the loaders, run:
$ npm i -D babel-loader file-loader url-loader
Let’s write a configuration for Webpack with the loaders we’ve installed. Update your webpack.config.js file with the code below:
// webpack.config.js

const path = require("path");
const HtmlWebpackPlugin = require("html-webpack-plugin");

module.exports = ({ mode } = { mode: "production" }) => {
    console.log(`mode is: ${mode}`);

    return {
            mode,
            entry: "./src/index.js",
            output: {
                publicPath: "/",
                path: path.resolve(__dirname, "build"),
                filename: "bundled.js"
            },
            module: {
                rules: [
                 {
                    test: /\.jpe?g|png$/,
                    exclude: /node_modules/,
                    loader: ["url-loader", "file-loader"]
                },
                    {
                        test: /\.(js|jsx)$/,
                        exclude: /node_modules/,
                        loader: "babel-loader"
                    }
                ]
            },
            plugins: [
                new HtmlWebpackPlugin({
                    template: "./public/index.html"
                }),
            ]
        }
};
Now, save it and run this in the terminal:
$ npm run prod
It builds and creates a build folder in our root folder. Open the folder and you’ll see the bundle.js and index.html file.
Now, let’s get the app running:
$ npm run dev
As you can see, our app runs. Now, go into .babelrc and comment out all of the codes in the file. Then run:
$ npm run dev
Now, we get compilation errors:

Here is why it’s breaking:
- webpack runs and encounters jsx syntax in App.js
- then goes into the webpack.config.js file for a loader that can tell it what to do with jsx
- then it finds the babel-loader and then goes ahead to load our .babelrc file
Uncomment the code, and everything is green again!
Now, go into App.js and add the code shown below:
// src/App.js

import React, { Component } from "react";

class App extends Component {
    state = {
        counter: 0
    };

    handleClick = () => {
        this.setState(prevState => {
            return { counter: prevState.counter + 1 };
        });
    };
    render() {
        return (
            <div className="App">
                <h1>I'm configuring setting up Webpack!!!</h1>
                <p>{`The count now is: ${this.state.counter}`}</p>
                <button onClick={this.handleClick}>Click me</button>
            </div>
        );
    }
}
export default App;
Add the code below to webpack.config.js as well:
// webpack.config.js
...
devServer: {
  open: true
}
What the property does:
- open : if true, opens our app in the browser.
Now every time we run $ npm run dev our app will open on a client-side server and listen for changes.
Save it and run:
$ npm run dev
It compiles and opens our app on http://localhost:8080/
Setting up Hot-Module-Replacement (HMR)
There is a problem we have though, every time we make a change, the server reloads and we lose our state. We can add a Hot Module Replacement plugin that ships with Webpack to our configuration to fix this. Update the webpack.config.js file, so it looks something like this:
// webpack.config.js

const path = require("path");
const webpack = require("webpack");
const HtmlWebpackPlugin = require("html-webpack-plugin");

module.exports = ({ mode } = { mode: "production" }) => {
    console.log(`mode is: ${mode}`);

    return {
            mode,
            entry: "./src/index.js",
            devServer: {
                hot: true,
                open: true
            },
            output: {
                publicPath: "/",
                path: path.resolve(__dirname, "build"),
                filename: "bundled.js"
            },
            module: {
                rules: [
                    {
                        test: /\.(js|jsx)$/,
                        exclude: /node_modules/,
                        loader: "babel-loader"
                    }
                ]
            },
            plugins: [
                new HtmlWebpackPlugin({
                    template: "./public/index.html"
                }),
                new webpack.HotModuleReplacementPlugin()
            ]
        }

};
What we added to the file:
- We set “ hot ” to true in the devServer property. If true, tells webpack we need to enable HMR
- HMR plugin to our array of plugins, to actually enable hot-module-reloading of our app
Every time you edit your webpack.config.js file, you MUST restart the server.
Increment your counter and change the header text in our App component. Our app re-renders, but we’re still losing our applications state.
Well, Webpack’s HMR can’t preserve our applications state. To preserve that state, we’ll need another library called react-hot-loader (RHL). The library works together with Webpack to deliver HMR to our application.
So let’s install it and add it to our configurations. Let’s crash the server and install the library.
To install, first run the command below to crash the server:
ctrl + C
and then run:
$ npm i -D react-hot-loader
Now update the .babelrc file:
// .babelrc
{
  "presets": [
    "@babel/preset-react",
    [
      "@babel/preset-env",
      {
        "targets": {
          "browsers": "last 2 versions"
        },
        "modules": false,
        "loose": false
      }
    ]
  ],
  "plugins": [
    "transform-class-properties", "react-hot-loader/babel"
  ],
  "env": {
    "test": {
      "plugins": [
        "transform-es2015-modules-commonjs"
      ]
    }
  }
}
Go into our App.js and update the code as well:
// App.js
import React, { Component } from "react";
import { hot } from "react-hot-loader";
class App extends Component {
  state = {
    counter: 0
  };
  handleClick = () => {
    this.setState(prevState => {
      return { counter: prevState.counter + 1 };
    });
  };
  render() {
    return (
      <div className="App">
        <h1>I'm configuring setting up Webpack!!!</h1>        <p>{`The count now is: ${this.state.counter}`}</p>        <button onClick={this.handleClick}>Click me</button>      </div>    );  }}
export default hot(module)(App);
We added the code above to our App.js because it will be our parent component. So wrapping App with hot(module) would enable HMR in every other component down the tree. We have to update our index.js to work with HMR too.
Go into our src/index.js and update the code as well:
 // src/index.js

    import React from "react";
    import ReactDOM from "react-dom";
    import App from "./App";
    import * as serviceWorker from "./serviceWorker";

    const rootId = document.getElementById("root");

    ReactDOM.render(, rootId);
    // If you want your app to work offline and load faster, you can change
    // unregister() to register() below. Note this comes with some pitfalls.
    // Learn more about service workers: http://bit.ly/CRA-PWA

    serviceWorker.unregister();
    if (module.hot && process.env.NODE_ENV === "development") {
        module.hot.accept("./App", () => {
          const NextApp = require("./App").default;
          ReactDOM.render(, rootId);
        });
    }
In our index.js, we have a conditional statement that does the following:
- module.hot : checks if there is a change in the app and fires the render method if true
- process.env.NODE_ENV : checks if we’re in development mode
- module.hot.accept : specifies how to handle the changes
Now, restart your server:
$ npm run dev
Now increment our counter and go back into App.js and edit the text. Viola! The state isn’t lost.
Handling styles with Webpack
We need to style our application, so we can customize Webpack to handle it:
- create sass folder in your src folder
- create an app.scss file in your sass folder
- copy the code below into the app.scss
// src/sass/app.scss
body{
  margin: 0
}
.App{
  display: flex;
  flex-direction: column;
  justify-content: center;
  align-items: center;
  background: rgba(gray, 0.2);
  height: 100vh
}
Notice nothing happens? Well, that’s because src/app.scss is not used in any component, so Webpack won’t attempt to bundle it. This is Tree-Shaking out of the box with Webpack thanks to the ES5 module syntax (i.e. import and export). Webpack wouldn’t bundle unused files so we’ve lighter bundles. (More on Tree Shaking).
Go ahead and import app.scss into our App.js file:
// src/App.js
import React, { Component } from "react";
import { hot } from "react-hot-loader";
import './sass/app.scss';
It breaks because Webpack doesn’t know what to do with .sass/.scss/.css files. We have to add a loader to tell Webpack how to handle the stylesheets we’re using.
Let’s run this:
$ npm i -D sass-loader css-loader style-loader
We are going to be implementing these loaders in different ways based on the environment.
Setting up environment specific Webpack configurations
Before setting up the loaders, we have to split our configurations. When shipping out to production, we want bundles as light as possible. But we aren’t as concerned with this for development. So we would treat stylesheets differently for both modes. Let’s create the environment specific configurations.
Run:
$ mkdir build-utils
Create webpack.development.js and webpack.production.js in the build-utils folder. They will hold configs specific to their mode.
webpack.config.js holds our generic configuration.
To pass environment specific configurations, we need a utility package called webpack-merge. If you are familiar with the ES6 Object.assign() method, webpack-merge works the same way. If you don’t, don’t worry, I’ll get into the concept in a bit.
We defined generic configurations to avoid code repetition, which is good practice. Now, we need to add the specific configurations to the generic config depending on which script we run. To achieve this, we need a way to concatenate both configurations. Webpack-merge does exactly that. If there is a clash of properties in our webpack.config.js, it would be overwritten by the incoming property.
We need to install this utility to add it to our configurations.
Run:
$ npm i -D webpack-merge
Go into the webpack.config.js and overwrite it with the code below:
 // webpack.config.js

    const path = require("path");
    const webpack = require("webpack");
    const webpackMerge = require("webpack-merge");
    const HtmlWebpackPlugin = require("html-webpack-plugin");
    const modeConfiguration = env => require(`./build-utils/webpack.${env}`)(env);

    module.exports = ({ mode } = { mode: "production" }) => {
        console.log(`mode is: ${mode}`);

        return webpackMerge(
            {
                mode,
                entry: "./src/index.js",
                devServer: {
                    hot: true,
                    open: true
                },
                output: {
                    publicPath: "/",
                    path: path.resolve(__dirname, "build"),
                    filename: "bundled.js"
                },
                module: {
                    rules: [
                        {
                            test: /\.(js|jsx)$/,
                            exclude: /node_modules/,
                            loader: "babel-loader"
                        }
                    ]
                },
                plugins: [
                    new HtmlWebpackPlugin({
                        template: "./public/index.html"
                    }),
                    new webpack.HotModuleReplacementPlugin()
                ]
            },
            modeConfiguration(mode)
        );
    };
Here, we required the webpack-merge package, then we created a function modeConfiguration that loads the configuration that matches the mode we’re in. We’ll pass modeConfiguration as the second argument to webpackMerge. webpackMerge then adds configurations from it to the generic configuration.
Now that we have that flow setup, let’s define our environment specific configurations.
Setting up development specific configurations
When in development mode, we’re going to define a loader for our SASS/SCSS files.
Add the code below to the webpack.development.js file:
// build_utils/webpack.development.js
module.exports = () => ({
  module: {
    rules: [
      {
        test: /\.sa?css$/,
        use: ["style-loader", "css-loader", "sass-loader"]
      }
    ]
  }
});
Setting up production specific configurations
In production mode, we’re going to do a few things:
- define a loader to extract our styles
- disable source-maps for our bundled javascript files
- optimize our styles
To install the plugin to extract our styles, run:
$ npm i -D mini-css-extract-plugin
Then add the following code to build_utils/webpack.production.js:
// build_utils/webpack.production.js

const MiniCssExtractPlugin = require("mini-css-extract-plugin");
module.exports = () => ({
    output: {
        filename: "production.js"
    },
    module: {
        rules: [
            {
                test: /\.sa?css$/,
                use: [MiniCssExtractPlugin.loader, "css-loader", "sass-loader"]
            }
        ]
    },
    plugins: [new MiniCssExtractPlugin()]
});
In the file above, we’ve defined a loader for our styles and Webpack reads this from right to left.
sass-loader — -> css-loader — -> MiniCssExtractPlugin.
The plugin extracts our CSS from the JS files to a separate file when going into production.
I named the bundled script for production environment production.js.
To build for production, run:
$ npm run prod
With this, we can see our CSS file in the output folder, although not optimized. We can optimise it using plugins like optimize-css-assets-webpack-plugin and uglifyjs-webpack-plugin to minify CSS.
To install the plugins to optimize our CSS, run:
$ npm i -D optimize-css-assets-webpack-plugin uglifyjs-webpack-plugin
Update the webpack.production.js file with the code below:
// build_utils/webpack.production.js

const MiniCssExtractPlugin = require("mini-css-extract-plugin");
const UglifyJsPlugin = require("uglifyjs-webpack-plugin");
const OptimizeCSSAssetsPlugin = require("optimize-css-assets-webpack-plugin");

module.exports = () => ({
    devtool: "nosource-source-map",
    output: {
        filename: "production.js"
    },
    optimization: {
        minimizer: [
            new UglifyJsPlugin({
                cache: true,
                parallel: true,
                sourceMap: true // set to true if you want JS source maps for css
            }),
            new OptimizeCSSAssetsPlugin({})
        ]
    },
    module: {
        rules: [
            {
                test: /\.sa?css$/,
                use: [MiniCssExtractPlugin.loader, "css-loader", "sass-loader"]
            }
        ]
    },
    plugins: [new MiniCssExtractPlugin()]
});
In the configuration, we disabled source-maps for dev-tools. It adds meta info for the browser in our dev-tools for debugging, but the trade-off is slower build speeds. So we can have this in development, but definitely not in production.
Delete the build folder. Then run the command build to rebuild with a minified CSS file:
$ npm run prod
It builds with an optimized CSS file now. Great job!
Lazying loading our app
For lazy loading React application, we use a library called react-loadable. It has a Higher Order Component (HOC) called Loadable. Loadable dynamically loads any module before rendering it into your app.
To install the library as a dependency, run:
$ npm i -D react-loadable
After installation, create a new file in src called LoadableApp.js
Copy the code below into it:
// src/LoadableApp.js
import React, { Component } from "react";
import Loadable from "react-loadable";
const LoadApp = Loadable({
  loader: () => import("./App"),
  loading() {
    return <div>Loading...</div>;
  },
  timeout: 10000 // 10 seconds
});
export default class LoadableApp extends Component {
  render() {
    return <LoadApp/>
  }
}
Let me explain the code above:
- we imported the HOC Loadable from react-loadable
- we passed in an object to tell Loadable what to do
- loader : this tells Loadable to import our specified component
- loading : a message to display to users while Loadable is importing our component
- timeout : this would tell Loadable how long to try loading the component before it fails. Handles issues with slow internet connection
- we assign the component returned by Loadable to LoadApp
- we render the returned component
Now, we have to update our index.js to render the lazy-loaded and code-split component. We need to change every mention of App.js with the LoadableApp.js.
Overwrite it with the code below:
// src/index.js
import React from "react";
import ReactDOM from "react-dom";
import LoadableApp from "./LoadableApp";
import * as serviceWorker from "./serviceWorker";

const rootId = document.getElementById("root");

ReactDOM.render(, rootId);
// If you want your app to work offline and load faster, you can change
// unregister() to register() below. Note this comes with some pitfalls.
// Learn more about service workers: http://bit.ly/CRA-PWA
serviceWorker.unregister();

if (module.hot && process.env.NODE_ENV === "development") {
  module.hot.accept("./LoadableApp", () => {
    const NextApp = require("./LoadableApp").default;
    ReactDOM.render(, rootId);
  });
}
Run:
npm run dev
We aren’t quite there yet. Our app throws an error in the console:

We need to add a plugin to our .babelrc to tell Babel to parse dynamic imports.
To install the plugin, run:
$ npm i -D babel-plugin-syntax-dynamic-import
Update the array of plugins in .babelrc to:
// .babelrc
"plugins": [
  "transform-class-properties",
  "react-hot-loader/babel",
  "syntax-dynamic-import"
]
Our app recompiles without errors thrown. Also from Webpack 2+, whenever you use import() syntax, Webpack automatically code-splits for you. So not only are we lazy-loading our components now, but also code-splitting it.
Conclusion
That’s it for setting up Webpack with React for generic and specific configuration needs. If you want to customize this any further, you can find out more from the Webpack docs for insights on how to go about it. You can find a working version of this project on GitHub.
Plug: LogRocket, a DVR for web apps

LogRocket is a frontend logging tool that lets you replay problems as if they happened in your own browser. Instead of guessing why errors happen, or asking users for screenshots and log dumps, LogRocket lets you replay the session to quickly understand what went wrong. It works perfectly with any app, regardless of framework, and has plugins to log additional context from Redux, Vuex, and @ngrx/store.
In addition to logging Redux actions and state, LogRocket records console logs, JavaScript errors, stacktraces, network requests/responses with headers + bodies, browser metadata, and custom logs. It also instruments the DOM to record the HTML and CSS on the page, recreating pixel-perfect videos of even the most complex single page apps.
The post Versatile Webpack configurations for your React application appeared first on LogRocket Blog.


Top comments (0)