
Written by Alexander Nnakwue✏️
Introduction
Nowadays, due to the wide adoption of microservice-based architecture, enterprise-grade applications are built as decoupled modules/services with specific functionalities. Queuing systems provide a sort of mechanism for these services to communicate by exchanging or transferring data in the form of buffers from one point (a source/output) to another (a destination). This can either be within the same application/process or different services, as the case may be.
Message brokers are tools that allow applications to communicate via a queuing mechanism. They offer a sort of temporary or intermittent storage for data, preventing losses along the chain. These systems may act as a publisher/subscriber kind of system, where one application or process is the publisher or producer of messages/data and the other, the subscriber or consumer of same.
As we move on, we will explore queuing systems using RabbitMQ, which is a highly performant, open-source message broker with support for a variety of messaging protocols. Here, we will use the Advanced Message Queuing Protocol (AMQP) because it is natively built in, and it is the core protocol supported by the broker. Also, it is quite easy to integrate or implement for clients in different programming languages.
In this article, we are going to cover the following:
- Getting started with RabbitMQ
- Important concepts to be aware of when working with RabbitMQ
- Setting up our RabbitMQ instance using the cloud-hosted version
- Example application to demonstrate message queueing using a popular Node.js client library, amqplib
Prerequisites
In order to easily follow along with this tutorial, it is advisable to have Node.js and npm installed. Instructions to do so are available in Node’s official documentation. Note that while we can set up our RabbitMQ server locally on our machine, in this tutorial, we will be setting up a cloud-hosted version of our RabbitMQ instance or server.
Why? Managed instances or services in general abstract maintenance because they are already configured. They also offer easy monitoring via a dashboard, have well-optimized clusters, and, of course, usually offer free plans for development purposes.

Getting started with RabbitMQ
According to its website, RabbitMQ is one of the most popular open-source message brokers. With RabbitMQ, we can define queues, push messages to these queues, and subsequently consume messages from them. Message brokers are key here because they offer a point of contact or interface between the producing and consuming application or process.
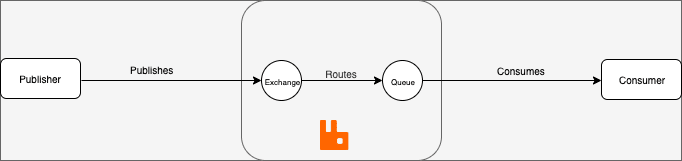
In a real-life scenario, we can leverage the powers of RabbitMQ by defining a queue (usually a string), sending messages to the predefined queue via an exchange, and then consuming messages from them. But before we proceed, we need to understand some terms we might come across when working with Rabbit and queueing systems in general.
Important concepts to be aware of when using RabbitMQ
- Producer: A producer sends or pushes messages to a queue based on a queue name
- Queue: A queue is a medium via which we can transfer and store messages or buffers
- Consumer: A consumer subscribes, receives, or consumes messages from the broker, and then processes or uses them in another process or application
- Exchange: An exchange is an entry point to the broker as it receives messages from a publisher and routes them to the appropriate queue
- Broker: A message broker basically offers a storage mechanism for data produced from one application. This data is usually meant to be consumed by another application that connects to the broker with the given parameters or connection strings
- Channel: Channels offer a sort of lightweight connection to a broker via a singular and shared TCP connection. This is due to the fact that creating multiple open connections to a broker is an expensive operation
- Virtual host (Vhost): Virtual hosts make it possible for a single broker to host a couple of isolated environments
Note: Details about other important concepts like bindings and accepting and rejecting messages (acknowledgements), are available here. As we go further, we will also learn how to push data or messages to queues and how to consume from them.
To run our setup locally, we can go ahead and download RabbitMQ on our machines for all kinds of operating systems by following the provided instructions. However, as mentioned earlier, we will be setting up a managed RabbitMQ instance with a popular cloud-hosted version, CloudAMPQ.
To begin our setup, we can click on the Sign up button on the homepage and configure our account. We will be making use of the free plan to create our new instance. After we are done with the entire step-by-step setup, we should be good to go on with the instance we created.
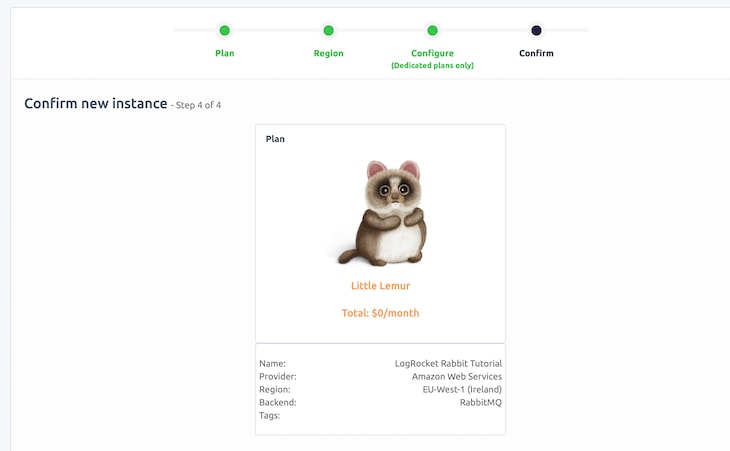
We can list our current instance to have a visual cue of the provided parameters needed to connect to our cluster from our application. The AMPQ url provided consists of the Host , User & Vhost, and Password. Later on, we will use these parameters to connect to our cluster from our application. Note that we can copy this URL directly from the dashboard. A format for the URL is shown below:
amqp://user:pass@host:port/vhost
Also, from the interface, we can have a visual cue of other fields, including the number of open connections, number of messages, etc., as shown below:
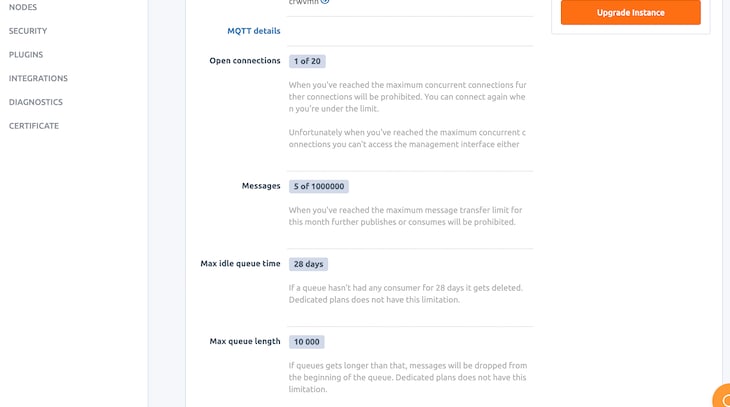
For cloud and local setup, RabbitMQ offers a web browser that aids in managing queues, connections, channels, user permissions, etc. A screenshot of our management interface is shown below:

Features and use cases of RabbitMQ
As mentioned earlier, message queuing is basically what allows different applications (like microservices) to communicate by sending messages to each other. RabbitMQ’s features include:
- Support for multiple configurable messaging protocols
- Plenty of libraries to work with in multiple programming languages
- Support for fully distributed and highly scalable systems with load balancing in the mix. This means that messages are routed to appropriate queues in an optimized manner
- Offers multiple exchange types meant for pub/sub systems and message broadcasting
- Supports multiple plugins
- Offers management and monitoring via a dashboard
- Easy to deploy (with high availability in different regions) and enterprise-ready with highly scalable clusters by design. For more information, you can check out this section of the documentation
Setting up our application with RabbitMQ and Node.js
Now, to better understand how to send messages to a queue and consume from same, let’s flesh out our application. Before we begin, we can go ahead and create a folder for our project. Then, we can run npm init inside the project directory to initialize a package.json file. We can then go ahead to install all the required dependencies for our project:
npm install amqplib restify dotenv concurrently --save
As mentioned earlier, we have made use of the Node.js client library for RabbitMQ, amqplib. We also installed restify, which will handle setting up a basic server for our app. Also, we have installed the dotenv package to load our env variables. Finally, the concurrently package will help us run multiple commands at the same time. Our package.json file should look like this when we are done:
{
  "name": "logrocket-rabbit-tutorial",
  "version": "1.0.0",
  "description": "",
  "main": "index.js",
  "scripts": {
    "server": "node app/server.js",
    "consumer": "node app/Consumer/consumer.js",
    "dev": "concurrently \"npm run server\" \"npm run consumer\""
  },
  "author": "Alexander Nnakwue",
  "license": "MIT",
  "dependencies": {
    "amqplib": "^0.5.5",
    "concurrently": "^5.0.1",
    "dotenv": "^8.2.0",
    "restify": "^8.5.0"
  }
}
As we can see above, the concurrently package helps us start our server, which calls the producer script that sends a random JSON object to the specified queue. Then, the consumer subscribes to messages in the queue. In our use case, we are making use of the default exchange (direct exchange), which means messages will be routed based on the queue name we specify.
Note: In order for an application to send out messages (publish) to multiple or different consumer applications or microservices that are bound to its queue, we can specify a different kind of exchange — usually fanout. To learn more about fanout exchanges, visit this section of the documentation.
To connect to the cluster we had set up earlier, we can go ahead and copy the connection parameters made available to us via the dashboard and create an env file to store them. Here is what a sample of it looks like (without the real-life credentials):
APP_PORT=3000
USER_= user
PASS= pass
HOST= host
VHOST= vhost
QUEUE_NAME= queue_name
We can then reference the env file above so as to configure our RabbitMQ cluster connection string, port, and queue, as shown below:
const path = require('path');
require('dotenv').config({path:path.resolve(__dirname, '../.env')})
const config= {
    port: process.env.APP_PORT,
    rabbit: {
    connectionString: `amqp://${process.env.USER_}:${process.env.PASS}@${process.env.HOST}/${process.env.VHOST}`,
    queue: process.env.QUEUE_NAME
    }
}
module.exports = config;
After the setup above, we can go ahead and send messages to our queue based on the provided queue name. Code for this can be found in the producer.js file, as shown below:
#!/usr/bin/env node

const amqp = require('amqplib');
const config = require('../config');

const publishToQueue = async (queue, message, durable = false) => {
    try {
    const cluster = await amqp.connect(config.rabbit.connectionString);
    const channel = await cluster.createChannel();
    await channel.assertQueue(queue, durable= false);
    await channel.sendToQueue(queue, Buffer.from(message));

    console.info(' [x] Sending message to queue', queue, message);

    } catch (error) {
        // handle error response
        console.error(error, 'Unable to connect to cluster!');
        process.exit(1);
    }

}
module.exports = publishToQueue;
Here, we are exporting a function, publishToQueue. As its name implies, it accepts a queue name, the message content to be pushed to the queue (in this case, the routing key is the queue name), and an optional parameter, durable. When set to true, this parameter makes sure messages aren’t lost when there is a broker restart or failure.
For more information, we can take a look at the properties of a queue. In the code above, we connected to our cluster, created a channel, asserted/created our queue with the properties we want (using the assertQueue method), and, finally, sent messages to the queue.
This method is exported and called in our server.js file so that once the app starts, we can start pushing messages to our specified queue. This closely mirrors how it works in a real-life scenario, in which we push messages to a queue based on some events happening or immediately queue messages generated from our application. The server.js file is shown below:
const restify = require('restify');
const server = restify.createServer({
    name: 'LogRocket RabbitMQ Tutorial',
    version: '1.0.0'
});
const config = require('./config');
const produce = require('./Producer/producer');
const rawdata = require('./sample.json');

const sampleData = JSON.stringify(rawdata);

produce(config.rabbit.queue, sampleData, durable = false);


server.listen(config.port, function () {
  console.log('%s listening at %s', server.name, server.url);
});
As we can see in the server file above, we have set up a simple Restify server and imported our producer scripts and also our random JSON data. We then called the producer function with all the required parameters, as shown above. Finally, our server is listening on the port we had specified earlier in our .env file.
We can go ahead with the consumer script, which reads and consumes messages from our queue. In a real-world use case, when we consume from a queue, we can acknowledge same to let the broker know the consumer has done its job.
Also, we can write the data to a database for further use or even reprocess the data on the fly before doing what we intend, as the case may be. The consumer.js file is shown below:
#!/usr/bin/env node

const amqp = require('amqplib');
const config = require('../config');

const consumeFromQueue = async (queue, isNoAck = false, durable = false, prefetch = null) => {
    const cluster = await amqp.connect(config.rabbit.connectionString);
    const channel = await cluster.createChannel();
    await channel.assertQueue(queue, durable=false);
    if (prefetch) {
        channel.prefetch(prefetch);
    }
    console.log(` [x] Waiting for messages in ${queue}. To exit press CTRL+C`)

    try {
        channel.consume(queue, message => {
      if (message !== null) {
        console.log(' [x] Received', JSON.parse(message.content.toString()));
        channel.ack(message);
        return null;
      } else {
        console.log(error, 'Queue is empty!')
        channel.reject(message);
      }
    }, {noAck: isNoAck})
    } catch (error) {
        console.log(error, 'Failed to consume messages from Queue!')
        cluster.close();
    }
}
consumeFromQueue(config.rabbit.queue);
In the consumer.js file above, let us first understand the arguments passed into the function. The prefetch argument basically controls how many messages are routed to consumers for cases in which a queue has multiple consumers connected to it (an example is a fanout queue). Message acknowledgements, as the name implies, are used to confirm message delivery or processing by consumers.
This is indeed important for cases in which there are network issues or application crashes, as the broker would be aware that the message has not been acknowledged by the consumer subscribed to it and, therefore, know to re-queue it for the next consumer connection. For more detailed information, you can check this link.
The code repository for this tutorial is available on this GitHub. It also contains a readme file that explains how to run the application. The output after starting the server looks like this:

Conclusion
In this tutorial, we have learned about how to send messages to queues and also how to consume messages from them. While there are other more advanced and complex use cases, like if we have multiple consumers subscribed to pull messages from a queue via a defined exchange, our current example use case mirrors the foundational concepts needed to understand how queuing systems work in practice.
You can learn even more about other use cases and more advanced concepts of queuing systems using RabbitMQ. To engage or give feedback, please contact me on my Twitter. Gracias!
200's only ✅: Monitor failed and slow network requests in production
Deploying a Node-based web app or website is the easy part. Making sure your Node instance continues to serve resources to your app is where things get tougher. If you’re interested in ensuring requests to the backend or third party services are successful, try LogRocket.

LogRocket is like a DVR for web apps, recording literally everything that happens on your site. Instead of guessing why problems happen, you can aggregate and report on problematic network requests to quickly understand the root cause.
LogRocket instruments your app to record baseline performance timings such as page load time, time to first byte, slow network requests, and also logs Redux, NgRx, and Vuex actions/state. Start monitoring for free.
The post Understanding message queuing systems using RabbitMQ appeared first on LogRocket Blog.


Top comments (0)