What is minification?
Minification (also minimization) is the process of removing all unnecessary characters from the source code of interpreted programming languages or markup languages without changing their functionality. These unnecessary characters usually include:
Let’s try to understand this with an example. The code below shows a sample JavaScript code for creating an array and initializing it with the first 20 integer values:
var array = [];
for (var i = 0; i < 20; i++) {
  array[i] = i;
}
Now, let’s try to minify this code by hand. The example below shows how we can achieve the same functionality with just one line of code:
for(var a=[i=0];++i<20;a[i]=i);
First, we reduced the name of the array variable (array to a), then we moved it inside the for() loop initialization construct. We also moved the array initialization on line 3 into the for() loop. As a result, the number of characters and the size of the file have reduced significantly.
Why minify?
Now that we understand what minification is, it’s easy to guess why we do it. Since minification reduces the size of the source code, its transmission over a network becomes more efficient.
This is especially useful for web and mobile apps where the frontend makes http requests to the backend for fetching resources like files, user data, etc. For reasonably big apps such as Instagram or Facebook, the frontend is usually installed on the user’s device, while the backend and database live as multiple instances inside on-premises servers or in the cloud.
In a typical user operation like loading a photo, the frontend makes http requests to the backend, and the backend, in turn, makes requests to the database instances to fetch the resource requested. This involves transferring data across the network, and the efficiency of this process is directly proportional to the size of the data being transferred. This is precisely where minification is useful.

So how do I minify?
In the previous section, we saw how to minify a trivial code by hand. But this is really not a scalable solution for huge codebases. Various tools have been built over the years to minify JavaScript code. Let’s look at the most popular ones:
UglifyJS
The goal of UglifyJS is to minify and compress the code. Let’s go ahead and install it using the following command:
npm install uglify-js -g
Now let’s try running uglify on a JavaScript module. For this purpose, I have written a sample module, sample.js, with the code below:
var print = "Hello world! Let's minify everything because, less is more"

var apple = [1,2,3,4,5]

for(let element in apple) {
    console.log(print)
    console.log(element)
}

for(let element in apple) {
    console.log(print)
    console.log(element)
}

for(let element in apple) {
    console.log(print)
    console.log(element)
}

for(let element in apple) {
    console.log(print)
    console.log(element)
}

for(let element in apple) {
    console.log(print)
    console.log(element)
}

for(let element in apple) {
    console.log(print)
    console.log(element)
}

for(let element in apple) {
    console.log(print)
    console.log(element)
}

for(let element in apple) {
    console.log(print)
    console.log(element)
}

for(let element in apple) {
    console.log(print)
    console.log(element)
}

for(let element in apple) {
    console.log(print)
    console.log(element)
}

for(let element in apple) {
    console.log(print)
    console.log(element)
}

for(let element in apple) {
    console.log(print)
    console.log(element)
}

for(let element in apple) {
    console.log(print)
    console.log(element)
}

for(let element in apple) {
    console.log(print)
    console.log(element)
}
This code basically prints a string and an array inside a for() loop. We copy the for() loop multiple times in order to increase the size of the file so we can see the effects of Uglify better.


As we can see, Uglify has a lot of options, most of which are self-explanatory. So, let’s go ahead and try a couple of them:
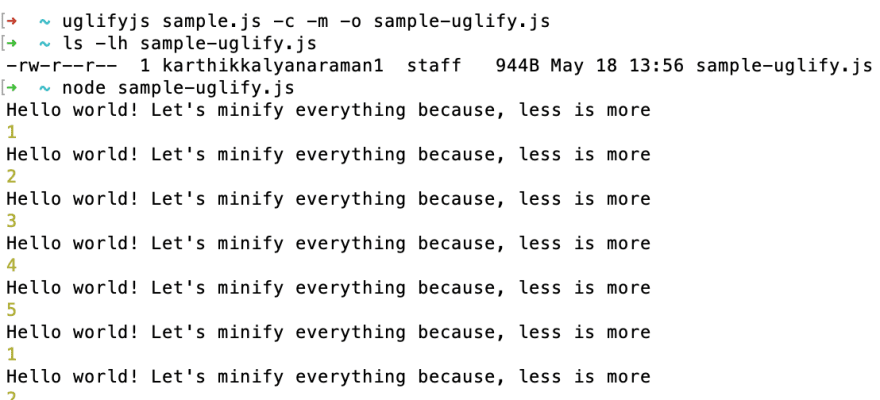
We have used the -c (compress) and -m (mangle) option on the sample.js file and uglified it. The file size has reduced to 944B, a roughly 22 percent reduction. Now, let’s look at the file contents to see how it has changed with uglification:
var print="Hello world! Let's minify everything because, less is more",apple=[1,2,3,4,5];for(i=0;i<5;i++)console.log(print),console.log(apple[i]);for(i=0;i<5;i++)console.log(print),console.log(apple[i]);for(i=0;i<5;i++)console.log(print),console.log(apple[i]);for(i=0;i<5;i++)console.log(print),console.log(apple[i]);for(i=0;i<5;i++)console.log(print),console.log(apple[i]);for(i=0;i<5;i++)console.log(print),console.log(apple[i]);for(i=0;i<5;i++)console.log(print),console.log(apple[i]);for(i=0;i<5;i++)console.log(print),console.log(apple[i]);for(i=0;i<5;i++)console.log(print),console.log(apple[i]);for(i=0;i<5;i++)console.log(print),console.log(apple[i]);for(i=0;i<5;i++)console.log(print),console.log(apple[i]);for(i=0;i<5;i++)console.log(print),console.log(apple[i]);for(i=0;i<5;i++)console.log (print),console.log(apple[i]);for(i=0;i<5;i++)console.log(print),console.log(apple[i]);for(i=0;i<5;i++)console.log(print),console.log(apple[i]);
From the sample above, we can see that the contents of the output has the same code without any whitespaces and newline characters.
In order to see the effects of Uglify further, let’s write a sample JS code with a prototype function:
// comments

function sample(helloworld) {
  this.hello = helloworld
}
sample.prototype.printvar = function()
{
  console.log(this.hello)
}


var hello = "hello world"
var s = new sample(hello)
s.printvar()
Now, let’s uglify this code:

Notice that I have used Uglify’s -e (enclose) option. This option embeds everything in a big function, with configurable argument(s) and value(s). In order to understand what this means, let’s look at the contents of the output:
!function(){function o(o){this.hello=o}o.prototype.printvar=function(){console.log(this.hello)};new o("hello world").printvar()}();
In the uglified output, we can see that the function name sample is gone, and it’s replaced by o. All of the code is enclosed in a big function, which reduces the size of the code further at the expense of readability.
The original file size was 207B, and after running Uglify, the file size decreased to 131B. This is a reduction of nearly 40 percent compared to the 22 percent when we did not use the -e option.
Now, let’s look at another popular minifier: babel-minify.
babel-minify (aka Babili)
babel-minify, formerly known as Babili, is an experimental project that attempts to use Babel’s toolchain (for compilation) to do something in a similar vein: minification. It’s currently in 0.x, and the official repository doesn’t recommend using it in production.
Why do we need this tool when we already have Uglify? If you noticed the previous examples, I have not used the syntax of the latest version of ECMAScript. This is because Uglify doesn’t support it yet — but babel-minify can.
This is because it is just a set of Babel plugins, and Babel already understands new syntax with the parser Babylon. Additionally, when it’s possible to target only browsers that support newer ES features, your code size can be smaller because you don’t have to transpile and then minify it.
Before babel-minify, we would run Babel to transpile ES6, and then run Uglify to minify the code. With babel-minify, this two-step process has essentially become a single step.
babel-minify is ES2015+ aware because it is built using the Babel toolchain. It is written as a set of Babel plugins, consumable with babel-preset-minify. Let’s look at an example.
Let’s install Babel and the Babel preset for transpiling ES6 locally using the command:
npm install --save-dev @babel/core @babel/cli
npm install --save-dev babel-plugin-transform-es2015-classes
Now, let’s write a sample.js with ES6 syntax:
//ES6 Syntax

class sample {
  constructor(helloworld) {
      this.hello = helloworld
  }
  printvar() {
    console.log(this.hello)
  }
}

var hello = "hello world"
var s = new sample(hello)
s.printvar()
Let’s transpile this code using the following command:
babel --plugins transform-es2015-classes sample.js > sample-transpiled.js
The contents of the transpiled code looks like this:
function _classCallCheck(instance, Constructor) { if (!(instance instanceof Constructor)) { throw new TypeError("Cannot call a class as a function"); } }

function _defineProperties(target, props) { for (var i = 0; i < props.length; i++) { var descriptor = props[i]; descriptor.enumerable = descriptor.enumerable || false; descriptor.configurable = true; if ("value" in descriptor) descriptor.writable = true; Object.defineProperty(target, descriptor.key, descriptor); } }

function _createClass(Constructor, protoProps, staticProps) { if (protoProps) _defineProperties(Constructor.prototype, protoProps); if (staticProps) _defineProperties(Constructor, staticProps); return Constructor; }

//ES6 Syntax
let sample = function () {
  function sample(helloworld) {
    _classCallCheck(this, sample);

    this.hello = helloworld;
  }

  _createClass(sample, [{
    key: "printvar",
    value: function printvar() {
      console.log(this.hello);
    }
  }]);

  return sample;
}();

var hello = "hello world";
var s = new sample(hello);
s.printvar();
As you can see, the ES6 class syntax has been transpiled to the regular function syntax. Now, let’s run Uglify on this content to minify it:
uglifyjs sample-transpiled.js -c -m -e -o sample-transpiled-uglified.js
Now, the contents of this output looks like this:
function \_classCallCheck(e,l){if(!(e instanceof l))throw new TypeError("Cannot call a class as a function")}function \_defineProperties(e,l){for(var n=0;n<l.length;n++){var r=l[n];r.enumerable=r.enumerable||!1,r.configurable=!0,"value"in r&&(r.writable=!0),Object.defineProperty(e,r.key,r)}}function \_createClass(e,l,n){return l&&\_defineProperties(e.prototype,l),n&&\_defineProperties(e,n),e}let sample=function(){function e(l){\_classCallCheck(this,e),this.hello=l}return \_createClass(e,[{key:"printvar",value:function(){console.log(this.hello)}}]),e}();var hello="hello world",s=new sample(hello);s.printvar();
If we compare the file sizes, sample.js is 227B, sample-transpiled.js is 1KB, and sample-transpiled-uglified.js is 609B. This is clearly not an optimal process since it leads to an increase in the file size. To solve this problem, babel-minify was introduced. Now, let’s install babel-minify and try transpiling and minifying the code.
npm install babel-minify --save-dev
Let’s minify the same sample.js code with babel-minify using the following command:
minify sample.js > sample-babili.js
Let’s look at the contents of this output:
class sample{constructor(l){this.hello=l}printvar(){console.log(this.hello)}}var hello="hello world",s=new sample(hello);s.printvar();
The size of this file is 135B, which is a nearly 40 percent reduction and a much better way to minify the code. It directly improves the efficiency of transferring this over the network and runs on browsers because Babel can transpile the code. There are various plugins available, too.
Terser
Terser is a JavaScript parser and mangler/compressor toolkit for ES6+, and it’s probably the most efficient one. Terser recommends you use Rollup to bundle your modules, as that produces smaller code overall.
Rollup is a module bundler similar to webpack that was created to build flat distributables of JavaScript libraries as efficiently as possible, taking advantage of the ingenious design of ES2015 modules.
Although Rollup is a nice-to-have, if you’re using webpack >v4, Terser is used by default. Terser can be enabled by switching a boolean variable like this:
module.exports = {
  //...
  optimization: {
    minimize: false
  }
};
Let’s install Terser:
npm install terser -g
The Terser command line has the following syntax:
terser [input files] [options]
Terser can take multiple input files. It’s recommended that you pass the input files first, then pass the options. Terser will parse input files in sequence and apply any compression options.
The files are parsed in the same global scope — that is, a reference from a file to some variable/function declared in another file will be matched properly. If no input file is specified, Terser will read from STDIN.
If you wish to pass your options before the input files, separate the two with a double dash to prevent input files being used as option arguments:
terser --compress --mangle -- input.js
Now let’s try running our sample.js code:
terser -c toplevel,sequences=false --mangle -- sample.js > sample-terser.js
Here are the contents of this output:
new class{constructor(l){this.hello=l}printvar(){console.log(this.hello)}}("hello world").printvar();
As we can see, the output is by far the best among all the tools we have seen so far. The size of the file is 102B, a reduction of nearly 55 percent from the original sample.js size. Terser’s other command line options can be found using the --help option.

Of all the options, we are mostly interested in --compress and --mangle, each of which has its own set of options. The options of --compress and --mangle give you control over how to treat your source code to generate the minified output.
If you noticed, we already used the toplevel and sequences options of --compress in our first Terser example. For instance, you can pass true to the drop_console option of --compress to remove all console.* functions from the source code, and you can use the keep_classnames option if you don’t want to mangle class names.
Sometimes, it may be useful to beautify the generated output. You can do this with the --beautify option. Many build tools use Terser — find them here.
Let’s try to use the drop_console option on our source file to see if the console.log() function gets dropped:
terser --compress drop\_console=true -- sample.js > sample-drop-console.js
Now, let’s look at the contents of the source, sample.js:
//ES6 Syntax

class sample {
  constructor(helloworld) {
      this.hello = helloworld
  }
  printvar() {
    console.log(this.hello)
  }
}

var hello = "hello world"
var s = new sample(hello)
s.printvar()
And now the output, sample-drop-console.js:
class sample{constructor(helloworld){this.hello=helloworld}printvar(){}}var hello="hello world",s=new sample(hello);s.printvar();
As you can see, the console.log(this.hello) call has been removed from the output. Now, let’s try drop_console with the toplevel and sequences options:
terser -c toplevel,sequences=false,drop\_console=true --mangle -- sample.js > sample-terser-tsd.js
Let’s look at the contents:
new class{constructor(r){this.hello=r}printvar(){}}("hello world").printvar();
As we can see, the code is mangled and compressed even further, and the size of this new file is a mere 79B. This is a 65 percent reduction in size compared to the 55 percent we saw without using the drop_console option. This way, we can use the options to balance readability and performance according to the requirements of the project.
Performance comparison
So far, we have looked at the three most popular tools for minifying JS and CSS files. The comparative benchmarking results from the Babel repository provide some stats for these tools, which can help you choose the right minifier for your project:

As we can see, Terser performs the best among the lot for projects based on React. You can find the results for other web frameworks here.
Configuring minifiers for React
In this section, we will look at the process of configuring a minifier for a React app. Let’s use Terser in this example to minify the React application. In order to achieve this in a streamlined fashion, we use webpack. webpack is a toolchain for bundling all of your files into a single file called bundle.js, which can be loaded efficiently. Let’s install webpack using the following command:
npm install webpack --save-dev
Let’s also install some Babel plugins in order to transpile the code:
npm install babel-core babel-loader babel-preset-env babel-preset-react\babel-preset-stage-0 --save-dev
Now, let’s install the Terser plugin:
npm install terser-webpack-plugin --save-dev
We also need the .svg and .css loaders, so let’s install them, too:
npm install svg-inline-loader --save-dev
npm install css-loader --save-dev
At this stage, we just need to configure the webpack.config.js file, so let’s do that:
const path = require('path');
const TerserPlugin = require('terser-webpack-plugin');

module.exports = {
  entry: "./src/index.js",
  output: {
    filename: 'bundle.js',
    path: path.resolve(__dirname, 'dist')
  },
  mode: 'development',
  module: {
    rules: [
    {
      test: /\.js$/,
      exclude: /(node_modules)/,
      use: {
        loader: 'babel-loader',
        options:{
          presets: ['@babel/preset-react']
        }
      }
    },
    {
      test: /\.svg$/,
      loader: 'svg-inline-loader'
    },
    {
      test: /\.css$/,
      use: ['style-loader', 'css-loader'],
    }]
  },
  optimization: {
    minimizer: [new TerserPlugin()],
  },
}
From the code above, we can see that the entry point of webpack is index.js inside src/, and the final output will be stored inside the dist/ directory as bundle.js. The Optimization field pulls the TerserPlugin in for the minification process. Now, let’s run webpack to statically build our app for production.
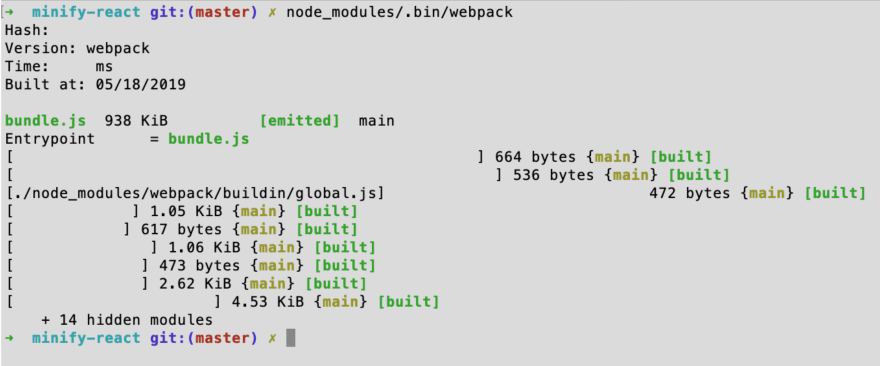
We can see that webpack ran the loaders and plugins on all the files and built a bundle.js that is 938KB in size, while our entire app is much bigger than this. This is the real power of webpack and the associated loaders and plugins.
There have been some new bundlers introduced recently. Of those, Rollup and Parcel are gaining popularity. The underlying configuration and setup for any bundler tool is similar to webpack. You can find the performance comparison between webpack, Rollup and Parcel here.
Conclusion
As a final note, let me conclude this post by showing a snippet from npm trends. As we can see, Terser has gained significant popularity in the past six months. This can be directly attributed to its better performance compared to other minification tools.

Thanks for reading this post. I hope you enjoyed learning about minification and cleared up some long-standing doubts about this concept.
Plug: LogRocket, a DVR for web apps

LogRocket is a frontend logging tool that lets you replay problems as if they happened in your own browser. Instead of guessing why errors happen, or asking users for screenshots and log dumps, LogRocket lets you replay the session to quickly understand what went wrong. It works perfectly with any app, regardless of framework, and has plugins to log additional context from Redux, Vuex, and @ngrx/store.
In addition to logging Redux actions and state, LogRocket records console logs, JavaScript errors, stacktraces, network requests/responses with headers + bodies, browser metadata, and custom logs. It also instruments the DOM to record the HTML and CSS on the page, recreating pixel-perfect videos of even the most complex single-page apps.
The post Uglify vs. Babel-minify vs. Terser: A mini battle royale appeared first on LogRocket Blog.


Latest comments (0)