
Written by Ovie Okeh✏️
So you want to publish a React component as a package to npm? This guide will provide all the information you need, even if you’re completely new to this.
I recently built and published a React package to npm, and I was unpleasantly surprised at the existing information on how to go about it. I found some articles online, but they were either not in-depth enough or were for plain JavaScript.
This guide is a culmination of all I’ve learned about npm (command and registry), documentation, versioning, and the ubiquitous package.json. To follow along with this guide, you should:
- Be familiar with TypeScript + React
- Have a Github account
- Have an npm account
- Have a cup of coffee (or not)
You can find a quick-start template here if you’re only interested in the code.
You could choose to build your package using JavaScript or TypeScript. I’ll be opting for TypeScript for this tutorial because there are already tutorials for JavaScript.
You should still go through this guide even if you decide to go with plain ol’ JavaScript because I’ll be covering some important universal topics.

Have you done due diligence?
Before you try to publish a package, consider doing a search for existing packages with similar functionality. You might be surprised to find that there may already be a solution for your needs.
Doing so will help us reduce the number of duplicate packages on npm and reduce confusion for new developers who may have a difficult time choosing one. You should still be able to contribute your expertise to the project seeing as packages on npm are open-source, which is a win-win for everyone involved.
Another benefit of doing your due diligence is that it prevents you from building a package that no one would use (thanks to more popular alternatives).
If you have done your due diligence and discovered that there are no existing similar packages, then you can build to your heart’s content. With that out of the way, it’s time to dive into this.
The npm registry
You may already be familiar with the npm command on the terminal. It’s how you manage your dependencies on a Node project (and frontend work these days). What you may not be familiar with is the npm registry.
The npm registry is a collection of reusable, open-source JavaScript packages that can be installed and used by any developer or organization, and it’s where we’ll be publishing our package for other developers to consume.
To publish to the npm registry, you’ll need a free account. Simply visit the sign-up page and fill in the form. You should now have an account that will enable you to publish to npm. Now let’s talk about the packages on the registry.
A package on npm is simply a file or directory that is described by a package.json file. It could be a collection of simple utility functions (Underscore), a network library (Axios), or even a React component.
Different kinds of packages exist on the registry:
Public packages
Public packages are the most common types on npm. They are publicly accessible and usually look like package-name. To install a public package, you’d run npm install package-name or yarn add package-name.
Private packages
Private packages are packages that are not accessible by default to the public. These are useful for custom packages that are shared within an organization. To publish a private package on npm, you’ll need a paid user or organization account.
Private packages are also scoped packages, meaning they take the format @scope/package-name. This makes it impossible to reserve useful generic names for your private packages.
Something to note, however, is that although all private packages are scoped, not all scoped packages are private.
Scoped packages
Scoped packages are packages that belong to a namespace and are usually used to group a collection of related packages. It enables you to create a package with the same name as a package created by another user or organization. Per the Microsoft docs:
“A namespace is a declarative region that provides a scope to the identifiers (the names of types, functions, variables, etc) inside it.”
They take the format @scope/package-name where the scope is usually your user name or the organization name on npm. Scoped packages are private by default, but you can pass a flag to the npm publish command when publishing to make it public.
Semantic versioning
Once you publish a package to npm, you need to make sure that all changes you’ll eventually push to your package are well tracked. This is so you don’t stump the users of your package when you introduce a breaking change, for instance.
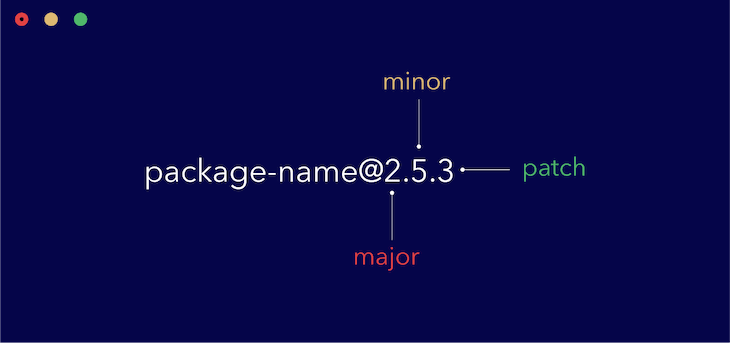
A typical package version looks like this: package-name@2.5.3. New packages usually start at version 1.0.0 and get incrementally updated according to the established semantic versioning conventions.
In the graphic below, you can see that the first digit denotes the major version. Any differences in major versions usually mean that breaking changes have been included. The second digit denotes the minor version and indicates that backwards-compatible features have been added. The last digit, patch , is reserved for backwards-compatible bug fixes.
So let’s recap what we know about semantic versioning:
- New packages start at version (
1.0.0) - Incrementing the first digit means backwards-incompatible features have been included (
2.0.0). When incremented, the second and last digits are reset to zero - Incrementing the second digit means backwards-compatible features have been included (
2.1.0). When incremented, the last digit is reset to zero - Incrementing the last digit means backwards-compatible bug fixes have been included (
2.1.1)
In practice, you do not need to manually implement any of these by yourself. The npm version command takes care of all these, and further down, we’ll look at how to use it to update our package versions.
For Git users, the npm version command also does a little bit more. It creates a tag for you automatically every time you bump up to a new version. This allows you to explore your code at a specific version just by checking out the tag. You can browse all your tags by running git tag.
Something to note, though: git push by default doesn’t push tags to origin. You have to manually tell it by passing the --tags command, like so: git push --tags.
That’s all you need to know about semantic versioning to be productive.
Package bundling
Transpiling and bundling a package is required if you want your package to work on different codebases. If you’d like to use a flavor of JavaScript like TypeScript or use some newer features from ES6, you need to transpile your source code to ensure that it works everywhere.
Basically, you write your source code using whatever flavor of JavaScript you want and transpile your code to work on all your targeted platforms. This is usually done with a package like webpack or Rollup.
For this guide, we’ll focus on Rollup because it is robust yet simple enough that even beginners can master it in days. When building the example project, we’re going to:
- Write our React code in TypeScript
- Transpile down to ES5
- Generate an
index.d.tsfile so that TypeScript users can benefit from having types provided by default
The good thing about these bundlers is that they also take care of any images and CSS (including Sass and Less) that your package requires. This allows you to focus on the actual business logic and let your bundler worry about making it work in other environments.
An advantage of having a transpiler like Rollup is that you can use either or both module systems at the same time (require vs. import). Learn more about the JavaScript module system here.
Thankfully, setting up Rollup is not a complicated process. We’ll need a rollup.config.js file to configure Rollup to suit our needs, but what are our needs in this case? We need to:
- Transpile our TypeScript + React code down to vanilla ES5 JavaScript
- Include type definitions for TypeScript users
- Include source maps for debugging
To accomplish all these, we’ll need some Rollup plugins that we’ll go over when building our sample project. Basically, plugins are required to extend the capability of Rollup. An example is configuring it to process Sass files.
You can get a template here.
Package testing
Once you’ve got your package transpiled and ready to ship, you need a way to test that it works correctly.
The most inefficient way to go about this is to publish your package to npm and test it manually by installing it into a sample project. This is not advised, as you may end up publishing buggy code to the registry for other developers to consume.
What you need is a way to test it locally to ensure that everything works correctly before publishing to npm. The npm link command takes care of that for you. Using npm link, you’ll be able to expose your package locally and use it on local projects just like you would a package downloaded from npm.
Note, though, that this doesn’t replace unit tests — you might still want that extra layer of confidence you only get from passing test 😃.
For this guide, however, I won’t be going through how to set up unit testing, as there is already a myriad of information on this subject available, and we’ll gain practical knowledge of working with npm link further down when we build our sample project.
Documentation
You’ll need a way to educate developers on how to use your package. This is what documentation is, and it’s necessary for all but the most useless packages.
There are different ways you could go about documenting your package. You could choose to host the documentation on a custom domain and link to it from your README.md file. You might even decide to be fancy and include a Storybook playground for developers to try out your package.
The easiest way, however — and the approach I’ll opt for in this guide — is to simply include the documentation in your README.md file. Good documentation usually contains:
- Why a package was created
- What problem the package solves
- How the package solves the problem
- All valid configurations/props of the package
- Example snippets
- Demos of the package in action
- Instructions for contributors
If you can include all the above in your README.md file, you’re good to go. A good example to follow is the Rollup package documentation on GitHub.
Project
I understand that many developers learn by doing, so we’re going to build a very small package and apply all the concepts we’ve touched on so far.
It’s a simple counter package that starts counting from zero to 100 and then resets back to zero. It takes in a single className prop and looks like this:

As a quick heads-up, while building this package, we’ll apply the following concepts that we’ve learned about so far:
- Semantic versioning
- Package bundling
- Package testing
- Documentation
For this package, we’ll be using the following technologies:
- React (obviously)
- TypeScript
- Sass
To keep this guide short and to the point, I won’t be explaining the React and Sass code. Rather, I’ll link to them, and you can simply copy and paste them. Or you could just clone the repo and follow along with the guide. You can check out a CodeSandbox playground below:
Setting up the project
Setting up this project thankfully does not require much. All we need are the following files and folders:
-
src– folder to hold the source code -
package.json– file to describe the package -
README.md– file to document the package -
rollup.config.js– file to configure Rollup -
tsconfig.json– file to configure TypeScript -
.npmignore– file to tell npm what files should be bundled with the package
There are some other files like .gitignore, .prettierrc, and the LICENSE file, which I’ll choose not to go through because they’re pretty self-explanatory. With that out of the way, it’s time to build something.
Building the React package
This is a simple React package that consists of a single index.tsx file and a styles.scss file for styling.
Let’s start with creating a new repo on Github and cloning it to your local machine. Follow the the steps here to create a public repo (with a Node .gitignore and a license of your choice) and then clone that to your computer. At this point, your folder will contain just two files:
.gitignoreLICENSE
Now we’ll initialize a new Node project by running npm init -y. Next, we’ll install React and all the other React-related packages.
npm i -D react react-dom typescript @types/react @types/react-dom
After installing the above packages, create the src folder along with index.tsx and styles.scss like so:
mkdir src && touch src/index.tsx src/styles.scss
- Copy and paste the contents of
index.tsxfrom here - Copy and paste the contents of
styles.scssfrom here
We’re done with the React side of things, so take some time to go through the code. You’ll notice that we’re exporting the component as a default export and the component’s typings as a named export. This will come in handy for TypeScript users to benefit from that sweet VS Code IntelliSense.
Next thing we’ll have to do is set up our TypeScript config. Create a new file called tsconfig.json by running touch tsconfig.json and paste in the following:
{
  "compilerOptions": {
    "outDir": "dist",
    "module": "esnext",
    "target": "es5",
    "lib": ["es6", "dom", "es2016", "es2017"],
    "sourceMap": true,
    "allowJs": false,
    "jsx": "react",
    "declaration": true,
    "moduleResolution": "node",
    "forceConsistentCasingInFileNames": true,
    "noImplicitReturns": true,
    "noImplicitThis": true,
    "noImplicitAny": true,
    "strictNullChecks": true,
    "suppressImplicitAnyIndexErrors": true,
    "noUnusedLocals": true,
    "noUnusedParameters": true
  },
  "include": ["src"],
  "exclude": ["node_modules", "dist", "example", "rollup.config.js"]
}
To understand what each of these fields means, please go through the tsconfig.json entry on the TypeScript handbook since they do a much better job of explaining them.
It’s time to set up Rollup to bundle our package.
Setting up Rollup
Rollup is a package bundler built with simplicity in mind. It is also very extensible through some available plugins that will give you extra functionality. Let’s install Rollup and all the plugins we’ll need in this project (we’ll also need Babel since it is used internally during transpiling).
npm i -D rollup rollup-plugin-typescript2 rollup-plugin-sass babel-core babel-runtime
After installing all the required packages, we’ll create a configuration file that will tell Rollup exactly how we want this package bundled. Create a rollup.config.js file by running touch rollup.config.js, and we’ll fill in this file bit by bit.
First, we want to bring in the Rollup plugins we have installed, so paste in the following:
import sass from 'rollup-plugin-sass'
import typescript from 'rollup-plugin-typescript2'

import pkg from './package.json'

// to be continued
The Sass plugin will help us transpile our Sass code down to normal CSS and inject it into our final build (users won’t have to import the CSS separately). The TypeScript plugin will help us transpile our TypeScript code down to ES5 JavaScript.
Next, we imported our package.json file as a module so that we can use some properties from it further down in our config.
We have to configure four more fields in the config file and then we’ll be done with Rollup.
-
input– tells Rollup which file is the root file (think of it as the parent of all the other files) -
output– tells Rollup where to bundle your file to and in what format -
plugins– tells Rollup which plugins we want to use along with the configuration for each one -
externals– tells Rollup which modules being used by the package should be supplied by the host environment (wherever it’s being used)
With that explained, paste in the following:
// continued
export default {
  input: 'src/index.tsx',
  output: [
    {
      file: pkg.main,
      format: 'cjs',
      exports: 'named',
      sourcemap: true,
      strict: false
    }
  ],
  plugins: [
    sass({ insert: true }),
    typescript({ objectHashIgnoreUnknownHack: true })
  ],
  external: ['react', 'react-dom']
}
You can go through the Rollup docs for further explanation on what each of these fields does and the possible valid values they accept.
Believe it or not, we’re actually done with configuring Rollup. All that’s left now is to update the package.json to add in the required scripts and some other information.
Updating the package.json
Now that we have our source code, and Rollup configured to transpile our code, we have to update our package.json file to contain some new scripts for easier development as well as some other information.
First, update the main field to contain "dist/index.js". Then, update the scripts field to look like so:
"scripts": {
  "build": "rollup -c",
  "start": "rollup -c -w"
},
This will allow us to simply run npm run build or yarn build to transpile and bundle our package. Using npm run start or yarn start will enable us to do this in “watch” mode for faster testing.
Next, add a peerDependencies field and paste in the following value:
"peerDependencies": {
  "react": "^16.8.0",
  "react-dom": "^16.8.0"
},
The peerDependencies field is only required if you’re publishing a package, like we’re doing. Here’s an explanation lifted from the Yarn documentation:
“Having a peer dependency means that your package needs a dependency that is the same exact dependency as the person installing your package. This is useful for packages like
reactthat need to have a single copy ofreact-domthat is also used by the person installing it.”
In this case, we’re simply telling npm that whoever is installing this package needs to also have a copy of React and React DOM installed, both at versions higher than v16.8.0.
Finally, add a files field and set it to an array containing "dist", like so:
"files": ["dist"]
This is simply telling npm that only the dist folder should be installed when someone installs our package.
We’re done with the package.json, and it’s time to test our package locally before writing documentation and publishing.
Testing the package
To ensure that our package works as expected, we need a way to test it locally before publishing it and making it available for the public to consume.
Since we already have a script setup for building the package, we’ll simply run npm run build to bundle our package into the dist folder. After running the build command, you can decide to inspect the dist folder yourself to see the output. Notice how it also emitted the index.d.ts so that TypeScript users can import your custom types.
Note : If you run
npm run buildand the output is not contained in thedistfolder, ensure that themainfield in yourpackage.jsonsaysdist/index.js.
Building the package is one thing, but testing it is another thing entirely. What we want to do is install this package into another separate package and use it as is.
To do this, we’ll use the yarn link command (essentially the same as npm link but with better output). The yarn link command will simply link a local package to another local package to enable you to use it as if you installed it from the registry.
After running the build command, run yarn link in the project root. You should get an output similar to:
You can now run `yarn link "dummy-counter"` in the projects where you want to use this package and it will be used instead.
Navigate to any existing React project you have on your local machine — if you don’t have one, simply create a bare-bones React app using CRA — and link the dummy-counter package to the project by running yarn link "dummy-counter" in the root of the package.
This will enable us to import the dummy-counter package as though we installed it by running npm install dummy-counter. However, if you tried using the package right now, you’d get an error.
This is because dummy-counter is using a different copy of React from your existing project. To resolve this, navigate back to the dummy-counter project and run npm link ../path/to/your/project/node_modules/react where ../path/to/your/project should be the actual path to your project.
For example, I have a workspace folder that contains all my projects like so:
workspace
  - dummy-counter
  - some-project
...
In my case, if I wanted to use dummy-counter inside some-project, I’d run the following command: npm link ../some-project/node_modules/react. Tweak to suit your own project path.
At this point, we can now import and use the dummy-counter package, like so:
import DummyCounter from 'dummy-counter'

const SomeProject = () => (
  <div>
    <DummyCounter />
  </div>
)
You can then compile your existing project and open it in the browser to confirm that dummy-counter is working fine. You should always test your packages manually like this before publishing to ensure that you only publish working code. Of course, having unit tests is also recommended.
If you’ve followed this guide accurately, your existing project should compile and run fine, and the DummyCounter component should be rendered to the DOM. Up next is the documentation.
Writing the documentation
Now that we have a fully functional package, we have to include documentation so that other developers know how to use the package and what props to pass.
Like I said earlier, there are different ways to go about documentation. You could choose a more interactive approach, like hosting the docs on a custom domain and providing interactive elements like sandboxes, Codepens, etc.
Our use case is much simpler, though, so simple text-based documentation along with code snippets on the README.md file is good enough. So that’s what we’ll do next.
The dummy-counter package is a very simple React component that takes in a single prop, so the documentation will reflect that. Copy the example documentation from GitHub here, open the README.md file, and paste in the contents.
You can take some time to go through the documentation, and you’ll note that it contains the following information:
- Why the package was created
- How to use the package
- All valid configurations/props of the package
- Example snippets
Granted it doesn’t contain all the information required in good documentation, but then again, this isn’t a good package: it serves no other purpose than to educate.
When you publish this package to npm, this README.md file will be picked up and the contents used as the documentation of the package. Now let’s see how to publish this package to the npm registry.
Publishing the package
We’re done with the hardest parts of publishing a package. All that remains now is to publish the package to the npm registry so that other developers can use it.
For that, you’re going to use two npm commands:
npm loginnpm publish
Firstly, you’re going to log in to your npm account (I’m assuming you created one earlier) from your CLI. This is so that npm knows which user or organization is the owner of the package.
- From your terminal, run
npm login - Enter your username
- Enter your password
- Enter your email address (this is public) and hit enter
You should now be logged in to your npm account on your terminal. Next is to actually publish the package. From your terminal, run npm publish.
If you’re publishing a scoped package but want it to be public, pass the --access flag like so: npm publish --access public.
You can now run npm install your-package from any environment and it will be installed to the node_modules folder.
Note that because dummy-counter is a useless package and was created only for demo purposes, I’d advise you not to publish it.
Maintaining the package
Now that you have a fully fledged package online that other developers can consume, you have to maintain the package. This includes adding new features, fixing bugs, optimizing bundle size, etc.
Whenever you publish any changes to your package, you have to update the package’s version number according to the severity and scope of the changes introduced. Remember how a package is versioned?
A typical package is versioned like some-package@1.2.3, where:
- The first digit (1 in this case) denotes the major version and is incremented when backwards-incompatible changes are introduced
- The second digit (2 in this case) denotes the minor version and is incremented when backwards-compatible changes are introduced
- The last digit (3 in this case) denotes the patch version and is incremented when backwards-compatible bug-fixes are introduced
Let’s go back to our dummy-counter package.
Say we changed the core functionality of the package to allow it to accept the count instead of counting automatically. This change is backwards-incompatible as the package no longer works as it used to. This is an example of a major change, and we’d communicate it by incrementing the first digit like so:
// before update, dummy-counter is @1.0.0

npm version major

// after update, dummy-counter is now @2.0.0
Notice how we didn’t actually specify the new version to increment to. This new version is determined automatically based off of the former version by the npm version command. It takes in three possible options:
-
major– for incrementing the first digit -
minor– for incrementing the second digit -
patch– for incrementing the last digit
Let’s consider another change. This time, we want to add a new prop called mode, which toggles the background of the counter to be either dark or light depending on the value passed. This change does not affect the previous className prop, so it is backwards-compatible.
We’d update the version number like so:
// before update, dummy-counter is @2.0.0

npm version minor

// after update, dummy-counter is now @2.1.0
One last scenario. Say we discovered a bug where the counter was counting up from 1 instead of 0, and we wanted to fix that. Since this doesn’t break how developers use the product, it’s a backwards-compatible fix, so we’d increment only the last digit, like so:
// before update, dummy-counter is @2.1.0

npm version patch

// after update, dummy-counter is now @2.1.1
Remember some rules though:
- Packages start out
@1.0.0 - When updating the major version, reset the last two digits to zero
- When updating the minor version, reset the last digit to zero
Keep these rules in mind and you should be fine.
Conclusion
Sharing your solution to a problem in the form of an npm package is a very fulfilling endeavor (albeit a poorly paid one) — one that can help you gain the approval of your peers, fast-track your career, or simply help you work faster by allowing easier code reuse.
While this guide should be able to get you started with your first package, there’s still a lot that you’ll learn about as you publish more packages in your career. One thing to note is that as a publisher, any change you make directly affects others, so keep this in mind when making certain decisions.
I hope this article has been of help to you. If you were able to read to the end, you’re awesome, and you deserve your own constellation named after you. Cheers and happy coding ❤.
Full visibility into production React apps
Debugging React applications can be difficult, especially when users experience issues that are difficult to reproduce. If you’re interested in monitoring and tracking Redux state, automatically surfacing JavaScript errors, and tracking slow network requests and component load time, try LogRocket.

LogRocket is like a DVR for web apps, recording literally everything that happens on your React app. Instead of guessing why problems happen, you can aggregate and report on what state your application was in when an issue occurred. LogRocket also monitors your app's performance, reporting with metrics like client CPU load, client memory usage, and more.
The LogRocket Redux middleware package adds an extra layer of visibility into your user sessions. LogRocket logs all actions and state from your Redux stores.
Modernize how you debug your React apps — start monitoring for free.
The post The complete guide to publishing a React package to npm appeared first on LogRocket Blog.


Top comments (0)