
CSS is what makes the web look and feel the way it does: the beautiful layouts, fluidity of responsive designs, colors that stimulate our senses, fonts that help us read text expressed in creative ways, images, UI elements, and other content displayed in a myriad of shapes and sizes. It’s responsible for the intuitive visual cues that communicate application state such as a network outage, a task completion, an invalid credit card number entry, or a game character disappearing into white smoke after dying.
The web would be either completely broken or utterly boring without CSS.
Given the need to build web-enabled apps that match or outdo their native counterparts in behavior and performance (thanks to SPAs and PWAs), we are now shipping more functionality and more code through the web to app users.
Considering the ubiquity of the web, its very low friction (navigate through links, no installation), and its low barrier to entry (internet access on very cheap phones), we will continue to see more people come online for the first time and join millions of other existing users engage on the web apps we are building today.

The less code we ship through the web, the less friction we create for our applications and our users. More code could mean more complexity, poor performance, and low maintainability.
Thus, there has been a lot of focus on reducing JavaScript payload sizes, including how to split them into reasonable chunks and minify them. Only recently did the web begin to pay attention to issues emanating from poorly optimized CSS.
CSS minification is an optimization best practice that can deliver a significant performance boost — even if it turns out to be mostly perceived — to web app users. Let’s see how!
What is CSS minification?
Minification helps to cut out unnecessary portions of our code and reduce its file size. Ultimately, code is meant to be executed by computers, but this is after or alongside its consumption by humans, who need to co-author, review, maintain, document, test, debug, and deploy it.
Like other forms of code, CSS is primarily formatted for human consumption. As such, we add spacing, indentation, comments, naming conventions, and instrumentation hacks to boost our productivity and the maintainability of the CSS code — none of which the browser or target platform needs to actually run it.
CSS minification allows us to strip out these extras and apply a number of optimizations so that we are shipping just what the computer needs to execute on the target device.
Why minify CSS?
Across the board, source code minification reduces file size and can speed up how long it takes for the browser to download and execute such code. However, what is critically important about minifying CSS is that CSS is a render blocking resource on the web.
This means the user will potentially be unable to see any content on a webpage until the browser has built the CSSOM (the DOM but with CSS information), which only happens after it has downloaded and parsed all style sheets referenced by the document.
Later in this article, we will explore the concept of critical CSS and best practices around it, but the point to establish here is that until CSS is ready, the user sees nothing. Unnecessarily large CSS files, due to shipping unminified or unused CSS, helps to deliver this undesirable experience to users.
Minify vs. compress — any difference?
Code minification and compression are often used interchangeably, maybe because they both address performance optimizations that lead to size reductions. But they are different things, and I’d like to clarify how:
- Minification alters the content of code. It reduces code file size by stripping out unwanted spaces, characters, and formatting, resulting in fewer characters in the code. It may further optimize the code by safely renaming variables to use even fewer characters.
- Compression does not necessarily alter the content of code — well, unless we consider binary files like images, which we are not covering in this exploration. It reduces file size by compacting the file before serving it to the browser when it is requested.
These two techniques are not mutually exclusive, so they can be used together to deliver optimized code to the user.
With the required background information out of the way, let’s go over how you can minify the CSS for your web project. We will be exploring three ways this can be achieved and doing so for this sample website I made, which has the following CSS in a single external main.css file:
html,
body {
  height: 100%;
}
body {
  padding: 0;
  margin: 0;
}
body .pull-right {
  float: right !important;
}
body .pull-left {
  float: left !important;
}
body header,
body [data-view] {
  display: none;
  opacity: 0;
  transition: opacity 0.7s ease-in;
}
body [data-view].active {
  display: block;
  opacity: 1;
}
body[data-nav='playground'] header {
  display: block;
  opacity: 1;
}
/* Home */
[data-view='home'] {
  height: 100%;
}
[data-view='home'] button {
  opacity: 0;
  pointer-events: none;
  transition: opacity 1.5s ease-in-out;
}
[data-view='home'] button.live {
  opacity: 1;
  pointer-events: all;
}
[data-view='home'] .mdc-layout-grid__cell--span-4.mdc-elevation--z4 {
  padding: 1em;
  background: #fff;
}
Standalone online tools
If you are totally unfamiliar with minifying CSS and would like to approach things slowly, you can start here and only proceed to the next steps when you are more comfortable. While this approach works, it is cumbersome and unsuitable for real projects of any size, especially one with several team members.
A number of free and simple online tools exist that can quickly minify CSS. They include:
All three tools provide a simple user interface consisting of one or more input fields and require that you copy and paste your CSS into the input field and click a button to minify the code. The output is also presented on the UI for you to copy and paste back into your project.
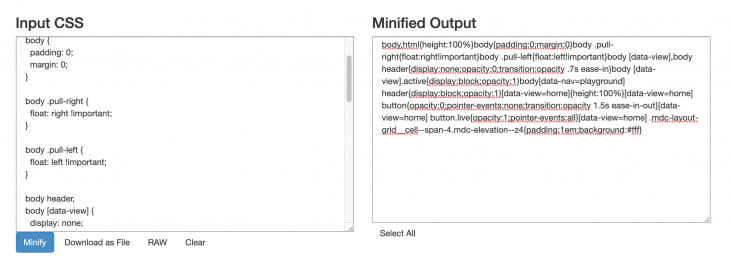
From the above screenshot of CSS Minifier, we can see the that the Minified Output section on the right has CSS code that has been stripped of spaces, comments, and formatting.
Minify does something similar, but can also display the file size savings due to the minification process.
In either of these cases, our minified CSS looks like the below:
body,html{height:100%}body{padding:0;margin:0}body .pull-right{float:right!important}body .pull-left{float:left!important}body [data-view],body header{display:none;opacity:0;transition:opacity .7s ease-in}body [data-view].active{display:block;opacity:1}body[data-nav=playground] header{display:block;opacity:1}[data-view=home]{height:100%}[data-view=home] button{opacity:0;pointer-events:none;transition:opacity 1.5s ease-in-out}[data-view=home] button.live{opacity:1;pointer-events:all}[data-view=home] .mdc-layout-grid__cell--span-4.mdc-elevation--z4{padding:1em;background:#fff}
Minifying CSS in this way expects you to be online and assumes the availability of the above websites. Not so good!
Command line tools
A number of command line tools can achieve the exact same thing as the above websites but can also work without internet, e.g., during a long flight.
Assuming you have npm or yarn installed locally on your machine, and your project is set up as an npm package (you can just do npm init -y), go ahead and install cssnano as a dev dependency using npm install cssnano --save-dev or with yarn add install cssnano -D.
Since cssnano is part of the ecosystem of tools powered by PostCSS, you should also install the postcss-cli as a dev dependency (run the above commands again, but replace cssnano with postcss-cli).
Next, create a postcss.config.js file with the following content, telling PostCSS to use cssnano as a plugin:
module.exports = {
    plugins: [
        require('cssnano')({
            preset: 'default',
        }),
    ],
};
You can then edit your package.json file and add a script entry to minify CSS with the postcss command, like so:
...
"scripts": {
  "minify-css": "postcss src/css/main.css > src/css/main.min.css"
}
...
"devDependencies": {
  "cssnano": "^4.1.10",
  "postcss-cli": "^6.1.2"
}
...
main.min.css will be the minified version of main.css.
With the above setup, you can navigate to your project on the command line and run the following command to minify CSS: npm run minify-css (or, if you’re using yarn, yarn minify-css).
Loading up and serving both CSS files from the HTML document locally (just to compare their sizes in Chrome DevTools — you can run a local server from the root of your project with http-server) shows that the minified version is about half the size of the original file.

While the above examples work as a proof of concept or for very simple projects, it will quickly become cumbersome or outright unproductive to manually minify CSS like this for any project with beyond-basic complexity since it will have several CSS files, including those from UI libraries like Bootstrap, Materialize, Material Design, etc.
In fact, this process requires you to save the minified version and update all style sheet references to the minified file version — manually. Chances are, you are already using a build tool like webpack, Rollup, or Parcel. These come with built-in support for code minification and bundling and might require very little or no configuration to take advantage of their workflow infrastructure.
Bring your own bundler (BYOB)
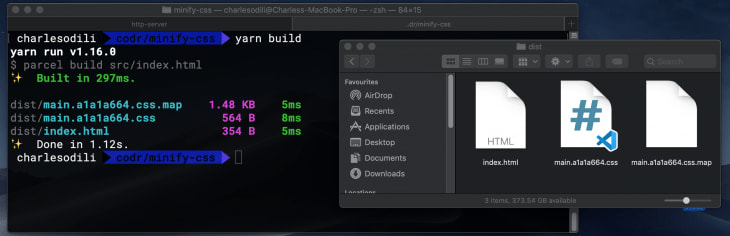
Given that Parcel has the least configuration of them all, let’s explore how it works. Install the Parcel bundler by running yarn add parcel-bundler -D or npm install parcel-bundler --save-dev.
Next, add the following script entries to your package.json file:
"dev": "parcel src/index.html",
"build": "parcel build src/index.html"
Your package.json file should look like this:
{
  ...
  "scripts": {
    "dev": "parcel src/index.html",
    "build": "parcel build src/index.html"
  },
  ...
  "devDependencies": {
    "parcel-bundler": "^1.12.3"
  }
  ...
}
The dev script allows us to run the parcel-bunder against the index.html file (our app’s entry point) in development mode, allowing us to freely make changes to all files linked to the HTML file. We’ll see changes directly in the browser without refreshing it.
By default, it does this by adding a dist folder to the project, compiling our files on the fly into that folder, and serving them to the browser from there. All of this happens by running the dev script with yarn dev or npm run dev and then going to the provided URL on a browser.

Like the dev script we just saw, the build script runs the Parcel bundler in production mode. This process does code transpilation (e.g., ES6 to ES5) and minification, including minifying our CSS files referenced in the target index.html file. It then automatically updates the resource links in the HTML file to the output code (transpiled, minified, and versioned copies). How sweet!
This production version is put in the dist folder by default, but you can change that in the script entry within the package.json file.
While the above process is specific to Parcel.js, there are similar approaches or plugins to achieve the same outcome using other bundlers like webpack and Rollup. Do take a look at the following as a starting point:
- webpack
- Rollup
Code coverage and unused code
Minifyng CSS in itself is not the goal; it is only the means to an end, which is to ship just the right amount of code the user needs for the experiences they care about.
Stripping out unnecessary spaces, characters, and formatting from CSS is a step in the right direction, but like unnecessary spaces, we need to figure out what portions of the CSS code itself is not totally necessary in the application.
The end goal is not really achieved if the app user has to download CSS (albeit minified CSS) containing styles for all the components of the Bootstrap library used in building the app when only a tiny subset of the Bootstrap components (and CSS) is actually used.
Code coverage tools can help you identify dead code — code that is not used by the current page or the application. Such code should be stripped out during the minification process as well, and
Chrome DevTools has an inbuilt inspector for detecting unused code.
With DevTools open, click on the “more” menu option (three dots at extreme top right), then click on More tools , and then Coverage.

Once there, click on the option to reload and start capturing coverage. Feel free to navigate through the app and do a few things to establish usage if need be.

After using the app to your heart’s content — and under the watchful eyes of the Coverage tool — click on the stop instrumenting coverage and show results red button.
You will be presented with a list of loaded resources and coverage metrics for that page or usage session. You can instantly see what percentage of the resource entries are used vs unused, and clicking each entry will also show what portions of the code is used (marked green) vs. unused (marked red).

In our case, Chrome DevTools has detected that nowhere in my HTML was I using the .pull-right and .pull-left CSS classes, so it marked them as unused code. It also reports that 84 percent of the CSS is unused. This is not an absolute truth, as you will soon see, but it gives a clear indication for where to begin investigating areas to clean up the CSS during a minification process.
Determining and removing unused CSS
I must begin by saying removing unused CSS code should be carefully done and tested, or else you could end up removing CSS that was needed for a transient state of the app — for instance, CSS used to display an error message that only comes into play in the UI when such an error occurs. How about CSS for a logged-in user vs. one who isn’t logged in, or CSS that displays an overlay message that your order has shipped, which only occurs if you successfully placed an order?
You can apply the following techniques to begin more safely approaching unused CSS removal to drive more savings for your eventual minified CSS code.
Add just the CSS you need — no more!
This technique emphasizes the leverage of code splitting and bundling. Just like we can key into code splitting by modularizing JavaScript and importing just the modules, files, or functions within a file we need for a route or component, we should be doing the same for CSS.
This means instead of loading the entire CSS for the Material Design UI library (e.g., via CDN), you should import just the CSS for the BUTTON and DIALOG components needed for a particular page or view. If you are building components and adopting the CSS-in-JS approach, I guess you’d already have modularized CSS that is delivered by your bundler in chunks.
Inline CSS meant for critical render — preload the rest!
Following the same philosophy of eliminating unnecessary code — especially for CSS, since it has a huge impact on when the user is able to see content — one can argue that CSS meant for the orders page and the shopping cart page qualifies as unused CSS for a user who is just on the homepage and is yet to log in.
We can even push this notion further to say CSS for portions below the fold of the homepage (portions of the homepage the user has to scroll down to see) can qualify as unnecessary CSS for such a user. This extra CSS could be the reason a user on 2G (most emerging markets) or one on slow 3G (the rest of the world most of the time) has to wait one or two more seconds to see anything on your web app even though you shipped minified code!
For best performance, you may want to consider inlining the critical CSS directly into the HTML document. This eliminates additional roundtrips in the critical path and if done correctly can be used to deliver a “one roundtrip” critical path length where only the HTML is a blocking resource.
– Addy Osmani on Critical
Once you have extracted and inlined the critical CSS, you can preload the remaining CSS (e.g., for the other routes of the app) with link-preload. Critical (by Addy Osmani) is a tool you can experiment with to extract and inline critical CSS.
You can also just place such critical-path CSS in a specific file and inline it into the app’s entry point HTML — that is, if you don’t fancy directly authoring the CSS within STYLE tags in the HTML document.
Remove unused CSS
Like cssnano, which plugs into PostCSS to minify CSS code, Purgecss can be used to remove dead CSS code. You can run it as a standalone npm module or add it as a plugin to your bundler. To try it out in our sample project, we will install it with:
npm install @fullhuman/postcss-purgecss --save-dev
If using yarn, we will do :
yarn add @fullhuman/postcss-purgecss -D
Just like we did for cssnano, add a plugin entry for Purgecss after the one for cssnano in our earlier postcss.config.js file, such that the config file looks like the following:
module.exports = {
    plugins: [
        require('cssnano')({
            preset: 'default',
        }),
        require('@fullhuman/postcss-purgecss')({
            content: ['./**/*.html']
        }),
    ],
};
Building our project for production and inspecting its CSS coverage with Chrome DevTools reveals that our purged and minified CSS is now 352B (over 55 percent less CSS code) from the earlier version that was only minified.
Inspecting the new output file, we can see that the .pull-left and .pull-right styles were removed since nowhere in the HTML are we using them as class names at build time.

Again, you want to tread carefully with deleting CSS that these tools flag as unused. Only do so after further investigation shows that they are truly unnecessary.
Design CSS selectors carefully
In our sample project, we might have intended to use the .pull-right and pull-left classes to style a transient state in our app — to display a conditional error message to the extreme left or right hand side of the screen.
As we just saw, Purgecss helped our CSS minifier remove these styles since it detected they were unused. Perhaps there could be a way to deliberately design our selectors to survive preemptive CSS dead code removal and preserve styling for when they’d be needed in a future transient app state.
It turns out that you can do so with CSS attribute selectors. CSS rules for an error message element that is hidden by default and then visible at some point can be created like this:
body [msg-type] {
    width: 350px;
    height: 250px;
    padding: 1em;
    position: absolute;
    left: -999px;
    top: -999px;
    opacity: 0;
    transition: opacity .5s ease-in
}
body [msg-type=error] {
    top: calc(50% - 125px);
    left: calc(50% - 150px);
    opacity: 1
}
While we don’t currently have any DOM elements matching these selectors, and knowing they will be created on demand by the app in the future, the minify process still preserves these CSS rules even though they are marked as unused — which is not entirely true.
CSS attribute selectors help us wave a magic wand to signal the preservation of rules for styling our error message elements that are not available in the DOM at build time.

This design construct might not work for all CSS minifiers, so experiment and see if this works in your build process setup.
Recap and conclusion
We are building more complex web apps today, and this often means shipping more code to our end users. Code minification helps us lighten the size of code delivered to app users.
Just like we’ve done for JavaScript, we need to treat CSS as a first-class citizen with the right to participate in code optimizations for the benefit of the user. Minifying CSS is the least we can do. We can take it further, too, by eliminating dead CSS from our projects.
Realizing that CSS has a huge impact on when the user sees any content of our app helps us prioritize optimizing its delivery.
Finally, adopting a build process or making sure your existing build process is optimizing CSS code is as trivial as setting up cssnano with Parcel or using a few plugins and configuration for webpack or Rollup.
Plug: LogRocket, a DVR for web apps

LogRocket is a frontend logging tool that lets you replay problems as if they happened in your own browser. Instead of guessing why errors happen, or asking users for screenshots and log dumps, LogRocket lets you replay the session to quickly understand what went wrong. It works perfectly with any app, regardless of framework, and has plugins to log additional context from Redux, Vuex, and @ngrx/store.
In addition to logging Redux actions and state, LogRocket records console logs, JavaScript errors, stacktraces, network requests/responses with headers + bodies, browser metadata, and custom logs. It also instruments the DOM to record the HTML and CSS on the page, recreating pixel-perfect videos of even the most complex single-page apps.
Try it for free.
The post The complete best practices for minifying CSS appeared first on LogRocket Blog.


Top comments (1)
A detailed article CSS minification. You must also check these links as well for CSS minification
minifycode.com/css-minifier/
url-decode.com/tool/css-minifier
willpeavy.com/tools/minifier/