
Written by Andrew Evans✏️
Introduction
Traditional APIs focused on REST services with standard endpoints and HTTP verbs like GET, POST, PUT, and DELETE. With the advent of GraphQL, REST now has an alternative that is just as strong and viable for any project.
There is a lot of information available about working with GraphQL, but a common issue is connecting your GraphQL server to your database. Prisma is an excellent tool that greatly simplifies interacting with your database via a GraphQL API.
This post is going to cover some basics about GraphQL, and then show how to use Prisma with your GraphQL instance.
We will be working with a GraphQL project that interacts with a Star Wars character database. This project is available on Github here. I will be walking through this post on a Mac, but as long as you have the Bash Shell installed the commands should be the same.
Additionally, if you want to have a fun way to lookup Star Wars characters for your database, check out the Star Wars databank here.
Some background
GraphQL was originally developed by Facebook in 2012 and consists of a query and manipulation language for APIs. Instead of building traditional request/response models, GraphQL enables you to interact with your application’s data through specific queries. This can be actual queries, or you can update your data using mutations. This is particularly beneficial when you are concerned with efficiency in your APIs, and only retrieving what is necessary.
With GraphQL you build a data schema and resolvers to control what data is returned and how you interact with it. Connecting to the data via a database can get complicated, but that’s where Prisma shines.
Prisma provides a database client for your GraphQL API. This client makes your life as a developer significantly easier because it autogenerates the basic database commands for you.
The Prisma CLI will even spin up a database within a docker container with just a few commands. Prisma currently supports TypeScript, JavaScript, Flow, and Go.
In the next sections, we will be creating a GraphQL API that interacts with a Star Wars character database. We will first set up the GraphQL API, and then connect it to a database with Prisma.

GraphQL set up
To start, go to your terminal and let’s create a folder and initialize a project with the following:
mkdir starwars-graphql
cd starwars-graphql
yarn init -y
(NOTE: we’re using yarn here but you can just as easily use npm)
This just creates a basic package.json and then enables you to have a workspace to start creating your GraphQL server.
Now let’s create a source directory with the traditional index.js file for your server:
mkdir src
touch src/index.js
Next, install the graphql-yoga package to automate creating a full instance of GraphQL:
yarn add graphql-yoga
Now that we’ve got our dependencies, let’s add the following:
- Type Definition = defines our data and operations
- Resolvers = ways to handle the GraphQL queries of our data
- Server = formal instantiation of our GraphQL instance
In your index.js file go ahead and add the following:
const { GraphQLServer } = require('graphql-yoga')

// Type Definition
const typeDefs = `
type Query {
  character: String!
}
`

// Resolvers
const resolvers = {
  Query: {
    character: () => `The force is strong with this API!`
  }
}

// Server
const server = new GraphQLServer({
  typeDefs,
  resolvers,
})
server.start(() => console.log(`Server is running on http://localhost:4000`))
Now let’s go ahead and test your GraphQL instance with the following:
node src/index.js
This should start up your server at http://localhost:4000. If you open your browser to that port you should see something like this:

What is this? This is the GraphQL Playground. The GraphQL Playground enables you to interact with your GraphQL server locally. In the panel on the left, you can put queries that will directly interact with your data. You can also open the schema on the right which shows the data this server is expecting (more on that in a second).
For the purposes of our initial test, go ahead and copy and paste the following into the left panel and click the little arrow to run your first query:
query {
  character
}
Once you’ve run your query you should see the following:

What did this do? It just ran your first GraphQL query!
Now let’s look at the code line by line:
// Type Definition
const typeDefs =
`type Query {
  character: String!
}`;
The typeDefs set up how you are interacting with your data, and this is also known as the GraphQL Schema. In this case, the data is very simple, and only has a field called character that is a string. The exclamation mark (!) means the character field will not return a null value.
A GraphQL schema determines the behavior of your API and uses special root types. These root types are special values that GraphQL uses to determine how the API interacts with the data.
The three different root types commonly used are:
- Query = selecting data
- Mutation = changing data
- Subscription = subscribing to a stream of data
NOTE: For our project, we are just going to be creating a query and a mutation. For more on subscription, please refer to the GraphQL blog post here.
// Resolvers
const resolvers = {
  Query: {
    character: () => `The force is strong with this API!`
  }
};
The resolver determines how the response is handled from your type definitions. In this case whenever a query is created for character the string “the force is strong with this API!” is returned.
How to set up our Star Wars GraphQL server
So for our Star Wars GraphQL server, we are going to be interacting with a database of characters with the following fields:
- name
- species
- affiliation (Rebel Alliance or Empire)
- weapon
Let’s first change our typeDefs section to reflect a character object with the following:
// Type Definition
const typeDefs = `
type Query {
  characters: [Character!]!
}

type Character {
  name: String!,
  species: String!,
  affiliation: affiliation!
  weapon: String!
}

enum affiliation {
  REBEL_ALLIANCE,
  EMPIRE
}`;
Note for more info on GraphQL types and fields, please check out the official documentation here.
So what did this do? Let’s go section by section.
type Query {
  characters: [Character!]!
}
First, we defined what our query will look like. Here, a query with the value “characters” will return an array of Character objects. The exclamation mark (!) indicates that the return type will not be null.
type Character {
  name: String!,
  species: String!,
  affiliation: affiliation!
  weapon: String!
}
Next, we define our character object.
enum affiliation {
  REBEL_ALLIANCE,
  EMPIRE
}
Finally, we define an enum of possible affiliation values (in this case either the Rebel Alliance or Empire).
Now with the Query and Object definitions set up, let’s define resolvers to handle the actual query.
Replace the resolvers section from above with the following:
// local storage of characters, this will be moved later
const characters = [
  {
    name: "Han Solo",
    species: "Human",
    affiliation: "REBEL_ALLIANCE",
    weapon: "blaster rifle"
  },
  {
    name: "Chewbacca",
    species: "Wookie",
    affiliation: "REBEL_ALLIANCE",
    weapon: "bowcaster"
  }
];

// resolving queries
const resolvers = {
  Query: {
    characters: () => characters
  },
  Character: {
    name: parent => parent.name,
    species: parent => parent.species,
    affiliation: parent => parent.affiliation,
    weapon: parent => parent.weapon
  }
};
What did this do?
// local storage of characters, this will be moved later
const characters = [
  {
    name: "Han Solo",
    species: "Human",
    affiliation: "REBEL_ALLIANCE",
    weapon: "blaster rifle"
  },
  {
    name: "Chewbacca",
    species: "Wookie",
    affiliation: "REBEL_ALLIANCE",
    weapon: "bowcaster"
  }
];
First, we define a local storage version of our characters. We are going to be retrieving those directly from the database once we get Prisma set up. Here we are just defining them in a local array so we can build the basics of our server before connecting with Prisma.
// resolving queries
const resolvers = {
  Query: {
    characters: () => characters
  },
  Character: {
    name: parent => parent.name,
    species: parent => parent.species,
    affiliation: parent => parent.affiliation,
    weapon: parent => parent.weapon
  }
};
Next, we define a resolver for our query to select the characters. Why are we using parent here? This is so GraphQL can resolve the nested query.
Basically, we first had to define for the Query operation to return a characters array. Using the parent field here, we are saying that for every record from the characters array lets pull back the corresponding character fields.
Now go ahead and restart your server with node src/index.js .
Open up http://localhost:4200 to open the GraphQL Playground.
Copy the following query into the playground:
query {
  characters {
    name
    species
    affiliation
    weapon
  }
}
Run your query and you should see something like this:

Note: If you saw an error about null fields (or something to that effect), it just means that GraphQL was unable to return a value based on your query. You probably just have a syntax error, and I’d recommend just consulting the final GitHub project to make sure your code matches.
If you click on the SCHEMA button you will see the values that we’ve defined above. This is a great way to validate what GraphQL is looking for.

Changing the data with a mutation
So just to review, there are three different root fields that are commonly used:
- Query = selecting data
- Mutation = changing data
- Subscription = subscribing to a stream of data
So far we have set up a Query that we can apply to an array in memory. Now let’s write a Mutation that will enable you to update the array of values and create a character.
Add the following to the typeDefs section:
type Mutation {
  post(name: String!, species: String!, affiliation: affiliation!, weapon: String!): Character!
}
This is saying that for a post with the associated arguments (name, species, affiliation, and weapon, create a Character object.
Next in the resolvers add a function to handle the Mutation operation with the following:
Mutation: {
  post: (parent, args) => {
    const character = {
      name: args.name,
      species: args.species,
      affiliation: args.affiliation,
      weapon: args.weapon
    };
    characters.push(character);
    return character;
  }
}
What this is saying is that for a mutation , create a character with the args provided and push it to the characters array.
If you go and run your server with node src/index.js , then open the GraphQL IDE in the browser at localhost:4000.
In the GraphQL IDE run the following command:
mutation {
  post(
    name: "Darth Vader"
    species: "Human",
    affiliation: EMPIRE,
    weapon: "lightsaber"
  ) {
    name
  }
}
Now go ahead and run the query we created before and you should see something like the following:

Then if you comment out the mutation and run the original Query, you should see the array updated with the value for “Darth Vader” here:

Congratulations! You now have a mutation setup for your GraphQL server!
Creating a Prisma client
What is Prisma? As mentioned in the intro, Prisma provides a client that GraphQL can use to interact with your database.
Why is this important? When you use GraphQL, you will want to connect your server to an actual database. Database access requires building direct SQL queries or using a traditional Object-Relational Mapping (ORM) to interact with the database. SQL Queries are error-prone as they have to be sent over as strings. ORMs typically are very simplistic and difficult to scale to properly work with complex applications.
_ …enter Prisma _
Prisma takes care of the challenge of connecting your server to your database through (1) a generated client and (2) a server that translates your GraphQL calls into commands for your database.
The resulting flow should look like the following:

The generated client becomes part of your GraphQL server and serves as the means for translating your queries, mutations, and subscriptions into database calls.
Prisma has a CLI which makes this whole process very easy. For our project, we’re going to use the Prisma CLI to stand up a demo database that’s hosted with AWS Aurora DB.
So let’s get started!
First, let’s create a Prisma directory in the project:
mkdir prisma
touch prisma/prisma.yml
touch prisma/datamodel.prisma
Open the datamodel.prisma file and add the following:
type Character {
  id: ID! @id
  name: String!
  species: String!
  affiliation: affiliation!
  weapon: String!
}

enum affiliation {
  REBEL_ALLIANCE
  EMPIRE
}
This defines the Character object for Prisma. If you notice we created the @id value here, this is so that every record created with Prisma is unique. Prisma will automatically generate the ID value for us, with each new record.
Next, open the prisma.yml file and add the following:
# HTTP Endpoint
endpoint: ""

# location of the datamodel file
datamodel: datamodel.prisma

# identifiy the language and location of the Prisma Client
generate:
  - generator: javascript-client
    output: ../src/generated/prisma-client
This file does the following:
- identifies the HTTP endpoint for your client (note this will be filled out by the CLI when we run the
deploycommand) - defines the location of the
datamodelfile - defines the application language
- defines the location of the (generated) Prisma Client
Now we’re ready to actually build the client so let’s install the Prisma CLI globally with:
yarn global add prisma
Once that completes, we’ll need to generate the Prisma Client code. Any of the commands with the Prisma CLI are prefixed with prisma, and will result in you answering the prompts with information about database type, location, etc.
In your terminal, go to the project’s root and run the following:
prisma deploy
In your terminal, select “Demo server + MySQL database” to enable Prisma to build you a demo in the cloud (it’s free). You’re terminal should look similar to the following:

Now with the infrastructure deployed into the cloud, you can generate the Prisma Client which will be used by your GraphQL API by running the following (at the project’s root):
prisma generate.
Now the Prisma Client is setup, and your Prisma Server is deployed.
In order to work with our Prisma Client, we will need to install the prisma-client-lib package with: yarn add prisma-client-lib
Once you’ve got the client library installed, you can test creating a record on your database instance by running the following (saved in the sample project as prisma_client.js):
const { prisma } = require("./generated/prisma-client");

async function main() {
  // Create a new character
  const newCharacter = await prisma.createCharacter({
    name: "Luke Skywalker",
    species: "Human",
    affiliation: "REBEL_ALLIANCE",
    weapon: "lightsaber"
  });
  console.log(
    `Created new character: ${newCharacter.name} (ID: ${newCharacter.id})`
  );

  const allCharacters = await prisma.characters();
  console.log(allCharacters);
}

main().catch(e => console.error(e));
Once you’ve run this code, you can also view it in the Prisma Console if you go to https://app.prisma.io/.
Running the prisma_client.js should result in something like the following:

Then if you go to your browser at https://app.prisma.io/, you can look directly at the data we were just working with:


Congratulations on getting the client setup! 🎉
Connecting to the Prisma Client
So the last step is to connect our GraphQL server to our generated Client. The prisma_client.js file is a standalone file that runs to directly add values to the database. We want to use the query and mutation we created before to interact directly with our database.
First, open our server file at src/index.js and add a line to pull in the Prisma Client.
const { prisma } = require("./generated/prisma-client");
Then at the bottom of the server file let’s redefine our server instance with the following:
// Server
const server = new GraphQLServer({
  typeDefs,
  resolvers,
  context: { prisma }
});
server.start(() => console.log(`Server is running on http://localhost:4000`));
If you notice here we are defining a context object which is essentially our Prisma Client. We didn’t have this before because we were just running this in memory. Defining the context as our Prisma Client here enables all of the requests to use the same connection to our Prisma server and stood up the database. For more on context objects in GraphQL please consult the documentation here.
Finally, let’s change our resolvers in the src/index.js file to be the following:
// // local storage of characters, this will be moved later
// const characters = [
//   {
//     name: "Han Solo",
//     species: "Human",
//     affiliation: "REBEL_ALLIANCE",
//     weapon: "blaster rifle"
//   },
//   {
//     name: "Chewbacca",
//     species: "Wookie",
//     affiliation: "REBEL_ALLIANCE",
//     weapon: "bowcaster"
//   }
// ];

// resolving queries
const resolvers = {
  Query: {
    characters: (root, args, context, info) => {
      return context.prisma.characters();
    }
  },
  Mutation: {
    post: (root, args, context) => {
      return context.prisma.createCharacter({
        name: args.name,
        species: args.species,
        affiliation: args.affiliation,
        weapon: args.weapon
      });
    }
  }
};
What is this doing? This modified the query and mutation to point to the Prisma Client and server in lieu of our local array. Also, comment out our characters array as you see here since we won’t need them now.
So now that everything’s set up, lets go ahead and restart our server with node src/index.js and then open the GraphQL Playground at https://localhost:4000.
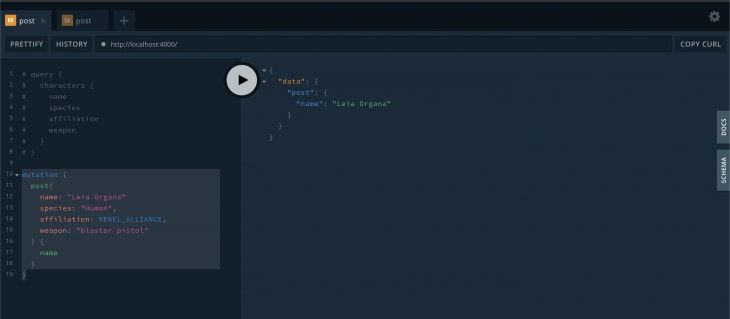
Run the following mutation to write a value into our database:
mutation {
  post(
    name: "Leia Organa"
    species: "Human",
    affiliation: REBEL_ALLIANCE,
    weapon: "blastor pistol"
  ) {
    name
  }
}
You should see the following:
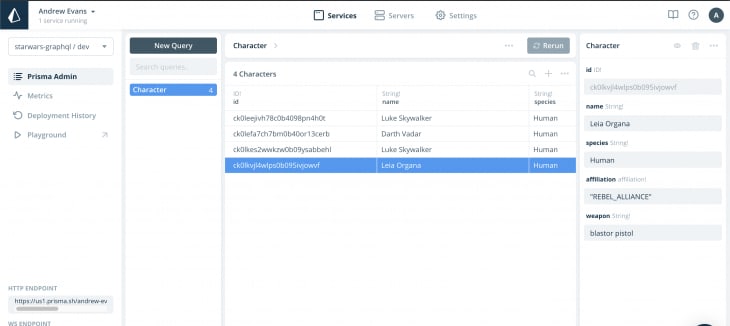
Then run the Query to see that Leia is in our database:

NOTE: I had added some of the characters during testing, so you might have slightly different results here. The important thing is that Leia is on the list.
And you can pull up the Prisma Client site to see the record populated in your database as well:
You’ve now connected our GraphQL server to the database!
NOTE: At this point, you could also refactor the application. Typically larger applications have places for a resolvers file and a definitions file (instead of defining them all in one place). Here our API was really simple so I left the file as is.
Conclusion
So with this post, we learned some basics about GraphQL, and also how to use the powerful tool Prisma. We built a query and a mutation of a GraphQL server. We also learned about the GraphQL Playground. I hope this post has helped to get started with GraphQL and helped get your feet wet with development.
GraphQL is a really powerful technology that makes applications both efficient and easy to work with. Prisma is also a very useful tool that greatly simplifies building your GraphQL applications.
The next steps from this project would be to consider actually deploying your GraphQL server instance, and building a front-end client that could call your API.
Prisma also has a lot of features that we didn’t cover here. I highly recommend checking out their website and looking at their examples.
Feel free to leave comments, and follow me on Twitter at @AndrewEvans0102!
Editor's note: Seeing something wrong with this post? You can find the correct version here.
Plug: LogRocket, a DVR for web apps

LogRocket is a frontend logging tool that lets you replay problems as if they happened in your own browser. Instead of guessing why errors happen, or asking users for screenshots and log dumps, LogRocket lets you replay the session to quickly understand what went wrong. It works perfectly with any app, regardless of framework, and has plugins to log additional context from Redux, Vuex, and @ngrx/store.
In addition to logging Redux actions and state, LogRocket records console logs, JavaScript errors, stacktraces, network requests/responses with headers + bodies, browser metadata, and custom logs. It also instruments the DOM to record the HTML and CSS on the page, recreating pixel-perfect videos of even the most complex single-page apps.
Try it for free.
The post Intro to GraphQL with Prisma appeared first on LogRocket Blog.


Top comments (1)
Any reason they used yoga instead of the new apollo server?