
Written by Olasunkanmi John Ajiboye✏️
There are quite a few frameworks that make it easy to create a REST API by reducing the number of boilerplates. I personally prefer Rust because it is simple, strongly typed, extremely fast, and safer than almost any language out there.
In this tutorial, we’ll demonstrate how to write simple endpoints, handle errors, maintain a connection to the database, persist data to Postgres DB, and, eventually, handle the request-response cycle.
I chose the Actix web 2.0 framework because it’s one of the most popular, has great documentation, and uses patterns similar to TypeScript Express in Node.js. Other popular alternatives include Rocket and Tower. Our persistence layer will consist of Postgres with Diesel as the ORM and query builder.
Before we dive into coding, let’s take establish what we’ll be building and some fundamental requirements and assumptions. We’ll create all the CRUD API endpoints for employee management applications. This will be a bare-bones project designed to demonstrate all the fundamental building blocks for writing APIs in Rust.

Requirements
To proceed with this tutorial, you’ll need a basic understanding of API development. You must at least understand the concept of CRUD.
I’ve written this guide to be easily understood by anyone with a basic understanding of the Rust language. To paint a clearer picture, I’ll compare it to Node.js throughout the article.
Now let’s get started!
Setup and important concepts
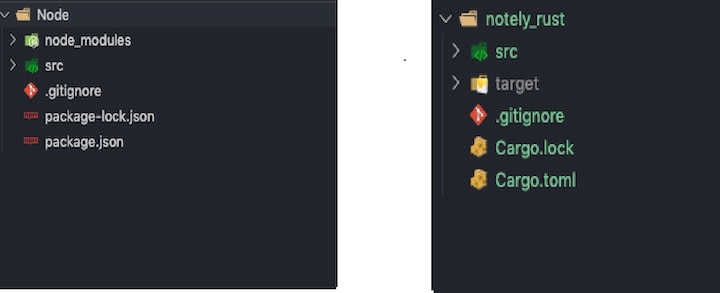
First, let’s go over how to set up a basic Rust project, folder structures, dependencies, etc. If you’re coming from a Node.js background. you’ll already be familiar with npm as the package management and registry. The equivalent in Rust is called cargo.
When you initiate a Node project with npm init, you get a package.json. This is where all your dependencies live. It can be updated with new dependencies from the npm registry.
Unfortunately, as of the time of writing, cargo does not have a way to update dependencies automatically. You need to manually write out the name and version of the dependency in the Cargo.toml, which is the equivalent of package.json.
Below is a comparison between a bare-bones Node project with npm and a Rust project with Cargo.
Getting started
If you don’t have Rust installed, follow the installation guide. Otherwise, create a new project.
cargo new emply
Basically, we asked rust cargo — just like we would with node’s npm — to scaffold a new project called emply.
Let’s set up a very basic route handler to ensure that everything works before moving forward.
First, navigate to the emply directory and add the dependencies inside Cargo.toml. Since we’ll be using Actix, add it’s dependencies by pasting the following under dependencies inside Cargo.toml.
Inside main.rs, which is the entry point for the application, pull in the actix crate. Per the Actix documentation, you’ll end up with code like this:
use actix_web::{web, App, HttpRequest, HttpServer, Responder};
async fn welcome(request: HttpRequest) -> impl Responder {
    let name = request.match_info().get("name").unwrap_or("World");
    format!("Hello {}!", &name)
}
#[actix_rt::main]
async fn main() -> std::io::Result<()> {
    HttpServer::new(|| {
        App::new()
            .route("/", web::get().to(welcome))
            .route("/{name}", web::get().to(welcome))
    })
    .bind("127.0.0.1:8000")?
    .run()
    .await
}
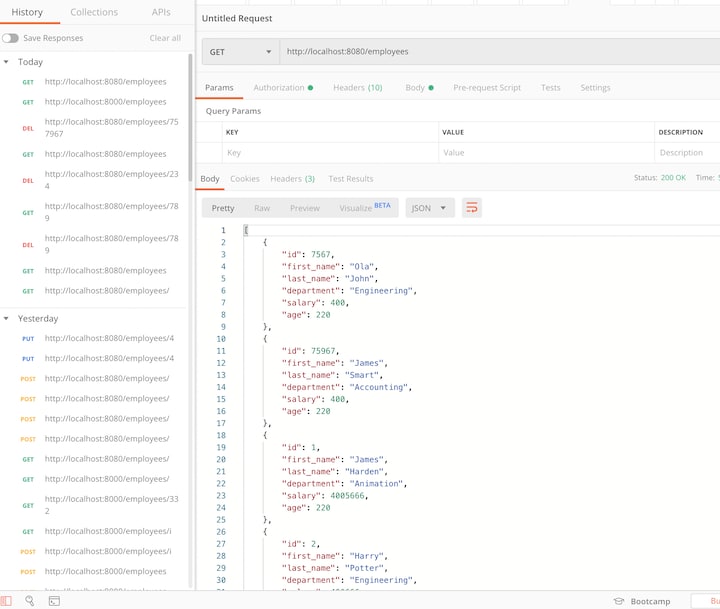
Here we brought the actix crate into scope within main.rs. The async function accepts the request parameter and returns “Welcome” if there is no request parameter. This is what we did with get("name").unwrap_or("World") from request.match_info. Now if you open postman and navigate to localhost:8000, you should see the text “Hello World.” Similarly, localhost:8000/Ola John will return “Welcome Ola John” where “Ola John” is a request parameter.
Watching for change
Try changing the name param in the request, and you’ll find that the response doesn’t change. That’s because, by default, you need to rebuild the code every time.
In Node, you’d fix this problem by watching for changes with nodemon. In Rust, you’d use cargo-watch to watch for changes and automatically rebuild your code after there is a change.
It’s also important to keep the connection open while your code recompiles. Imagine a situation in which a request is sent to your API during compilation, and the REST client just breaks off without any useful information. To ensure that the connection remains open and that we can respond to a request as soon as recompilation is complete, we’ll introduce the systemfd crate by running the following.
cargo install systemfd cargo-watch
Now run the code in watch mode so you don’t have to kill and restart the server after every modification.
systemfd --no-pid -s http::PORT -- cargo watch -x run
Creating the API endpoints
Now that you have the initial setup running and can confirm the modest server is up, you can proceed to create real API endpoints. Since your API will be communicating over HTTPS via JSON, you’ll need the ability to serialize and deserialize the JSON objects from and to the server.
For this, you’ll need to add another dependency called Serde. Since you’re running cargo-watch, you don’t need to rebuild; Cargo recompiles automagically.
[dependencies]
[dependencies]
actix-web = "2.0"
actix-rt = "1.0"
listenfd = "0.3"
serde = "1.0"
serde_json = "1.0"
First, define a model for the employees. In the src folder, create a directory named employees. Create a model.rs file and add the model as a struct.
// src/user/model.rs
use serde::{Deserialize, Serialize};
#[derive(Deserialize, Serialize)]
pub struct Employee {
    pub id: i32,
    pub first_name: String,
    pub last_name: String,
    pub department: String,
    pub salary: i32,
    pub age: i32,
}
Here we imported the serde crate’s Serialize and Deserialize annotations, respectively, which are responsible for converting our model from and to JSON. This is similar to what you’d do with body-parser in Node.
Creating routes for our API
Next, you’ll need to persist your data and respond to clients’ CRUD requests when they hit your endpoints. At first, you can respond with hardcoded data to make sure things work, then add persistence with postgres.
Create a route.rs file inside the employees directory.
use crate::note::Note;
use actix_web::{delete, get, post, put, web, HttpResponse, Responder};
use serde_json::json;
#[get("/employees")]
async fn find_all() -> impl Responder {
    HttpResponse::Ok().json(vec![
        Employee {
            id: 1,
            first_name : "Ola".to_string(),
            last_name: "John Ajiboye".to_string(),
           department: "Engineering".to_string(),
           salary: 4500,
           age: 23
        },
       Emoloyee {
             id: 2,
            first_name : "James".to_string(),
            last_name: "Bond".to_string(),
           department: "Accounting".to_string(),
           salary: 3500,
           age: 43
        },
    ])
}
#[get("/employees/{id}")]
async fn find() -> impl Responder {
    HttpResponse::Ok().json(Employee {
       id: 2,
            first_name : "James".to_string(),
            last_name: "Bond".to_string(),
           department: "Accounting".to_string(),
           salary: 3500,
           age: 43
    })
}
pub fn init_routes(config: &mut web::ServiceConfig) {
    config.service(find_all);
    config.service(find);
}
Here we simply created endpoints for \employees and \employees{id}. As of now, you’ll always get the same data back from these endpoints because you hardcoded the data without any persistence.
Your next task is to connect to a real database and expose the model as a crate to other programs within your application outside the employees directory. For this, you’ll need to create a mod.rs file.
// src/employees/mod.rs
mod model;
mod routes;
pub use model::*;
pub use routes::init_routes;
Here we imported the model and routes. Then, with the pub keyword, we made them public outside of the employees folder. It’s important to note that we exposed everything within the model by using * in line 4. We only made the init_routes public from the routes crate.
Now, bind your routes inside main.rs and bring the employees crate into scope with mod employees. Nothing has changed except that you’re replacing your dummy endpoints with a more dynamic mapping, which happens within route.rs. This is what we have in line 9:
App::new().configure(employees::init_routes)
Data persistence with Postgres
If you test all the endpoints with any of the HTTP verbs, it should work. However, you’re only returning hardcoded dummy data. A bunch of API endpoints without the ability to persist data is not really interesting.
Our next task is to persist clients’ data into a database, giving them the ability to retrieve, modify, and delete that data.
For this project, we’ll use postgres. To make queries and interactions with Postgres easier, we’ll use Diesel as our ORM and query builder. Diesel, which claims to be “the most productive way to interact with databases in Rust because of its safe and composable abstractions over queries,” has two major dependencies that you’ll need to have installed before you can use its CLI: openssl and the postgres library itself.
After you install those dependencies, install the Diesel CLI.
install diesel_cli --no-default-features --features postgres
The --features postgres postgres flag indicates to Diesel that you are only interested in using the postgres ORM.
You’ll also need to add Diesel to your list of dependencies.
[dependencies]
diesel = { version = "1.0.0", features = ["postgres"] }
Now that you have your dependencies updated, it’s time to set up Diesel in your project. It’s important to specify the database URL.
diesel setup
diesel migration generate create_employees
With these commands, Diesel will create a migration folder. You should have another folder inside the migration folder that contains up.sql and down.sql. up.sql creates a schema for the employees, while down.sql reverts everything done by up.sql or just drops the whole table.
Creating the employees schema and data table
Inside src/migrations/~/up.sql, create a table named employees to hold data for your notes.
// up.sql

sql
CREATE TABLE "employees"
(
id SERIAL PRIMARY KEY,
firstname VARCHAR NOT NULL,
lastname VARCHAR NOT NULL,
department VARCHAR NOT NULL,
salary INT NOT NULL,
age INT NOT NULL,
)
Now that you’ve created the employees migration, it’s time to run it with the Diesel CLI. This should create a schema file that will be used to build SQL queries. Run diesel migration to create the schema.
diesel migration run
If you run the above command, you’ll get an error asking for a database URL. For this, you’ll need to add a .env to handle your environment variables.
DATABASEURL=postgres://postgres:password@localhost/employeesrest_api
This will tell Diesel the location of your database. In the root of the project, create a .env file. By default, the schema is created inside src/schema.rs.
Database connection
Now it’s time to create a database connection for data persistence. Create db.rs. Upon connecting the database, you can now connect your CRUD operations to it. Update the model to reflect this.
js
use crate::db;
use crate::error_handler::CustomError;
use crate::schema::employees;
use diesel::prelude::*;
use serde::{Deserialize, Serialize};
#[derive(Serialize, Deserialize, AsChangeset, Insertable)]
#[table_name = "employees"]
pub struct Employee {
    pub first_name: String,
    pub last_name: String,
    pub department: String,
    pub salary: i32,
    pub age: i32,
}
#[derive(Serialize, Deserialize, Queryable, Insertable)]
#[table_name = "employees"]
pub struct Employees {
    pub id: i32,
    pub first_name: String,
    pub last_name: String,
    pub department: String,
    pub salary: i32,
    pub age: i32,
}
impl Employees {
    pub fn find_all() -> Result<Vec, CustomError> {
        let conn = db::connection()?;
        let employees = employees::table.load::(&conn)?;
        Ok(employees)
    }
    pub fn find(id: i32) -> Result<Self, CustomError> {
        let conn = db::connection()?;
        let employee = employees::table.filter(employees::id.eq(id)).first(&conn)?;
        Ok(employee)
    }
    pub fn create(employee: Employee) -> Result<Self, CustomError> {
        let conn = db::connection()?;
        let employee = Employee::from(employee);
        let employee = diesel::insert_into(employees::table)
            .values(employee)
            .get_result(&conn)?;
        Ok(employee)
    }
    pub fn update(id: i32, employee: Employee) -> Result<Self, CustomError> {
        let conn = db::connection()?;
        let employee = diesel::update(employees::table)
            .filter(employees::id.eq(id))
            .set(employee)
            .get_result(&conn)?;
        Ok(employee)
    }
    pub fn delete(id: i32) -> Result<usize, CustomError> {
        let conn = db::connection()?;
        let res = diesel::delete(employees::table.filter(employees::id.eq(id))).execute(&conn)?;
        Ok(res)
    }
}
impl Employee {
    fn from(employee: Employee) -> Employee {
        Employee {
            first_name: employee.first_name,
            last_name: employee.last_name,
            department: employee.department,
            salary: employee.salary,
            age: employee.age,
        }
    }
}
Let’s examine what’s happening in model.rs. We added an Employee struct as an Insertable, which is used to INSERT into the database. You’ll notice that this does not have an id property since this is automatically generated.
We also implemented this as a trait. In find_all, for instance, like all other methods, we connected the database with let conn = db::connection()?;.
The next line —
let employees = employees::table.load::(&conn)?;
— is equivalent to saying, “Connect to postgres and execute the below SQL.”
sql
SELECT * FROM employees
The above line is equivalent to:
rs
employees::table.load
We then stored the response as a JSON under employees. The expected response is an enum of type pub enum Result<T, E> — that is, result or error. We return an Option with the employee JSON. The logic is similar to all the other methods, which correspond to one HTTP verb.
You also need to replace the hardcoded route with routes operating on your postgres database.
js
use crate::employees::{Employee, Employees};
use crate::error_handler::CustomError;
use actix_web::{delete, get, post, put, web, HttpResponse};
use serde_json::json;
#[get("/employees")]
async fn find_all() -> Result<HttpResponse, CustomError> {
    let employees = Employees::find_all()?;
    Ok(HttpResponse::Ok().json(employees))
}
#[get("/employees/{id}")]
async fn find(id: web::Path) -> Result<HttpResponse, CustomError> {
    let employee = Employees::find(id.into_inner())?;
    Ok(HttpResponse::Ok().json(employee))
}
#[post("/employees")]
async fn create(employee: web::Json) -> Result<HttpResponse, CustomError> {
    let employee = Employees::create(employee.into_inner())?;
    Ok(HttpResponse::Ok().json(employee))
}
#[put("/employees/{id}")]
async fn update(
    id: web::Path,
    employee: web::Json,
) -> Result<HttpResponse, CustomError> {
    let employee = Employees::update(id.into_inner(), employee.into_inner())?;
    Ok(HttpResponse::Ok().json(employee))
}
#[delete("/employees/{id}")]
async fn delete(id: web::Path) -> Result<HttpResponse, CustomError> {
    let deleted_employee = Employees::delete(id.into_inner())?;
    Ok(HttpResponse::Ok().json(json!({ "deleted": deleted_employee })))
}
pub fn init_routes(config: &mut web::ServiceConfig) {
    config.service(find_all);
    config.service(find);
    config.service(create);
    config.service(update);
    config.service(delete);
}
Now it’s time to put everything together. You now have a dbconnection, an error handler, models, and the route handler. Import these crates inside main.rs. lazy_static has been implemented for pooling the database. Now update the main.rs to tie all this together.
Let’s test that everything works as expected. If you run the cargo watch command we went over earlier, you should be able to create, read, update, and delete (CRUD) an employee from the database through your API endpoints.
See the full code referenced in this tutorial on GitHub.
Conclusion
You should now understand how to create API endpoints and handle a simple request response cycle in Rust using Actix. We covered how to build endpoints to handle the fundamental CRUD operations, manage data persistence with Diesel as the postgres ORM, and handle and respond to errors with an error handler.
What I really like about building APIs with Rust is that it enforces good practices by engaging you to think critically about your code. If your code compiles, it is virtually guaranteed to do what it is intended to do.
For a deeper dive, refer to the finished GitHub repo.
Plug: LogRocket, a DVR for web apps

LogRocket is a frontend logging tool that lets you replay problems as if they happened in your own browser. Instead of guessing why errors happen, or asking users for screenshots and log dumps, LogRocket lets you replay the session to quickly understand what went wrong. It works perfectly with any app, regardless of framework, and has plugins to log additional context from Redux, Vuex, and @ngrx/store.
In addition to logging Redux actions and state, LogRocket records console logs, JavaScript errors, stacktraces, network requests/responses with headers + bodies, browser metadata, and custom logs. It also instruments the DOM to record the HTML and CSS on the page, recreating pixel-perfect videos of even the most complex single-page apps.
Try it for free.
The post How to create an API with Rust and Postgres appeared first on LogRocket Blog.


Top comments (0)