
Written by Obinna Ekwuno✏️
In the world of JavaScript, a new framework comes out every day and the idea behind such advancements are almost always the same but with a few very significant improvements. Modern component-based frameworks include ReactJS, VueJS, EmberJS, Angular, and many more.
In this article, we will be looking at one of these new frameworks, known as SvelteJS. Which builds on the of the basic knowledge of HTML, CSS, and JavaScript, to give a unique and understandable approach to building platforms for the web.
Svelte serves as a middle ground, a way to get started with the fundamentals while getting used to modern concepts like component-driven development, scoped vs. cascading CSS, templating, declarative functions, etc.
Prerequisites
Before we go any further, this article assumes the following:
- Node.js ≥v6 is installed on your machine
- npm is installed on your machine
- Familiarity with HTML, CSS, and JavaScript
- A basic understanding of component-based frameworks like, ReactJS is good but not required

The difference between Svelte and component-based frameworks
Svelte is more understandable for those who are new to coding and it avoids getting lost in a world of hot reloads and components because it allows for application of DOM type manipulation. Svelte compiles all the generated files down to a single file (bundle.js). Svelte is a framework, meaning it doesn’t work with the virtual DOM but writes code that surgically updates the DOM when the state of your app changes.
Building a bookstore app with Svelte
Getting started
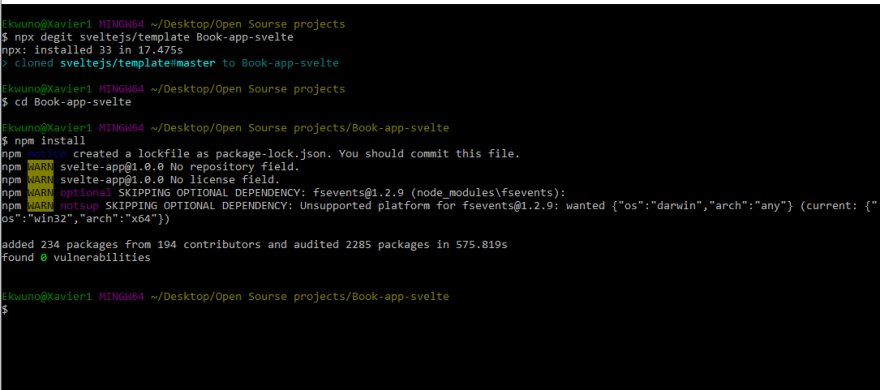
There are several ways to get Svelte up and running for a project. You can read more about the many ways to get started here. For the purpose of this article, we will be working with degit which is a software scaffolding tool. To start, run the following commands:
- npx degit sveltejs/template {project name }: In this case I am calling it Book-app-svelte
npx degit sveltejs/template Book-app-svelte
- Cd into project directory
- Run npm install
- Run the application by running
npm run dev
After setting up, in the main.js , we should see a “hello world” that renders into the app.svelte – this would be a good time to note that components in Svelte are saved with .svelte extension.
import App from './App.svelte';
const app = new App({
    target: document.body,
    props: {
        name: 'world'
    }
});
export default app;
The above code shows a simple set-up with the app component accepting a prop of name and targets a place in the HTML file.
In the app.svelte we can see some sort of VueJS format:
<script>
    export let name;
</script>
<style>
    h1 {
        color: purple;
    }
</style>
<h1>Hello {name}!</h1>
This is where the main.js gets handled by exporting the name variables to allow it to be manipulated from outside.
Creating a dynamic book component
When creating our components, there are a few things that are noteworthy about SvelteJS:
- Styles are scoped within components – so a
h1styled in one component will not affect another in a different component - We can define functions that are connected dynamically
In this section, we will be looking at creating a dynamic event with Svelte and linking the book.svelte component with app.svelte and passing props.
The first step is setting up the book component and exporting variables which can be set from the parent tag in app.svelte:
<script>
    export let bookTitle;
    export let bookPages;
    export let bookDescription;
</script>
<style>
    div{
        margin: 1rem;
        box-shadow: 0 2px 8px rgba(0, 0, 0, 0.26)
    }
    h1{
        font-size: 1.25rem;
        margin: 0.25rem 0;
    }
    h2{
        font-size: 1rem;
        margin: 0.25rem 0;
        color: aqua;
    }
    p{
        margin: 0.25rem 0;
    }
    button{
        font : larger;
        padding: 0.15rem 0.5rem;
        background-color: #1b1a1a;
        border: 1px solid  aliceblue ;
        cursor: pointer;
        color: white;
    }
</style>

<div>
    <h1> {bookTitle} </h1>
    <h2> {bookPages}</h2>
    <p> {bookDescription}</p>
    <button> Add </button>
</div>
From the code block above, we can see that we have variables that are being dynamically passed to the tags in the div . They have their values coming from the app.svelte which we will see next and where most of the dynamic manipulations happen.
In the app.svelte we have imported the book component and this is where we will do a lot of the dynamic manipulation.
<script>
    import Book from './book.svelte'
    let title = '';
    let pages = 0;
    let description = '';
    function setTitle(event){
        title = event.target.value;
    }
</script>
<style>
    h1 {
        color: purple;

    }
    section{
        margin: auto;
        width :30rem;

    }
    label,input,textarea{width: 100%}
</style>
<section>
    <div>
        <label for="title">Title</label>
        <input type="text" id="title" value={title} on:input={setTitle}/>
    </div>
    <div>
        <label for="pages"> pages</label>
        <input type="number" id="price" value={pages} bind:value={pages}/>
    </div>
    <div>
        <label for="description">Description</label>
        <textarea rows="3" id="description" bind:value ={description}/>
    </div>
</section>
<Book bookTitle={title} bookPages={pages} bookDescription={description}/>
From the code example above, we can see that inside our script tag, we have also set variables to empty “ ”. These are the values that are automatically updated, we can also notice a function setTitle , this function is used to set a title to target the object that calls it within the on:.
Note that we call the function without parenthesis because we don’t want it immediately executed. Instead, we are trying to set up a refers so that Svelte can call the function on every keystroke.
We use the on: to add event listeners in Svelte. We can use this to listen to the input event, and the curly braces are used to show dynamic input. Since the function we have uses two-way binding, we can use it on other tags using the bind: This binds the value property then binds to the price variable. We also do this for the description.
Finally passing back to Book tag is the part where we update the props being exported in the book component. We do this by dynamically passing the values of title, pages, and descriptions using curly braces {}.
Displaying book information
Now that we have the card updating when we input value, the next step is to make sure that we are able to add books to our bookstore. The first thing we have to do is make our button a standalone component, in order to be able to use it in the other two components. We do this by creating a button.svelte and importing it to the book and app component respectively.
<style>
  button{
        font : larger;
        padding: 0.15rem 0.5rem;
        background-color: #1b1a1a;
        border: 1px solid  aliceblue ;
        cursor: pointer;
        color: white;
    }

</style>


<button on:click >
    <slot/>
</button>
You might notice an on:click attribute in the button tag, this is used to trigger the event listener in the original calling of the button so that other importations can be able to actually work with the onclick event.
Eg. : app.svelte
<Button on:click={addBook}>ADD Book</Button>
This engages with an addBook function that allows the button to add books dynamically to an array:
let books =[]

function addBook(){
        const newBook = {
            title : title,
            pages : pages,
            description: description
        };
        books = books.concat(newBook)
    }
The above code exists inside the script tag and what it does is, call all the properties of the book from the form and concatenates them. We make use of a concat because push does not change the book variable. It only changes the array but assigning concat to a new value with trigger a change.
We now have an array of books which is displayed conditionally using a special markup that Svelte gives us:
{#if books.length === 0}
    <p>
       Add a new book
    </p>
    {:else}
    {#each books as book}
        <Book bookTitle={book.title} bookPages={book.pages} bookDescription={book.description}/>
    {/each}
{/if}
What this does is that it prompts the user to add new books then displays each new block as a new card:

And displays the information on the card once the user updates:

Adding the price of books
To achieve this, we will have to make another component called purchase.svelte . In the script tag, we would want to export the books variable so that it can be updated by the book tag, by passing the information as props in the app.svelte.
In the app.svelte we add an empty array in the script to hold the purchased books. Now how do we add books to these purchases? We will use the buy button in the book component and then, add the purchaseBook function to script and bind to the button using on:{purchaseBook}.
We then use the create a dispatch function from the Svelte’s custom library.
Then we can link the function to the Book tag by adding the on:buy = {purchaseBook} This event dispatches from our purchaseBook function.
function purchaseBook(event){
        const selectedTitle= event.detail;
        purchases = purchases.concat({
            ...books.find(book => book.title === selectedTitle )
        });
    }
Conclusion
In this article, we have attempted to understand the basic use of Svelte by creating a book store demo. I hope this post helps you understand the power of SvelteJS and shows you the ways you can go about creating awesome applications. Here is a link to the demo. Happy coding! 
Editor's note: Seeing something wrong with this post? You can find the correct version here.
Plug: LogRocket, a DVR for web apps

LogRocket is a frontend logging tool that lets you replay problems as if they happened in your own browser. Instead of guessing why errors happen, or asking users for screenshots and log dumps, LogRocket lets you replay the session to quickly understand what went wrong. It works perfectly with any app, regardless of framework, and has plugins to log additional context from Redux, Vuex, and @ngrx/store.
In addition to logging Redux actions and state, LogRocket records console logs, JavaScript errors, stacktraces, network requests/responses with headers + bodies, browser metadata, and custom logs. It also instruments the DOM to record the HTML and CSS on the page, recreating pixel-perfect videos of even the most complex single-page apps.
Try it for free.
The post How to build a simple Svelte JS app appeared first on LogRocket Blog.


Top comments (3)
Svelte is my best front end framework/compiler so far.... It's super fast compared to angular and react 👏👏👏
How great is client-side rendering in svelte?
amazing. we need more svelte on dev.to!