
Written by Obinna Ekwuno✏️
Electron is awesome. I love it but I’m aware it has mixed reviews. Whatever side of the divide you find yourself, you can’t help but agree that it has revolutionized how desktop applications are built by mostly lowering the entry barrier through the use of web technologies.
With simple one-window apps, you don’t have to worry about a lot of complexity that can arise from passing data around. You only start to worry when your software has more than one window as things like keeping track of how data is moved around, persisted, and modified can quickly spiral out of control. In this article, we’ll look at how to pass data between different windows (known as processes), the common pitfalls, and how to tackle them.
Prerequisites
Before we go any further, this article assumes the following:
- Node.js ≥ v6 is installed on your machine
- npm is installed on your machine
- you have a basic understanding of Electron and, by extension, JavaScript

Getting started
We’ll make use of the electron-quick-start template. For this demo, we will name the project folder electron-process-comm (you can name yours whatever you wish).
After we’ve created the project directory, run the following code:
git clone https://github.com/electron/electron-quick-start <your-project-folder>
This clones the quick start template into your project folder. Now, change directory into your project directory and npm install, then run the start script:
cd <your-project-folder>
npm install
npm start
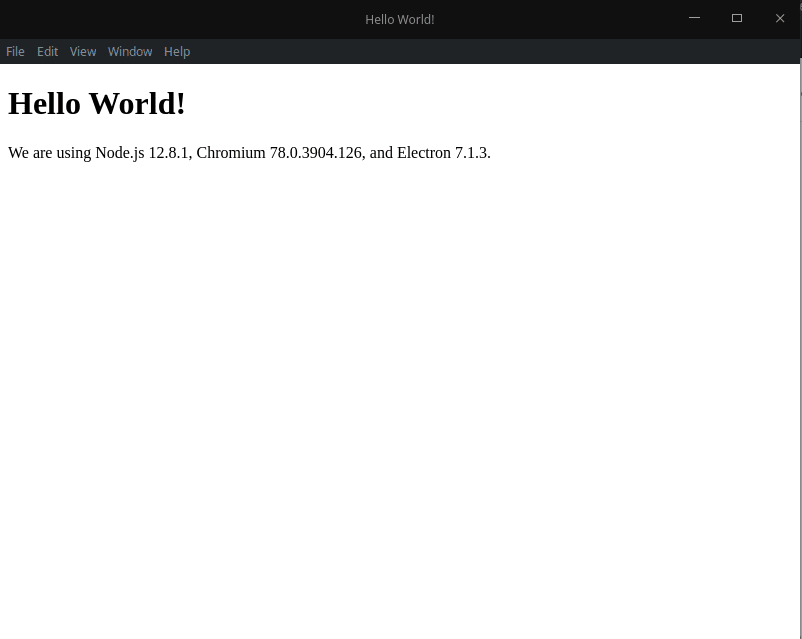
If all goes well, the default HTML page that comes with the quick start template will be rendered, contents may vary depending on when you’re reading this article (due to node, chromium, and electron updates).
Before we get into all the interesting stuff let’s cover a few important things.
Processes in Electron
A process, in this context, basically describes how an electron application runs and is divided into two parts:
- Main process
- Renderer process
There can be only one main process for every electron app, it runs the package.json main script and manages other renderer processes (creating and managing windows and some APIs, like the file system, is available only in this process).
The renderer process, in contrast, is isolated and only cares about the web page that is running it. When a web page instance is destroyed, the corresponding renderer process is also terminated.
It is worthy to note that a renderer process can be made to behave like the main process. i.e access API’s otherwise meant to be accessible to just the main process. This is, however, not typically encouraged.
Interprocess communication
Because electron is divided into two processes, a way of communicating between them is needed. Electron provides a module for this, the IPC module, with which you can send and receive synchronous and asynchronous messages between processes. Both the main process and renderer have specific modules, ipcMain for the main process and ipcRenderer for the renderer process. In order to demonstrate how this works, we’ll proceed to modify the index.html file and the renderer.
You might choose to organize your project’s folder structure a different way but because this is just for demonstration purposes, I’ll leave it as it currently is.
Synchronous IPC messaging
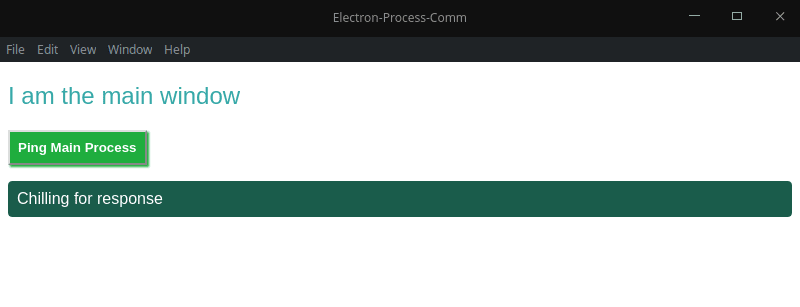
We’ll begin by modifying the index.html. Change the content in the <body> tag with the following:
<h2 id="mainWindowTitle">I am the main window</h2>
<button id="sendSyncMsgBtn">Ping Main Process</button>
<p id="syncReply">Chilling for response</p>
Next, we define some styles. Create a style.css file and copy the following style block into it:
#mainWindowTitle{
    color: rgb(54, 168, 168);
    font-family: -apple-system, BlinkMacSystemFont, 'Segoe UI', Roboto, Oxygen, Ubuntu, Cantarell, 'Open Sans', 'Helvetica Neue', sans-serif;
    font-weight: 200;
}
#sendSyncMsgBtn {
    color: #fff;
    font-family: sans-serif;
    font-weight: bold;
    padding: .5rem;
    background-color: rgb(31, 173, 62);
    box-shadow: 2px 2px 2px rgb(31, 173, 62);
}
#syncReply {
    font-family: sans-serif;
    color: #fff;
    border: 1px solid rgb(26, 92, 75);
    border-radius: 4px;
    padding: .5rem;
    background-color: rgb(26, 92, 75);
    box-shadow: inset 0 0 2px rgb(26, 92, 75);
}
Next, place the link for our new style within the head of our index.html. Also, change the text within the title if you so desire:
<title>Electron-Process-Comm</title>
<link rel="stylesheet" href="style.css">
To see the result of our change, open a terminal in the project’s directory and run the start command:
npm start
Once it starts, your app windows will look something like this:
With this in place, open the renderer.js file and add the piece of code that will be triggered when we click our button including the code responsible for accepting the response back. To begin, we first import the correct IPC module, ipcRenderer, being in the renderer process.
const electron = require('electron')
const ipc = electron.ipcRenderer
We then get the reference to our button and attach an event listener to it:
const syncMsgBtn = document.querySelector('#sendSyncMsgBtn')
syncMsgBtn.addEventListener('click', () => {

})
For every IPC send there must be an IPC receive method. The basic structure of this call looks like this:
ipcRenderer.sendSync (channel, \[, arg1\][, arg2], [,...})
The channel parameter is a string that is used as a message identifier. It’s this identifier that the companion method will be listening for. You can optionally send additional values as arguments, which can be any of the JavaScript primitives (string, number, arrays, objects):
syncMsgBtn.addEventListener('click', () => {
  const reply = ipc.sendSync('sync-message', 'Sent from main Window')
})
Whenever we are working with IPC events, once we write our sending function, we switch to the other process and write the companion stub function. So, let’s switch to the main.js file and do this. The main process will also need to import the IPC module as well:
const {app, BrowserWindow, ipcMain} = require('electron')
We can now write our receiver function, it is pretty straightforward, we define which channel it should listen on and a function to execute:
ipcMain.on('sync-message', (event, arg) => {
})
The callback function has two arguments, the event object, and the arguments. While the arguments will contain the data that our sending function passed over, the event object has some special functions. The event object has the built-in ability to respond to the sender. This means there is no need to write another set of listeners and receivers to communicate a response. For synchronous IPC messages, the method is:
event.returnValueipcMain.on('sync-message', (event, arg) => {
 event.returnValue = 'Message Received!'
})
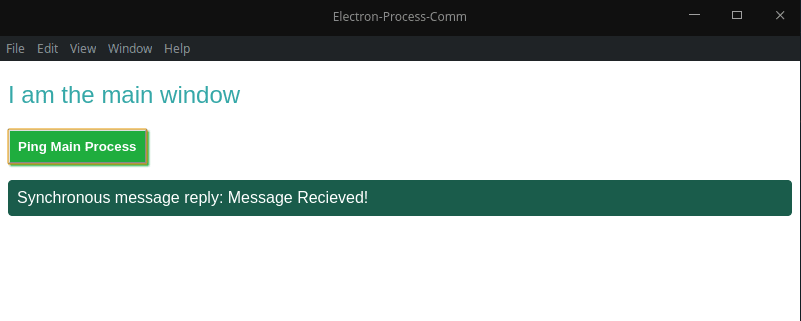
We then switch back to the renderer.js file, where we can now add the code to handle this returned value. The value that we sent over from the main process will be stored in the reply. The complete code is shown here:
const syncMsgBtn = document.querySelector('#sendSyncMsgBtn')
syncMsgBtn.addEventListener('click', () => {
    const reply = ipc.sendSync('sync-message', 'Sent from main Window')
    const message = `Synchronous message reply: ${reply}`
    document.querySelector('#syncReply').innerHTML = message
})
Once you’re certain you’ve got all that, proceed to start up your app and test it out. You should see something like this if all goes well.
These are the basics of using the IPC module synchronously within Electron. Now, let’s explore using IPC messaging in an asynchronous way!
Asynchronous IPC messaging
A huge downside with synchronous messaging is that for tasks that take a bit of time to complete, it blocks the renderer process leaving our app non-functional during that time. This isn’t a great user experience so for such scenarios, we can use the asynchronous IPC methods instead.
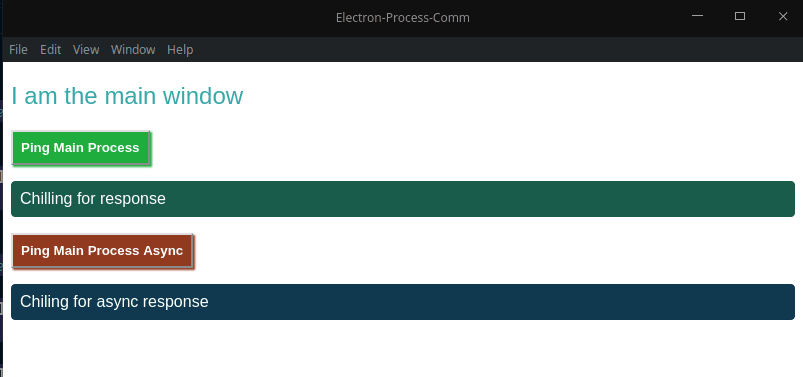
We will now add two more elements to our index.html file:
<button id="sendAsyncMsgBtn">Ping Main Process Async</button>
<p id="asyncReply">Chilling for async response</p>
Also, add the following block styles to the style.css file, it is the styling for the new elements we’ve added:
#sendAsyncMsgBtn{
    color: #fff;
    font-family: sans-serif;
    font-weight: bold;
    padding: .5rem;
    background-color: rgb(146, 58, 31);
    box-shadow: 2px 2px 2px rgb(146, 58, 31);
}
#asyncReply{
    font-family: sans-serif;
    color: #fff;
    border: 1px solid rgb(16, 56, 78);
    border-radius: 4px;
    padding: .5rem;
    background-color: rgb(16, 56, 78);
    box-shadow: inset 0 0 2px rgb(16, 56, 78);
}
Switching over to our renderer.js file, we will get the reference to our new button and, like before, we will create an event listener for the button click:
const asyncMsgBtn = document.querySelector('#sendAsyncMsgBtn')
asyncMsgBtn.addEventListener('click', () => {

})
There are two major differences in working with asynchronous IPC messages. The first is instead of using the sendSync method, we use the send method instead:
asyncMsgBtn.addEventListener('click', () => {
  ipc.send('async-message', 'Async message baby')
})
The other difference is that we now have to explicitly write the callback function that will handle the response from the main process:
ipc.on('async-reply', (event, arg) => {
 const message = `Asynchronous message reply: ${arg}`
 document.querySelector('#asyncReply').innerHTML = message
})
The IPC code in the main process changes slightly as well in the main.js file. The actual listener does remain the same, but the method to respond changes. Instead of calling the returnValue method on the Event object, we now use event.sender.send to respond:
ipcMain.on('async-message', (event, arg) => {
 if (arg === 'Async message baby') {
 event.sender.send('async-reply', 'Yes hunie, I hear you loud and clear')
 }
})
You can now proceed to test out this new functionality. You should be able to trigger both styles of IPC messaging.

Conclusion
This concept of IPC messaging is applied to concepts like communicating with the app’s splash window and main process. Here, we started a third-party library in the main process using an action from a renderer process.
The IPC module doesn’t have a lot of methods — just variations of sending and receiving. This is crucial for processes in Electron applications to coexist.
Editor's note: Seeing something wrong with this post? You can find the correct version here.
Plug: LogRocket, a DVR for web apps

LogRocket is a frontend logging tool that lets you replay problems as if they happened in your own browser. Instead of guessing why errors happen, or asking users for screenshots and log dumps, LogRocket lets you replay the session to quickly understand what went wrong. It works perfectly with any app, regardless of framework, and has plugins to log additional context from Redux, Vuex, and @ngrx/store.
In addition to logging Redux actions and state, LogRocket records console logs, JavaScript errors, stacktraces, network requests/responses with headers + bodies, browser metadata, and custom logs. It also instruments the DOM to record the HTML and CSS on the page, recreating pixel-perfect videos of even the most complex single-page apps.
Try it for free.
The post Handling interprocess communications in Electron applications like a pro appeared first on LogRocket Blog.


Top comments (0)