
Written by Nwose Lotanna✏️
When building forms in Vue.js, you might want to leverage the user’s input to enhance the experience of using your application. Take an email newsletter, for example. Usually, you’ll be asked to enter your name to sign up. Then, after you subscribe to the newsletter, the name you provided will appear in the greeting of the email.
This approach is called data binding. In this tutorial, we’ll explore the concept of form input binding in Vue and demonstrate the v-model directive on which it relies.
Prerequisites
This walkthrough is suited for developers at all stages, including beginners. Before going through this tutorial, you should already have the following.
- Node.js version 10.x and above installed. You can verify whether you do by running the command below in your terminal/command prompt:
node -v
- A code editor, such as Visual Studio Code
- Vue’s latest version installed globally on your machine
- Vue CLI 3.0 installed on your machine
- To do this, uninstall the old CLI version first
npm uninstall -g vue-cli
- Then, install the new one
npm install -g @vue/cli
- Download a Vue starter project
- Unzip the downloaded project
- Navigate into the unzipped file and run the command below to keep all the dependencies up to date
npm install
What is two-way data binding?
One way to bind data in Vue.js is to use the v-model directive. When attached to an input, this model monitors the input and updates the given template once there is a change in the model. It also updates the data model if there is a change in the template. This is what we call two-way data binding.
This improves speed because you can easily keep tabs on your data object and your template section. It also reduces complexity when it comes to maintaining the consistency of the data model — all thanks to the v-model directive.

What we’ll build
To demonstrate two-way data binding, we’ll build a basic Vue visa app with a preview section.
In the Vue canvas project you downloaded from GitHub, you’ll find the root Vue component, app.vue, and a test component file in the components folder. Open the project in your development environment.
Your app.vue file should look like this:
<template>
  <div id="app">
    <img alt="Vue logo" src="./assets/logo.png">
    <Test/>
  </div>
</template>
<script>
import Test from './components/Test.vue'
export default {
  name: 'app',
  components: {
    Test
  }
}
</script>
<style>
#app {
  font-family: 'Avenir', Helvetica, Arial, sans-serif;
  -webkit-font-smoothing: antialiased;
  -moz-osx-font-smoothing: grayscale;
  text-align: center;
  color: #2c3e50;
  margin-top: 60px;
}
</style>
Here’s a simple component displaying the Vue logo, the content in the test component, and some CSS styles. To create a form, open the test.vue component and copy the following code block into the template section.
<template>
  <div id="visa">
    <h1>Vue Visa Application</h1>
    <form>
      <label for="first name">First Name:</label>
      <input type="text" required>
      <br>
      <label for="last name">Last Name:</label>
      <input type="text" required>
      <br>
      <label for="country">Nationality:</label>
      <input type="text" required>
      <br>
      <label for="passport number">Passport Number:</label>
      <input type="text"required>

      <label for="duration">Duration of stay:</label>
      <input type="text" required>

      <h2>Preview Application Details</h2>
      <p>First Name: </p>
      <p>Last Name: </p>
      <p>Nationality: </p>
      <p>Passport Number: </p>
      <p>Duration: </p>

    </form>
</div>
</template>
This form has labels for identification and other important information associated with a visa application. To add some styling, copy this code block inside the style section:
<style scoped>
#visa {
  margin: 20px auto;
  max-width: 700px;
}
label{
  display: block;
  margin: 20px 0 10px;
}
input {
  font-size: 30px;
  border: 1px double rgb(102, 97, 96) ;
  border-radius: 4px;
}
</style>
Run the project in a terminal with the serve command.
npm run serve
Your form should look like this:

Input binding
Now that we have our visa application form up and running, you can see that there is a preview section. In this section, we want to display everything the user types in the text boxes above. That way, before they hit submit, the user doesn’t need to go through each box one by one. Instead, they can scroll to the submit button and see a quick preview of the information they entered.
To achieve this, we can use the v-model directive to bind the input in the template section to the data object. Now the input binding syntax should look something like this:
<h2>My first name is {{fName}}</h2>
<input v-model="fName"/>
Whatever the user types in the input box is bound to the first name we already defined.
To apply this to the visa application demo, copy and replace the template section with the code block below.
<template>
  <div id="visa">
    <h1>Vue Visa Application</h1>
    <form>
      <label for="first name">First Name:</label>
      <input type="text" v-model="fName" required>
      <br>
      <label for="last name">Last Name:</label>
      <input type="text" v-model="lName" required>
      <br>
      <label for="country">Nationality:</label>
      <input type="text" v-model="country" required>
      <br>
      <label for="passport number">Passport Number:</label>
      <input type="text" v-model="pNumber" required>

      <label for="duration">Duration of stay:</label>
      <input type="text" v-model="duration" required>

      <h2>Preview Application Details</h2>
      <p>First Name: {{fName}}</p>
      <p>Last Name: {{lName}}</p>
      <p>Nationality: {{country}}</p>
      <p>Passport Number: {{pNumber}}</p>
      <p>Duration: {{duration}}</p>

    </form>
</div>
</template>
The input sections now have the v-model directives and the preview section now has data-binding curly brackets. If you run the application now, you will get some errors.
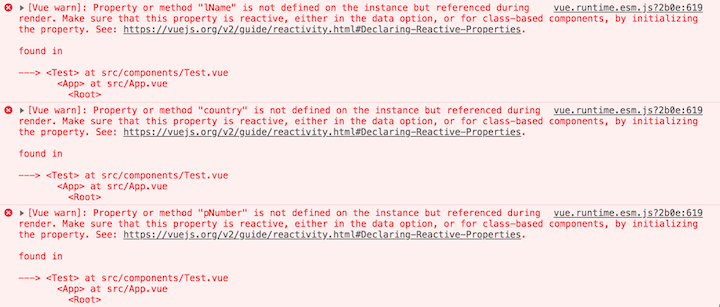
These errors occur because we have not defined these new properties in our data object. To fix them, go to the script section of your test.vue component and replace the content with the code block below.
<script>
export default {
  name: 'Test',
  props: {
    msg: String
  },
  data(){
    return {
      fName: '',
      lName: '',
      country: '',
      pNumber: '',
      duration: ''
    }
  }
}
</script>
Now run the app in your dev server again. It should look like this:

Bonus tip: The lazy property
These bindings happen in real time, so the app updates as you type. You can also make it all appear simultaneously once you leave a tab by leveraging the lazy property of the v-model directive.
Go to the component template and add the lazy property to all the v-model definitions in the inputs.
<template>
  <div id="visa">
    <h1>Vue Visa Application</h1>
    <form>
      <label for="first name">First Name:</label>
      <input type="text" v-model.lazy="fName" required>
      <br>
      <label for="last name">Last Name:</label>
      <input type="text" v-model.lazy="lName" required>
      <br>
      <label for="country">Nationality:</label>
      <input type="text" v-model.lazy="country" required>
      <br>
      <label for="passport number">Passport Number:</label>
      <input type="text" v-model.lazy="pNumber" required>

      <label for="duration">Duration of stay:</label>
      <input type="text" v-model.lazy="duration" required>

      <h2>Preview Application Details</h2>
      <p>First Name: {{fName}}</p>
      <p>Last Name: {{lName}}</p>
      <p>Nationality: {{country}}</p>
      <p>Passport Number: {{pNumber}}</p>
      <p>Duration: {{duration}}</p>

    </form>
</div>
</template>
When you run the app in your dev server, it should load the binding results lazily after you leave the tab.

Conclusion
You should now have a basic understanding of form input binding in Vue JS. We examined the importance of this technique and explored a few use cases. We also demonstrated the lazy property of the v-model directive.
Experience your Vue apps exactly how a user does
Debugging Vue.js applications can be difficult, especially when there are dozens, if not hundreds of mutations during a user session. If you’re interested in monitoring and tracking Vue mutations for all of your users in production, try LogRocket.
LogRocket is like a DVR for web apps, recording literally everything that happens in your Vue apps including network requests, JavaScript errors, performance problems, and much more. Instead of guessing why problems happen, you can aggregate and report on what state your application was in when an issue occurred.
The LogRocket Vuex plugin logs Vuex mutations to the LogRocket console, giving you context around what led to an error, and what state the application was in when an issue occurred.
Modernize how you debug your Vue apps - Start monitoring for free.
The post Form input binding in Vue appeared first on LogRocket Blog.


Top comments (0)