
Written by Praveen Kumar✏️
This is a continuation of part two in our series on creating a full-stack MERN app using JWT authentication. If you haven’t read the second part, please do so for extra context so you can better understand this post. You can also read the first part here.
By now, we have got a system in place that can generate JSON Web Tokens on the server side. Let’s start consuming it by building a React single-page application on the front end.
Creating a React app
The first thing I’ll recommend is the environment setup. After going through the courses by Wes Bos, I am more inclined to use Visual Studio Code (I hated it at first because it was a completely different development environment, being faithful to Sublime Text).
The simplest way to go about creating a new React application is by using the simple create-react-app. Navigate to the client directory in your terminal and run:
➜ FrontEnd git:(master) $ npx create-react-app .
The npx here is not a typo — that’s the right command. The create-react-app application installs packages like react, react-dom, and react-scripts. Once that’s done, you have your fresh and shiny new React application ready.
Securing with HTTPS
Almost any website we visit today is protected by HTTPS. If yours isn’t yet, it should be. Securing your server with HTTPS will also make sure you can’t send requests to this server from one that isn’t protected by HTTPS. This poses a problem for developers who use a local development environment because all of them run on http://localhost out of the box.
When we are working with different authentication mechanisms, payment gateways, and similar technologies, we definitely need to secure our local development environment with HTTPS not only to make them work, but also to mimic the production server. You have a simple way of using HTTPS out of the box using React, and you can about it in “Using React’s Proxy to get ahead of CORS & use HTTPS for API calls.”

Installing the dependencies
Since the application is built using create-react-app, everything is installed by default. The primary dependencies include:
reactreact-domreact-scripts
react-scripts is actually the complete bundle that contains all the dependencies (like webpack and babel) necessary to transpile the React JSX and ES6+ to ES5-based JavaScript. Along with the above dependencies, we might require a few more.
One of the main style-related packages we will be using is node-sass for compiling the SCSS into CSS. Another notable one is the axios AJAX library for firing the HTTP GET, POST, PUT, and DELETE calls. This is just a beautiful wrapper for the fetch() API.
Let’s crack on by installing the above two dependencies using our favorite npm install command. You can install more than one package with npm install by specifying them using space-separated library names, as follows:
➜  FrontEnd git:(master) $ npm install axios node-sass
npm WARN ts-pnp@1.0.1 requires a peer of typescript@* but none is installed. You must install peer dependencies yourself.

+ axios@0.18.0
installed 1 package and audited 36854 packages in 8.074s
Peer requirements
In any case, if you are using TypeScript for your React application, you might need to install the typescript package for ts-pnp using npm, which is a low-level package that exports a function to implement the resolveModuleName Hook from CompilerHost:
➜  FrontEnd git:(master) npm install typescript
+ typescript@3.4.5
added 1 package from 1 contributor, updated 1 package and audited 36855 packages in 8.982s
➜  FrontEnd git:(master) npm install axios
+ axios@0.18.0
updated 1 package and audited 36855 packages in 8.959s
You can see that once you install the typescript package, the error goes off.
Using React’s proxy
We can set up a simple proxy server in our React web app during our development phase to mimic the live environment for API calls. This is very important because we will use only relative URLs to the domain to make the API calls, and all calls will be routed with the prefix /api/.
All we need to do is add a new line in our package.json file to get the feature. Considering our Express.js API server — which we built in the previous article — runs on Port 3100, we should let the React dev server (CRA/webpack) know using the following change:
{
  "name": "client",
  "version": "0.1.0",
  "proxy": "http://localhost:3100/",    // Set the proxy this way. All the unrouted requests will go here.
  "private": true,
  // Other stuff.
}
Setting up AJAX calls
This is the main crux of the article now. We need to set up a wrapper for all the AJAX calls, and then we need wrappers for each service. You can call them better as service callers — that would be the best way.
To get to know how to fire AJAX calls with Axios, let’s just concentrate on the most common GET and POST requests. Remember, Axios returns a promise that we need to further process.
Importing Axios
You can import Axios by its package. A simple import will do, and you don’t need to import it everywhere; that’s why we have service caller wrappers.
import Axios from "axios";
Many use Axios or axios, but it really doesn’t matter because it’s a default import. Default imports aren’t named, so you can have anything. You can even have something like:
import Praveen from "axios";
And it works flawlessly. Let’s use Axios for now. 😇
HTTP GET and POST requests
HTTP GET and POST requests are the two basic methods (or verbs) for API requests. The simplest way to perform an HTTP GET request is as follows. Let’s say we are hitting the /user API endpoint to retrieve the details about the user with name as praveen:
// Make a request for a user with a given name.
axios.get("/user?name=praveen")
  .then(function (response) {
    console.log(response);
  })
  .catch(function (error) {
    console.log(error);
  });
The above request can also be written this way:
// Optionally, the request above could also be done as:
axios.get("/user", {
  params: {
    name: "praveen"
  }
})
  .then(function (response) {
    console.log(response);
  })
    .catch(function (error) {
    console.log(error);
  });
The second parameter is the data parameter. In any case, if you have an object to be sent, you can send this way.
The POST request is similar. First you need to change the method to axios.post(), and you would be giving the data parameter. For example, let’s try creating a user with the name parameter:
axios.post("/user", {
  firstName: "Praveen",
  lastName: "Kumar",
  name: "praveen"
})
  .then(function(response) {
    console.log(response);
  })
  .catch(function(error) {
    console.log(error);
  });
That’s neat, right? You can check out some of the differences between Axios and fetch() here.
JSON Web Token authentication
Moving on, the main reason for this application is to demonstrate JSON Web Token (JWT) authentication on the client side. Let’s look at the JWT authentication workflow.
First, the client fires an HTTP POST request to the server, then the server creates a JSON Web Token and sends it to the client. The client then stores the JWT locally (using a localStorage or variable) and sends it on the Authorization header.
When a POST request is made to the server, the JWT is sent as a string token in the following format:

There are three sections — Header, Payload, and Signature. The signature section is only used for verification of the JWT, and since we are on the client side and verification needs the secret-key, we will not verify the token in the client side — even though it’s possible. All we need is the payload section.
Installing the JWT library
To parse the JWT, we will be using the same library that we used in the server side to generate the JWT. The jsrsasign works well on the client side, too. Let’s install that on the client-side React app using npm install, like below:
➜  FrontEnd git:(master) npm install jsrsasign
npm WARN ts-pnp@1.0.1 requires a peer of typescript@* but none is installed. You must install peer dependencies yourself.

+ jsrsasign@8.0.12
added 1 package from 1 contributor and removed 1 package in 18.476s
The above is a typical installation of the package. You might get the same typescript@* peer dependency issue, and if you are using TypeScript in your application, it is better you install any version of typescript along with this.
Importing jsrsasign into your React app
After the installation, just use a normal import in your React app to use the library:
import JSRSASign from "jsrsasign";
The most common functions that you will be using from this library are:
-
b64utos(): Theb64utos()function is used to convert a Base64URL-encoded string to an ASCII string. Note that this function can’t be used for Base64URL-encoded non-ASCII characters. -
WS.readSafeJSONString(): TheJWS.readSafeJSONString()function reads a string"s"as a JSON object if it is safe. If a string"s"is a malformed JSON string, or not a JSON string, this returns null; otherwise, it returns a JSON object.
Cleanup from Create React App
By now, we have got most of our environment and dependencies set up. At this point, we should remove and change some content from the automatically generated CRA repository. The first thing we will do is remove all the CSS files and default React logos, and get rid of the imports for the deleted files.
Organizing files
I also follow a pattern of my own design for my React applications, which would be the “category-first” model. I categorize all the contents into what they are in React and reduce the src folder to just:
-
actions: Contains all the Redux actions. (Not implemented for the current project…) -
components: Contains all the React Components. If the components have dependent components, they reside here in a hierarchical manner. -
helpers: Utility functions that might clutter the main components. (Not implemented for the current project…) -
reducers: Contains all the Redux Reducers. (Not implemented for the current project…) -
services: Contains all the AJAX URLs and service calls using Axios. -
styles: Contains all the SCSS files for styling. Imported only one file inindex.js -
tests: Contains all the files related to tests. (Not in scope for the current project…) -
index.js: The main file that gets loaded when the server is started and includes the styles and App component.
Updating the main App component
We will be moving our App.js from the src folder to components/App.js. Let’s also remove the unnecessary and unused imports from the App.js, slimming it down to the following:
import React from "react";

function App() {
  return (
    <div className="App">
      <p>Hello World!</p>
    </div>
  );
}

export default App;
Updating the public HTML
With the above organization of files, the next change we should make is the main public/index.html file, which gets loaded first on the browser and loads our React app. The modifications include changing the title, including fonts, CSS frameworks, and Bootstrap in our project, etc. The final file looks similar to the following (without comments):
<!DOCTYPE html>
<html lang="en">
  <head>
    <meta charset="utf-8" />
    <link rel="shortcut icon" href="%PUBLIC_URL%/favicon.ico" />
    <meta name="viewport" content="width=device-width, initial-scale=1" />
    <meta name="theme-color" content="#000000" />
    <meta name="description" content="Creating a Full Stack MERN Application using JWT Authentication" />
    <link rel="apple-touch-icon" href="logo512.png" />
    <link rel="stylesheet" href="https://stackpath.bootstrapcdn.com/bootstrap/4.3.1/css/bootstrap.min.css" />
    <link rel="stylesheet" href="https://stackpath.bootstrapcdn.com/font-awesome/4.7.0/css/font-awesome.min.css" />
    <link rel="stylesheet" href="https://fonts.googleapis.com/css?family=Open+Sans:400,400i,600,600i&display=swap" />
    <link rel="manifest" href="%PUBLIC_URL%/manifest.json" />
    <title>Creating a Full Stack MERN Application using JWT Authentication</title>
  </head>
  <body>
    <noscript>You need to enable JavaScript to run this app.</noscript>
    <div id="root"></div>
  </body>
</html>
Styles
After updating the HTML file, next comes the CSS part. We get rid of all the CSS files and have one main styles/App.scss. Note that this is an SCSS file, so it won’t run without node-sass installed. Once we’ve created App.scss inside the styles directory, let’s change the index.js to use the SCSS file and not the CSS file:
- import './index.css';
+ import "./styles/App.scss";
The styles/App.scss file included in index.js initially looks like this:
body {
  margin: 0;
  padding: 0;
  list-style: none;
}
.App {
  &,
  * {
    margin: 0;
    padding: 0;
    list-style: none;
  }
}
Even though we aren’t covering tests in this article, please make sure to remove the unused and obsolete imports from the tests/App.test.js, and then we can safely forget the tests directory for the rest of the application.
Sign-in form
Let’s quickly build a simple form that helps us get the username and password. There are multiple ways of capturing this information; we’ll review the one I like most.
We will be using component states to store the current value of the inputs, and based on that, we will update them. There are a number of solutions to build forms in React, but I’ll cover them later.
Building the form
Since the form is going to be a component, and React is all about components, let’s create a login component — say, components/Login.js — next to our App.js. Let’s build a nice form using Bootstrap’s Forms and Card layouts. But before that, let’s start by creating the login component with a basic skeleton like the following:
import React, { Component } from "react";

class Login extends Component {
  render() {
    return (
      <div className="login">

      </div>
    );
  }
}
export default Login;
Now let’s import it in the App.js and use it. You don’t need to add the .js extension since it’s a JavaScript file.
import React from "react";
// Importing the Login Component
import Login from "./Login";

function App() {
  return (
    <div className="App">
      {/* Import the Login */}
      <Login />
    </div>
  );
}
With the help of Bootstrap’s Grid System, it’s easier to create a nice, centered layout for the form. I have done a simple one that looks like this:
import React, { Component } from "react";

class Login extends Component {
  render() {
    return (
      <div className="login">
        <div className="container">
          <div className="row">
            <div className="col-6 offset-3">
              <div className="card">
                <div className="card-body">
                  <h5 className="card-title">Sign In</h5>
                  <h6 className="card-subtitle mb-2 text-muted">
                    Please sign in to continue.
                  </h6>
                  <form>
                    <div className="form-group">
                      <label htmlFor="exampleInputEmail1">Email address</label>
                      <input
                        type="email"
                        className="form-control"
                        id="exampleInputEmail1"
                        aria-describedby="emailHelp"
                        placeholder="Enter email"
                      />
                    </div>
                    <div className="form-group">
                      <label htmlFor="exampleInputPassword1">Password</label>
                      <input
                        type="password"
                        className="form-control"
                        id="exampleInputPassword1"
                        placeholder="Password"
                      />
                    </div>
                    <button type="submit" className="btn btn-success">
                      Submit
                    </button>
                  </form>
                </div>
              </div>
            </div>
          </div>
        </div>
      </div>
    );
  }
}
export default Login;
The complete form above has been nicked from React’s official docs. I’ve changed all the class= to className= and for= to htmlFor= since class and for are reserved keywords in JavaScript.
We need to make a lot of changes with the above form. Let’s start organizing some styling, too. The main App.scss looks very small since most of the resetting CSS will now be handled by Bootstrap.
body {
  font-family: "Open Sans", "Segoe UI", sans-serif;
}
.App {
  @import "login";
}
Creating the file _login.scss will allow us to import the contents into App.scss under the .App class. We will put the styles related to the form inside _login.scss this way:
.login {
  margin-top: 50px;
  .card {
    border-radius: 10px;
    &-body {
      overflow: hidden;
      padding-top: 10px;
      border-radius: 10px;
      background-color: rgba(#f90, 0.15);
      form {
        margin: 10px -20px -20px;
        padding: 15px;
        background-color: #fff;
        border-top: 1px solid rgba(#000, 0.125);
      }
    }
  }
}
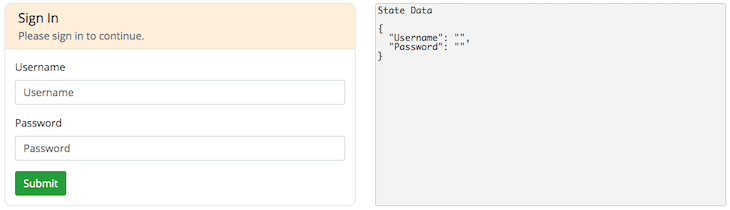
With the above code, the form looks centered in the page and similar to the below image.

Tracking the state
It’s easier to look at the state by inspecting the component with React Developer Tools, but it would be even better if we had a nice tracker along with us on the right side of the form. I thought of making the React app shell out the contents of state in a pretty format using JSON.stringify() and <pre> to display it.
With a nice style addition to App.scss, Login looks like this:
pre {
  font-family: "Monaco", "Consolas", monospace;
  border: 1px solid #ccc;
  background-color: #f5f5f5;
  padding: 3px;
  border-radius: 3px;
  line-height: 1;
  height: 100%;
}
<div className="login">
  <div className="container">
    <div className="row">
      {/* Removed the Offset */}
      <div className="col-6">
        <div className="card">
          <div className="card-body">
            <h5 className="card-title">Sign In</h5>
            {/************************/}
            {/* That unchanged form! */}
            {/************************/}
          </div>
        </div>
      </div>
      <div className="col-6">
        <pre>
          State Data
          <br />
          <br />
          {JSON.stringify(this.state, null, 2)}
        </pre>
      </div>
    </div>
  </div>
</div>
The page now looks like this:
We totally forgot to connect it with the state! We need to set the value and onChange event of the element to something like this. First, let’s initialize the state in the Login component. Not only that, we need to change the right names for the form elements, too.
import React, { Component } from "react";

class Login extends Component {
  state = {
    Username: "",
    Password: ""
  };
  render() {
    return (
      <div className="login">
        <div className="container">
          <div className="row">
            <div className="col-6">
              <div className="card">
                <div className="card-body">
                  <h5 className="card-title">Sign In</h5>
                  <h6 className="card-subtitle mb-2 text-muted">
                    Please sign in to continue.
                  </h6>
                  <form>
                    <div className="form-group">
                      <label htmlFor="Username">Username</label>
                      <input
                        type="Username"
                        className="form-control"
                        id="Username"
                        placeholder="Username"
                      />
                    </div>
                    <div className="form-group">
                      <label htmlFor="Password">Password</label>
                      <input
                        type="password"
                        className="form-control"
                        id="Password"
                        placeholder="Password"
                      />
                    </div>
                    <button type="submit" className="btn btn-success">
                      Submit
                    </button>
                  </form>
                </div>
              </div>
            </div>
            <div className="col-6">
              <pre>
                State Data
                <br />
                <br />
                {JSON.stringify(this.state, null, 2)}
              </pre>
            </div>
          </div>
        </div>
      </div>
    );
  }
}
export default Login;
Handling the input changes
Now let’s start writing the handleChange() function. We aren’t going to use binding in the constructor since it’s unnecessary if we use fat arrow functions, so let’s use them for defining the event handler.
handleChange = e => {
  // Here, e is the event.
  // e.target is our element.
  // All we need to do is to update the current state with the values here.
  this.setState({
    [e.target.name]: e.target.value
  });
};
This will update the state variable of the same name.
Removing repetition and two-way binding with state
We can clearly see that there’s repetition in our code. Let’s use an array of possible types and try rendering it fully using a loop. We can literally replace both the inputs and bind the input values to the state, thus making them controlled components.
{["Username", "Password"].map((i, k) => (
  <div className="form-group" key={k}>
    <label htmlFor={i}>{i}</label>
    <input
      type={i === "Password" ? "password" : "text"}
      name={i}
      className="form-control"
      id={i}
      placeholder={i}
      value={this.state[i]}
      onChange={this.handleChange}
    />
  </div>
))}
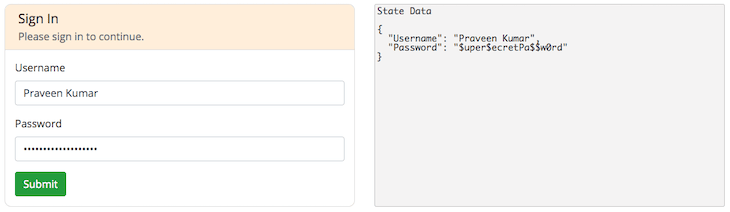
There are no changes with the above code at the moment, except when you try typing something on the form, you can see it reflected in the right-side state data, too.
You can see that I have written Praveen Kumar and $uper$ecretPa$$w0rd, and you can clearly see it reflected in our <pre> tag below.
Preventing default submission
The next thing a form does when you click on the submit button needs to be prevented since we are using AJAX calls to communicate with our REST API, which we built in the previous article. Let’s write a form handler for this:
handleSubmit = e => {
  // Here, e is the event.
  // Let's prevent the default submission event here.
  e.preventDefault();
  // We can do something when the button is clicked.
  // Here, we can also call the function that sends a request to the server.
};
Let’s also add it to the <form>‘s onSubmit event handler:
<form onSubmit={this.handleSubmit}>
Now the default action of submitting the form and reloading the page is prevented. But here we also need to send an AJAX request using Axios to the REST API endpoint we have created. Let’s move on by creating service calls for our front-end application.
Creating service calls
All the service calls should be inside the services directory, and we should use our Axios library only inside this directory. At the moment, we don’t have any endpoint in our server to handle the user authentication. The only endpoints we have right now are for JWT functions like GenerateJWT, DecodeJWT, and ValidateJWT for generating, decoding, and validating JWTs, respectively.
Let’s use them anyway by creating a services/JWTService.js file with the following skeleton that imports Axios and exports the functions for the above calls:
import axios from "axios";

export const GenerateJWT = (header, claims, key, cb) => {
  // Send request to /api/GenerateJWT
};
export const DecodeJWT = (sJWS, cb) => {
  // Send request to /api/DecodeJWT
};
export const ValidateJWT = (header, token, key, cb) => {
  // Send request to /api/ValidateJWT
};
With Axios, a POST request call looks like this:
axios
  .post(URL, {
    postData
  })
  .then(function(res) {
    // Log the response.
    console.log(res);
  })
  .catch(function(err) {
    // Log the error.
    console.log(err);
  });
Service calls for JWT Functions
With the above done, we can start sending the request to the right endpoints this way:
import axios from "axios";

export const GenerateJWT = (header, claims, key, cb) => {
  // Send POST request to /api/GenerateJWT
  axios
    .post("/api/GenerateJWT", {
      header,
      claims,
      key
    })
    .then(function(res) {
      cb(res);
    })
    .catch(function(err) {
      console.log(err);
    });
};
export const DecodeJWT = (sJWS, cb) => {
  // Send POST request to /api/DecodeJWT
  axios
    .post("/api/DecodeJWT", {
      sJWS
    })
    .then(function(res) {
      cb(res);
    })
    .catch(function(err) {
      console.log(err);
    });
};
export const ValidateJWT = (header, token, key, cb) => {
  // Send POST request to /api/ValidateJWT
  axios
    .post("/api/ValidateJWT", {
      header,
      token,
      key
    })
    .then(function(res) {
      cb(res);
    })
    .catch(function(err) {
      console.log(err);
    });
};
Note that all the requests are relative to the current domain to make sure we don’t hit the CORS issue, since we have already proxied the requests to the server.
Default values for server keys
As we know, the secret keys for JWT are sensitive, so we cannot send the keys from the client side. It is definitely a ridiculous thing to store the secret key anywhere in the client — whether JavaScript, HTML, cookies, or local storage — as it can be easily found and compromised.
Let’s update our server-side server.js to use some default values like key = "$PraveenIsAwesome!" in case the client doesn’t send the keys.
app.post("/api/GenerateJWT", (req, res) => {
  let { header, claims, key } = req.body;
  // In case, due to security reasons, if the client doesn't send a key,
  // use our default key.
  key = key || "$PraveenIsAwesome!";
  res.json(GenerateJWT(header, claims, key));
});
app.post("/api/DecodeJWT", (req, res) => {
  res.json(DecodeJWT(req.body.sJWS));
});
app.post("/api/ValidateJWT", (req, res) => {
  let { header, token, key } = req.body;
  // In case, due to security reasons, if the client doesn't send a key,
  // use our default key.
  key = key || "$PraveenIsAwesome!";
  res.json(ValidateJWT(header, token, key));
});
Server-side logging
It’s always a good practice to have all your logs in place, especially in the server side. We have to be sure what request is coming up and where it is hitting.
One package that does this for us in the same standards as Apache and nginx is morgan. It is an HTTP request logger middleware for Node.js. We can install morgan by using npm on the server side:
➜ Server git:(master) $ npm install morgan
Syntax for morgan and requiring with Express
We will be able to include the middleware by requiring the module:
var morgan = require('morgan')
Since we are just in the development phase, we can use the "dev" format.
app.use(morgan("dev"));
Create a new morgan logger middleware function using the given format and options. The format argument may be a string of a predefined name (see below for the names), a string of a format string, or a function that will produce a log entry.
The format function will be called with three arguments, tokens, req, and res, where tokens is an object with all defined tokens, req is the HTTP request, and res is the HTTP response. The function is expected to return a string that will be the log line or undefined/null to skip logging.
The dev format gives a concise output colored by response status for development use. The :status token will be colored red for server error codes, yellow for client error codes, cyan for redirection codes, and uncolored for all other codes.
:method :url :status :response-time ms - :res[content-length]
Back to the client side
We had to quickly change a few elements in the server side, and now that we are done, let’s make the front end talk to the REST API.
Calling the JWT service
Let’s call the GenerateJWT service and display it in the client side. The first thing to do here is import the service from the services/JWTService.js. You don’t need to add the .js extension since it is a JavaScript file.
import { GenerateJWT } from "../services/JWTService";
Now let’s update the handleSubmit function to call the GenerateJWT function from the JWTService. Note that we are sending a null value to the third parameter of the function, which actually takes in the secret key. Due to privacy issues, we are not going to store any keys, and we will let the server handle the keys.
handleSubmit = e => {
  // Here, e is the event.
  // Let's prevent the default submission event here.
  e.preventDefault();
  // We can do something when the button is clicked.
  // Here, we can also call the function that sends a request to the server.
  // Get the username and password from the state.
  const { Username, Password } = this.state;
  const claims = {
    Username,
    Password
  };
  const header = {
    alg: "HS512",
    typ: "JWT"
  };
  GenerateJWT(header, claims, null, res => {
    if (res.status === 200) {
      this.setState({ Response: res.data });
    } else {
      this.setState({ Response: "Error!" });
    }
  });
};
The next thing to do is add another section in our <pre> to clearly show the LoginData and ResponseData (only when a response is received):
<pre>
  State Data
  <br />
  <br />
  {JSON.stringify(
    {
      Username: this.state.Username,
      Password: this.state.Password
    },
    null,
    2
  )}
  {this.state.Response && (
    <>
      <br />
      <br />
      Response Data (JWT)
      <br />
      <br />
      {this.state.Response}
     </>
  )}
</pre>
It is worth updating the styles of <pre> tag, as the response is a huge JWT string that needs to be broken down. Let’s add white-space: pre-wrap; and word-break: break-all; to break the lines it displays.
pre {
  font-family: "Monaco", "Consolas", monospace;
  white-space: pre-wrap;
  word-break: break-all;
  border: 1px solid #ccc;
  background-color: #f5f5f5;
  padding: 3px;
  border-radius: 3px;
  line-height: 1;
  height: 100%;
}
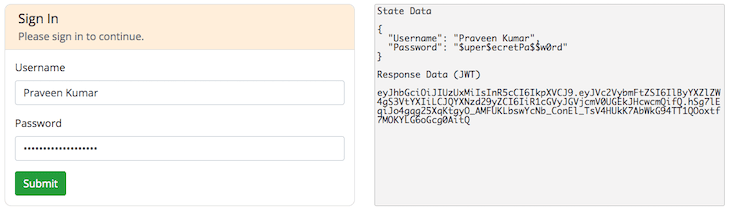
Once you type in the username and password and press Submit , you will see something like this:
Decoding the JWT data
Decoding the received JWT can be done both on the client side and the server side. Since we are dealing with REST APIs, let’s try to decode on the server side and receive it via AJAX. We’ll change the handleSubmit event again to handle the decoding of JWT as well. First, let’s import the DecodeJWT function from the same file:
import { GenerateJWT, DecodeJWT } from "../services/JWTService";
Now we need to change our handleSubmit function to use the above function:
handleSubmit = e => {
  // Here, e is the event.
  // Let's prevent the default submission event here.
  e.preventDefault();
  // We can do something when the button is clicked.
  // Here, we can also call the function that sends a request to the server.
  // Get the username and password from the state.
  const { Username, Password } = this.state;
  const claims = {
    Username,
    Password
  };
  const header = {
    alg: "HS512",
    typ: "JWT"
  };
  GenerateJWT(header, claims, null, res => {
    if (res.status === 200) {
      this.setState({ Response: res.data }, () => {
        // Once we get the data, let us decode the data.
        DecodeJWT(this.state.Response, data =>
          this.setState({ Data: data.data })
        );
      });
    } else {
      this.setState({ Response: "Error!" });
    }
  });
};
We might as well show the data inside Data from the state in our state viewer <pre> tag by adding the following:
{this.state.Data && (
  <>
    <br />
    <br />
    Decoded Data
    <br />
    <br />
    {JSON.stringify(this.state.Data, null, 2)}
  </>
)}
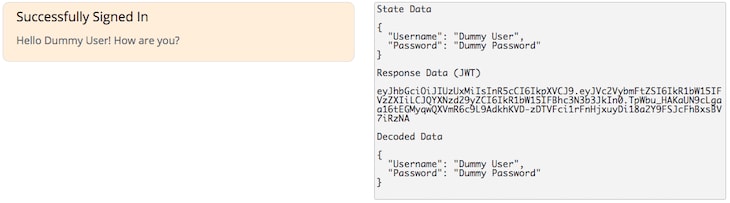
Cool! Now if we try putting the same username and password and press enter or submit the form, we will see something like this:

Post-sign-in screen
There should definitely be a difference between a signed-in screen and a signed-out screen. In the state, we have the decoded data stored under Data. If that content is set, we can assume that the user has completed the sign-in process successfully and show a different screen for them. With a simple if ... else ... condition, we can get this going:
<div className="col-6">
  <div className="card">
    {this.state.Data ? (
      <div className="card-body">
        {/* Show the signed in screen */}
      </div>
    ) : (
      <div className="card-body">
        {/* Show the original signed out form */}
      </div>
    )}
  </div>
</div>
With the above as a guide, we can either create new components or just use the conditions and make it easier, as there are some setState and state functions to be used. We can show a simple screen like the below, which says Hello {Username}! How are you?.
<div className="col-6">
  <div className="card">
    {this.state.Data ? (
      <div className="card-body">
        <h5 className="card-title">Successfully Signed In</h5>
        <p className="text-muted">
          Hello {this.state.Data.Username}! How are you?
        </p>
      </div>
    ) : (
      <div className="card-body">
        <h5 className="card-title">Sign In</h5>
        <h6 className="card-subtitle mb-2 text-muted">
          Please sign in to continue.
        </h6>
        <form onSubmit={this.handleSubmit}>
          {["Username", "Password"].map((i, k) => (
            <div className="form-group" key={k}>
              <label htmlFor={i}>{i}</label>
              <input
                type={i === "Password" ? "password" : "text"}
                name={i}
                className="form-control"
                id={i}
                placeholder={i}
                value={this.state[i]}
                onChange={this.handleChange}
              />
            </div>
          ))}
          <button type="submit" className="btn btn-success">
            Submit
          </button>
        </form>
      </div>
    )}
  </div>
</div>
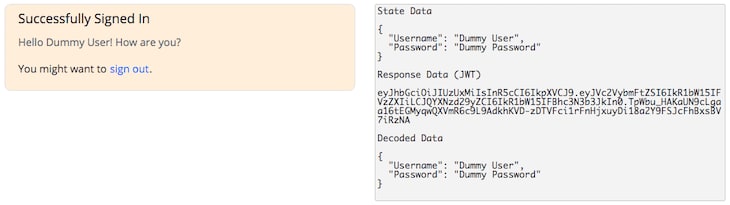
The above code renders to our browsers like this, when the user signs in with literally any username and password. There’s no authentication happening here; we are just generating a claim based on the username and password created by the user. I have given Dummy User and Dummy Password as the username and password and got my signed-in screen below:
Sign-out process
After you have implemented the sign-in process, we have to provide a way for the user to sign out as well. All we need to do is clear the Respose and Data of our state using setState, and the user is signed out.
We can use a simple <button> and style it like a link with Bootstrap using the btn-link class. When using a button, please let’s not forget to prevent the default event of reloading the page:
<p className="mb-0">
  You might want to{" "}
  <button
    className="btn btn-link"
    onClick={e => {
      e.preventDefault();
      this.setState({ Response: null, Data: null });
    }}
    >
    sign out
  </button>
  .
</p>
Now the screen looks like this, with a paragraph and link to sign out:
Persisting data
Currently we are just developing a JavaScript-based application. When you reload the screen, it most likely clears the session data and any data that is stored in the memory. We somehow need to persist this data or else we will be losing out the information of the state.
We could avoid the risk of someone hijacking the session information by using httpOnly cookies with the httpOnly flag. This would make it impossible for the browser to read any cookies, and instead allows you to use server-side cookies instead of localStorage. If you want to know more about this approach, please read this nice article by Jeff Atwood.
Instead, we can temporarily store the contents like the JWT in the local storage, although it is widely not recommended due to security concerns. The first thing that needs doing is checking for storage support in the browser. This can be done by the following code:
if (typeof Storage !== "undefined") {
  localStorage.setItem( key, value );
  localStorage.getItem( key );
}
So, with the above code, let’s add the code for saving the JWT in the local storage:
GenerateJWT(header, claims, null, res => {
  if (res.status === 200) {
    this.setState({ Response: res.data }, () => {
      // Check if local storage is supported.
      if (typeof Storage !== "undefined") {
        localStorage.setItem("JWT", res.data);
      }
      DecodeJWT(this.state.Response, data =>
        this.setState({ Data: data.data })
      );
    });
  } else {
    this.setState({ Response: "Error!" });
  }
});
Loading data from local storage
Just as we have documents’ ready() event or windows’ load() event, for every component in React, there’s a lifecycle method called [componentDidMount()](https://reactjs.org/docs/react-component.html#componentdidmount), which is executed when a component is mounted (inserted into the tree).
If we need to load data from a remote endpoint, this is a good place to instantiate the network request. For now, we need to use only the local storage to load the data.
componentDidMount() {
  if (typeof Storage !== "undefined") {
    // When this component loads, check if JWT is already saved in the local storage.
    if (localStorage.getItem("JWT") !== null) {
      // If there's something, try to parse and sign the current user in.
      this.setState({ Response: localStorage.getItem("JWT") });
      DecodeJWT(localStorage.getItem("JWT"), data =>
        this.setState({ Data: data.data })
      );
    }
  }
}
Here, other than the Username and Password, we are able to restore the session. But just as we have seen how to load the data, we also have to clear the data when we sign out of the system. Generally, it is a good idea to keep the functions separate and not use inline functions like we used before to sign out of the application. Let us now create a SignOutUser function:
SignOutUser = e => {
  e.preventDefault();
  this.setState({ Response: null, Data: null });
  if (typeof Storage !== "undefined") {
    // When this component loads, check if JWT is already saved in the local storage.
    if (localStorage.getItem("JWT") !== null) {
      localStorage.removeItem("JWT");
    }
  }
};
And bind it to the sign out button:
<button
  className="btn btn-link"
  onClick={this.SignOutUser}
>
  sign out
</button>
Now when you refresh or reload your browser, the only thing that gets lost is the Username and Password Response data. You can compare the differences between the signed-in page and the reloaded page.


The only thing that is missing in the second image is the state data, which is entered by the user. Once you click on the sign out link, you will be back to the original state of the app.

Validation of authentication
It is always a better idea to validate the user input before you send a request to the server. Before we fire the AJAX request, we must check for the valid cases and then fire the request. This helps reduce the number of requests that are made to the server from the client. Here, for example, let’s make sure both the inputs are at least three characters long.
handleSubmit = e => {
  // Here, e is the event.
  // Let's prevent the default submission event here.
  e.preventDefault();
  // We can do something when the button is clicked.
  // Here, we can also call the function that sends a request to the server.
  // Get the username and password from the state.
  const { Username, Password } = this.state;
  // Right now it even allows empty submissions.
  // At least we shouldn't allow empty submission.
  if (Username.trim().length < 3 || Password.trim().length < 3) {
    // If either of Username or Password is empty, set an error state.
    this.setState({ Error: "You have to enter both username and password." });
    // Stop proceeding.
    return false;
  }
  const claims = {
    Username,
    Password
  };
  const header = {
    alg: "HS512",
    typ: "JWT"
  };
  GenerateJWT(header, claims, null, res => {
    if (res.status === 200) {
      this.setState({ Response: res.data }, () => {
        if (typeof Storage !== "undefined") {
          localStorage.setItem("JWT", res.data);
        }
        DecodeJWT(this.state.Response, data =>
          this.setState({ Data: data.data })
        );
      });
    } else {
      this.setState({ Response: "Error!" });
    }
  });
};
We might as well display an error message for the users, letting them know the error that prevents them from proceeding. In our case, it should be, "You have to enter both username and password.".
{this.state.Error && (
  <div className="alert alert-danger text-center">
    <p className="m-0">{this.state.Error}</p>
  </div>
)}
Conclusion
Until now, we have successfully created a basic system that talks to the REST endpoint and provides the response, changes the states as required, and shows the right content. It also has a persistent login, too.
The next article will deal with creating users, validating them on the server side, and generating different types of responses, like user not found, invalid credentials, etc. We will start with a sample store for the server and validating the users. Don’t forget to check back for the final part!
Editor's note: Seeing something wrong with this post? You can find the correct version here.
Plug: LogRocket, a DVR for web apps

LogRocket is a frontend logging tool that lets you replay problems as if they happened in your own browser. Instead of guessing why errors happen, or asking users for screenshots and log dumps, LogRocket lets you replay the session to quickly understand what went wrong. It works perfectly with any app, regardless of framework, and has plugins to log additional context from Redux, Vuex, and @ngrx/store.
In addition to logging Redux actions and state, LogRocket records console logs, JavaScript errors, stacktraces, network requests/responses with headers + bodies, browser metadata, and custom logs. It also instruments the DOM to record the HTML and CSS on the page, recreating pixel-perfect videos of even the most complex single-page apps.
Try it for free.
The post Creating a full-stack MERN application using JWT authentication: Part 3 appeared first on LogRocket Blog.


Top comments (0)