Written by Doğacan Bilgili✏️
In this article, I am going to cover how to implement a menu bar application by using Electron.js along with React in a detailed manner.
Although I chose to use React, the client side can of course use any of the other frameworks or just vanilla JavaScript.
Moreover, the target operating system in this tutorial is macOS.
So, if you want to try this tutorial on another operating system, such as Windows or Linux, you might need to do small tweaks in the code due to the fact that the Electron API shows differently on different operating systems.
Setting up the project
To make it fast and easy for those who are not sure how to configure the project, I have prepared a boilerplate for Electron with React.js.
You can clone or download it to start the project, or you can use your own favorite boilerplate instead.
Find mine here:
https://github.com/dbilgili/minimal-electron-react-boilerplate

Basics of Electron
Before we start, let’s quickly go over how Electron is structured.
Electron has two processes: renderer and main.
You can think of them as client and server side, respectively.
The renderer process defines what to render inside the windows as the name suggests, and the main process defines what windows to create, as well as the interactions with them and other back-end related things.
These two processes are not aware of each other.
To make them communicate, there are ipcMain and ipcRenderer modules, which are basically EventEmitters.
I am going to touch on these modules in more detail later.
For the time being, let’s start with the basic imports to the src/server/main.js file.
Note that I am referring to the directory structure of the boilerplate I provided at the top of the article, so this might change for your setup.
electron-util is a useful package to conditionally enable things such as devTools when you are in development mode.
Don’t forget to install electron-util before importing:
const { app, BrowserWindow } = require('electron');
const { is } = require('electron-util');
const path = require('path');
Creating a window
In Electron, the BrowserWindow API creates a browser window with the specified options and loads a desired URL to display.
Let’s create a function called createMainWindow and create a BrowserWindow in it.
let mainWindow = null;

const createMainWindow = () => {
  mainWindow = new BrowserWindow({
    backgroundColor: '#FFF',
    width: 250,
    height: 150,
    webPreferences: {
      devTools: is.development,
      nodeIntegration: true,
    }
  });
  if (is.development) {
    mainWindow.webContents.openDevTools({ mode: 'detach' });
    mainWindow.loadURL('http://localhost:3000');
  } else {
    mainWindow.loadURL(`file://${path.join(__dirname, '../../build/index.html')}`);
  }
};
The reason I declared the mainWindow variable out of the createMainWindow function is because we will create a class to create a Tray object out of this BrowserWindow later, so we need to access the variable globally.
The API documentation helps you figure out all the available settings, so I won’t go into much detail about that.
However, you’ll see we use is.development to open devTools and loadURL from local the development server. You can also use the build folder if it is built for production.
To create the BrowserWindow instance, we need to wait until the app is ready.
Therefore, we need to use ready event, which is emitted when Electron has finished initializing:
app.on('ready', () => {
  createMainWindow();
});
So far, we have only created a BrowserWindow and specified what to display in it.
However, we don’t have any renderer process running.
If you run npm run client, this will start a server on localhost port 3000, which is the specific port loaded by the loadURL method in development mode.
Since there is already a component rendering a text, you can go ahead and run npm run server in another terminal instance.
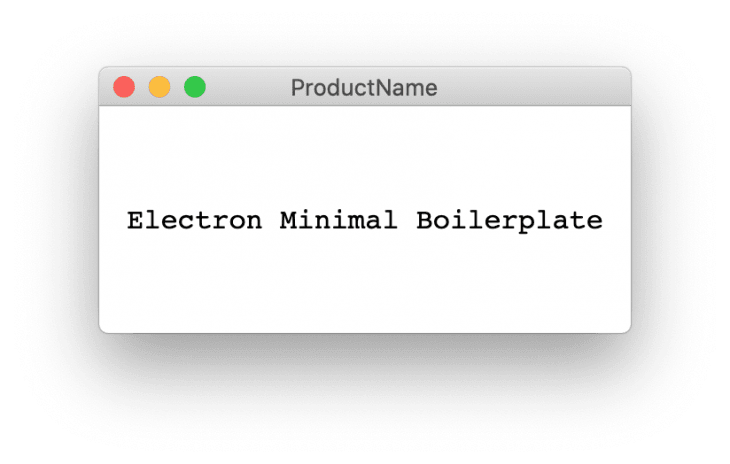
This will run the Electron app. You should see the following application window:
Editing src/client/components/App/index.js will re-render the component and update the contents of the mainWindow automatically.
Creating a tray object
The mainWindow we created appears in the middle of the screen, but we want to create an icon in the menu bar and toggle this window when it’s clicked.
To do that, we first need to create a Tray object, which displays the specified icon in the menu bar.
Since we need to position and toggle our mainWindow object and also preferably be able to show a system menu when right clicked to Tray icon, it is more convenient to create a class which bundles all the functionalities inside.
So, let’s create a file named TrayGenerator.js under src/server.
In the TrayGenerator, class we need the following functions along with a constructor accepting a BrowserWindow object, which is the mainWindow variable in our case:
getWindowPositionshowWindowtoggleWindowrightClickMenu-
createTray
const { Tray, Menu } = require('electron');
const path = require('path');

class TrayGenerator {
  constructor(mainWindow) {
    this.tray = null;
    this.mainWindow = mainWindow;
  }
  getWindowPosition = () => {
  };

  showWindow = () => {
  };

  toggleWindow = () => {
  };

  rightClickMenu = () => {
  }

  createTray = () => {
  };
}

module.exports = TrayGenerator;
getWindowPosition()
This function needs to figure out the position and dimensions of the Tray icon and BrowserWindow in order to find the x and y coordinates that place BrowserWindow centered and right relative to the Tray icon.
The getBounds() function called on BrowserWindow and Tray objects returns x and y positions, along with width and height information.
Although a Tray object instance is not assigned to this.tray yet, it will be assigned at the time getWindowPosition() is called, so assume that it has the appropriate object assigned.
getWindowPosition = () => {
  const windowBounds = this.mainWindow.getBounds();
  const trayBounds = this.tray.getBounds();
  const x = Math.round(trayBounds.x + (trayBounds.width / 2) - (windowBounds.width / 2));
  const y = Math.round(trayBounds.y + trayBounds.height);
  return { x, y };
};
Returned x and y values guarantee that the mainWindow will be positioned centered and below the Tray icon.
showWindow()
This function is responsible for setting the position of mainWindow by using the previous function we created, getWindowPosition().
First, we set the position of mainWindow by using the setPosition method.
Then we make it visible by using the show method.
Note that although mainWindow is visible by default, we will set it to be invisible later since we don’t want it to appear when the menu bar application runs.
In macOS, there are multiple desktops (workspaces), so if you click the Tray icon and show the window, then switch to another desktop and click the icon there again, you should make sure that it does not focus the previously opened window.
In order to handle this, we make it visible on all desktops by using the setVisibleOnAllWorkspaces method, then focus the one visible on the active desktop.
We hide the rest by passing false to same method:
showWindow = () => {
  const position = this.getWindowPosition();
  this.mainWindow.setPosition(position.x, position.y, false);
  this.mainWindow.show();
  this.mainWindow.setVisibleOnAllWorkspaces(true);
  this.mainWindow.focus();
  this.mainWindow.setVisibleOnAllWorkspaces(false);
};
toggleWindow()
This is a very straightforward function.
We use the isVisible method to figure out whether the window is visible. If it is, we hide it.
If it’s not, we show it.
This function will later be attached to the click event listener of the Tray object.
toggleWindow = () => {
  if (this.mainWindow.isVisible()) {
    this.mainWindow.hide();
  } else {
    this.showWindow();
  }
};
rightClickMenu()
This function creates an array for the options of a contextMenu, which will be shown when right clicked on the Tray icon.
You can find the details on the popUpContextMenu and buildFromTemplate methods used on Tray and Menu along with other available options used to create a menu in the following API documentations:
Tray | Electron
Add icons and context menus to the system’s notification area.
Menu | Electron
Create native application menus and context menus.
rightClickMenu = () => {
  const menu = [
    {
      role: 'quit',
      accelerator: 'Command+Q'
    }
  ];
  this.tray.popUpContextMenu(Menu.buildFromTemplate(menu));
}
createTray()
This final method eventually creates a Tray instance by passing the path to the Tray icon.
Create a folder named assets under /server and put your icon file in PNG format there.
It’s a rule for macOS that the icon file name should end with Template, hence the name selection of IconTemplate.
You need two versions with the @1x and @2x suffixes, which corresponds to 16×16 and 32×32 pixels in size.
It is required to enable the setIgnoreDoubleClickEvents method on macOS so that double click events are ignored and every individual click is registered as a single click.
Now we need to use the toggleWindow() function to toggle mainWindow whenever the Tray icon is clicked.
Likewise, we need to call rightClickMenu when the Tray icon is right clicked in order to display the contextMenu.
So we use click and right-click event listeners on our tray object:
createTray = () => {
  this.tray = new Tray(path.join(__dirname, './assets/IconTemplate.png'));
  this.tray.setIgnoreDoubleClickEvents(true);

  this.tray.on('click', this.toggleWindow);
  this.tray.on('right-click', this.rightClickMenu);
};
Now we are done with the TrayGenerator class.
It’s time to instantiate it and then call the createTray method on it.
But first, import the TrayGenerator class at the top of the main.js file:
const TrayGenerator = require('./TrayGenerator');
Then initialize TrayGenerator by passing mainWindow and calling the createTray() method on its instance to generate a Tray object.
We do this right after calling createMainWindow(), which creates and assigns an instance of BrowserWindow to the mainWindow variable.
app.on('ready', () => {
  createMainWindow();
  const Tray = new TrayGenerator(mainWindow);
  Tray.createTray();
});
Further tweaks
If you run npm run client and then npm run server , you will notice that the mainWindow still appears in the middle of the screen and then disappears when you click the Tray icon.
And if you click the Tray icon once again, it repositions itself below the icon as we desired.
This is because we didn’t hide the mainWindow initially.
So, the following options passed to BrowserWindow ensure that:
– The window won’t be visible initially
– The window won’t have a frame
– It won’t be possible to put the window in fullscreen mode
– The user won’t be able to resize the window
show: false,
frame: false,
fullscreenable: false,
resizable: false,
You may have noticed that although we have a Tray icon in the menu bar, the application icon is still visible in the dock.
If you don’t want this, you can simply call the following line to hide it:
app.dock.hide();
So, after all the adjustments, the final code in main.js looks as follows:
// eslint-disable-next-line import/no-extraneous-dependencies
const { app, BrowserWindow } = require('electron');
const { is } = require('electron-util');
const path = require('path');
const TrayGenerator = require('./TrayGenerator');

let mainWindow = null;

const createMainWindow = () => {
  mainWindow = new BrowserWindow({
    backgroundColor: '#FFF',
    width: 300,
    height: 150,
    show: false,
    frame: false,
    fullscreenable: false,
    resizable: false,
    webPreferences: {
      devTools: is.development,
      nodeIntegration: true,
    }
  });
  if (is.development) {
    mainWindow.webContents.openDevTools({ mode: 'detach' });
    mainWindow.loadURL('http://localhost:3000');
  } else {
    mainWindow.loadURL(`file://${path.join(__dirname, '../../build/index.html')}`);
  }
};

app.on('ready', () => {
  createMainWindow();
  const Tray = new TrayGenerator(mainWindow);
  Tray.createTray();
});

app.dock.hide();
Persisting data on main process
Whether you want to store some user preferences or application state, there is a very handy npm package called electron-store to persist data on main process.
Let’s use this package to store a user preference, which is important for menu bar applications: “Launch at startup”.
Automatically launch at startup
Install and import the package and then create a store with a schema in main.js:
const Store = require('electron-store');
const schema = {
  launchAtStart: true
}
const store = new Store(schema);
The next thing we want to do is to be able to toggle this value.
This can be done in the renderer process, or we can add this functionality to contextMenu we created earlier, which is triggered by right clicking on the Tray icon.
Let’s change the TrayGenerator class slightly so that it also accepts a store object and shows a toggle option for “Launch at startup”.
We add a new menu item, which has this type of checkbox.
Its state should depend on the launchAtStart key, which we defined in the schema that we used to initialize the store.
So, to fetch this value, we use the get method on the store object.
And whenever we click this menu item, we get the value of the checkbox and store it as the value of the launchAtStart key by using the set method.
So, final version of the TrayGenerator.js file looks like this:
constructor(mainWindow, store) {
  this.tray = null;
  this.store = store;
  this.mainWindow = mainWindow;
}

rightClickMenu = () => {
  const menu = [
    {
      label: 'Launch at startup',
      type: 'checkbox',
      checked: this.store.get('launchAtStart'),
      click: event => this.store.set('launchAtStart', event.checked),
    },
    {
      role: 'quit',
      accelerator: 'Command+Q'
    },
  ];
  this.tray.popUpContextMenu(Menu.buildFromTemplate(menu));
}
And don’t forget to pass the store object as the second argument when creating the TrayGenerator instance.
const Tray = new TrayGenerator(mainWindow, store);
Now you should be able to see the “Launch at startup” option in the contextMenu opened through right-click.
Although we store the value of the checkbox in the store object under the name launchAtStart key, we didn’t make use of it to add our application to the system’s login items list.
This is done by calling the setLoginItemSettings method on app with an object, which has the key of openAtLogin with the value of launchAtStart store item.
app.setLoginItemSettings({
  openAtLogin: store.get('launchAtStart'),
});
Communication between renderer and main processes
So far we have only created a window and triggered it with a Tray icon click.
However, the actual application lives on the client side, which is the renderer process.
Building and styling the application on renderer process with React is no different than building a regular React application.
But, when it comes to communication between renderer and main processes, this is something handled through Electron API.
ipcMain and ipcRenderer
The communication between these two processes happens through ipcMan and ipcRenderer modules.
ipcRenderer can both listen and send messages, whereas ipcMain can only listen for messages coming from the Renderer process.
In order to send a message to a specific window, webContents.send() should be called on the specific BrowserWindow object.
Below you can see the example demonstration of the communication.
- Main process => Renderer process:
// In main process
const { ipcMain } = require('electron');
mainWindow.webContents.send('MSG_FROM_MAIN', 'hello renderer');

// In renderer process
const { ipcRenderer } = window.require('electron');
ipcRenderer.on('MSG_FROM_MAIN', (event, data) => console.log(data));
- Renderer process => Main process
// In renderer process
const { ipcRenderer } = window.require('electron');
ipcRenderer.send('MSG_FROM_RENDERER', 'hello main');

// In main process
const { ipcMain } = require('electron');
ipcMain.on('MSG_FROM_RENDERER', (event, data) => console.log(data));
IPC in action
Let’s build a very basic React app and store its state data on the electron-store we have created in the previous section.
The React app is a basic counter where you can increase or decrease a number by clicking the buttons.

I am just sharing the component code along with the styling without getting into any details since it is very basic. I will go into the details of the IPC connection.
import React from 'react';
import styles from './styles.sass';
class App extends React.Component {
  constructor() {
    super();
    this.state = {
      counter: 0
    };
  }

  increase = () => {
    this.setState(prevState => ({ counter: prevState.counter + 1 }));
  }

  decrease = () => {
    const { counter } = this.state;
    if (counter) {
      this.setState(prevState => ({ counter: prevState.counter - 1 }));
    }
  }

  render() {
    const { counter } = this.state;
    return (
      <div className={styles.app}>
        <button
          type="button"
          className={styles.button}
          onClick={this.decrease}
        >
          -
        </button>
        <div className={styles.counter}>{counter}</div>
        <button
          type="button"
          className={styles.button}
          onClick={this.increase}
        >
          +
        </button>
      </div>
    );
  }
}
export default App;
body
  margin: 0
.app
  align-items: center
  display: flex
  font-family: monospace
  font-size: 16px
  height: 100vh
  justify-content: space-around
  padding: 0 40px

  .counter
    font-size: 20px

  .button
    align-items: center
    border: 1px solid black
    border-radius: 50%
    cursor: pointer
    display: flex
    font-size: 20px
    height: 50px
    justify-content: center
    outline: none
    width: 50px
When the user interacts with the app and changes the state, we need to send this information to main process to be stored.
As we discussed earlier, sending data from renderer to main process happens through ipcRenderer.send();.
Sending from renderer process
Let’s include the ipcRenderer from Electron.
const { ipcRenderer } = window.require('electron');
Now, every time we update the state, we need to send a message.
In increase and decrease functions, we call setState.
Its callback function is where we need to dispatch our message.
Since we are going to send the same message along with the data, I’ve created a function named sendCounterUpdate and called this function in the callback of setState by passing the state variable counter as the argument.
Note that if you use object destructuring as const {counter} = this.state to pass the counter state, this would be referring to the old state, not the recently updated state, hence the use of this.state.counter as the parameter of this.sendCounterUpdate.
sendCounterUpdate = (data) => {
      ipcRenderer.send('COUNTER_UPDATED', data);
    }

    increase = () => {
  this.setState(prevState => (
    { counter: prevState.counter + 1 }
  ), () => {
    this.sendCounterUpdate(this.state.counter);
  });
}

decrease = () => {
  const { counter } = this.state;
  if (counter) {
    this.setState(prevState => (
      { counter: prevState.counter - 1 }
    ), () => {
      this.sendCounterUpdate(this.state.counter);
    });
  }
}
Now the message is sent to main process, but we don’t have any mechanism listening for this message.
Receiving on renderer process
Include ipcMain from Electron in your main.js file.
const { app, BrowserWindow, ipcMain } = require('electron');
Inside the callback function of the ready event of app, we listen for the specific message we sent from renderer process and store the received data in counterValue key of the store.
We also have to add this key to schema of the store.
So, update the schema variable as follows with an initial value of 0:
const schema = {
  launchAtStart: true,
  counterValue: 0
}
app.on('ready', () => {
  createMainWindow();
  const Tray = new TrayGenerator(mainWindow, store);
  Tray.createTray();

  ipcMain.on('COUNTER_UPDATED', (event, data) => {
    store.set('counterValue', data);
  });
});
Now the message is sent to main process, but we don’t have any mechanism listening for this message.
Storing this value alone doesn’t have any use. Therefore, we need to send this value back to the renderer process each time the app is initialized.
We also need to listen for this message on renderer process.
Sending from main process
As we discussed earlier, this happens by calling the send method on mainWindow.webContent, where mainWindow is the window that we want to send the message to.
Before sending a message, we need to make sure that the browserWindow instance we created (mainWindow) is finished loading.
If we don’t do that check, chances are our message would be sent before the renderer process starts listening for it and we could miss it as a result.
did-finish-load event is emitted on mainWindow.webContents and guarantees that the renderer process is loaded and ready.
Inside the callback function of mainWindow.webContents.on('did-finish-load'), we send an INITIALIZE_COUNTER message along with counterValue data fetched from the store.
app.on('ready', () => {
  createMainWindow();
  const Tray = new TrayGenerator(mainWindow, store);
  Tray.createTray();

  ipcMain.on('COUNTER_UPDATED', (event, data) => {
    store.set('counterValue', data);
  });

  mainWindow.webContents.on('did-finish-load', () => {
    mainWindow.webContents.send('INITIALIZE_COUNTER', store.get('counterValue'));
  });
});
Receiving on main process
In the React app, we use componentDidMount lifecycle hook to start listening for the INITIALIZE_COUNTER message and set the counter state with the received data whenever this message is sent from the main process, which happens only one time right after the renderer process is finished loading.
componentDidMount() {
  ipcRenderer.on('INITIALIZE_COUNTER', (event, counter) => {
    this.setState({ counter });
  });
}
Final versions of both main.js and the React component are below
Main.js:
const { app, BrowserWindow, ipcMain } = require('electron');
const Store = require('electron-store');
const { is } = require('electron-util');
const path = require('path');
const TrayGenerator = require('./TrayGenerator');

const schema = {
  launchAtStart: true,
  counterValue: 0
};

const store = new Store(schema);
let mainWindow = null;

const createMainWindow = () => {
  mainWindow = new BrowserWindow({
    backgroundColor: '#FFF',
    width: 300,
    height: 150,
    show: false,
    frame: false,
    fullscreenable: false,
    resizable: false,
    webPreferences: {
      devTools: is.development,
      nodeIntegration: true,
    }
  });
  if (is.development) {
    mainWindow.webContents.openDevTools({ mode: 'detach' });
    mainWindow.loadURL('http://localhost:3000');
  } else {
    mainWindow.loadURL(`file://${path.join(__dirname, '../../build/index.html')}`);
  }
};

app.on('ready', () => {
  createMainWindow();
  const Tray = new TrayGenerator(mainWindow, store);
  Tray.createTray();
  ipcMain.on('COUNTER_UPDATED', (event, data) => {
    store.set('counterValue', data);
  });
  mainWindow.webContents.on('did-finish-load', () => {
    mainWindow.webContents.send('INITIALIZE_COUNTER', store.get('counterValue'));
  });
});

app.dock.hide();
React component:
import React from 'react';
import styles from './styles.sass';
const { ipcRenderer } = window.require('electron');

class App extends React.Component {
  constructor() {
    super();
    this.state = {
      counter: 0
    };
  }

  componentDidMount() {
    ipcRenderer.on('INITIALIZE_COUNTER', (event, counter) => {
      this.setState({ counter });
    });
  }

  sendCounterUpdate = (data) => {
    ipcRenderer.send('COUNTER_UPDATED', data);
  }

  increase = () => {
    this.setState(prevState => (
      { counter: prevState.counter + 1 }
    ), () => {
      this.sendCounterUpdate(this.state.counter);
    });
  }

  decrease = () => {
    const { counter } = this.state;

    if (counter) {
      this.setState(prevState => (
        { counter: prevState.counter - 1 }
      ), () => {
        this.sendCounterUpdate(this.state.counter);
      });
    }
  }

  render() {
    const { counter } = this.state;

    return (
      <div className={styles.app}>
        <button
          type="button"
          className={styles.button}
          onClick={this.decrease}
        >
          -
        </button>
        <div className={styles.counter}>{counter}</div>
        <button
          type="button"
          className={styles.button}
          onClick={this.increase}
        >
          +
        </button>
      </div>
    );
  }
}

export default App;
Distributing the application
After you are done with implementation, the final step is to distribute your app.
There are several different packages for distributing an electron app, but I personally use electron-builder and this is already included in the boilerplate, which I have shared at the beginning of this article.
If you are using the boilerplate, all you have to do is run npm run build to create a production build of the React app, and then run npm run dist to distribute your Electron app.
Conclusion
Those who use their own setup can get more information regarding electron-builder here.
Happy coding!
Full visibility into production React apps
Debugging React applications can be difficult, especially when users experience issues that are difficult to reproduce. If you’re interested in monitoring and tracking Redux state, automatically surfacing JavaScript errors, and tracking slow network requests and component load time, try LogRocket.

LogRocket is like a DVR for web apps, recording literally everything that happens on your React app. Instead of guessing why problems happen, you can aggregate and report on what state your application was in when an issue occurred. LogRocket also monitors your app's performance, reporting with metrics like client CPU load, client memory usage, and more.
The LogRocket Redux middleware package adds an extra layer of visibility into your user sessions. LogRocket logs all actions and state from your Redux stores.
Modernize how you debug your React apps — start monitoring for free.
The post Building a menu bar application with Electron and React appeared first on LogRocket Blog.


Top comments (0)