Overview
REST was the undisputed champion of web APIs forever. It dethroned SOAP and its verbose XML in favor of svelte JSON over HTTP. REST also had a quite elaborate conceptual model rooted in resources and verbs. But, REST wasn’t a perfect fit for every problem. Developers bent over backward and tried to fit every communication and data exchange pattern into the REST paradigm.
Recently, the tide has turned and several new APIs appeared and gained significant mindshare: WebSockets, GraphQL and http2/ + gRPC.
This article is all about WebSockets. You’ll learn what WebSockets are all about, what they are good for, and even get to build a cool client-server game of Connect4 with Node on the backend, React+SVG on the frontend, with all of the communication between the server and the clients runs over WebSockets.
What are WebSockets?
WebSockets are a connection-based communication protocol.
What’s the big deal, you ask? We’ve had TCP since the dawn of time.
That’s true, but TCP is not available for web developers in the browser. WebSockets work in the browser. Until WebSockets came along you could only do HTTP request-response. WebSockets are message-based. That means you send a message and the other side receives a message.
Note that WebSockets are implemented on top of TCP. But, raw TCP is stream-based. You send a bunch of bytes (octets) and the other side has to figure out how to accumulate them and break them down into coherent messages. WebSockets does it for you, which is a great boon.

Who needs WebSockets?
WebSockets are really useful when the server wants to push a lot of data and/or frequently update the browser (think multiplayer games or chat services). Consider a game where every operation a player performs must be communicated to the other players ASAP. If you tried to implement it with REST, you’d probably resort to some polling mechanisms where all the players constantly bombard the server with requests for updates.
There are several issues with this scenario:
- the server has to handle a lot of requests even if it has nothing to report
- lag will exist and will grow if players are nicer and don’t poll as often
- the server has to maintain the recent state until all players were notified and come up with a solution for coordinating versioning with the client
- if a client drops the server has no good way to know about it
With WebSockets all these problems go away. The server is in control. It knows exactly how many clients are connected at each time. It can update all the connected clients immediately when something worthwhile happens. There is no lag. The server doesn’t need to keep around state once it notified all clients. If a client drops the connection drops and the server is notified immediately.
Chat services are a killer application for WebSockets. Character by character updates or even just the message: “X is typing…” are not possible without WebSockets (in the browser).
The Connect4 demo app
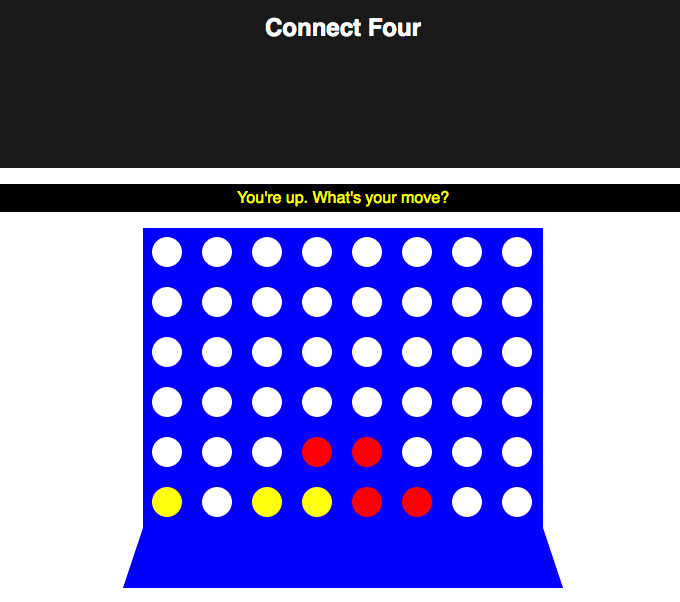
Let’s build a Connect4 game that demonstrates how WebSockets work. It will be pretty simple. There will be a server that manages the state of the game and two players that play against each other. The server is in charge of managing the board, ensuring the players make only valid moves, tell each player when it’s their turn, check for victory condition and again notify the players.
The client is a React-based app. It displays the board and messages from the server. When the server sends an updated board or a message the client just updates its state and React takes care of updating the display. The client also takes care of responding to clicks on the board when it’s the player’s turn and notifying the server.
The Connect4 game is not optimized at all. I send a lot of redundant information (e.g. the whole board every time instead of just changes), I send multiple messages even when they can be combined. This is by design. I intend to show how easy and user-friendly WebSockets are. The code is very straight-forward and readable. The only somewhat complex piece is checking for victory and it’s isolated in its own function on the server-side.
Here is what it looks like:

The code
Before we dive into the code let’s go quickly about where to find it and how the code is structured. The code for both the server and the client is available on gitlab: https://gitlab.com/the-gigi/connect4.
The entire server is in a single file: server.js
The client was created using create-react-app , which creates its own directory structure. I moved everything into the client sub-directory.
There are two README files. README.md is a concise file that gives a short description of the app and how to use it. The README2.md is the file generated by create-react-app and contains a lot of information about the goodies you get from using create-react-app to start your project.
Building the Connect4 server
The server is a node.js application that uses socket.io to function as a WebSockets server. All it takes to start a WebSockets server listening on port 1337:
const io = require('socket.io')()
.
.
.
reset()
const port = 1337
io.listen(port)
console.log('Listening on port ' + port + '...')
The server is super simple. It can run only one game at a time. The game state includes the game board, the two players, and who the current player is. The board is a 6x8 2D array where all the cells are initially white. I chose to represent the players as an object with two attributes ‘red’ and ‘yellow’. No need for a map here because the keys are strings and I don’t need to iterate over the keys. The value for each player is their WebSocket, which is initially null.
let board = null
const players = {'red': null, 'yellow': null}
let player = 'red'

function reset() {
  board = Array(6).fill(0).map(x => Array(8).fill('white'))
  players['red'] = null
  players['yellow'] = null
  player = 'red'
}
Why keep a players objects instead of just two variables? The strings ‘red’ and ‘yellow’ are used throughout to communicate important information back and forth between the server and the client.
OK. It’s time to talk about communication. On the server-side, everything happens inside io.on('connection', function(socket) {...}. This callback function is called whenever a client connects.
The server registers callbacks for various events and messages that I’ll cover soon. But, first the server stores the socket in the players object. The first client to connect gets to be the red player, yellow is second. The server will brutally and mercilessly disconnect any further connection attempts. The server will also send each player their color and whose turn it is.
if (players['red'] == null) {
    players['red'] = socket
    socket.emit('color', 'red')
  } else if (players['yellow'] == null) {
    players['yellow'] = socket
    socket.emit('color', 'yellow')
    io.emit('turn', 'red')
  } else {
    socket.disconnect()
  }
The emit() function used to send messages to the client or clients has two flavors. The io.emit() call lets the server broadcast the same message to all connected, while the socket.emit() call sends the message to a particular client. For example, each player needs to get a different message to know their color, but all players need to get the same message to tell who’s turn it is.
The server then goes on to register callbacks for two events: ‘disconnect’ and ‘click’. The ‘disconnect’ event is not very interesting and just removed the disconnecting player’s socket from the player’s object.
The ‘click’ event is where all the action is. When the active player clicks a column on the board the server receives the ‘click’ event and goes to work. First, the server verifies that the click is valid. It ignores clicks in the following cases: out of turn clicks, clicks on full columns (the top spot is already taken) and clicks when only one player is connected (if no one is connected then no one can click).
socket.on('click', function (column) {
    // Ignore players clicking when it's not their turn
    if (players[player] !== socket) {
      return
    }

// Ignore clicks on full columns
    if (board[0][column] !== 'white') {
      return
    }

// Ignore clicks before both players are connected
    if ((players['red'] == null) || (players['yellow'] == null)) {
      return
    }
Once this excruciatingly agonizing part is done, the server knows it’s a proper click and proceed to process it. Then, the server places a new piece at the top of the target column and send the updated board to all players via the ‘board’ message:
// find first open spot in the column
    let row = -1
    for (row = 5; row >= 0; --row) {
      if (board[row][column] === 'white') {
        board[row][column] = player
        break
      }
    }

io.emit('board', board)
Now the server needs to check if the current player actually won by placing that piece. It calls the checkVictory() with the location of the currently placed piece and if it returns true it means the current player won. The server broadcasts the ‘victory’ message to both players with the winning player’s color, disconnects both players and bails out.
But, if the player didn’t win the player toggles the active player and notifies both players with the ‘turn’ message.
// Check victory (only current player can win)
    if (checkVictory(row, column)) {
      io.emit('victory', player)
      // Disconnect players
      players['red'].disconnect()
      players['yellow'].disconnect()
      reset()
      return
    }

// Toggle the player
    player = player === 'red' ? 'yellow' : 'red'
    io.emit('turn', player)
Checking for victory
The most complicated part of the server is the victory check. It’s not rocket science, but you can easily miss some corner cases if you’re not careful. Let’s discuss it a little bit and then look at some of the code.
To win, a player must have four adjacent pieces aligned horizontally, vertically, or diagonally. If a player wins on a turn then the piece that was just placed must be part of 4 adjacent pieces. The trivial approach is to start from the last placed piece and then check in each of the 8 directions of additional 3 adjacent pieces in the player’s color.
But, then you can miss a case where the placed piece was in the middle of the sequence as in the following image:
So, the correct way to check is to go both ways and count the total of pieces with the player’s color. For example, when checking the horizontal direction we check both to the left and to the right.
That means that we only need to check four directions: horizontal, vertical, top-left to bottom-right diagonal and bottom-left to top-right diagonal. We also need to pay attention and not go out of bounds with our checks. Here is part of the code for horizontal checks:
function checkVictory(i, j) {
  const c = board[i][j]

// Check horizontally
  let count = 0
  // count to the left
  for (let k = 1; k < 4; ++k) {
    if (j - k < 0) {
      break
    }
    if (board[i][j - k] !== c) {
      break
    }
    count++
  }
  // count to the right
  for (let k = 1; k < 4; ++k) {
    if (j + k > 7) {
      break
    }
    if (board[i][j + k] !== c) {
      break
    }
    count++
  }

if (count > 2) {
    return true
  }
We count up to three places to the left and right, breaking when encountering anything that is not the current player’s color. In the end, if the count is more than two it means we have a sequence of 4 (including the currently placed piece) and it’s a victory.
The checks for vertical and diagonals are very similar except the indices are a little different and, in the case of the diagonals, both i and j are incremented.
Check it out here: https://gitlab.com/thegigi/connect4/blob/master/server.js#L15
On protocol design
WebSockets are awesome, but let’s talk about protocol design. The client connects and sends ‘click’ messages to the server. The server sends multiple messages like ‘board’, ‘color’, and ‘turn’.
Is it really necessary? Not really.
The server could send a single state message that includes everything. But, if you send just one message then the client code will be more complicated having to parse and figuring out what has changed.
The ‘board’ message presents another decision point. I send the whole board, but I could just as easily send just the location of the most recently placed piece.
If that was the case then the client would have to keep the board and update it properly when receiving a message on a newly placed piece vs. just receiving the whole board. Not a big deal in this case.
Building the Connect4 Client
The client is a React app where all the action takes place in the App.js main component. It also has two sub-components: board and infobar.
The InfoBar component
The InfoBar is a stateless functional component that just displays some information in the player’s color. It’s got some embedded style and it receives the message and the color as properties from its parent:
import React from 'react'

const InfoBar = ({message, color}) => {
  let style = {color: color,
               backgroundColor: 'black',
               padding: '5px'};
  return <p style={style}>{message}</p>
}

export default InfoBar
The Board component
The board is much more interesting. It has to handle clicks and yet it is also a stateless functional component that knows nothing about the server or WebSockets.
How does it work?
The parent passes a callback function called ‘onColumnClick’ as a prop. The board simply invokes this callback with the clicked column. Another cool thing about the board is that it uses SVG to render the board and the pieces. In addition, it also changes the mouse pointer according to the player’s turn. Let’s break it down piece by piece.
The board accepts 3 props from the parent. The ‘board’ prop is the 6x8 2D array that you’re already familiar with from the server. The ‘onColumnClick’ prop is the callback that will be invoked when a column is clicked and ‘yourTurn’ is a boolean.
Next, it defines an empty array for cells that will be populated later and sets the mouse cursor to either pointer or no-drop depending on the yourTurn prop.
import React from 'react'

const Board = ({board, onColumnClick, yourTurn}) => {
  const cells = []
  const style = {cursor: yourTurn? 'pointer' : 'no-drop'}
Here, we populate the cells arrays with the board cells. Each cell is an SVG group that has 50x50 blue rectangle with a circle in the middle. The circle’s color comes from the board prop and will be either red, yellow or white.
for (let i = 0; i < 6; ++i) {
  for (let j = 0; j < 8; ++j) {
    let cell =  onColumnClick(j)}
                style={style}>


    cells.push(cell)
  }
}
Finally, we return a 440x360 svg element with the board represented by the cells on top followed by a blue trapezoid polygon that serves as the base.
return <svg width={440} height={360}>
          {cells}
          <polygon points="20,300 0,360 440,360 420,300"
          fill={'blue'}/>
       </svg>
}
export default Board
The App Component
The App is the main component it is in charge of rendering the InfoBar and board components as well handling all the communication. It also uses a little css from App.css. For communicating with the server it uses the socket.io-client library that provides the openSocket() function.
import React, {Component} from ‘react’
import ‘./App.css’
import InfoBar from ‘./components/InfoBar’
import Board from ‘./components/Board’
import openSocket from ‘socket.io-client’;
The constructor sets the state, which consists of:
- the board (which is identical to the sever’s representation)
- the socket that connects to the server
- a message that is always displayed in the InfoBar
- the yourTurn boolean
class App extends Component {
  constructor(props) {
    super(props)

    this.state = {
      board: Array(6).fill(0).map(x => Array(8).fill('white')),
      socket: openSocket('http://localhost:1337'),
      message: 'Waiting for another player...',
      yourTurn: false
    }
The next part (still in the constructor) is where all the communication takes place. First, the this pointer is stored as the self variable in a closure. This is necessary for the WebSockets access to have access to the component’s state.
Then, the App constructor registers handlers for the following messages: ‘board’, ‘color’, ‘turn’ and ‘victory’. In each cases it updates the relevant parts of the state. Note, the handlers are registered in the constructor, but will be called later as the game progresses.
let self = this
    this.state.socket.on('board', board => {
      this.setState(...self.state, {board: board})
    });
    this.state.socket.on('color', color => {
      this.setState(...self.state, {color: color})
    });
    this.state.socket.on('turn', player => {
      if (player === this.state.color) {
        this.setState(...self.state,
                      {message: "You're up. What's your move?",
                       yourTurn: true})
      } else {
        this.setState(...self.state,
                      {message: player + ' is thinking...',
                       yourTurn: false})
      }
    });

this.state.socket.on('victory', player => {
      let newState = {yourTurn: false}
      if (player === this.state.color) {
        newState['message'] = 'You win!'
      } else {
        newState['message'] = 'You lose!'
      }
      this.setState(...self.state, newState)
    });
  }
Remember the onColumnClick function the board receives to invoke when a column is clicked? It’s a one-liner that just sends a ‘click’ message to the server.
onColumnClick = column => this.state.socket.emit('click', column);
The render() function is pretty straight-forward. It renders the header, then the InfoBar and then the board passing the necessary props from the state.
render() {
    return (
      <div className="App">
        <header className="App-header">
          <h1 className="App-title">Connect Four</h1>
        </header>
        <InfoBar color={this.state.color}
                 message={this.state.message} />
        <Board board={this.state.board}
               onColumnClick={this.onColumnClick}
               yourTurn={this.state.yourTurn}/>
      </div>
    )
  }
Here is an illustration with some arrows of a victory:

Conclusion
WebSockets are a great technology for client-server applications where the server needs to send messages, events or notifications to the client without being prompted or polled constantly.
In this post, we went though a full-fledged example of a Node server and React clients that communicate over WebSockets and together implement the classic Connect4 game. As a bonus, we used SVG for rendering the board and pieces.
Now, it’s your time to go out there and build awesome stuff with WebSockets.
Plug: LogRocket, a DVR for web apps

LogRocket is a frontend logging tool that lets you replay problems as if they happened in your own browser. Instead of guessing why errors happen, or asking users for screenshots and log dumps, LogRocket lets you replay the session to quickly understand what went wrong. It works perfectly with any app, regardless of framework, and has plugins to log additional context from Redux, Vuex, and @ngrx/store.
In addition to logging Redux actions and state, LogRocket records console logs, JavaScript errors, stacktraces, network requests/responses with headers + bodies, browser metadata, and custom logs. It also instruments the DOM to record the HTML and CSS on the page, recreating pixel-perfect videos of even the most complex single page apps.
Try it for free.
The post Quick guide to React compound components appeared first on LogRocket Blog.


Top comments (0)