
Originally published here
(If this is your first time here, check out my first MicroPython tutorial. Use it to get acquainted with the Wokwi simulator interface so that you are prepared to dive into this tutorial).
As humans, we rely a lot on our eyesight to detect movement in our environment. But there's a core requirement to that - the environment must be illuminated by light for us to see anything. That seems like an obvious requirement, until you realize that devices like smart light-switches are able to detect your movement in a pitch dark hallway and turn on the lights for you. How do they do that? Today we'll learn how, and even build our own smart light using MicroPython!
 Enemy cones of vision in the 1998 stealth classic Metal Gear Solid. Jetijones, CC BY 3.0, via Wikimedia Commons
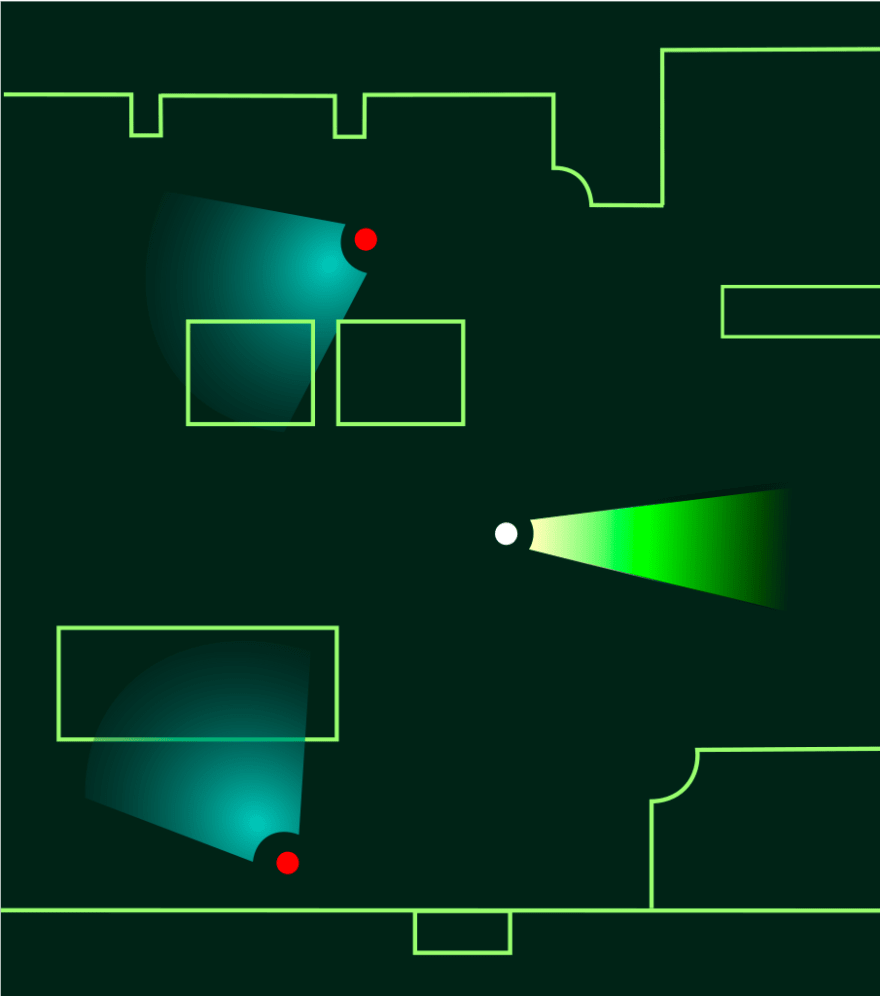
"Huh? Who's there?" If you've played stealth video games, you'll recognize the cone of vision that visualizes whether an enemy character can spot you moving. The cone shape accurately captures the sensitivity of our vision - movement that is closer to the centre of the cone or closer to the person is easier to notice than movement that is far from the person or from their line of sight. (It's a bit more complex than that because we have extra sensitivity to high frequency motion in our peripheral vision, but I won't get into it).
Turns out this cone of vision applies to machines as well! In every smart light-switch or automatic door system, there is a sensor known as a PIR, or passive infrared sensor. PIR sensors measure infrared light and they too have a 'cone of vision' i.e. they can sense movement up to a certain distance and angle, just like video game characters. What makes them different is that they can see in the dark.
 Automatic light-switch with PIR sensor at the top. Now you know why it looks so weird. Z22, CC BY-SA 4.0, via Wikimedia Commons
How? We humans (and animals too) are constantly radiating out energy from our bodies in the form of infrared light. You are a magnificent, radiant being - literally. When we step in front of a PIR sensor, it sees us in infrared regardless of whether the room is dark or lit. The sensor converts this infrared light into an electrical signal, which is conditioned by internal circuitry to output a digital signal - a hight voltage or '1' when motion is detected, and low voltage or '0' when no motion is detected.
Well, that's convenient. We can use this to build our own smart light-switch and get rich! Let's fire up the Raspberry Pi Pico simulator in Wokwi and give it a try. Click the 'plus' button at the top of the simulator and select the PIR Motion Sensor component. It has 3 pins - VCC, GND and OUT. As usual, we'll refer to the Pi Pico pinout and find that VCC should be connected to the 3.3V supply at pin 36. GND can be connected to any ground pin - I chose pin 23 this time. OUT can be connected to any of the GPIO pins - I chose GP20 on the right side. Let's wire it up in the simulator pane!
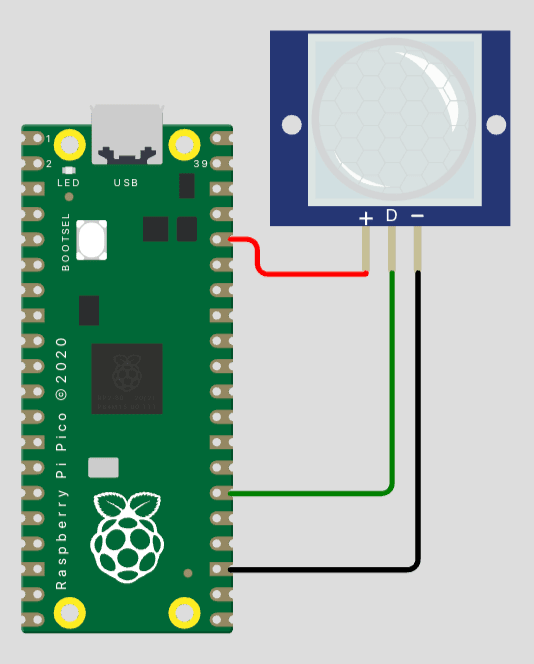 PIR sensor connected to the Raspberry Pi Pico
Before we get fancy and try to control a light, let's first get a feel for the output from the PIR sensor. In the Wokwi editor, we'll write a MicroPython program to just print out the digital value being output by the sensor. As always, we'll use the machine and time libraries to accomplish this.
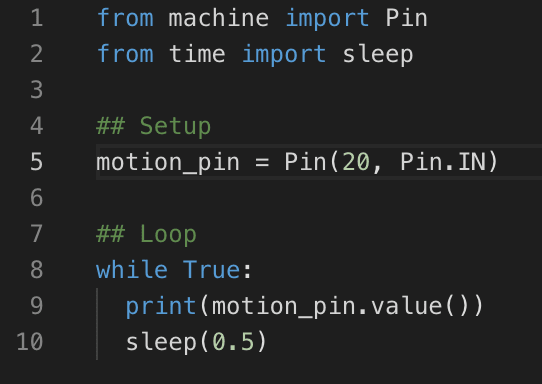 Code for printing out PIR sensor data
In the setup phase, we define the pin GP20 as an input pin so it can read the digital output of the PIR. In the main loop, we repeatedly read the value on that pin and print it out to the console. Then the code is idle for 0.5 seconds before reading the PIR again. Run the simulation and click 'Simulate motion' on the PIR sensor to see how its value changes.
 Data from the PIR sensor when it detects motion
As expected, it outputs a '0' all the time and outputs a '1' when motion is detected. However, it only outputs a '1' for about 5 seconds. Imagine trying to switch on a light in your room directly from this sensor data - you'd have to move in front of it every 5 seconds just to keep the light on! It would be pretty annoying. Our code needs to account for this and keep the light on for much longer. In a real light-switch, that time may be something like 1 - 2 hours. But to test out our code, let's just set it to 10 seconds and see if it works (unless you want to stare at your screen for an hour just to find out your code doesn't work!).
Here are the requirements: (a) if someone moves in front of the light, switch it on for 10 seconds, and (b) if someone moves again within that 10 second time-frame, refresh the countdown again so the light stays on for 10 seconds. Let's create a flowchart to help visualize the program.
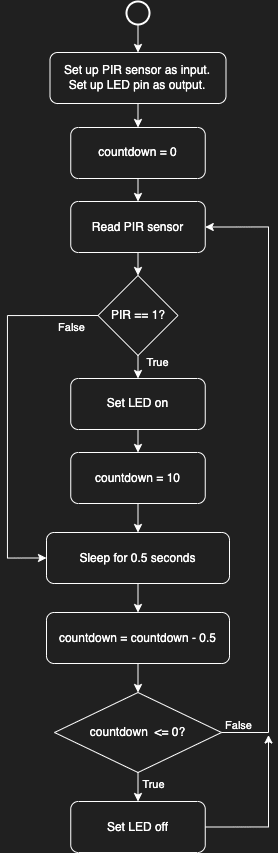
Before starting the main loop, we create a variable called countdown which we'll use for keeping the light on for a set time. We then start the program's main loop by reading the PIR sensor. If it returns '1', i.e. motion was detected, then we switch on the LED and set the countdown variable to 10 seconds. The code sleeps for 0.5 seconds and we account for that by subtracting the time from the countdown time. We keep repeating this until the countdown reaches 0, at which point we know that no more motion was detected so we can switch off the LED.
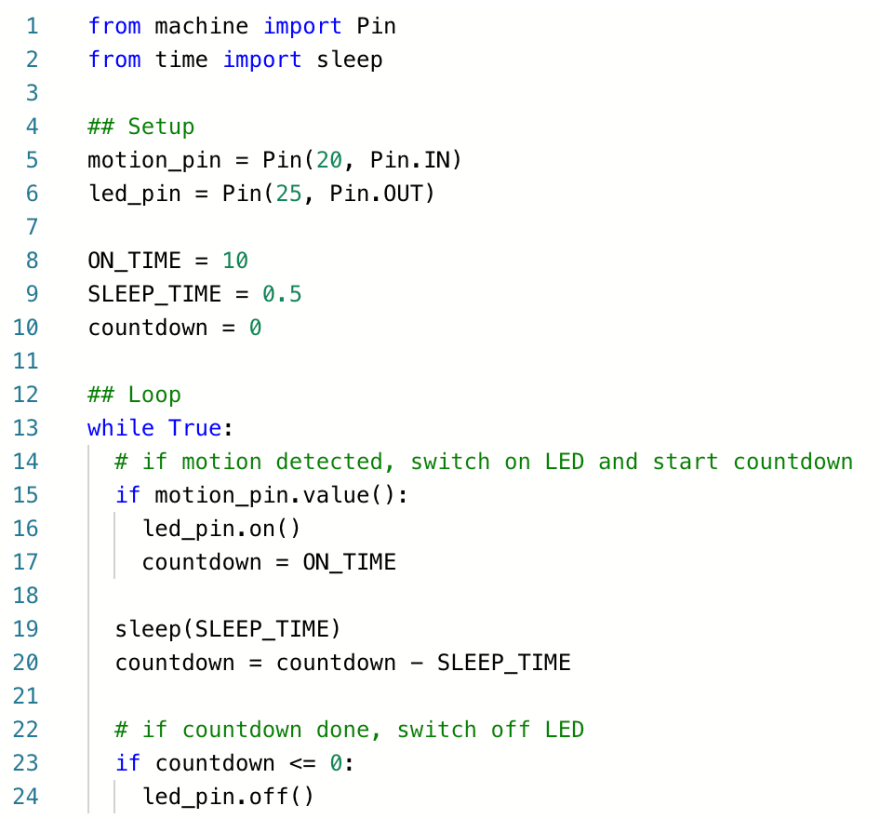
If this code works for the 10-second case, we know it should also work for the 1 hour case - we'll simply just have to change the countdown to 3600 seconds at that point, and we'll have a real (simulated) smart light! Let's modify our code from before to look like below. Remember from the Pico pinout diagram that the onboard LED is on pin GP25.
 Code for controlling an LED based on motion detected by the PIR sensor
Press the 'play' button in the simulator to try out your code! You'll see now that the LED stays on for 10 seconds even though the PIR sensor outputs '1' for only 5 seconds. And if you change the ON_TIME constant from 5 seconds to 3600 seconds, the LED will actually stay on for an hour in the simulation.
 I wanted to put an hour-long gif here but they wouldn't let me
There you have it! A fully auto-magic smart light, in just a couple dozen lines of MicroPython. What a time to be alive. For today's extra challenge, let's combine your knowledge of motion sensing and temperature sensing from the previous tutorial. You're going to build the sensor system for a thermostat! Your system must switch on the LED for 10 seconds if and only if (a) motion is detected, and simultaneously (b) the temperature is below 18 °C. Believe it or not, this is more or less how a smart thermostat with occupancy sensing works.
Good luck on the challenge question, and please reach out to me on Twitter if you'd like to ask me questions, give feedback, discuss the challenge solution or just casually chat about the meaning of life. And do follow/subscribe if you'd like more of my MicroPython tutorials :) I'm looking forward to your messages! Sayonara!


Top comments (0)