Introduction
I'm working on a project where streamers reward their audience with crypto
for showing off their gaming skills to the world. Rewards and other notifications are generated on backend and are embedded into the video stream by the plugin we developed.
Now we use polling to render reward codes and notifications which works, but has some drawbacks:
- Codes are time-sensitive and we have to use local time to render them. It becomes a problem when time on a streamer's box is off my a couple of minutes.
- Plugin code has too much logic to support polling and notification queues.
WebSocket looks like a natural solution. Here's how it should help:
- Codes are delivered to the plugin just when they need to be rendered. No need to use local time anymore.
- Plugin logic simplifies as we just need to wait for an appropriate event and start rendering.
Why socket.io?
Socket.io is a library that supports websockets and gives you some benefits out of the box:
- It supports multiple transports. It automatically upgrades connection from HTTP to WebSocket if the client supports it. If not, it uses HTTP long polling for message exchange.
- It automatically tests connection and reconnects if backend stops responding. Yay!
- It's load balancer friendly (at least on paper)
- It's a mature and well-supported project
To me that sounds good enough to start using it. Let's see how to build a simple that support scaling.
Desired architecture with scalability in mind
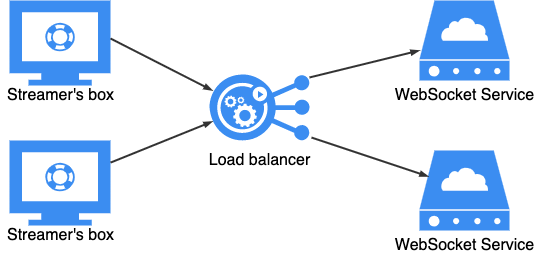
We need multiple nodes to handle connections (pretty obvious) and a load balancer to rule them all. In AWS we have 2 types of load balances available:
Both of them support WebSockets, but ALB also supports node health checks which is quite handy. See ALB settings section down below on how to set up critical load balancer parameters.
Server code
import * as bodyParser from 'body-parser';
import * as cors from 'cors';
import * as express from 'express';
import { nanoid } from 'nanoid';
import * as io from 'socket.io';
import { Config, ConfigProvider } from './common/config';
import { initLogger, logger } from './common/logger';
import { S2S as RestS2S } from './rest/middlewares';
import { router } from './rest/routes';
import { ConnectionOrchestrator } from './websocket/connectionOrchestrator';
import { DropCodeHandler } from './websocket/handlers';

const config: Config = ConfigProvider.get();
initLogger(config);

const app = express();
const port = config.port;

app.use(cors());
app.use(bodyParser.urlencoded({ extended: false }));
app.use(bodyParser.json());

// configuring /healthcheck endpoint
const auth = RestS2S(config);
app.use('/', router(config, auth));

// start the server
const server = app.listen(port, () => logger.info('server is started at http://localhost:' + port));

// set up socket.io
const ws = io(server, {
    path: '/websockets', // path to make requests to [http://host/websockets]
    maxHttpBufferSize: 1024, // max message payload size (prevents clients from sending gigabytes of data)
    pingInterval: 60 * 1000, // 1 minute
    pingTimeout: 4 * 60 * 1000 // 4 minutes
});

// creating a node identifier to see if sticky sessions work as expected
const nodeId = nanoid(6);

ws.use(async (socket, next) => {
    logger.debug(`[node: ${nodeId}] New connection headers: `, socket.handshake.headers);

    // Global namespace handling
    // Authentication and connection rate limiting goes here
});

ws.of(`/dropcodes`).on('connection', socket => {
    const socketId = socket.conn.id;
    logger.debug(`[node: ${nodeId}] Dropcodes handler starts`, socketId);

    // Subscribe to messages and emit messages
});
Multiple namespace support is also a cool feature and allows clients to subscribe to notifications they're interested in. For instance, after rolling out reward codes over WebSockets I can easily add donation notifications later on.
Client code
It's not clear from the documentation how to configure socket.io client. Where the namespace goes in the URI? What exactly is the path?
Short answer to these questions: namespace goes to connection URI https://example.com/namespace, path goes to client options (see the example below).
import io from "socket.io-client";

// Connection
const socket = io( "https://your-alb-host/dropcodes", {
  "path": "/websockets",
  "transports": ["polling","websocket"],
  "transportOptions": {
    "polling": {
        "extraHeaders": {
            "authorization": "ApiKey <Key>"
        }
    }
  }
});

// Listeners
socket.on("connect", (data) => {
  console.log("socket connected");
});

socket.on("disconnect", () => {
  console.log("socket disconnected");
});
Path is the URI where socket.io handles requests. In my case it's important as I'd like the service to provide health checks for ALB. It's also important to understand what socket.io path is to configure routing on ALB if needed.
For the longer answer please see this post on StackOverflow. It explains the difference between path and namespace in more detail.
Application Load Balancer settings
There are two important things to configure in your load balancer:
- Sticky session support
- Connection Idle timeout
Sticky sessions
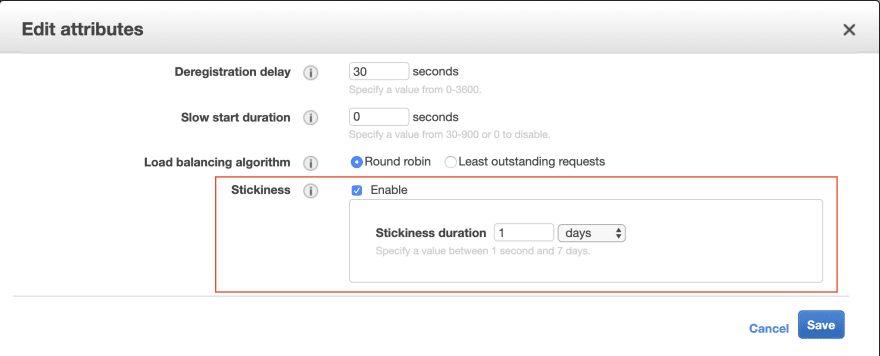
Sticky sessions is a technique that allows load balancer to redirect traffic to the same node after a connection has been established. This is vital for normal WebSocket operation and every tutorial mentions it. Here is how to enable it.
Using AWS Console
- Open EC2 Management Console
- Go to
Load Balancerslist - Find your Load Balancer
- Open
Listenerstab - In the
Rulescolumn you'll find a link to your target group. Follow the link - In Target Group settings click
Edit attributesbutton - Enable stickiness. Duration is value is basically how long you would like load balancer
to redirect traffic from one client to the same node. This value should be aligned with user's session duration.
CloudFormation
  ECSTG:
    Type: AWS::ElasticLoadBalancingV2::TargetGroup
    DependsOn: ECSALB
    Properties:
      Name: !Sub '${Prefix}-${Name}-${Environment}-tg'
      [...skipped healthcheck parameters...]
      Port: 80
      Protocol: HTTP
      VpcId: <vpcId>
      TargetGroupAttributes:
      - Key: deregistration_delay.timeout_seconds
        Value: '30'
      - Key: stickiness.enabled
        Value: 'true'
Idle timeout
I've learned the importance of this setting the hard way. I've changed server heartbeat interval and noticed weird behavior. Firecamp logs show too many reconnects and WebSocket connection has been downgraded to long polling. After spending hours debugging and adding more logs I figured out where the problem was. If Idle timeout for ALB is less than a heartbeat interval, then ALB just closes connection as inactive. Here is how to find the parameter:
Using AWS Console
- Open EC2 Management Console
- Go to
Load Balancerslist - Find your Load Balancer
- Under
Attributessection in Load Balancer settings clickEdit attributesbutton.
CloudFormation
  ECSALB:
    Type: AWS::ElasticLoadBalancingV2::LoadBalancer
    Properties:
      Name: !Sub '${Prefix}-${Name}-${Environment}-alb'
      Type: application
      IpAddressType: ipv4
      LoadBalancerAttributes:
      - Key: idle_timeout.timeout_seconds
        Value: '120'
      Subnets: <subnets>
      SecurityGroups: [!Ref ALBSecurityGroup]
Testing
Testing tools that just support WebSocket (like websocket.org) won't work as socket.io expects HTTP connection first. The good news is there are tools that support socket.io directly.
You can go with online socketserve, but I'd recommend checking out Firecamp. The basic version does it's job, does not require any coding and is free. It saved me a lot of time debugging connectivity issues.
Conclusion
I didn't envision this post to be a step-by-step tutorial on how to use socket.io. There are plenty of them already. I'd like to highlight and share with you some issues that are not covered in the official documentation and could be tricky diagnose and fix.
Please let me know in comments if you're interested in authentication implementation and connection flooding prevention.


Top comments (2)
Thanks for the great post. Please let us know more about authentication and connection flooding prevention.
Thanks for writing this detiled blog post and using Firecamp :)