Table of Contents
Hi, I'm Brittney and I just published my first theme Deep Water to the VSCode Marketplace. I'm also an instructor over at ZTM Academy and the owner, designer, and developer at bDesigned. You can find more dev notes by me at Console Logs.
TLDR: Create and publish your own VSCode theme or just check out mine below.

Deep Water Theme
Deep Water Repo
Creating a VSCode Theme Extension
Themes and extensions are a great part of what makes Visual Studio Code (VSCode) so amazing to use. I love changing my colors ever so often, just to get a new look and feel when I code. Creating your own VSCode theme can be a learning and sometimes challenging experience, so I wanted to write this post on my journey in creating my first theme. From editing a theme to publishing on the marketplace, I want to take you step by step through the process. Let's get started!
Create Files
To begin, we need to create a directory to hold our theme files.
mkdir theme-name
cd theme-name
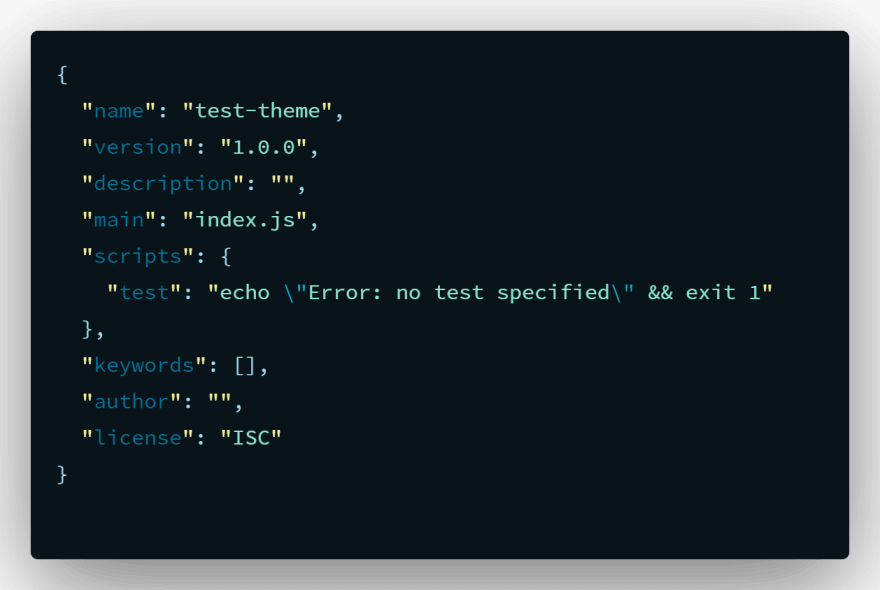
There are only 2 required components of a color theme in VSCode, a package.json file and a theme file in json format. A readme file and a logo is always a nice addition, so we will be creating those as well. Let's create the required files. Run npm init -y in the directory you made to create the package.json. Create a folder called themes or run mkdir themes in the terminal. The next step caused me a lot of trouble when first publishing my theme. It is not documented, but the json file for the theme, needs to be named a specific way in order for it to show up within the vscode preferences. Inside of your themes folder, create a file named the displayName of your theme followed by -color-theme.json. It should look like this if your name is Test Theme, its Test Theme-color-theme.json. Here are the commands in order.
npm init -y
mkdir themes
touch themes/Test Theme-color.theme.json
Package.json
For our package.json file, there are some required fields for the VSCode extension. After running the npm init -y, we should have a file that looks similar to the one below.
We can rip out the scripts section and the other fields can be modified to fit your theme. There are additional fields needed for the VSCode extension inside the package.json file, these are publisher, engines, categories, and contributes, a displayName field is also nice. After editing the initial package.json, let's add the required fields in.
{
  "publisher": "bDesigned",
  "engines": {
    "vscode": "^1.0.0"
  },
  "categories": [
    "Themes"
  ],
  "contributes": {
    "themes": [
      {
        "label": "test-theme",
        "uiTheme": "vs-dark",
        "path": "./themes/theme-name.json"
      }
    ]
  },
  "displayName": "Theme Name"
Edit Colors
Now, we can start working on our theme. VSCode uses a settings.json file to edit your workspace. To see the colors as you add them, I edited my settings.json and then added to my theme/theme-name.json to ensure they were the correct colors. In VSCode, open settings.json by clicking CTRL+SHIFT+P in Windows, or CMD+SHIFT+P in Mac and then type settings.json in the box that pops up. This will open the file.
You may already have things inside your settings.json, but the areas we need to edit are under "workbench.colorCustomizations" and "editor.tokenColorCustomizations": {"textMateRules":[]}. To ease the confusion of adding these scopes, VSCodes term for the rules used, I created a color pallette and then added a "name" field to all of my "textMateRules" that says the color or what the rule is setting. Below is a sample of my settings.json.
"workbench.colorCustomizations": {
    "activityBar.background": "#08131a",
    "activityBar.border": "#008c9644",
    "activityBar.foreground": "#008c96",
    "activityBarBadge.background": "#08131a",
    "activityBarBadge.foreground": "#008c96"
},
"editor.tokenColorCustomizations": {
    "textMateRules": [
      {
        "name": "Italic",
        "scope": [
          "comment",
        ],
        "settings": {
          "fontStyle": "italic"
        }
      },
      {
        "name": "Gray",
        "scope": ["comment"],
        "settings": {
          "foreground": "#4b6869"
        }
      },
    ]
}
I separated the italic and the colors into individual scopes to keep them apart in case I want to change or remove something, I only need to go to that place. After, figuring out a color pallette, you can add a scope with a "name" field for each color. To add rules to each of these scopes, we need to figure out what VSCode calls what we want to color. I used the built in Developer: Inspect Editor Tokens and Scopes to figure out what each individual item was called. You can find it with the Command Pallette again by searching for the developer inspect editor and it should come up with a box that looks similar to the ones below.

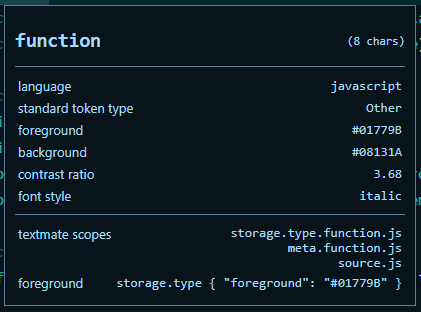
On the left side of the bottom image, you can see textmate scopes and on the right are the scopes that fit the currently selected item. The image has the function in JavaScript selected. You will use those scopes to add to a color inside your settings.json. Usually these are very specific to the language, but just using the base should work in most cases. Here is an example:
"editor.tokenColorCustomizations": {
    "textMateRules": [
      {
        "name": "Dark Teal",
        "scope": [
          "storage.type"
        ],
        "settings": {
          "foreground": "#01779b"
        }
      }
    ]
}
Now you can go through each thing you want to colorize and add a scope for that item to the correct color. Once it is where you like it, we can copy the rules over into our theme.json file. Everything inside "workbench.colorCustomizations": { ...copyEverythingHere } and inside "textMateRules": [ ...copyEverythingHere ] needs to be copied over to the theme.json file like this:
{
  "name": "Deep Water",
  "type": "dark",
  "colors": {
    ...pasteAll workbench.colorCustomizations here
  },
  "tokenColors": [
      ... pasteAll textMateRules here
  ]
}
Images
After this is done, the theme is technically ready to publish. But, if you want it to look nice, you can add an icon and a readme file. Create an images folder in the root directory or mkdir images in the terminal. Create an icon and any screenshots in png format (SVGs are not supported) and place them in the images folder. We need to update the package.json to accept the icon. Add an "icon" key followed by the image path "icon": "images/logo.png".
Readme
Now we can add a readme.md file to the root directory. Write up info about your theme and add any screenshots of your theme to make it stand out. You can also add some badges to it for some flair from Badgen.net. Making sure to specify the language the themes support and screenshots showing the theme off are always helpful.
Becoming a Publisher
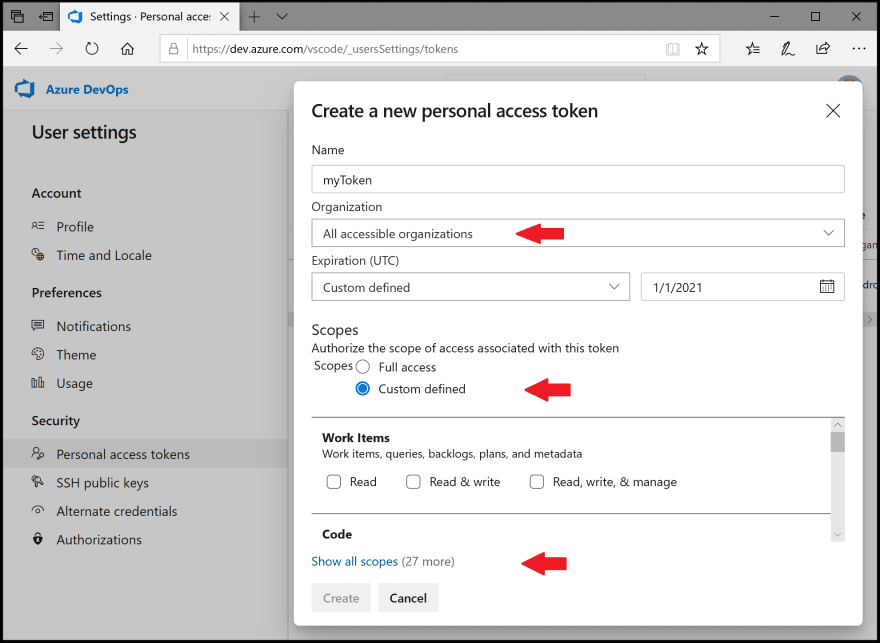
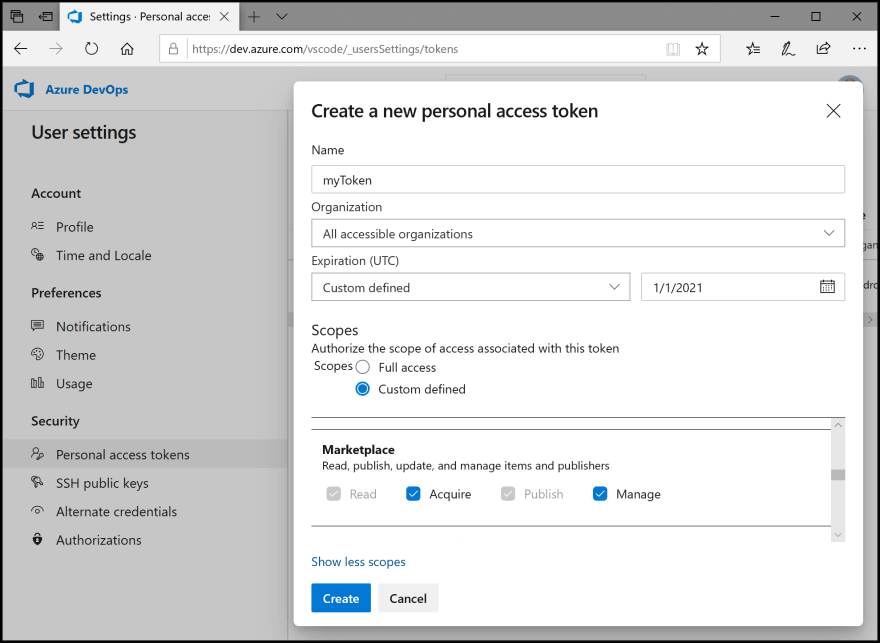
To publish a file in the marketplace, you need to have an access token from Azure. You can create this account by going to dev.azure.com/vscode. Once it is created, we need to get a personal access token. This is a detailed process to get right, so make sure to follow all the directions in the images below. Things to note, in Organization, make sure to select All accessible organizations. Then, to open the Marketplace option, click on Custom defined and show all scopes. You can then find the Marketplace and click all the check boxes (read, acquire, publish, and manage). Once all of this is done, click Create and make sure to save your access token somewhere as Azure does not save it on their end. Also, copy the access token to the clipboard, because we will use it in the next step.
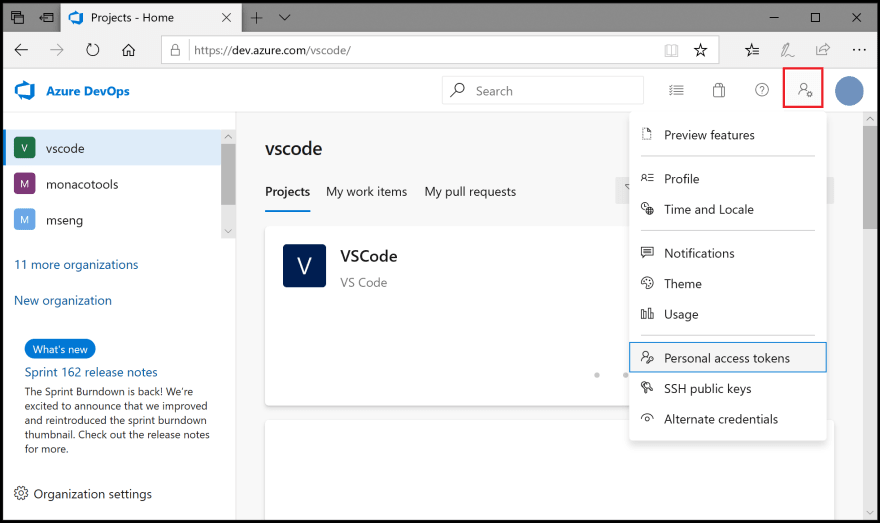

Azure
Publish Theme
Now that we have an Azure account set up to publish on the Marketplace, we can install the vsce package and create a publisher. If you already have a publisher name under the account section of VSCode Marketplace, you can skip the creation part and use the name you have already created.
npm i -g vsce
vsce create-publisher your-name
Here it should prompt you for the access token you copied when creating your account. You can use CTRL+V on Windows or CMD+V on Mac to paste the token. After the publisher is set, we should then be able to login.
vsce login your-publisher-name
In the package.json file the publisher field is the username used in the vsce login as well. Double check you have copied all of your settings.json rules into the correct sections of your themes json file and we can move onto packaging and publishing the extension.
vsce package
vsce publish
As long as there were no errors, you should now have a package published in the Marketplace. It will show you a link to the themes page that will take approximately 5 minutes to work. But wait, what if we try to update? VSCode does not automatically track the repo for changes.
Updating
If you make any changes to your theme, to update we first need to up our version number in the package.json from 1.0.0 to 1.0.1. After updating the version, push the changes to GitHub.
git add .
git commit -m 'commit message'
git push
When the changes are pushed, we need to tag the version with git.
git tag v1.0.1
Once the version is tagged, we can then republish the updated extensions.
vsce publish
Now you should have a fully functional theme on the Marketplace! Hopefully you enjoyed reading through and learned a thing or two along the way!


Top comments (9)
This post will help me to build a youtube video on my channel!
Nice, did you end up creating a video on building VScode themes ?
Not yet actually. Maybe next year - Vscode themes in 2021
thanks, i was able to build my own vs theme
marketplace.visualstudio.com/items...
Nice theme :D
Thanks
Wonderful post! Creating a VSCode theme is in my bucket list, this will help.
This is amazing. Well detailed and clear. I will definitely create a vscode color theme. 💯🌟
Freaking awesome. Thanks