This post is a tutorial showing how to setup a TLS/SSL connection from Apache NiFi to Solr.
Certificates
We can save ourselves some time and use NiFi’s TLS toolkit to generate everything we need.
Assuming you have downloaded the latest toolkit and extracted it somewhere, runthe following command:
./bin/tls-toolkit.sh standalone -n 'localhost' -C 'CN=bbende, OU=NIFI' -o './target'
This should generate the following in the target directory where you ran the above command:
  target/
  ├── CN=bbende_OU=NIFI.p12
  ├── CN=bbende_OU=NIFI.password
  ├── localhost
  │   ├── keystore.jks
  │   ├── nifi.properties
  │   └── truststore.jks
  ├── nifi-cert.pem
  └── nifi-key.key
- nifi-cert.pem - public certificate of the CA
- nifi-key.key - private key of the CA
- keystore.jks - public certificate and private key for CN=localhost, OU=NIFI
- truststore.jks - public certificate of the CA (nifi-cert.pem)
- nifi.properties - passwords for the keystore and truststore
- CN=bbende_OU=NIFI.p12 - client certificate for your browser
- CN=bbende_OU=NIFI.password - password for CN=bbende_OU=NIFI.p12
We can now configure Solr…
Solr config
Download the latest Solr release
https://lucene.apache.org/solr/downloads.html
Extract the Solr release somewhere
tar xzvf solr-7.0.1.tgz
cd solr-7.0.1
Copy the keystore and truststore from above
mkdir certs
cp nifi-toolkit-home/target/localhost/* /path/to/solr-7.0.1/certs/
Edit bin/solr.in.sh to specify TLS/SSL properties
SOLR_SSL_KEY_STORE=/path/to/solr-7.0.1/certs/keystore.jks
SOLR_SSL_KEY_STORE_PASSWORD=YOUR-PASSWORD
SOLR_SSL_KEY_STORE_TYPE=JKS
SOLR_SSL_TRUST_STORE=/path/to/solr/solr-7.0.1/certs/truststore.jks
SOLR_SSL_TRUST_STORE_PASSWORD=YOUR-PASSWORD
SOLR_SSL_TRUST_STORE_TYPE=JKS
SOLR_SSL_NEED_CLIENT_AUTH=false
SOLR_SSL_WANT_CLIENT_AUTH=false
The keystore and truststore passwords should be replaced with the real passwords which in our case are in nifi.properties in nifi.security.keystorePasswd and nifi.security.truststorePasswd respectively.
Start Solr
./bin/solr start
Create a core
./bin/solr create_core -c nifi-test
Verify Solr is up and running correctly over https with the created core
https://localhost:8983/solr/#/nifi-test
You will have to accept a security exception since we are using a self-signed certificate.
NiFi Config
For this post I am using Apache NiFi 1.4.0. I’m going to assume you can download and start NiFi.
Launch the NiFi UI in your browser
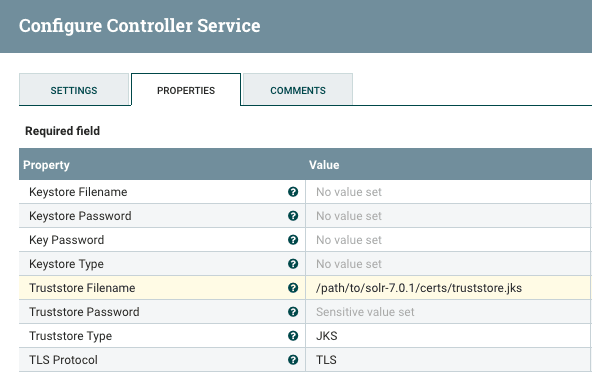
Create an SSLContextService from context palette on the left and start the service
NOTE: Since Solr currently has need-client-auth and want-client-auth set to false, we are only doing one-way TLS here, which means NiFi is verifying the certificate presented by Solr, but NiFi is not presenting a certificate itself.
Create a GenerateFlowFile processor to create some data
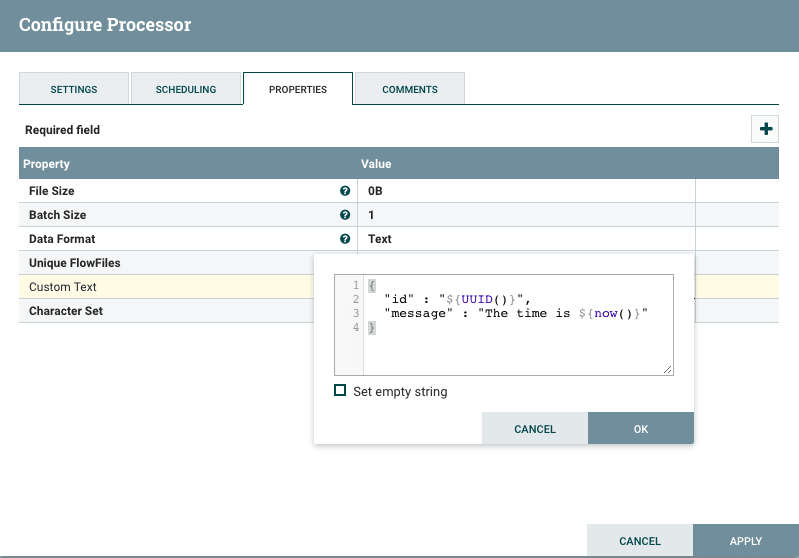
Change the scheduling to run every 10 seconds, or something reasonable.
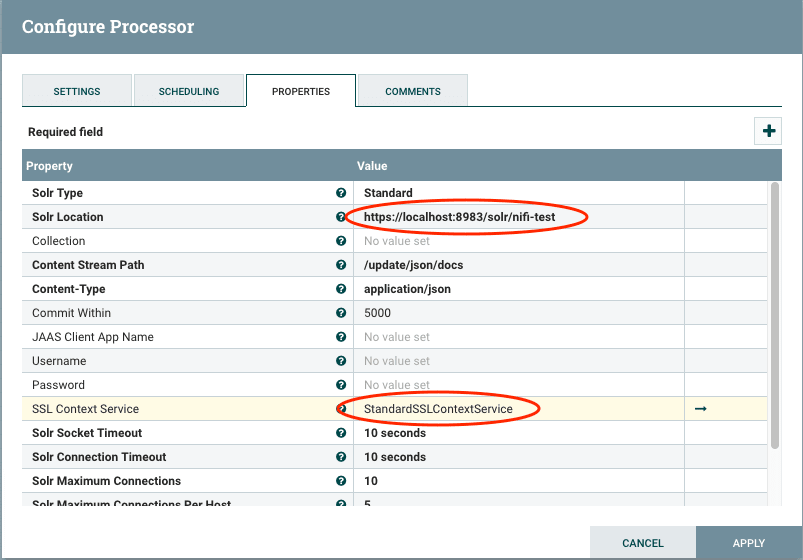
Create a PutSolrContentStream processor using the SSLContextService
Connect everything and start the flow

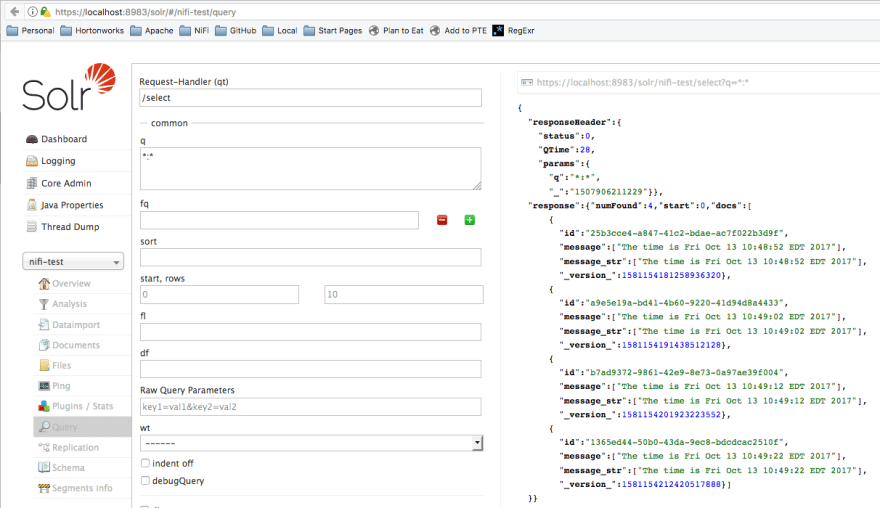
Check Solr Admin UI to see documents were ingested
What About Two-Way TLS/SSL?
Stop the flow in NiFi
Stop Solr
/path/to/solr-7.0.1/bin/solr stop -all
Edit /path/to/solr-7.0.1/bin/solr.in.sh and require client auth
SOLR_SSL_NEED_CLIENT_AUTH=true
Start Solr again
/path/to/solr-7.0.1/bin/solr start
NOTE: You will now need the client p12 from earlier loaded in your browser if you need to access Solr Admin UI
Add a keystore to the SSLContextService in NiFi

NOTE: In a real environment, NiFi and Solr would likely be running on different machines, and each would have their own certificatein their own respective keystore. In this example, NiFi and Solr are both using the same keystore for simplicity.
Start the flow again and documents should be ingesting
What About Solr Cloud?
The Solr Reference Guide has really good documentation on enabling SSL, and has a specific section onhow to enable SSL with Solr Cloud.
One thing to keep in mind is that the certificates you generate for Solr need to line-up with the hostname that Solr isbinding to.
If you wanted to test this locally and use the same localhost cert we used above, you would need to tell each Solr instanceto bind to localhost:
bin/solr -cloud -s cloud/node1 -z localhost:2181 -p 8984 -h localhost
bin/solr -cloud -s cloud/node2 -z localhost:2181 -p 7574 -h localhost
If you don’t do that, they will likely bind to an internal IP address which wont match the value in the certificate.
Another option for testing is to turn off peer verification as the Solr reference guide shows:
bin/solr -cloud -s cloud/node1 -z localhost:2181 -p 8984 -Dsolr.ssl.checkPeerName=false
bin/solr -cloud -s cloud/node2 -z localhost:2181 -p 7574 -Dsolr.ssl.checkPeerName=false
You should only turn off peer verification for testing.
On the NiFi side, you would have to reconfigure PutSolrContentStream to use cloud mode, and provide the ZooKeeperconnection string, rather than the standalone URL.


Oldest comments (0)