
I recently decided to create a new site to share my posts, talks recording, slides and other content, making it more accessible. Having already a static page published with GitHub pages, I explored the currently available options and decided on Hugo and Netlify.
Hugo and Netlify
Hugo is nowadays one of the most popular open-source static site generators, very flexible, counts with shortcodes and plenty of themes. There is also a cli available, which burst the speed to have your site ready to be published.
Netlify then covers all the aspects from continuous deployment workflow with Git integration, supporting several branches and versions, automated certificates renewal or DNS if you choose to use a custom domain.
1. Install Hugo and create your first site
The first step would be to install Hugo, I am using macOS in the examples if you are using any other operating system, visit the official installation guides.
$ brew install hugo
$ hugo version
Once we have tested the installation, we are ready to create our first site. The below will also create a folder named b3a.dev where we can now init our git repository.
$ hugo new site b3a.dev
2. Configuring a theme
Visit Hugo themes for a list to consider. You can find from personal or blog to company-oriented. Choose the one that best suits you.
In the specific theme page, you will find installation guidance. A couple of examples: Beautiful Hugo or Hugo Bootstrap4.
2.1 Working with git submodules
Once you have chosen a theme there are several methods to work with it inside your site repository.
The best practice is to clone the theme as a git submodule, will allow you to manage the theme repository as an independent one, so you can update and pull future versions in a comfortable manner. Also, you will keep your site and the theme isolated, making it also easier to change to a different theme in the future.
Clone the chosen theme as a submodule in the themes directory:
$ cd b3a.dev
$ git submodule add https://github.com/themefisher/timer-hugo.git themes/timer-hugo
When you push your changes, the contents of the submodule will appear as a reference to the commit in the original theme repository you are using:

When cloning your site repository, don't forget to use the --recurse-submodules flag to also download the submodule contents:
$ git clone --recurse-submodules https://github.com/b3a-dev/b3a.dev.git
3. Initial setup
Every theme has specific setup guides, but most of them count with an exampleSite directory that contains some home configuration, nav menu, template blog posts, etc
It will help you to see the theme of your choice in action and start working on your own site structure.
Copy the contents of the directory exampleSite inside the theme folder into the main root directory (our site, the one created previously).
$ cp -r exampleSite/* ../../
Now you can start Hugo server and access your site: http://localhost:1313/
$ hugo serve
3.1 Hugo cli
There are several actions that we can perform with the provided cli. Of course, we could also do some of them manually like creating new blog posts, but using the cli helps you build faster.
$ hugo new posts/my-first-post.md
Visit the official documentation for a full list of all the hugo cli available commands.
4. Site customization
Now we have all we need to start working on our site locally. All the changes that we made are automatically updated, so after starting the hugo server we can forget about it and just focus on the contents.
4.1 Custom content
Naturally, you will need to customize the logo, nav tabs, images, blog posts, the home page, footer, banner...
Most of them will be located in the different directories inside your site repository, such post for the blog with markdown .md extension, or static files such images including the logo.
Do not edit any file in the themes directory. Remember this is a submodule, you will be working on someone else repository, changing the original theme.
If you need to make changes for example to some theme .html templates, copy the template from the subdirectory in themes/yourTheme directory into your site equivalent subdirectory.
For example, from yourSite/themes/yourTheme/layouts/partials/banner.html to yourSite/layouts/partials/banner.html
4.2 Working with templates
Usually markdown .md files are used, common when working with blog posts content. Also yaml format .yml is used for data definition and Hugo also supports toml .toml. Below you can find an example in every one of the mentioned formats.
Every post is written in a markdown file.
config.toml file contains the different menu tabs with the links.
The home page includes a list of the recent contributions, this data is loaded from a yaml list.
Working with templates in our html layouts helps us customize the output when data may vary from one entry to another.
{{ with ... }}
In the first example, we have one layout to show our blog posts, but not every post has the same information, some of them contain recordings, other only slides. Using {{ with ... }}, only if the param exists the information is loaded.
{{ range ... }} and {{if eq .param "value"}}
In the second example, the links for the different nav tabs are configured, but one of them, unlike the others, points to an id on the same page, not a different page. With {{ range ... }} we can go through an array. {{if eq .param "value"}} alow to compare two string values.
{{ if ... }}
The third example is similar to the first one, in the list of content to show on the home page, not every entry of the list has the same attributes. By using the templating in the html layout we can show the right content for every item.
4.3 Converters
Working with all the formats supported by Hugo: .toml, .yaml, .json, .md or .html, it is easy to come with the necessity of a converter. You can find some toolkit online.
Or use hugo for that purpose, visit the official guide.
hugo convert toTOML [flags]
4.4 Add tweet button
Make it easier for others to share your content.
When you want to share something on Twitter, you look for the author handle, then the short link to the content, and some hashtags, in addition to a sentence that summarizes the content you are sharing. Adding a click to tweet button with all that already set is something your readers will appreciate.
For example, if we wanted to tweet this content: Check out this talk: “Cloud-native monitoring with Prometheus” by @beatrizmrg https://youtu.be/ZGckorAJ1IQ #PrometheusIO #commitconf, we need:
-
endpoint
http://twitter.com/intent/tweet -
text
?text=%20.. -
handle
%20%40.. -
url
&url= -
hashtags
%20%23..
This would be the href we will use:
http://twitter.com/intent/tweet?text=Check%20out%20this%20talk:%20“Cloud-native%20monitoring%20with%20Prometheus”%20by%20%40beatrizmrg%20%23PrometheusIO%20%23commitconf&url=https://youtu.be/ZGckorAJ1IQ
Check the guide How to add the Tweet button to your website for more complex options.
4.5 Shortcodes
A shortcode is a simple snippet inside a content file that Hugo will render using a predefined template.
Hugo has a set of predefined shortcodes that represent very common usage: figure, gist, highlight, instagram, param, ref and relref, tweet, vimeo or youtube.
This makes it really easy to embed in your post markdown, for example, a youtube video:
{{< youtube ZGckorAJ1IQ >}}
Nevertheless, another common necessity not supported currently by Hugo is to embed slides. In this case, you will need to build your own shortcode.
Example of the html wrapper to embed Google slides:
<p><h2 id="slides">Slides</h2><style>.embed-container { position: relative; padding-bottom: 58.25%; height: 0; overflow: hidden; max-width: 100%; } .embed-container iframe, .embed-container object, .embed-container embed { position: absolute; top: 0; left: 0; width: 100%; height: 100%; }</style></p>
                {{ with .Params.googleslides }}<div class="embed-container"><iframe src="{{ . }}" allowfullscreen="true" mozallowfullscreen="true" webkitallowfullscreen="true" frameborder="0"></iframe></div>{{ end }}
4.6 Logo
One of the first things we see is the logo, if you don't have one yet, the first step will be to create one. There are tons of free online tools that will help you with the design and colors.
One of my favorites one is freelogodesign, but there are others such logomakr or shopify.
4.7 Icons
Most themes work with a specific set of icons. A well-known one is fontawesome. The one I chose uses ionicons, which means by default I can use any of the supported ones by only setting the right class name.<i class="ion-ios-mic"></i>
Most used ones are usually covered, such as Youtube or Twitter. But when others are not, ioicons is missing Medium or DEV, we can use the official ones provided by the sites. DEV one can be found here: dev badge.
5. Forms
Even being a static site, at least a form is commonly used for Contact reasons. Nowadays we provide our social media accounts such as Twitter or Github but there are those who rather prefer sending an email.
One quick and easy option is to use formspree service. Free up to 50 posts per month. You will just need to create an account, verify your email and configure the service:

Netlify, which is covered in the next section also provides a form service.
6. Publish your site with Netlify
The first step would be to create an account and a team.

As one of the functionalities we are going to use is push-to-deploy, publishing automatically new versions with every push to a git repository, we need to create a new site and configure the access to the repository:

Then we follow the steps, select the repository and the options for deploying. Initially, we are going to work just with the master branch, which will be associated with the production environment.

Configure the environment variables:

You can also configure all the parameters in a netlify.toml file in the root of our git repository. If it exists will overwrite the manually set config.
Remember to set the right baseURL in your site config.toml file, if you don't you will see the following:

Instead of the default one, which usually is http://example.org, you need to use the provided by Netlify or your custom domain if you have one.

Congratulations, you have successfully deployed your site!
Netlify will provide you with a random name, similar to: stupefied-northcutt-******.netlify.com.
7. Configure your custom domain
This step is optional, in case you already have or you want to buy a new domain for your site. The easiest way is to use Netlify DNS:
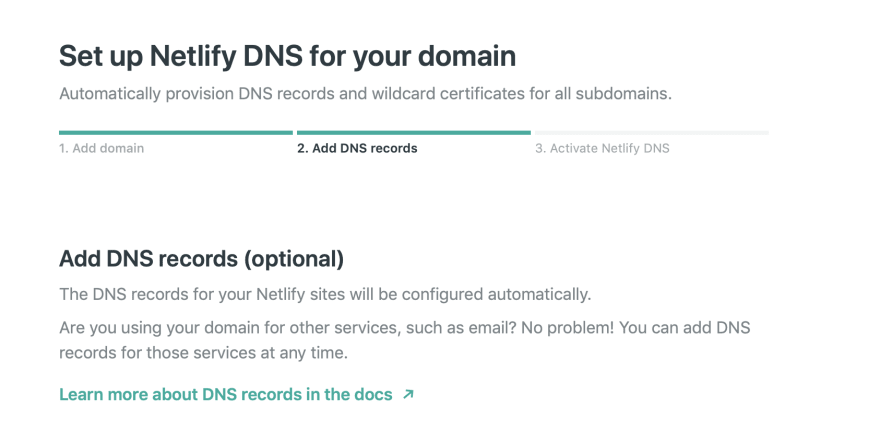
If you are using the domain for email, you will have to add DNS records, you can add them anytime. Read more about netlify-dns.
Netlify is going to provide you four nameservers that you then need to configure in your domain provider.

I have mine with namecheap.com

And you are done. It may take up to 48h to propagate, it took just a few minutes in my case. Once it is complete, it will appear as verified:

8. SSL
With Netlify there is no need for further configuration. HTTPS is enabled by default. It integrates with Let’s Encrypt and automatically provisions, distributes and renews your certificate. Of course, you can choose to use your own certificate.

9. Netlify deploy contexts
9.1 Continuous Deployment
With the current setup, we already have Continuous Deployment up and running. Every time we make a change to our master branch, the site is automatically built and deployed by Netlify, and the new version is published in our domain.
9.2 Split testing
But Netlify provides more flexibility to create workflows with different branches, pull requests merging, versions simultaneously deployed, even split testing. We could choose which percentage of users access to what version of the site.

9.3 Deploy contexts
In this case, we are going to keep it simple. We just need to build, deploy and publish different versions of our site, from different branches, in different URLs.
In order to do that, we are going to use contexts. There are three predefined: production, deploy-preview and branch-deploy. You can read more about Netlify deploy contexts here.
After building the initial version of the site working with master branch, I have been working in a more light theme version in a different branch light, and now, I want to deploy this new theme, but not in the production domain where I keep my original site.
Editing the Netlify site deploy context, the individual branches can be enabled, adding the new one.

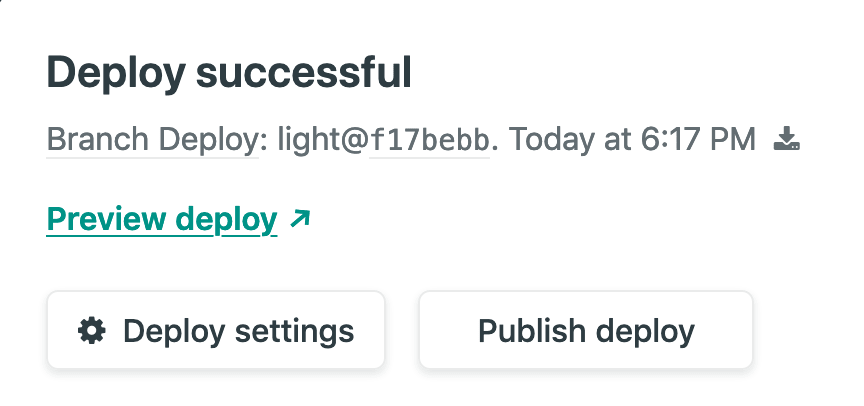
Now, making a push to light branch triggers automatically a new deploy in Netlify:

By clicking in preview deploy you can now see your light branch version deployed in a new URL:
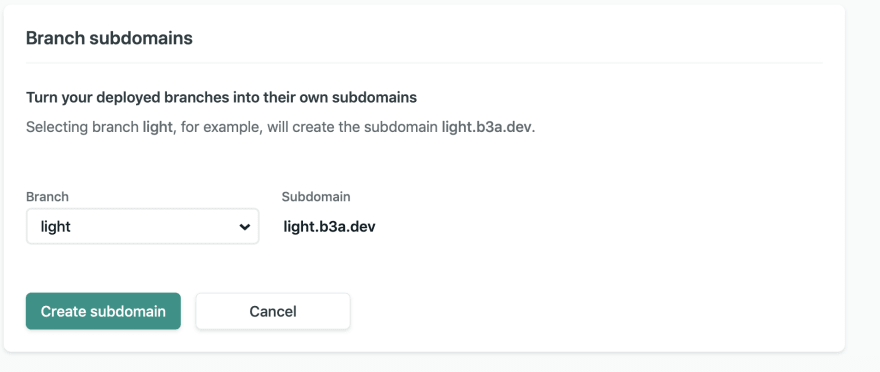
If using Netlify DNS, branch subdomains can also be enabled, so we can turn the deployed branches into their own subdomains.

Using Netlify URL
- [master branch] main site:
https://stupefied-northcutt-******.netlify.com - [light branch] light version:
https://light--stupefied-northcutt-******.netlify.com
Using a custom domain
- [master branch] main site:
https://b3a.dev - [light branch] light version:
https://light.b3a.dev
10. Site Analytics
We have built our new site, designing our logo, adding forms and other features, handy click-to-tweet buttons, we have a continuous deployment workflow implemented with Netlify that allows us to work on different branches automatically publishing several versions and now, it is online!
How many people are visiting it? Do most of them use their laptops or mobile devices? Which browsers are they using? Do we have any visits from abroad or our audience is national? When participating in technical events or publishing new projects, is this reflected in the number of visits?
To answer all these questions and even get more information we provide our site with analytics.
There are several options available, most commonly used and the one I have chosen is Google Analytics, visit also Segment.
10.1 Create an Account
The first step is to create an account and do the basic configuration, I recommend to not enable any of the options provided in the Account Data Sharing Setting.

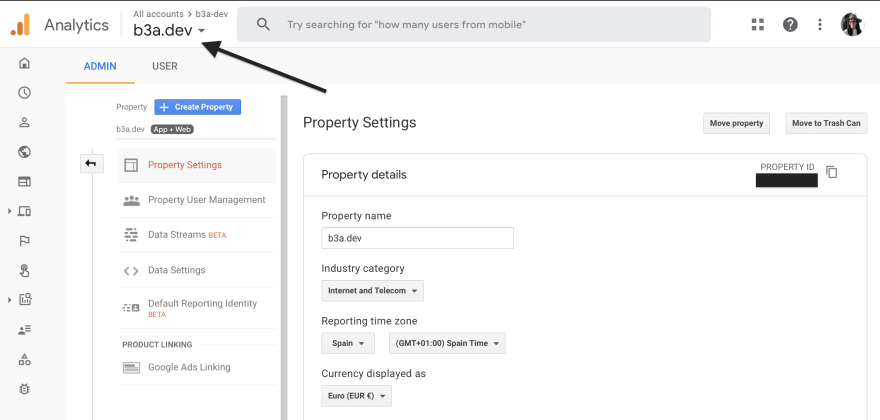
10.2 Create a Property

Currently, we have an account and a property associated with it, both with their specific IDs. In order to see them click in the menu:
The diagram below will help you understand how Google Analytics works and what objects and identifiers do we need to create.

- Organization: is optional, represents a company, groups products or users.
- Account: user account.
- Property: represents an application or web site.
- Data Stream: represents the stream from the end-user contact point (android app, ios app, web site) to Google Analytics. Data streams will be created in the Firebase project linked to the Analytics property.
10.3 Create a Data Stream
Now we need to create the data stream.

After that, we need to get the Measurement ID not the Stream ID.

10.4 Configuring our site
Most themes support by default google analytics, check your config.toml file for the param googleAnalitycsID. If you find it, just need to set the value with the Measurement ID.
If you cannot find the parameter in the theme you chose, copy the code provided in the Global Site Tag (gtag.js) and add it to an element present in every one of your pages, for example, the header or the footer.
And you are done. After at least 24h you will start to see statistics of the activity on your site.
Demographics:

By behavior:

By technology:


Top comments (0)