Being on the Cloud Advocate team at Microsoft, we're always looking to empower every developer to achieve more on Azure. One way of doing this is by bringing you hands-on content to deliver end-to-end scenarios using cloud-native and open source technologies.
My colleague on the Cloud Native team, Aaron Wislang has been cooking up a bunch of labs in our Azure Open Source Labs repo and one area we've been collaborating on is within the Azure Linux VM space.
If you have done any work with Azure VMs or have gone through some of our Microsoft Learn content, you may be familiar with some of the options you have to connect to your Linux VM and we cover a few of the options in the lab. One of the easiest ways to get started is to assign a public IP, open inbound access to port 22 on your VM, and access the VM using SSH. This will certainly get the job done, but what if you needed to securely connect to your VM without exposing it to the internet?
In this post, I will walk you through one option in the linux/vm lab to securely connect to your Linux VM using Tailscale, a zero config VPN based on the open source WireGuard protocol, and a fully managed service with open source clients across every major platform. We'll use one of its most interesting features, Tailscale SSH.
What is Tailscale?
Tailscale has excellent documentation on what it is and how it works. I highly recommend you visit their website to learn about what makes them special. At a high-level, Tailscale provides a peer-to-peer mesh VPN network that allows your devices to be added to a private network and be accessible from anywhere in the world. The devices that you add to your private network communicate with each other over an encrypted point-to-point connection which uses the open source WireGuard protocol. Their solution offers a "coordination" server (managed by Tailscale) which acts as a control plane that allows nodes (your devices) on your private network to share metadata needed to establish network connections.
Tailscale also offers the ability to integrate with 3rd party identity providers which can enable teams and enterprises to offer 2-factor authentication and even address higher level security concerns using Access Control Lists (ACLs) and security policies. Again, please refer to this doc for more information.
On Tailscale's homepage, they have published a diagram on how VM connectivity can look like without Tailscale:

...and here is a diagram on how VM connectivity looks with Tailscale:

Looks much simpler with Tailscale, right?
The reason why I find Tailscale to be an intriguing solution is that it is simple to setup and can be used in a variety of environments ranging from enterprises (with regulatory compliance needs) to hobbyists. Within a lab environment, this is a great fit for increasing security while staying within budget (especially my tiny budget 😆).
Tailscale is offered on a "freemium" pricing model which means for personal use, I can use it for free. I like free things so this makes it really easy to get started.
Let's dive in.
Azure Linux VM Lab
Before we begin with the lab, be sure to review this doc to see all the endorsed Linux distributions available on Azure. You can chose to use any of these distributions for the lab. We opted to go for the ubiquitous Ubuntu image by Canonical.
If you need to find a different Linux image, you can refer to this doc which covers how to find specific Azure VM images using Azure CLI.
Many of the Azure-endorsed Linux distros are cloud-init-enabled but you should consult this doc to ensure it is available on the distro you are targeting. We will be using a cloud-init template to bootstrap the VM with Tailscale installed and configured.
Getting started
Make sure you have the following tools:
- Visual Studio Code with Remote - Containers extension installed
- Azure Subscription
- Azure CLI with Azure Bicep installed
- Git
Using your web browser, navigate to https://aka.ms/oss-labs, clone the repo to your local machine, then open the repo using VS Code.
If you have a dockerd container runtime running locally (i.e., Docker Desktop or Rancher Desktop), you can open the repo in a Dev Container (your should also see a prompt asking if you'd like to reopen the folder in a contianer). This Dev Container includes all the tools you need to work with the HOL content.
If you want to work completely in the cloud and have access to GitHub Codespaces, you can open the repo using Codespaces by clicking in the "<> Code" button then clicking on the "Create codespaces on main" button (this will also use the Dev Container configuration mentioned above).

The Dev Container contains a lot of tooling so the initial build of the container can a few minutes. Use this time to go get yourself a beverage ☕️
Once you are in the repo, use a terminal and drop into the linux/vm directory.
Here you will see a README.md file which is your "lab guide" and Aaron has also included a linked to a quick video walkthrough of the Tailscale implementation using the Azure Portal.
I personally like to deploy all my Azure resources using Infrastructure-as-Code (IaC) tooling, we'll walk through Azure Bicep implementation and use Azure CLI to deploy the template.
If you open and look through the vm.bicep file, you'll find code to deploy Azure resources and a few cloud-init templates. This lab is meant to be used as a "base" lab for other Azure Linux VM labs, so it is written to be configurable using parameters. There is one parameter in particular to bring attention to. The parameter called cloudInit is used to determine which cloud-init template will be used. The README.md file covers how each value is used. For now, we'll focus on using the tailscale-private option (which is Option #4 in the lab guide) since I want to deploy a Linux VM in Azure and not expose any of it to the public internet (there's one exception and I'll explain later).
Tailscale
The vm.bicep file has everything we need to deploy our Azure VM. All we really need is a pre-existing Azure Resource Group, and to pass in some parameters to the deployment template. In the lab guide, we need the following variables set:
-
RESOURCE_GROUP- Name of your pre-provisioned resource group -
VM_NAME- Name your new VM -
ENV- Content in your env.json file loaded as an environment variables for thecloud-initscript to use
These values will be passed into the command that will deploy the Bicep template.
Setting the RESOURCE_GROUP and VM_NAME are easy... just make something up and set as environment variables.
The ENV is interesting as you will need to create a env.json file and fill in some JSON content that looks like this:
{ "tskey": "<YOUR_TAILSCALE_AUTH_KEY>" }
You are expected to have a Tailscale authentication key. You probably don't have one yet, so let's go get one...
Adding your first tailnet device
The steps below are also documented in Tailscale's quickstart guide.
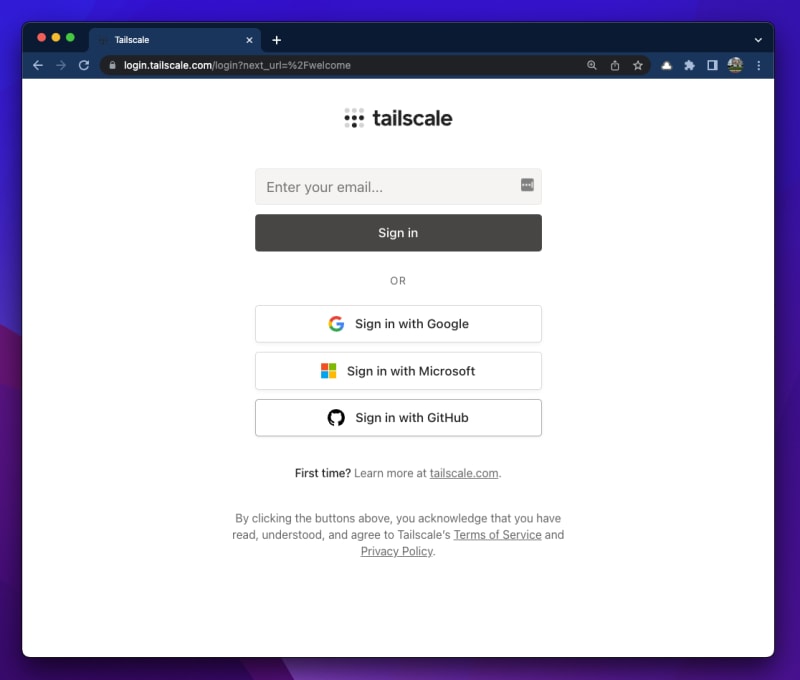
In your browser, navigate to https://login.tailscale.com/login to log into the Tailscale Admin console
Choose your favorite authentication provider (I chose GitHub).
You will also need to install Tailscale locally to connect to your tailnet. Browse to https://tailscale.com/download and install the app based on your operating system.
A
tailnetis your private network. Any devices that you add is added to yourtailnetand these devices cannot be accessed from the internet.
With the application installed, open it and go through the configuration wizard and proceed to "Sign in to your network" which is essentially signing into tailscale.com via web browser.
You will be able to manage your Tailscale app, view devices on your network, and navigate to the Admin console from the system tray.

If all went well with the local app install, you should see your machine on the "Machines" page in the Admin console.

Configure MagicDNS
Next, let's go configure MagicDNS so that our local machine can resolve Azure VM names to their tailnet IP.
In the Tailscale Admin console, click on the "DNS" link.

You can see it is asking you to add a global nameserver first, so let's go and do that.
Click on the "Add nameserver" button and select a nameserver (I picked Cloudflare).
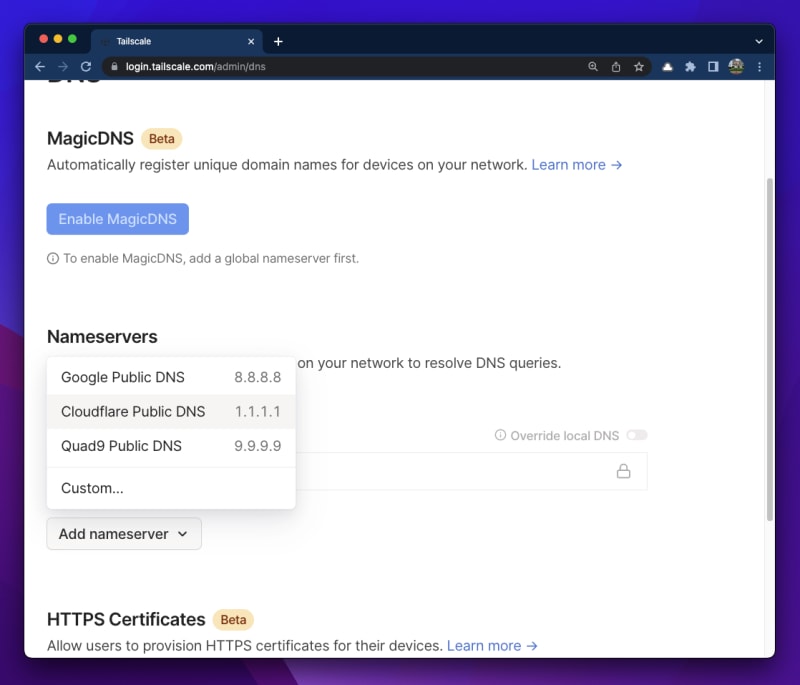
Adding a global nameserver should enable the "Enable MagicDNS" button. Go ahead and click that button and you should see confirmation that MagicDNS has been enabled.

Generate device auth key
Finally, we need to generate an auth key which is required to register devices to our tailscale network. This auth key will be passed into the cloud-init template and used as Tailscale is initialized via the tailscale up command.
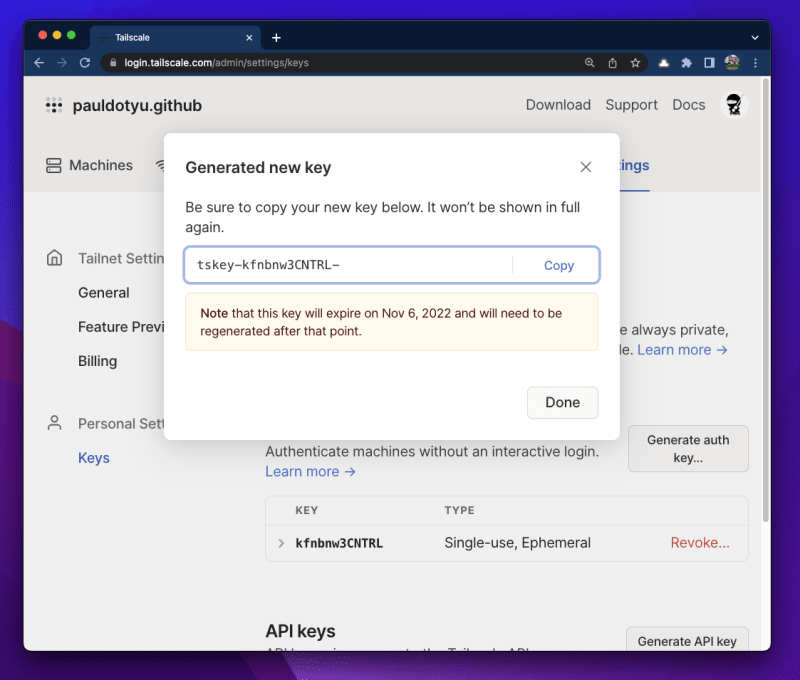
In the Tailscale Admin console, click on "Settings", then click on "Keys", then "Generate auth key..".

In the modal window that pops up, you'll see some additional settings for your auth key. Since we are in a lab environment, I want my key and machine will be removed once it goes offline, so I toggled the "Ephemeral" option. If you want your machine to persist in Tailscale, leave the toggle as-is (in the "off" position).

Click the "Generate key" button then copy the contents to your clipboard.
Deploy Azure Linux VM
Now we have content we can provide in the env.json file.
Using your terminal (this will only work with Bash), create a new file called env.json and paste in your auth key (it should still be in your clipboard from the previous step).
cat << EOF > env.json
{ "tskey":"<PASTE_IN_YOUR_AUTH_KEY>" }
EOF
Execute the command above in the
linux/vmdirectory of the lab repo.
Let's load the file contents into a variable so we can pass it into the Bicep template.
ENV=$(cat env.json)
If you run echo $ENV in the terminal, you will see a tiny JSON document with your auth key.
In order to deploy the vm.bicep template, we need to create an Azure Resource Group.
RESOURCE_GROUP=MyResourceGroup
LOCATION=westus3

az group create --name $RESOURCE_GROUP --location $LOCATION
Now we can deploy our Bicep template.
VM_NAME=MyAzureVM
az deployment group create \
  --resource-group $RESOURCE_GROUP \
  --template-file vm.bicep \
  --parameters \
      vmName="$VM_NAME" \
      cloudInit='tailscale-private' \
      env="$ENV"
The deployment should take a few minutes to complete. Once the VM has provisioned, it will go through the cloud-init process and install/configure Tailscale using the auth key you provided in the JSON file. Once the VM has successfully deployed to Azure, it normally takes about two minutes for the VM to show up in the list of VMs.
While we wait for that to complete, let's talk a little bit about what is deployed.
The resources that are deployed are fairly standard for a virtual machine in Azure, you are getting a virtual network, a network interface (private IP), the virtual machine and its operating system disk which, by default in this template, is a 256GiB Premium SSD. There's also a managed identity assigned to the virtual machine in case you need it to perform actions against other Azure resources. The one thing I want to focus on here is the use of a Network Security Group (NSG).

This NSG is essentially a simple IP/port-based firewall that allows you to control inbound and outbound rules. It can be assigned (associated) to a subnet or a network interface in Azure. In our case it is assigned to the network interface.
If you click on the Inbound security rules, you will see that there is a single rule which allows UDP traffic on port 41641 from the internet.

According to Tailscale doc, this rule is to "ensure that the Azure nodes can make direct connections by allowing UDP port 41641 to ingress through the firewall." This direct connection is what minimizes latency. (See How Tailscale works).
This is the only piece of the Azure VM networking that gets exposed to the internet.
Connect to your Azure Linux VM
If we head back to the "Machines" section of the Tailscale Admin console, we should now see our newly provisioned Azure VM.

The machine has its own tailnet IP and we could SSH using this address (100.69.108.231), but we've configured MagicDNS so let's give that a try.
In your local terminal, execute the command:
ssh azureuser@myazurevm
The username is defaulted to
azureuserin the Bicep template.

As you can see in the image above, not only did Tailscale establish network connectivity using WireGuard, but it also allowed you to establish the connection without managing SSH keys (yes, we put a default SSH key in the vm.bicep file to save you having to specify one at VM creation time, but it isn't really being used). Tailscale SSH handled the authentication for us when it asked for credentials. Pretty slick 😎
Now that we are connected to the Azure Linux VM, we can now focus on doing some development work and disconnect when done. There is also an option to run Docker in the VM (which we install by default alongside Tailscale), or a PostgreSQL database, also deployed via Docker, so I highly advise you to try out those lab scenarios as well.
Summary
Hopefully you had a smooth end-to-end experience and can see how easily you can connect to your Azure Linux VM using SSH in a secure manner without having to open up additional ports or exposing public IPs to the internet. This can be a valuable use case for anyone looking to do some quick Proof of Concept (PoC) work on Azure Linux VMs or conduct research experiments using Azure Linux Data Science Virtual Machines images, all without having to worry about implementing complicated network security rules and configurations. Whatever the case may be, security should not be compromised for convenience. Tailscale SSH is a good tool to have in your toolbox and I agree with Aaron when he said, "it's magical 🎉".
We only covered how to connect to a Linux VM but the same can be done for Windows VMs as well (see links below).
Before we forget... if you are done with your Azure resources and will no longer need to access them anytime soon, be sure to delete your resources to save a few bucks 😉
Here, I am deleting my entire resource group which will delete all resources within it.
az group delete --name $RESOURCE_GROUP --yes --no-wait
Learn More
Be sure to keep an eye on the https://aka.ms/oss-labs repo as there will be more hands-on lab content and scenarios for you to try.
If you want to learn more about Azure VMs and cloud-init, check these resources out:
- Linux virtual machines in Azure
- cloud-init support for virtual machines in Azure
- Custom data and cloud-init on Azure Virtual Machines
There's quite a bit of integration that is possible from Tailscale to Azure. Here are just a few examples:
- Azure AD - Supported SSO identity providers
- Access your tailnet from code-server
- Access Azure Linux VMs privately using Tailscale
- Access Azure Windows VMs privately using Tailscale
- Using Tailscale on Azure App Services
If you have any questions or feedback, please let me know in the comments below or reach out to me on Twitter @pauldotyu
Cheers!


Top comments (0)