This blog post demonstrates how you can use Change Data Capture to stream database modifications from PostgreSQL to Azure Data Explorer (Kusto) using Apache Kafka.
Change Data Capture (CDC) can be used to track row-level changes in database tables in response to create, update and delete operations. It is a powerful technique, but useful only when there is a way to leverage these events and make them available to other services.
Introduction
Using Apache Kafka, it is possible to convert traditional batched ETL processes into real-time, streaming mode. You can do-it-yourself (DIY) and write good old Kafka producer/consumer using a client SDK of your choice. But why would you do that when you've Kafka Connect and it's suite of ready-to-use connectors?
Once you opt for Kafka Connect, you have a couple of options. One is the JDBC connector which basically polls the target database table(s) to get the information. There is a better (albeit, a little more complex) way based on change data capture. Enter Debezium, which is a distributed platform that builds on top of Change Data Capture features available in different databases. It provides a set of Kafka Connect connectors which tap into row-level changes in database table(s) and convert them into event streams that are sent to Apache Kafka. Once the change log events are in Kafka, they will be available to all the downstream applications.
Here is a high-level overview of the use-case presented in this post. It has been kept simplified for demonstration purposes.
Overview
Data related to Orders is stored in the PostgreSQL database and contains information such as order ID, customer ID, city, transaction amount. time etc. This data is picked up the Debezium connector for PostgreSQL and sent to a Kafka topic. Once the data is in Kafka, another (sink) connector sends them to Azure Data Explorer allow or further querying and analysis.
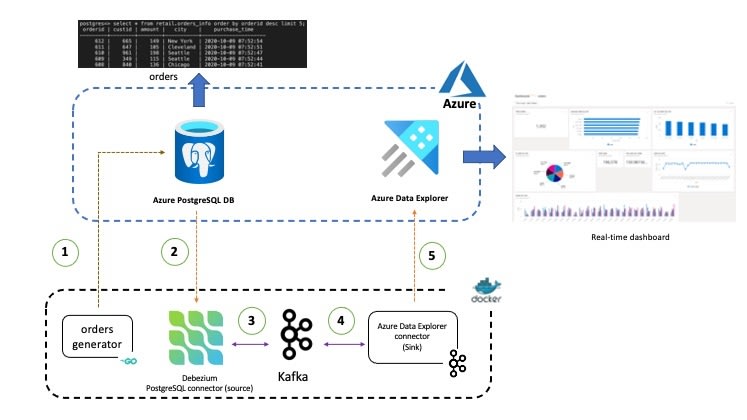
The individual components used in the end to end solution are as follows:
Source and Destination
Data pipelines can be pretty complex! This blog post provides a simplified example where a PostgreSQL database will be used as the source of data and a Big Data analytics engine acts as the final destination (sink). Both these components run in Azure: Azure Database for PostgreSQL (the Source) is a relational database service based on the open-source Postgres database engine and Azure Data Explorer (the Sink) is a fast and scalable data exploration service that lets you collect, store, and analyze large volumes of data from any diverse sources, such as websites, applications, IoT devices, and more.
Although Azure PostgreSQL DB has been used in this blog, the instructions should work for any Postgres database. So feel free to use alternate options if you'd like!
The code and configuration associated with this blog post is available in this GitHub repository
Kafka and Kafka Connect
Apache Kafka along with Kafka Connect acts as a scalable platform for streaming data pipeline - the key components here are the source and sink connectors.
The Debezium connector for PostgreSQL captures row-level changes that insert, update, and delete database content and that were committed to a PostgreSQL database, generates data change event records and streams them to Kafka topics. Behind the scenes, it uses a combination of a Postgres output plugin (e.g. wal2json, pgoutput etc.) and the (Java) connector itself reads the changes produced by the output plug-in using the PostgreSQL’s streaming replication protocol and the JDBC driver.
The Azure Data Explorer sink connector picks up data from the configured Kafka topic, batches and sends them to Azure Data Explorer where they are queued up ingestion and eventually written to a table in Azure Data Explorer. The connector leverages the Java SDK for Azure Data Explorer.
Most of the components (except Azure Data Explorer and Azure PostgreSQL DB) run as Docker containers (using Docker Compose) - Kafka (and Zookeeper), Kafka Connect workers and the data generator application. Having said that, the instructions would work with any Kafka cluster and Kafka Connect workers, provided all the components are configured to access and communicate with each other as required. For example, you could have a Kafka cluster on Azure HD Insight or Confluent Cloud on Azure Marketplace.
Check out these hands-on labs if you're interested in these scenarios
Here is a breakdown of the components and their service definitions - you can refer to the complete docker-compose file in the GitHub repo
Docker Compose services
  zookeeper:
    image: debezium/zookeeper:1.2
    ports:
      - 2181:2181
  kafka:
    image: debezium/kafka:1.2
    ports:
      - 9092:9092
    links:
      - zookeeper
    depends_on:
      - zookeeper
    environment:
      - ZOOKEEPER_CONNECT=zookeeper:2181
      - KAFKA_ADVERTISED_LISTENERS=PLAINTEXT://localhost:9092
The Kafka and Zookeeper run using the debezium images - they just work and are great for iterative development with quick feedback loop, demos etc.
dataexplorer-connector:
    build:
      context: ./connector
      args:
        KUSTO_KAFKA_SINK_VERSION: 1.0.1
    ports:
      - 8080:8083
    links:
      - kafka
    depends_on:
      - kafka
    environment:
      - BOOTSTRAP_SERVERS=kafka:9092
      - GROUP_ID=adx
      - CONFIG_STORAGE_TOPIC=adx_connect_configs
      - OFFSET_STORAGE_TOPIC=adx_connect_offsets
      - STATUS_STORAGE_TOPIC=adx_connect_statuses
  postgres-connector:
    image: debezium/connect:1.2
    ports:
      - 9090:8083
    links:
      - kafka
    depends_on:
      - kafka
    environment:
      - BOOTSTRAP_SERVERS=kafka:9092
      - GROUP_ID=pg
      - CONFIG_STORAGE_TOPIC=pg_connect_configs
      - OFFSET_STORAGE_TOPIC=pg_connect_offsets
      - STATUS_STORAGE_TOPIC=pg_connect_statuses
The Kafka Connect source and sink connectors run as separate containers, just to make it easier for you to understand and reason about them - it is possible to run both the connectors in a single container as well.
Notice that, while the PostgreSQL connector is built into debezium/connect image, the Azure Data Explorer connector is setup using custom image. The Dockerfile is quite compact:
FROM debezium/connect:1.2
WORKDIR $KAFKA_HOME/connect
ARG KUSTO_KAFKA_SINK_VERSION
RUN curl -L -O https://github.com/Azure/kafka-sink-azure-kusto/releases/download/v$KUSTO_KAFKA_SINK_VERSION/kafka-sink-azure-kusto-$KUSTO_KAFKA_SINK_VERSION-jar-with-dependencies.jar
Finally, the orders-gen service just Go application to seed random orders data into PostgreSQL. You can refer to the Dockerfile in the GitHub repo
  orders-gen:
    build:
      context: ./orders-generator
    environment:
      - PG_HOST=<postgres host>
      - PG_USER=<postgres username>
      - PG_PASSWORD=<postgres password>
      - PG_DB=<postgres db name>
Hopefully, by now you have a reasonable understanding of architecture and the components involved. Before diving into the practical aspects, you need take care of a few things.
Pre-requisites
- You will need a Microsoft Azure account. Don't worry, you can get it for free if you don't have one already!
- Install Azure CLI
- Install Docker and Docker Compose
Finally, clone this GitHub repo:
git clone https://github.com/abhirockzz/kafka-adx-postgres-cdc-demo
cd kafka-adx-postgres-cdc-demo
To begin with, let's make sure you have setup and configured Azure Data Explorer and PostgreSQL database.
Setup and configure Azure Data Explorer
Create an Azure Data Explorer cluster and a database - this quickstart will guide you through the process.
Create a table (
Orders) and the mapping (OrdersEventMapping) using the KQL queries below:
.create table Orders (orderid: string, custid: string, city: string, amount: int, purchase_time: datetime)

.create table Orders ingestion json mapping 'OrdersEventMapping' '[{"column":"orderid","Properties":{"path":"$.orderid"}},{"column":"custid","Properties":{"path":"$.custid"}},{"column":"city","Properties":{"path":"$.city"}},{"column":"amount","Properties":{"path":"$.amount"}},{"column":"purchase_time","Properties":{"path":"$.purchase_time"}}]'
During the ingestion process, Azure Data Explorer attempts to optimize for throughput by batching small ingress data chunks together as they await ingestion - the IngestionBatching policy can be used to fine tune this process. Optionally, for the purposes of this demo, you can update the policy as such:
.alter table Orders policy ingestionbatching @'{"MaximumBatchingTimeSpan":"00:00:30", "MaximumNumberOfItems": 500, "MaximumRawDataSizeMB": 1024}'

.show table <enter database name>.Orders policy ingestionbatching
Refer to the IngestionBatching policy command reference for details
- Create a Service Principal in order for the connector to authenticate and connect to Azure Data Explorer service. If you want to use the Azure Portal to do this, please refer to How to: Use the portal to create an Azure AD application and service principal that can access resources. The below example makes use of Azure CLI az ad sp create-for-rbac command. For example, to create a service principal with the name
adx-sp:
az ad sp create-for-rbac -n "adx-sp"
You will get a JSON response:
{
  "appId": "fe7280c7-5705-4789-b17f-71a472340429",
  "displayName": "kusto-sp",
  "name": "http://kusto-sp",
  "password": "29c719dd-f2b3-46de-b71c-4004fb6116ee",
  "tenant": "42f988bf-86f1-42af-91ab-2d7cd011db42"
}
Please note down the
appId,passwordandtenantas you will be using them in subsequent steps
- Add permissions to your database
Provide appropriate role to the Service principal you just created. To assign the admin role, follow this guide to use the Azure portal or use the following command in your Data Explorer cluster
.add database <enter database name> admins ('aadapp=<enter service principal appId>;<enter service principal tenant>') 'AAD App'
Setup and configure Azure PostgreSQL DB
You can setup PostgreSQL on Azure using a variety of options including, the Azure Portal, Azure CLI, Azure PowerShell, ARM template. Once you've done that, you can easily connect to the database using you favourite programming language such as Java, .NET, Node.js, Python, Go etc.
Although the above references are for Single Server deployment mode, please note that Hyperscale (Citus) is another deployment mode you can use for "workloads that are approaching -- or already exceed -- 100 GB of data."
Please ensure that you keep the following PostgreSQL related information handy since you will need them to configure the Debezium Connector in the subsequent sections - database hostname (and port), username, password
For the end-to-end solution to work as expected, we need to:
- Ensure that the PostgreSQL instance in Azure is accessible from the local Kafka Connect workers (containers)
- Ensure appropriate PostrgeSQL replication setting ("Logical")
- Create the
Orderstable which you will use to try out the change data capture feature
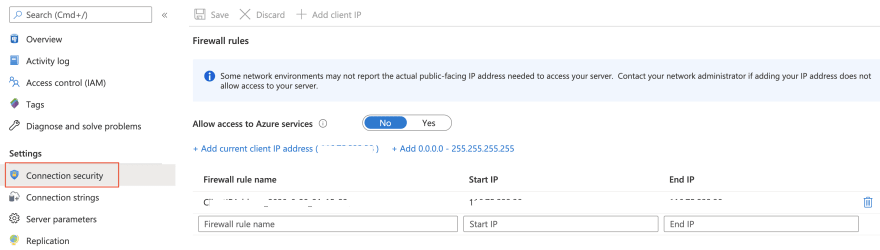
If you're using Azure DB for PostgreSQL, create a firewall rule using az postgres server firewall-rule create command to whitelist your host. Since we're running Kafka Connect in Docker locally, simply navigate to the Azure portal (Connection security section of my PostrgreSQL instance) and choose Add current client IP address to make sure that your local IP is added to the firewall rule as such:
To change the replication mode for Azure DB for PostgreSQL, you can use the az postgres server configuration command:
az postgres server configuration set --resource-group <name of resource group> --server-name <name of server> --name azure.replication_support --value logical
.. or use the Replication menu of your PostgreSQL instance in the Azure Portal:
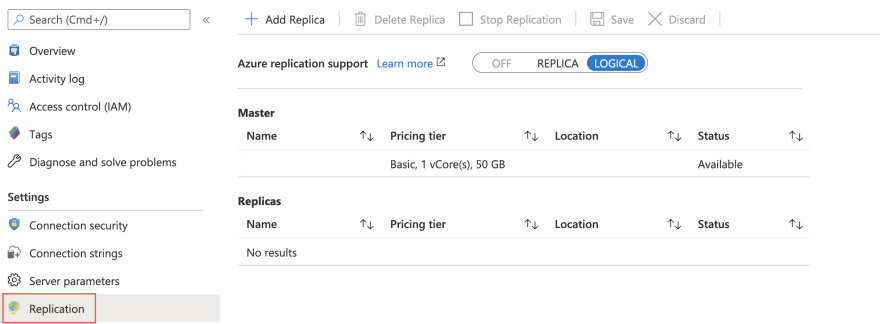
After updating the configuration, you will need to re-start the server which you can do using the CLI (az postgres server restart) or the portal.
Once the database is up and running, create the table. I have used psql CLI in this example, but feel free to use any other tool. For example, to connect to your PostgreSQL database on Azure over SSL (you will be prompted for the password):
psql -h <POSTGRESQL_INSTANCE_NAME>.postgres.database.azure.com -p 5432 -U <POSTGRES_USER_NAME> -W -d <POSTGRES_DB_NAME> --set=sslmode=require

//example
psql -h my-pgsql.postgres.database.azure.com -p 5432 -U foo@my-pgsql -W -d postgres --set=sslmode=require
Use the below SQL to create the table:
CREATE SCHEMA retail;

CREATE TABLE retail.orders_info (
    orderid SERIAL NOT NULL PRIMARY KEY,
    custid INTEGER NOT NULL,
    amount INTEGER NOT NULL,
    city VARCHAR(255) NOT NULL,
    purchase_time VARCHAR(20) NOT NULL
);
The
purchase_timecaptures the time when the purchase was executed, but it usesVARCHARinstead of aTIMESTAMPtype (ideally) to reduce the overall complexity. This is because of the way Debezium Postgres connector treats TIMESTAMP data type (and rightly so!)
Over the course of the next few sections, you will setup the source (PostgreSQL), sink (Azure Data Explorer) connectors and validate the end to end pipeline.
Start Docker containers
Starting up our local environment is very easy, thanks to Docker Compose - all we need is a single command:
docker-compose --project-name adx-kafka-cdc up --build
This will build (and start) the order generator application container along with Kafka, Zookeeper and Kafka Connect workers.
It might take a while to download and start the containers: this is just a one time process.
To confirm whether all the containers have started:
docker-compose -p adx-kafka-cdc ps


//output

                 Name                              Command             State                      Ports
--------------------------------------------------------------------------------------------------------------------------
adx-kafka-cdc_dataexplorer-connector_1   /docker-entrypoint.sh start   Up      0.0.0.0:8080->8083/tcp, 8778/tcp, 9092/tcp,
                                                                               9779/tcp
adx-kafka-cdc_kafka_1                    /docker-entrypoint.sh start   Up      8778/tcp, 0.0.0.0:9092->9092/tcp, 9779/tcp
adx-kafka-cdc_orders-gen_1               /orders-gen                   Up
adx-kafka-cdc_postgres-connector_1       /docker-entrypoint.sh start   Up      0.0.0.0:9090->8083/tcp, 8778/tcp, 9092/tcp,
                                                                               9779/tcp
adx-kafka-cdc_zookeeper_1                /docker-entrypoint.sh start   Up      0.0.0.0:2181->2181/tcp, 2888/tcp, 3888/tcp,
                                                                               8778/tcp, 9779/tcp
The orders generator app will start inserting random order events to the orders_info table in PostgreSQL. At this point you can also do quick sanity check to confirm that the order information is being persisted - I have used psql in the example below:
psql -h <POSTGRESQL_INSTANCE_NAME>.postgres.database.azure.com -p 5432 -U <POSTGRES_USER_NAME> -W -d <POSTGRES_DB_NAME> --set=sslmode=require

select * from retail.orders_info order by orderid desc limit 5;
This will give you the five most recent orders:
 orderid | custid | amount |   city    |    purchase_time
---------+--------+--------+-----------+---------------------
      10 |     77 |    140 | Seattle   | 2020-10-09 07:10:49
      9  |    541 |    186 | Cleveland | 2020-10-09 07:10:46
      8  |    533 |    116 | Cleveland | 2020-10-09 07:10:42
      7  |    225 |    147 | Chicago   | 2020-10-09 07:10:39
      6  |    819 |    184 | Austin    | 2020-10-09 07:10:36
(5 rows)
To stream the orders data to Kafka, we need to configure and start an instance of the Debezium PostgreSQL source connector.
Debezium PostgreSQL source connector setup
Copy the JSON contents below to a file (you can name it pg-source-config.json). Please ensure that you update the following attributes with the values corresponding to your PostgreSQL instance: database.hostname, database.user, database.password.
{
    "name": "pg-orders-source",
    "config": {
        "connector.class": "io.debezium.connector.postgresql.PostgresConnector",
        "database.hostname": "<enter database name>.postgres.database.azure.com",
        "database.port": "5432",
        "database.user": "<enter admin username>@<enter database name>",
        "database.password": "<enter admin password>",
        "database.dbname": "postgres",
        "database.server.name": "myserver",
        "plugin.name": "wal2json",
        "table.whitelist": "retail.orders_info",
        "value.converter": "org.apache.kafka.connect.json.JsonConverter"
    }
}
At the time of writing, Debezium supports the following plugins: decoderbufs, wal2json, wal2json_rds, wal2json_streaming, wal2json_rds_streaming and pgoutput. I have used wal2json in this example, and it's supported on Azure as well.
To start the connector, simply use the Kafka Connect REST endpoint to submit the configuration.
curl -X POST -H "Content-Type: application/json" --data @pg-source-config.json http://localhost:9090/connectors

# to confirm
curl http://localhost:9090/connectors/pg-orders-source
Notice that port for the REST endpoint is
9090- this is per service port mapping defined indocker-compose.yaml
Let's peek into the Kafka topic and take a look at the change data capture events produced by the source connector.
docker exec -it adx-kafka-cdc_kafka_1 bash
You will be dropped into a shell (inside the container). Execute the below command to consume the change data events from Kafka:
cd bin && ./kafka-console-consumer.sh --topic myserver.retail.orders_info --bootstrap-server kafka:9092 --from-beginning
Note that the topic name
myserver.retail.orders_infois as a result of the convention used by the Debezium connector
Each event in topic is corresponding to a specific order. It is in a JSON format that looks like what's depicted below. Please note that the payload also contains the entire schema which has been removed for brevity.
{
    "schema": {....},
    "payload": {
        "before": null,
        "after": {
            "orderid": 51,
            "custid": 306,
            "amount": 183,
            "city": "Austin",
            "purchase_time":"2020-10-09 07:23:10"
        },
        "source": {
            "version": "1.2.1.Final",
            "connector": "postgresql",
            "name": "myserver",
            "ts_ms": 1602057392691,
            "snapshot": "false",
            "db": "postgres",
            "schema": "retail",
            "table": "orders_info",
            "txId": 653,
            "lsn": 34220200,
            "xmin": null
        },
        "op": "c",
        "ts_ms": 1602057392818,
        "transaction": null
    }
}
So far, we have the first half of our pipeline. Let's work on the second part!
Azure Data Explorer sink connector setup
Copy the JSON contents below to a file (you can name it adx-sink-config.json). Replace the values for the following attributes as per your Azure Data Explorer setup - aad.auth.authority, aad.auth.appid, aad.auth.appkey, kusto.tables.topics.mapping (the database name) and kusto.url
{
    "name": "adx-orders-sink",
    "config": {
        "connector.class": "com.microsoft.azure.kusto.kafka.connect.sink.KustoSinkConnector",
        "flush.size.bytes": 10000,
        "flush.interval.ms": 30000,
        "tasks.max": 2,
        "topics": "myserver.retail.orders_info",
        "kusto.tables.topics.mapping": "[{'topic': 'myserver.retail.orders_info','db': '<enter database name>', 'table': 'Orders','format': 'json', 'mapping':'OrdersEventMapping'}]",
        "aad.auth.authority": "<enter tenant ID from service principal info>",
        "kusto.url": "https://ingest-<enter cluster name>.<enter region>.kusto.windows.net",
        "aad.auth.appid": "<enter app ID from service principal info>",
        "aad.auth.appkey": "<enter password from service principal info>",
        "key.converter": "org.apache.kafka.connect.storage.StringConverter",
        "transforms": "unwrap",
        "transforms.unwrap.type": "io.debezium.transforms.ExtractNewRecordState"
    }
}
Notice that Kafka Connect Single Message Transformation (SMT) have been used here - this is the ExtractNewRecordState transformation that Debezium provides. You can read up on it in the documentation
"transforms": "unwrap",
"transforms.unwrap.type": "io.debezium.transforms.ExtractNewRecordState"
It removes the schema and other parts from the JSON payload and keeps it down to only what's required. In this case, all we are looking for the order info from the after attribute (in the payload). For e.g.
{
    "orderid": 51,
    "custid": 306,
    "amount": 183,
    "city": "Austin",
    "purchase_time":"2020-10-09 07:23:10"
}
You could model this differently of course (apply transformation in the source connector itself), but there are a couple of benefits to this approach:
- Only the relevant data sent to Azure Data Explorer
- The Kafka topic contains the entire change data event (along with the schema) which can be leveraged by any downstream service
To install the connector, just use the Kafka Connect REST endpoint like before:
curl -X POST -H "Content-Type: application/json" --data @adx-sink-config.json http://localhost:8080/connectors

# check status
curl http://localhost:8080/connectors/adx-orders-sink/status
Notice that port for the REST endpoint is
8080- this is per service port mapping defined indocker-compose.yaml
The connector should spin into action, authenticate to Azure Data Explorer and start batching ingestion processes.
Note that
flush.size.bytesandflush.interval.msare used to regulate the batching process. Please refer to the connector documentation for details on the individual properties.
Since the flush configuration for the connector and the batching policy for the Orders table in Azure Data Explorer is pretty aggressive (for demonstration purposes), you should see data flowing into Data Explorer quickly.
Query Data Explorer
You can query the Orders table in Data Explorer to slice and dice the data. Here are a few simple queries to start with.
Get details for orders from New York city;
Orders
| where city == 'New York'

Get only the purchase amount and time for orders from New York city sorted by amount
Orders
| where city == 'New York'
| project amount, purchase_time
| sort by amount

Find out the average sales per city and represent that as a column chart:
Orders
| summarize avg_sales = avg(amount) by city
| render columnchart

The total purchase amount per city, represented as a pie chart:
Orders
| summarize total = sum(amount) by city
| sort by total
| render piechart

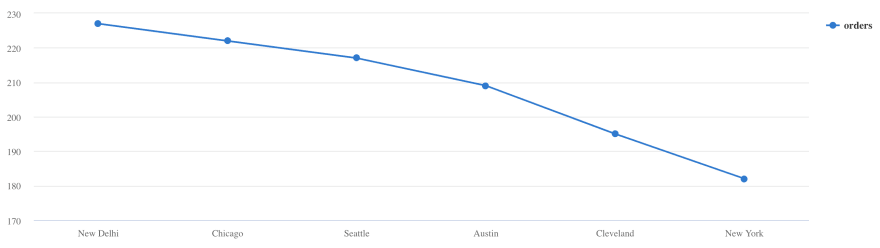
Number of orders per city, represented as a line chart:
Orders
| summarize orders = count() by city
| sort by orders
| render linechart
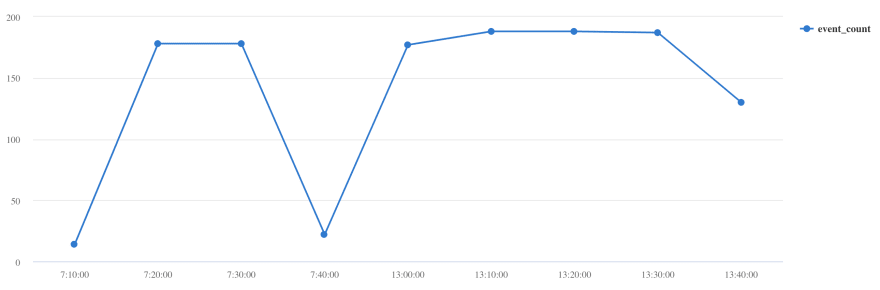
How do purchases vary over a day?
Orders
| extend hour = floor(purchase_time % 1d , 10m)
| summarize event_count=count() by hour
| sort by hour asc
| render timechart
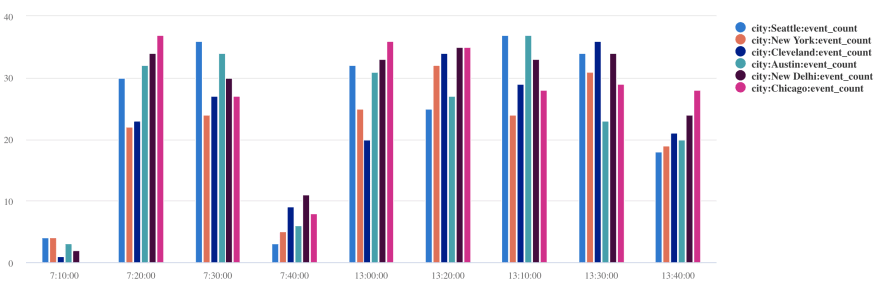
How does it vary over a day across different cities?
Orders
| extend hour= floor( purchase_time % 1d , 10m)
| where city in ("New Delhi", "Seattle", "New York", "Austin", "Chicago", "Cleveland")
| summarize event_count=count() by hour, city
| render columnchart
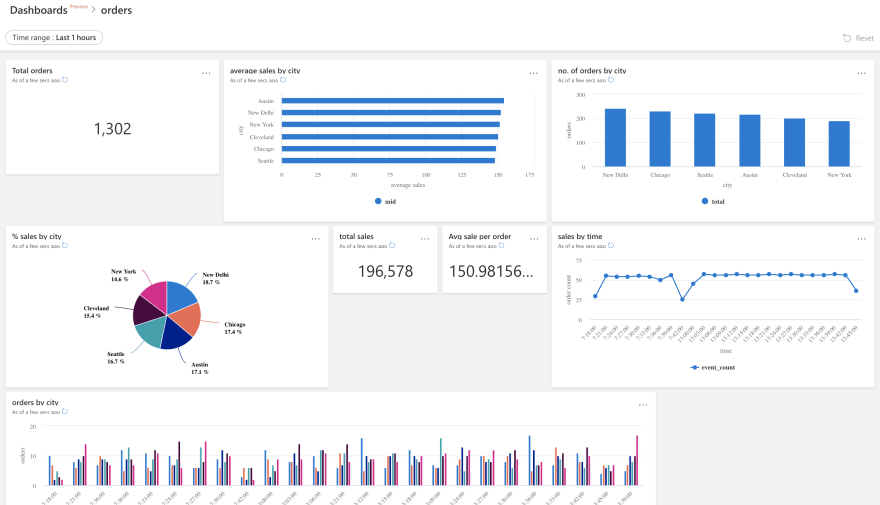
Azure Data Explorer Dashboards
- Learn how to visualize data with Azure Data Explorer dashboards
Clean up
To stop the containers, you can:
docker-compose -p adx-kafka-cdc down -v
To delete the Azure Data Explorer cluster/database, use az cluster delete or az kusto database delete. For PostgreSQL, simply use az postgres server delete
az postgres server delete -g <resource group name> -n <server name>
az kusto cluster delete -n <cluster name> -g <resource group name>
az kusto database delete -n <database name> --cluster-name <cluster name> -g <resource group name>
Conclusion
Kafka Connect helps you build scalable data pipelines without having to write custom plumbing code. You mostly need to setup, configure and of course operator the connectors. Remember that Kafka Connect worker instances are just JVM processes and depending on your scale and requirements you can use choose to operate them using Azure Kubernetes Service. Since Kafka Connect instances are stateless entities, you've a lot of freedom in terms of the topology and sizing of your cluster workloads!
Additional resources
If you want to explore further, I would recommend
- Explore Debezium connectors
- Azure Data Explorer Ingestion overview
- Explore what you can do with Kusto Query Language
- Data Explorer connector features
- What is Azure Event Hubs?
- Use Change Data Capture with Kafka Connect support on Azure Event Hubs (Preview)


Top comments (0)