Every day millions of people spend their precious time in productivity tools. What if you use data and intelligence behind the Microsoft applications (Microsoft Teams, Outlook, and many other Office apps) to build seemsless automations and custom apps to boost productivity? In this post, we'll build a seamsless onboarding experience to new employees joining a company with the power of Microsoft Graph.
📝 What We'll Cover
- ✨ The power of Microsoft Graph
- 🖇️ How do Microsoft Graph and Event Hubs work together?
- ⚒️ Exercise: Setup Azure Event Hubs and Key Vault
- 🪡 Exercise: Subscribe to
usersresource to receive change notifications by using Azure Functions - ♾️ Exercise: Create Onboarding Function
- 🚀 Debug your onboarding experience
- 📚 Resources
Following pre-requisites are recommended:
- Microsoft 365 Developer Program account
- Microsoft Azure Subscription
- Visual Studio Code
- Azure Functions Extension for Visual Studio Code
- Azure Storage Emulator
✨ The power of Microsoft Graph
Microsoft Graph is the gateway to data and intelligence in Microsoft 365 platform. Microsoft Graph exploses Rest APIs and client libraries to access data across Microsoft 365 core services such as Calendar, Teams, To Do, Outlook, People, Planner, OneDrive, OneNote and more.

You can build custom experiences by using Microsoft Graph such as automating the onboarding process for new employees. When new employees are created in the Azure Active Directory, they will be automatically added in the Onboarding team on Microsoft Teams.

🖇️ How do Microsoft Graph and Event Hubs work together?
Microsoft Graph uses webhook mechanism to track changes in resources and deliver change notifications to the clients. As an example to the Microsoft Graph Change Notifications, you can receive change notifications when:
- a new task is added in the to-do list
- a user changes the presence status from busy to available
- an event is deleted/cancelled from the calendar
If you'd like to track a large set of resources in a high frequency, you can use Azure Events Hubs instead of traditional webhooks to receive change notifications. Azure Event Hubs is a popular real-time events ingestion and distribution service built for scale.
Microsoft Graph Change Notifications can be also received by using Azure Event Grid that is currently available for Microsoft Partners. Please review the documentation for more information: Partner Events overview for customers - Azure Event Grid
⚒️ Exercise: Setup Azure Event Hubs and Key Vault
To get Microsoft Graph Change Notifications delivered to Azure Event Hubs, we'll have to setup Azure Event Hubs and Azure Key Vault. We'll use Azure Key Vault to access to Event Hubs connection string.
1️⃣ Create Azure Event Hubs
- Go to Azure Portal and select Create a resource, type Event Hubs and select click Create.
- Fill in the Event Hubs namespace creation details, and then click Create.
- Go to the newly created Event Hubs namespace page, select Event Hubs tab from the left pane and + Event Hub:
- Name your Event Hub as Event Hub
- Click Create.
- Click the name of the Event Hub, and then select Shared access policies and + Add to add a new policy:
- Give a name to the policy
- Check Send and Listen
- Click Create.
- After the policy has been created, click the name of the policy to open the details panel, and then copy the Connection string-primary key value. Write it down; you'll need it for the next step.
- Go to Consumer groups tab in the left pane and select + Consumer group, give a name for your consumer group as onboarding and select Create.
2️⃣ Create Azure Key Vault
- Go to Azure Portal and select Create a resource, type Key Vault and select Create.
- Fill in the Key Vault creation details, and then click Review + Create.
- Go to newly created Key Vault and select Secrets tab from the left pane and click + Generate/Import:
- Give a name to the secret
- For the value, paste in the connection string you generated at the Event Hubs step
- Click Create
- Copy the name of the secret.
- Select Access Policies from the left pane and + Add Access Policy:
- For Secret permissions, select Get
- For Principal, select Microsoft Graph Change Tracking
- Click Add.
- Select Overview tab from the left pane and copy the Vault URI.
🪡 Exercise: Subscribe to users resource to receive change notifications by using Azure Functions
To start receiving Microsoft Graph Change Notifications, we'll need to create subscription to the resource that we'd like to track. We'll use Azure Functions to create subscription.
To create subscription for Microsoft Graph Change Notifications, we'll need to make a http post request to https://graph.microsoft.com/v1.0/subscriptions. Microsoft Graph requires Azure Active Directory authentication make API calls. First, we'll need to register an app to Azure Active Directory, and then we will make the Microsoft Graph Subscription API call with Azure Functions.
1️⃣ Create an app in Azure Active Directory
- In the Azure Portal, go to Azure Active Directory and select App registrations from the left pane and select + New registration. Fill in the details for the new App registration form as below:
- Name: Graph Subscription Auth
- Supported account types: Accounts in any organizational directory (Any Azure AD directory - Multitenant) and personal Microsoft accounts (e.g. Skype, Xbox)
- Select Register.
- Go to newly registered app in Azure Active Directory, select API permissions:
- Select + Add a permission and Microsoft Graph
- Select Application permissions and add
User.Read.AllandTeamMember.ReadWrite.All. - Select Grant admin consent for the organization
- Select Certificates & secrets tab from the left pane, select + New client secret:
- Choose desired expiry duration
- Select Add
- Copy the value of the secret.
- Go to Overview from the left pane, copy Application (client) ID and Directory (tenant) ID.
2️⃣ Create subscription with Azure Functions
-
Open Visual Studio Code, open the pallete by clicking
CTRL + SHIFT + Pon Windows orCMD + SHIFT + Pon Mac, search for "create function" and choose Azure Functions: Create Function:- A window will pop-up with a message "you must have a project open to create function", select Create new project. Create a new folder and select the folder for your project
- Select JavaScript as a project language
- Select Timer Trigger as a template for your project's first function.
- Name your Timer Trigger as SubscriptionFunction and press enter.
- Specify schedule as
0 */61 * * * *and press enter - Select Open in current window and press enter.
-
Select Terminal from the menu bar on top and select New Terminal. Run the following commands in the terminal to install the dependencies:
npm install @azure/identity @microsoft/microsoft-graph-client isomorphic-fetch readline-sync Create a folder under the project and name as Shared.
Create a new file inside the Shared folder, name as dateTimeFormat.js, copy the entire code in dateTimeFormat.js inside your file to define the expiration date of the subscription.
-
Create a new file inside the Shared folder, name as Graph.js. Add the following authentication code snippet inside the Graph.js:
const expiry = require('./dateTimeFormat');
require('isomorphic-fetch');
const azure = require('@azure/identity');
const graph = require('@microsoft/microsoft-graph-client');
const authProviders = require('@microsoft/microsoft-graph-client/authProviders/azureTokenCredentials');
let _clientSecretCredential = undefined;
let _appClient = undefined;
let _expiry = undefined;

function ensureGraphForAppOnlyAuth() {
if (!_clientSecretCredential) {
    _clientSecretCredential = new azure.ClientSecretCredential(
    '<YOUR-AAD-APP-TENANT-ID>',
    '<YOUR-AAD-APP-CLIENT-ID>',
    '<YOUR-AAD-APP-CLIENT-SECRET>'
    );
}

if (!_appClient) {
    const authProvider = new authProviders.TokenCredentialAuthenticationProvider(
    _clientSecretCredential, {
        scopes: [ 'https://graph.microsoft.com/.default' ]
    });

    _appClient = graph.Client.initWithMiddleware({
    authProvider: authProvider
    });
}
}
Replace
<YOUR-AAD-APP-TENANT-ID>,<YOUR-AAD-APP-CLIENT-ID>and<YOUR-AAD-APP-CLIENT-SECRET>with the registered app details in the previous step -
Add the following function inside Graph.js to make a REST API request to Microsoft Graph
/subscriptionsendpoint and create a subscription to track new users:
async function postSubscriptionAsync() {
ensureGraphForAppOnlyAuth();
if(!_expiry){
    _expiry = await expiry.getDateTimeAsync();
    }
    const subscription = {
        changeType: 'created, updated',
        notificationUrl: 'EventHub:https://<YOUR-VAULT-URI>/secrets/<YOUR-KEY-VAULT-SECRET-NAME>?tenantId=<YOUR-TENANT-ID>',
        resource: 'users',
        expirationDateTime: _expiry,
        clientState: 'secretClientValue',
        };

    return _appClient?.api('/subscriptions')
        .post(subscription);
}
module.exports.postSubscriptionAsync = postSubscriptionAsync;
In notificationUrl, make sure to replace
<YOUR-VAULT-URI>with the vault uri,<YOUR-KEY-VAULT-SECRET-NAME>with the secret name and<YOUR-TENANT-ID>with the tenant id that you copied from the Key Vault. -
Go to SubscriptionFunction > index.js and copy the following references on top of the page:
require('isomorphic-fetch'); const graph = require('../Shared/graph'); -
In the index.js, copy the following code snippet inside the function to trigger the subscription every 61 minutes:
const subscription = await graph.postSubscriptionAsync(); -
Go to local.settings.json, replace the existing code with the code snippet below:
{ "IsEncrypted": false, "Values": { "AzureWebJobsStorage": "UseDevelopmentStorage=true", "FUNCTIONS_WORKER_RUNTIME": "node" }, "watchDirectories": [ "Shared" ] } -
For the testing purposes only, go to SubscriptionFunction > function.json and add the following parameter inside the binding:
"runOnStartup": trueMake sure to remove this parameter for the production.
-
Run the Microsoft Azure Storage Emulator and run the following command on the Visual Studio Code terminal to test your function:
func host start
When subscription function runs successfully, it will create a subscription for users resource. Azure Event Hubs will receive notifications whenever there is a new user created in Azure Active Directory.
♾️ Exercise: Create Onboarding Function
We'll create a second function in the project to receive change notifications from Event Hubs when there is a new user created in the Azure Active Directory and add new user in Onboarding team on Microsoft Teams.
-
Open the patlete on Visual Studio by clicking
CTRL + SHIFT + Pon Windows orCMD + SHIFT + Pon Mac, search for "create function" and choose Azure Functions: Create Function:- Select Azure Event Hub trigger as a template for your function
- Name your Event Hub trigger as OnboardingFunction and press enter
- Select + Create new local app setting
- Select your Event Hub settings that you created in the previous steps:
- Azure subscription
- Event Hub Namespace
- Event Hub
- Event Hub policy
- Consumer group
- Press enter.
-
Go to Shared > Graph.js, add the following parameter on top of the page:
let _memberId = undefined; -
Inside Graph.js, copy the following code to automatically add the new user to the Onboarding team on Microsoft Teams:
async function postTeamsMemberAsync(memberId) {
    ensureGraphForAppOnlyAuth();
    _memberId = memberId;
    const user = 'https://graph.microsoft.com/v1.0/users(\'' + _memberId +'\')';
    const conversationMember = {
        '@odata.type': '#microsoft.graph.aadUserConversationMember',
        roles: ['owner'],
        'user@odata.bind': user
    };

    return _appClient?.api('/teams/<YOUR-ONBOARDING-TEAM-ID>/members')
        .post(conversationMember);
}
module.exports.postTeamsMemberAsync = postTeamsMemberAsync;
Make sure to replace
<YOUR-ONBOARDING-TEAM-ID>with the team id that you'd like to add your users as a member. You can login to Microsoft Graph Explorer and run my joined teams sample query to view available team ids. -
Go to OnboardingFunction > index.js and copy the following references on top of the page:
const graph = require('../Shared/graph'); -
In the index.js, and replace the code inside the function with the following code snippet:
 eventHubMessages.forEach(async (message, index) => {
    var jsonMessage = JSON.parse(message);

    for (let i in jsonMessage.value) {
        var resourceData = jsonMessage.value[i].resourceData;
        const newMemberId = resourceData.id;
        await graph.postTeamsMemberAsync(newMemberId);
    }
});
🚀 Debug your onboarding experience
To debug our onboarding experience, we'll need run our functions locally and create a new user in Azure Active Directory to see if the new user is added automatically in Microsoft Teams Onboarding team.
-
Open the terminal in Visual Studio Code and run your functions with the following command:
func host startMake sure that Microsoft Azure Storage Emulator is running in the background.
-
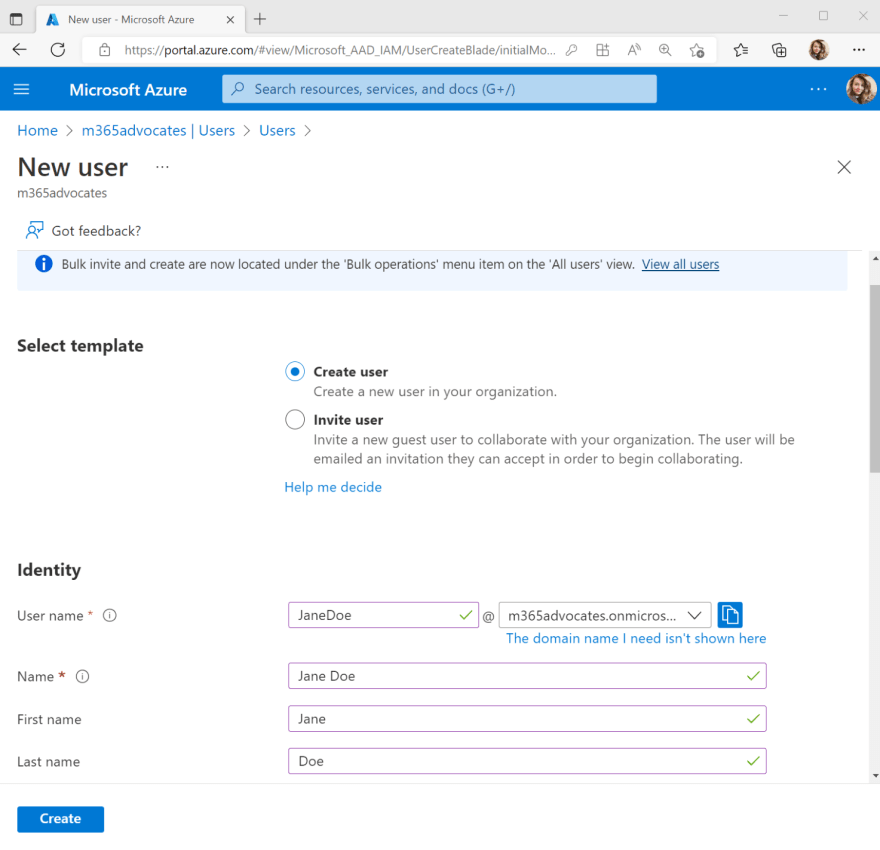
Go to Azure Portal and select Azure Active Directory from the left pane and go to Users. Select + New user and Create new user. Fill in the details as below:
- User name:
JaneDoe - Name:
Jane Doe
- User name:
- When you added
Jane Doeas a new user, it should trigger the OnboardingFunction to run.
Once the OnboardingFunction runs successfully, you should be able to see Jane Doe as a member of the Onboarding team on Microsoft Teams! 🥳

Source code for this solution can be found in the following GitHub Repository: Onboarding-Functions


Oldest comments (0)