Launched at AWS re:Invent 2019, AWS Inferentia is a high performance machine learning inference chip, custom designed by AWS: its purpose is to deliver cost effective, low latency predictions at scale. Inferentia is present in Amazon EC2 inf1 instances, a new family of instances also launched at re:Invent.
In this post, I’d like to show you how to get started with Inferentia and TensorFlow. Please note that Apache MXNet, PyTorch and ONNX are also supported.
A primer on Inferentia
The CMP324 breakout session is a great introduction to Inferentia, and the Alexa use case is a rare look under the hood. It’s well worth your time.
In a nutshell, each Inferentia chip hosts 4 Neuron Cores. Each one of these implements a “high performance systolic array matrix multipy engine” (nicely put, Gadi), and is also equipped with a large on-chip cache.
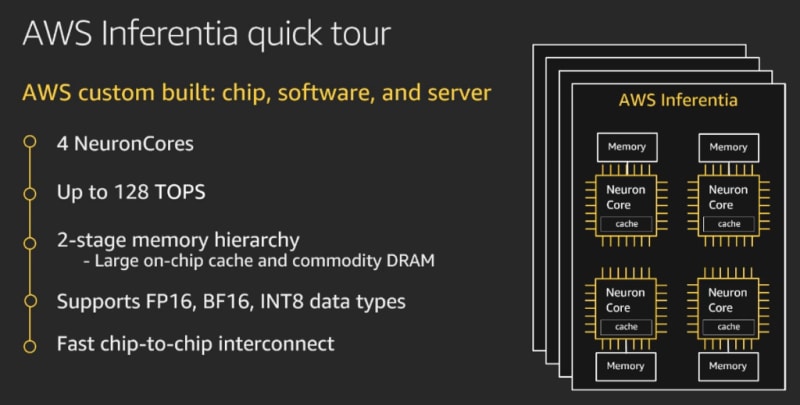
NeuronCores are interconnected, which makes it possible to:
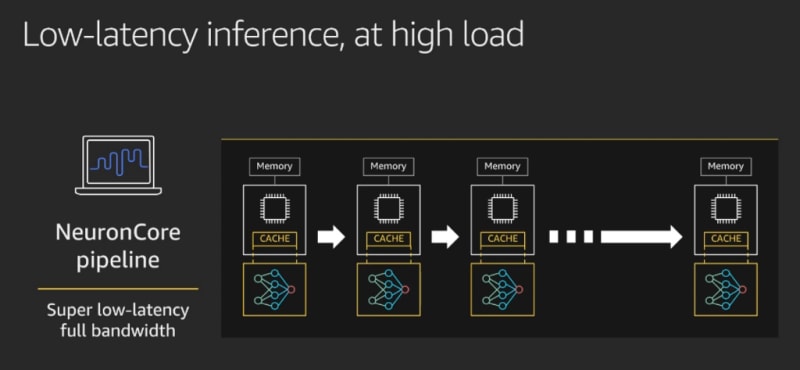
- Partition a model across multiple cores (and Inferentia chips, if several are available), storing it 100% in on-cache memory.
- Stream data at full speed through the pipeline of cores, without having to deal with latency caused by external memory access.
Alternatively, you can run inference with different models on the same Inferentia chip. This is achieved by partitioning NeuronCores into NeuronCore Groups, and by loading different models on different groups.
The Neuron SDK
In order to run on Inferentia, models first need to be compiled to a hardware-optimized representation. Then, they may be loaded, executed and profiled using a specific runtime. These operations can be performed through command-line tools available in the AWS Neuron SDK, or through framework APIs.
Let’s get started!
Launching an EC2 instance for model compilation
This first step doesn’t require an inf1 instance. In fact, you should use a compute-optimized instance for fast and cost effective compilation. In order to avoid any software configuration, you should also use the Deep Learning AMI, which comes preinstalled with the Neuron SDK and with updated frameworks.
At the time of writing, the most recent is Deep Learning AMI for Amazon Linux 2 is version 26.0, and it’s AMI identifier is ami-08e68326c36bf3710.

Using this AMI, I fire up a c5d.4xlarge instance. No special settings are required, just make sure you allow SSH access in the Security Group.

Once the instance is up, I ssh to it, and I’m greeted by the familiar Deep Learning AMI banner, tellling me that Conda environments are available for TensorFlow and Apache MXNet.
====================================================================
 \_\_| \_\_|\_ )
 \_| ( / Deep Learning AMI (Amazon Linux 2) Version 26.0
\_\_\_|\_\_\_|\_\_\_|
====================================================================

Please use one of the following commands to start the required environment with the framework of your choice:
for MXNet(+Keras2) with Python3 (CUDA 10.1 and Intel MKL-DNN)
source activate mxnet\_p36
for MXNet(+Keras2) with Python2 (CUDA 10.1 and Intel MKL-DNN)
source activate mxnet\_p27
**for MXNet(+AWS Neuron) with Python3
source activate aws\_neuron\_mxnet\_p36**
for TensorFlow(+Keras2) with Python3 (CUDA 10.0 and Intel MKL-DNN) source activate tensorflow\_p36
for TensorFlow(+Keras2) with Python2 (CUDA 10.0 and Intel MKL-DNN) source activate tensorflow\_p27
**for TensorFlow(+AWS Neuron) with Python3
source activate aws\_neuron\_tensorflow\_p36**
for TensorFlow 2(+Keras2) with Python3 (CUDA 10.0 and Intel MKL-DNN) ssource activate tensorflow2\_p36
for TensorFlow 2(+Keras2) with Python2 (CUDA 10.0 and Intel MKL-DNN) ssource activate tensorflow2\_p27
for PyTorch with Python3 (CUDA 10.1 and Intel MKL)
source activate pytorch\_p36
for PyTorch with Python2 (CUDA 10.1 and Intel MKL)
source activate pytorch\_p27
for Chainer with Python2 (CUDA 10.0 and Intel iDeep)
source activate chainer\_p27
for Chainer with Python3 (CUDA 10.0 and Intel iDeep)
source activate chainer\_p36
for base Python2 (CUDA 10.0)
source activate python2
for base Python3 (CUDA 10.0)
source activate python3

Official Conda User Guide: [https://docs.conda.io/projects/conda/en/latest/user-guide/](https://docs.conda.io/projects/conda/en/latest/user-guide/)
AWS Deep Learning AMI Homepage: [https://aws.amazon.com/machine-learning/amis/](https://aws.amazon.com/machine-learning/amis/)
Developer Guide and Release Notes: [https://docs.aws.amazon.com/dlami/latest/devguide/what-is-dlami.html](https://docs.aws.amazon.com/dlami/latest/devguide/what-is-dlami.html)
Support: [https://forums.aws.amazon.com/forum.jspa?forumID=263](https://forums.aws.amazon.com/forum.jspa?forumID=263)
For a fully managed experience, check out Amazon SageMaker at [https://aws.amazon.com/sagemaker](https://aws.amazon.com/sagemaker)
**When using INF1 type instances, please update regularly using the instructions at:** [**https://github.com/aws/aws-neuron-sdk/tree/master/release-notes**](https://github.com/aws/aws-neuron-sdk/tree/master/release-notes)
====================================================================
I activate the appropriate environment, which provides all required dependencies.
For the rest of this post, any shell command prefixed by (aws_neuron_tensorflow_p36) should be run inside that Conda environment.
$ source activate aws\_neuron\_tensorflow\_p36
(aws\_neuron\_tensorflow\_p36) $
Next, I upgrade the tensorflow-neuron package.
$ conda install numpy=1.17.2 --yes --quiet
$ conda update tensorflow-neuron
We’re now ready to fetch a model and compile it.
Compiling a model
The code below fetches a ResNet50 image classification model pretrained on the ImageNet dataset, and stores it in the resnet50 directory.
Then, it compiles it for Inferentia. I highlighted the single line of code required: everything else is vanilla TensorFlow. Then, the compiled model is saved in the ws_resnet50 directory, and in a ZIP file for easy copy to an inf1 instance.
import os
import time
import shutil
import tensorflow as tf
**import tensorflow.neuron as tfn**
import tensorflow.compat.v1.keras as keras
from tensorflow.keras.applications.resnet50 import ResNet50
from tensorflow.keras.applications.resnet50 import preprocess\_input

# Create a workspace
WORKSPACE = './ws\_resnet50'
os.makedirs(WORKSPACE, exist\_ok=True)

# Prepare export directory (old one removed)
model\_dir = os.path.join(WORKSPACE, 'resnet50')
compiled\_model\_dir = os.path.join(WORKSPACE, 'resnet50\_neuron')
shutil.rmtree(model\_dir, ignore\_errors=True)
shutil.rmtree(compiled\_model\_dir, ignore\_errors=True)

# Instantiate Keras ResNet50 model
keras.backend.set\_learning\_phase(0)
keras.backend.set\_image\_data\_format('channels\_last')

model = ResNet50(weights='imagenet')

# Export SavedModel
tf.saved\_model.simple\_save(
    session = keras.backend.get\_session(),
    export\_dir = model\_dir,
    inputs = {'input': model.inputs[0]},
    outputs = {'output': model.outputs[0]})

**# Compile using Neuron
tfn.saved\_model.compile(model\_dir, compiled\_model\_dir)**

# Prepare SavedModel for uploading to Inf1 instance
shutil.make\_archive('./resnet50\_neuron', 'zip', WORKSPACE, 'resnet50\_neuron')
That one API is all it takes! Impressive.
Power users will enjoy reading about the CLI compiler, neuron-cc.
Running this code produces the expected output.
(aws\_neuron\_tensorflow\_p36) $ python compile\_resnet.py

<output removed>
Downloading data from [https://github.com/keras-team/keras-applications/releases/download/resnet/resnet50\_weights\_tf\_dim\_ordering\_tf\_kernels.h5](https://github.com/keras-team/keras-applications/releases/download/resnet/resnet50_weights_tf_dim_ordering_tf_kernels.h5)
102973440/102967424 [==============================] - 2s 0us/step
<output removed>
INFO:tensorflow:fusing subgraph neuron\_op\_d6f098c01c780733 with neuron-cc
INFO:tensorflow:Number of operations in TensorFlow session: 4638
INFO:tensorflow:Number of operations after tf.neuron optimizations: 556
INFO:tensorflow:Number of operations placed on Neuron runtime: 554
INFO:tensorflow:Successfully converted ./ws\_resnet50/resnet50 to ./ws\_resnet50/resnet50\_neuron
Then, I simply copy the ZIP file to an Amazon S3 bucket, probably the easiest way to share it with inf1 instances used for inference.
$ ls \*.zip
resnet50\_neuron.zip
$ aws s3 mb s3://jsimon-inf1-useast1
$ aws s3 cp resnet50\_neuron.zip s3://jsimon-inf1-useast1
upload: ./resnet50\_neuron.zip to s3://jsimon-inf1-useast1/resnet50\_neuron.zip
Alright, let’s fire up one of these babies.
Predicting on Inferentia with TensorFlow
Using the same AMI as above, I launch an inf1.xlarge instance.

Once this instance is up, I ssh to it, and I can view some properties using the neuron-ls CLI tool.

4 NeuronCores, as expected. The ‘east’ and ‘west’ columns show connections to other Inferentia chips: as this instance only has one, they’re empty here.
Next, I retrieve the compiled model from my S3 bucket, and extract it. I also retrieve a test image.
$ aws s3 cp s3://jsimon-inf1-useast1/resnet50\_neuron.zip .
download: s3://jsimon-inf1-useast1/resnet50\_neuron.zip to resnet50\_neuron.zip
$ unzip resnet50\_neuron.zip
Archive: resnet50\_neuron.zip
 creating: resnet50\_neuron/
 creating: resnet50\_neuron/variables/
 inflating: resnet50\_neuron/saved\_model.pb
$ curl -O [https://raw.githubusercontent.com/awslabs/mxnet-model-server/master/docs/images/kitten\_small.jpg](https://raw.githubusercontent.com/awslabs/mxnet-model-server/master/docs/images/kitten_small.jpg)
Using the code below, I load and transform the test image. I then load the compiled model, and use it to classify the image.
import os
import time
import numpy as np
import tensorflow as tf
from tensorflow.keras.preprocessing import image
from tensorflow.keras.applications import resnet50

tf.keras.backend.set\_image\_data\_format('channels\_last')

# Create input from image
img\_sgl = image.load\_img('kitten\_small.jpg', target\_size=(224, 224))
img\_arr = image.img\_to\_array(img\_sgl)
img\_arr2 = np.expand\_dims(img\_arr, axis=0)
img\_arr3 = resnet50.preprocess\_input(img\_arr2)

# Load model
COMPILED\_MODEL\_DIR = './resnet50\_neuron/'
predictor\_inferentia = tf.contrib.predictor.from\_saved\_model(COMPILED\_MODEL\_DIR)

# Run inference
model\_feed\_dict={'input': img\_arr3}
infa\_rslts = predictor\_inferentia(model\_feed\_dict);

# Display results
print(resnet50.decode\_predictions(infa\_rslts["output"], top=5)[0])
Can you guess how many lines of Inferentia specific code are present here? The answer is zero. We seamlessly use the tf.contrib.predictor API. Woohoo!
Running this code produces the expected output, and we see the top 5 classes for the image.
(aws\_neuron\_tensorflow\_p36) $ python infer\_resnet50.py

<output removed>
[('n02123045', 'tabby', 0.6918919), ('n02127052', 'lynx', 0.12770271), ('n02123159', 'tiger\_cat', 0.08277027), ('n02124075', 'Egyptian\_cat', 0.06418919), ('n02128757', 'snow\_leopard', 0.009290541)]
Now let’s see how we can deploy a compiled model using TensorFlow Serving, which is a very good option for production deployments.
Predicting on Inferentia with TensorFlow Serving
First, we need to package the model properly, and move it to a directory reflecting it’s version. We have only one here, so let’s move the saved model to a directory named ‘1’.
$ pwd
/home/ec2-user/resnet50\_neuron
$ mkdir 1
$ mv \* 1
Now, we can launch TensorFlow Serving, and load the compiled model. Once again, this is vanilla TensorFlow.
(aws\_neuron\_tensorflow\_p36) $ tensorflow\_model\_server\_neuron
--model\_name=resnet50
--model\_base\_path=/home/ec2-user/resnet50\_neuron
--port=8500

2019–12–13 16:16:27.704882: I tensorflow\_serving/core/loader\_harness.cc:87] **Successfully loaded servable version {name: resnet50 version: 1}**
2019–12–13 16:16:27.706241: I tensorflow\_serving/model\_servers/server.cc:353] Running gRPC ModelServer at 0.0.0.0:8500
Once TensorFlow Serving is up and running, we can use the script below to load a test image, and send it for prediction. At the risk of repeating myself… this is vanilla TensorFlow :)
import numpy as np
import grpc
import tensorflow as tf
from tensorflow.keras.preprocessing import image
from tensorflow.keras.applications.resnet50 import preprocess\_input
from tensorflow.keras.applications.resnet50 import decode\_predictions
from tensorflow\_serving.apis import predict\_pb2
from tensorflow\_serving.apis import prediction\_service\_pb2\_grpc

if \_\_name\_\_ == '\_\_main\_\_':
    chan = grpc.insecure\_channel('localhost:8500')
    stub = prediction\_service\_pb2\_grpc.PredictionServiceStub(chan)

    img\_file="kitten\_small.jpg",
    img = image.load\_img(img\_file, target\_size=(224, 224))
    img\_array = preprocess\_input(image.img\_to\_array(img)[None, ...])

    request = predict\_pb2.PredictRequest()
    request.model\_spec.name = 'resnet50\_inf1'
    request.inputs['input'].CopyFrom(
        tf.contrib.util.make\_tensor\_proto(
            img\_array, shape=img\_array.shape)
    )

    result = stub.Predict(request)
    prediction = tf.make\_ndarray(result.outputs['output'])
    print(decode\_predictions(prediction))
Running this code produces the expected output, and we see the top 5 classes for the image.
(aws\_neuron\_tensorflow\_p36) $ python tfserving\_resnet50.py

<output removed>
[[(‘n02123045’, ‘tabby’, 0.6918919), (‘n02127052’, ‘lynx’, 0.12770271), (‘n02123159’, ‘tiger\_cat’, 0.08277027), (‘n02124075’, ‘Egyptian\_cat’, 0.06418919), (‘n02128757’, ‘snow\_leopard’, 0.009290541)]]
Diving deeper
That’s it for today. I hope I gave you a clear introduction to AWS Inferentia, and how easy it is to use it! All it took is one line of code to compile our model.
If you’d like to dive deeper, I highly recommend the excellent workshop delivered at re:Invent by my colleague Wenming Ye. One of the labs shows you how to compile a 32-bit floating point (FP32) ResNet50 model to 16-bit floating point (FP16). By reducing arithmetic complexity, this technique is known to improve performance while preserving accuracy. Indeed, on an inf1.2xlarge instance, the FP16 model delivers an impressive 1,500 image classifications per second!
As always, thank you for reading. Happy to answer questions here or on Twitter.
Inferentia NeuronCores are totally hardcore. They destroy everything \m/


Top comments (0)