
So What's the Big Picture?
When looking at AWS cloud consumption, many companies may have instances that aren't actively utilized compared to others. Wouldn't it be cool, if there was a way to shutdown those instances outside of work hours, and start them back up before people log onto the system?
Well, you're in luck, because today I want to show you how to save money on your monthly AWS bill, by creating an automatic stop and start schedule on your infrequently used ec2 instances.
The services involved in making this happen are:
AWS IAM
AWS Identity and Access Management (IAM) is a web service that allows you to securely control access to your AWS resources. With IAM, we can govern who can sign in, and authorization to use resources.
For more about IAM, click this link
AWS Lambda
AWS Lambda is a compute service that allows you to build applications that respond to new information and events.
Visit this link for more information about Lambda.
AWS Eventbridge
EventBridge is a serverless event bus that ingests data from your apps, AWS services and routes that data to targets.
Visit this link to learn more about EventBridge
Prior to getting started, It's important that you know which ec2 instances you're wanting to test. For the sake of the demonstration, I am conducting the shutdown & start up by collecting the instance IDs.
For the demo, only one region will be used, but if you're interested in running it across multiple regions, you may need to create another lambda function to associate with that specified region.
Now that the formalities are out of the way, lets get to it!
Create IAM Policy
First, search for IAM in the top search bar, select create policy, and choose JSON. For ease of use, please copy and paste the code provided.
{
  "Version": "2012-10-17",
  "Statement": [
    {
      "Effect": "Allow",
      "Action": [
        "logs:CreateLogGroup",
        "logs:CreateLogStream",
        "logs:PutLogEvents"
      ],
      "Resource": "arn:aws:logs:*:*:*"
    },
    {
      "Effect": "Allow",
      "Action": [
        "ec2:Start*",
        "ec2:Stop*"
      ],
      "Resource": "*"
    }
  ]
}
You can name your policy whatever you desire, but for nostalgic purposes, I named my policy StopNGo , which was a gas station in Houston.
After the policy is named, select create.
Developing the IAM Role
Next, we want to create the IAM Role for the Lambda function.
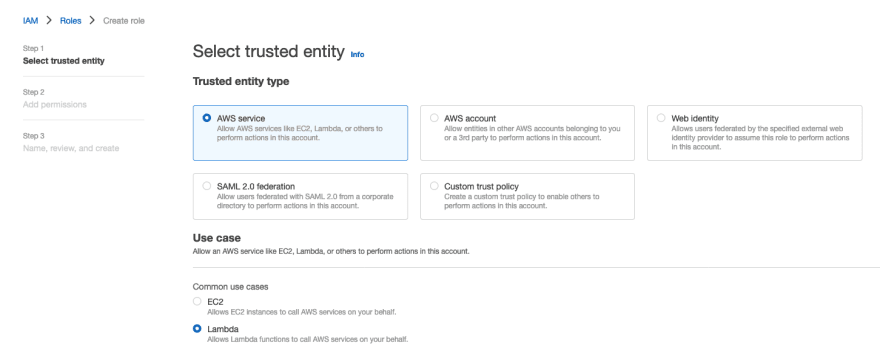
Since we are still in the IAM console, select Roles and select Create Roles.
Select the AWS Service, and choose Lambda as the common use case.
Select Next, and search for AWSLambdaBasicExecutionRole and choose it.

While we are at it, lets ensure to add the policy we previously created. Please be sure to clear the existing filter for Lambda prior to searching.
Select Next, and label your role, and click create role. I kept it similar and named it StopNGo-N.

Creating our Lambda Function
At this point, we need to create a lambda function that will end up triggering the shut down and start of our selected ec2 instances.
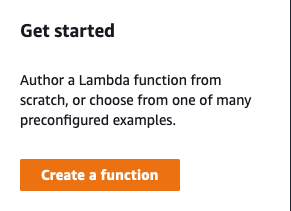
Let's utilize the search bar at the top, and type Lambda, choose it, and to get started choose Create a function.
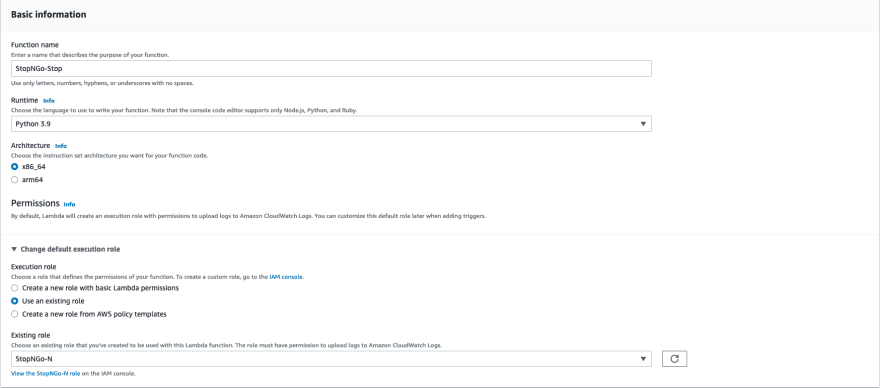
Ensure the Author from scratch option is highlighted, and proceed to fill out
Function Name : StopNGo-Stop
Runtime : Python 3.9
Architecture : X86_64
Under the Permissions section, expand the Change default execution role and choose Use an existing role. Be sure to attach the previous IAM role created.
Select Create Function, and let the real work commence!
Function Code
Under the code tab, make sure we are in the code source subtask and lets change what we have in the editor.
Feel free to copy and paste the code below into your editor pane, but modify the region and instances section to reflect your environment.
import boto3
region = 'us-east-1'
instances = ['i-0d274fa2a0606dd64', 'i-0081fec0e3aa3883a', 'i-05ac19a60ca8e823d', 'i-053147387fd6e625e']
ec2 = boto3.client('ec2', region_name=region)

def lambda_handler(event, context):
    ec2.stop_instances(InstanceIds=instances)
    print('We stopped your instances: ' + str(instances))
Save the function and deploy
Now we want to create a separate function to kick-start our instances. When you create a lambda function, you can copy and paste the code block below. Please be sure to modify the region and instance ids to fit your use case.
import boto3
region = 'us-east-1'
instances = ['i-0d274fa2a0606dd64', 'i-0081fec0e3aa3883a', 'i-05ac19a60ca8e823d', 'i-053147387fd6e625e']
ec2 = boto3.client('ec2', region_name=region)

def lambda_handler(event, context):
    ec2.start_instances(InstanceIds=instances)
    print('We started your instances: ' + str(instances))
Save the function and deploy.
Testing our functions
After creating our functions, we want to ensure they work.
Select our StopNGo-Stop function
Choose the Code tab
In the code source section, click Test

In the Configure test pop-up option, create a new event, enter a suitable name, and click Save.


Sidenote: There is no need to modify the JSON code for our test event, because the function won't use it.
Now, lets press the Test button to run the function.
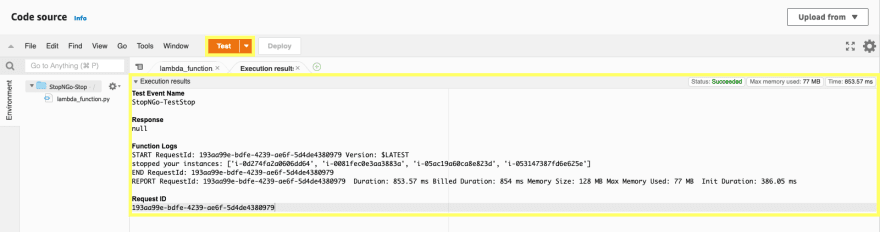
If we analyze the execution results, the function ran properly and stopped the targeted instances.
So, let's check our EC2 instances. The test should've shut them down.

Regarding the start function, we will mirror the previous steps used for our stop function.
Once you have verified its success, we are one step closer to the finish line.
Scheduling the Time Schedule with EventBridge
Here is where the rubber meets the road, we will be creating a rule that stops and starts the targeted instances at a defined time.
Search for EventBridge, and open the console.
Select Create Rule

Name the Rule
Write the description - Optional
Under Rule Type, select Schedule
Select Continue to create rule

For the schedule pattern, we are going to utilize the fine-grained schedule, as this is a suitable use case for our example.
Next, we are going to define the parameters that our cron expression will trigger.

I want to stop my ec2 instances everyday at 7:30pm UTC,so my minutes and hours will be entered, but different wildcard expressions are used in the other fields.
If you're wanting to create your own cron expressions, select this link.
Select Next
Now, let's define our Target
- Target Types: AWS Service
- Target: Lambda Function
- Function: StopNGo-Stop
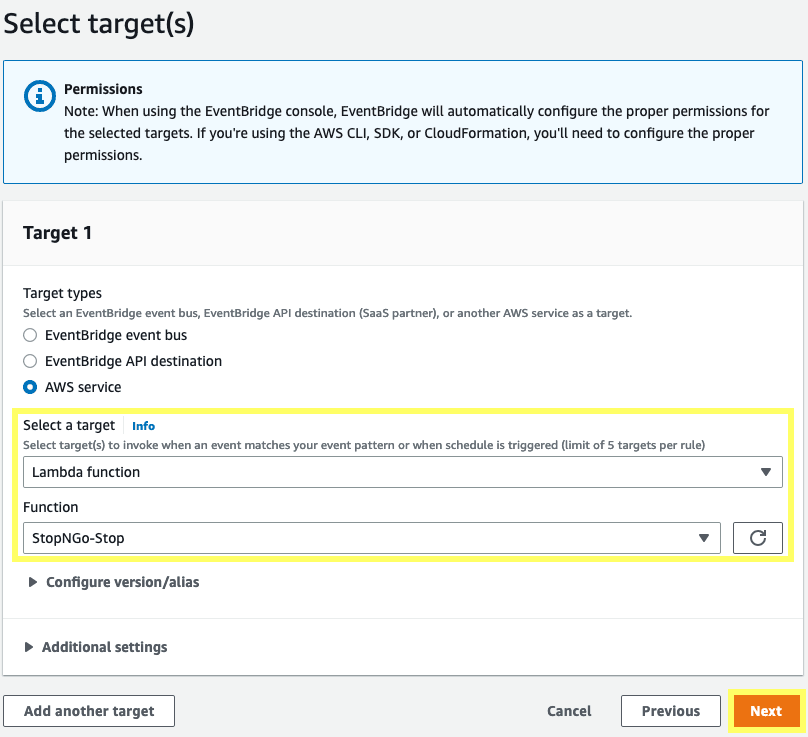
Select Next, skip the tags, and review the rules.

Once rules are created for StopNGo-Stop, we will create another EventBridge rule for our ec2 instances to start at 6:30am UTC.
Similar to the stop rule, I will modify the cron expression to fit my use case.

If you've been able to followed me up to this point, there will be two EventBridge rules that are similar to the photo below.

Which means a congratulations is in order, because you've successfully created a lambda function, and created a schedule with EventBridge that stops instances at 7:30pm UTC, and starts them at 6:30am UTC.


Top comments (0)