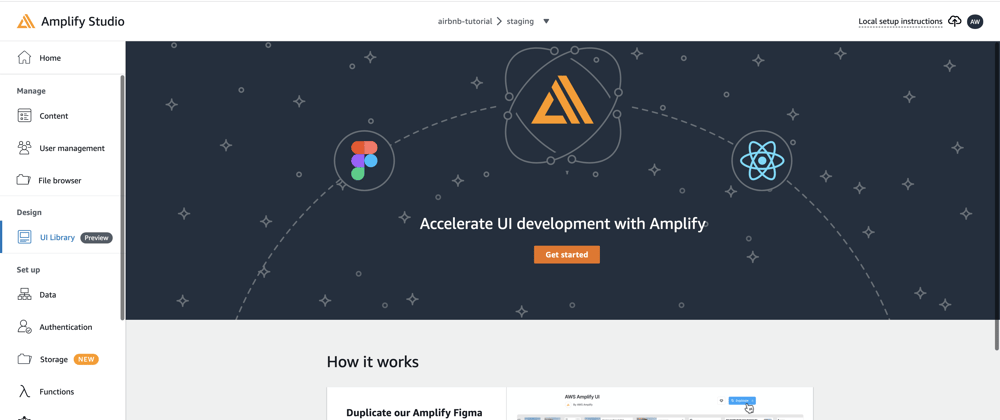
Full Stack for Front-End Developers: Building Your First AWS Amplify and React App Introduction
In this course, you will learn how to build full-stack applications with AWS Amplify Studio. We will be building a note-taking app with authentication, authorization, and data features. Additionally, we will use Amplify Studio's Figma to generate code that facilitates a seamless transition from design to React components.
If you are a front-end developer looking to build full-stack apps, then you have come to the right place!
Prerequisites
- Knowledge of React, including states, event handlers, and props.
- Familiarity with using the command-line interface on your computer. You don't have to be an expert, though!
- Although not mandatory, it would be useful to learn about Figma before building your own applications with AWS Amplify Studio.
Things You Will Build
- We will build a note-taking app with the following features:
- All notes will be listed on the homepage.
- Ability to create, update, and delete notes.
- User accounts will be able to login, create accounts, and log out.
- Users will only be able to view and modify their own notes.

1. Create data model
The first thing we need to do for our note-taking app is to create data models. We will want to store our notes in a database so that users can access them on different devices.
If you don't have an AWS account, go ahead and create one. You also may want to read about AWS Amplify pricing and how to set a billing alarm.
Go to the AWS Amplify Console.

Continue to Start in Amplify Studio.
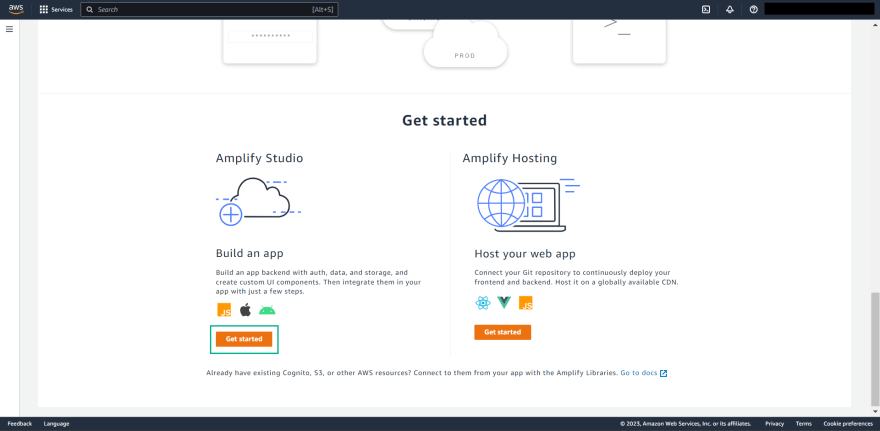
Enter Application Name: notes . Select Confirm Development.

When development app is selected Launch studio.
Select Data and Setup on the left navigation

Data models allow us to organize and normalize data - in JavaScript it would be very difficult to do with an array of objects where each object has different keywords. Instead, we want to normalize our data so that each version has the same properties. We also want the data types to be normalized.
For example, if you are going to create a data model for items in an online store, you will have the item name and description you want as strings. You will also have the price, float and image, which will be a URL. Normalizing your data in this way will make your interaction much easier.
In Studio, create a named Notes data model and add two fields, title and text. Preserve the String data type.
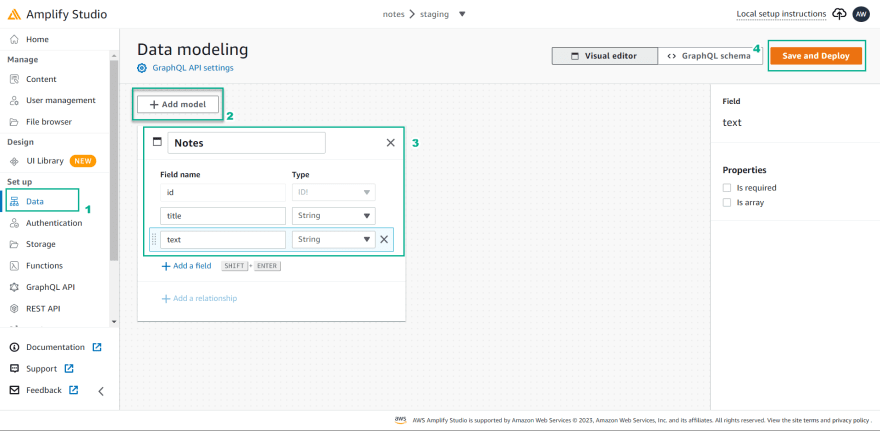
Once you've done this, click Save and deploy - your data will simply be mined to AWS!

AWS Amplify Data Storage
When you create a data model with AWS Amplify Studio, you are using the DataStore. DataStore stores your data both online and offline without any extra work. In the browser, it stores data in IndexedDB similar to localStorage. It will also save your data to the cloud using an Amazon DynamoDB database.
2. Use the AWS Amplify Data Manager to Seed Data
Go to the Content tab in Amplify Studio.

In the Content page select Actions and select Auto generate data.
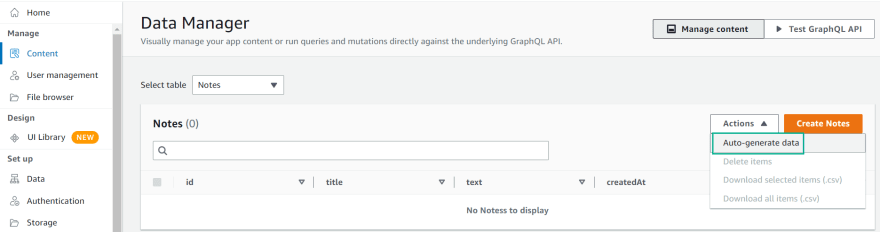
Here you will be able to modify your application data. I will create 100 rows of data and add some constraints. I want my title to be 1-3 words long. I want each of my text fields to be 1-5 sentences long. Then I will click Generate Data.

You should now see 100 rows of data in the Amplify data manager.

You can access and edit any rows of data, create new notes, or delete them using the data manager.
3. Import Figma Designs into Amplify Studio
Go to UI Library in Studio. Select Sync with Figma.

For this course, I pre-created a remixed Figma file from the original Amplify UI Kit for your use. has the necessary components for the note taking application. Click get a copy on Figma to use it. You'll be prompted to create a Figma account if you don't already have one -- this project is on their free tier.
Select My Components you will see your UI components in Amplify Studio

Copy the link to your Figma file and return to Amplify Studio. Paste your link into the input, then click Continue.

Amplify Studio allows you to take these components and export them to human-readable React code - we'll do this in a few lessons!
4. Connect Data Models to UI Components
Go to UI Library in Studio. Select NoteUI then enter Configure

Click on the title on the existing card that says T-Shirt.

On the right side of the page, Select Set Text Label. We'll want to make this the title of the note.
- Set the label holder:
note.title.
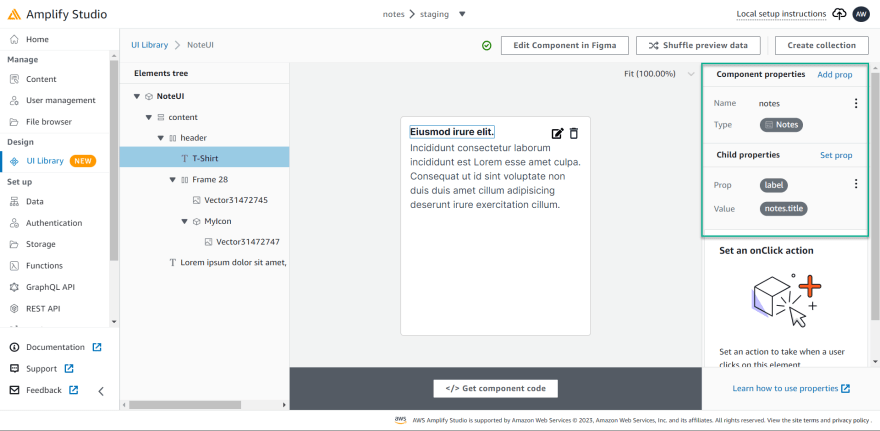
You should see the t-shirt text change to one of the titles of one of the generated notes. If you click Shuffle Preview Data you will cycle through different notes!

Do the same for the note text - select the paragraph below the title.
- Set the label to
note.title. - Click on the trash can icon.
- Set
onClickholder toDeleteunder data. Then selectNotemodel and set ID tonote.id

Create a form
Back to UI Library.
Click on the CreateNote form, then select Configure. Click Save and add
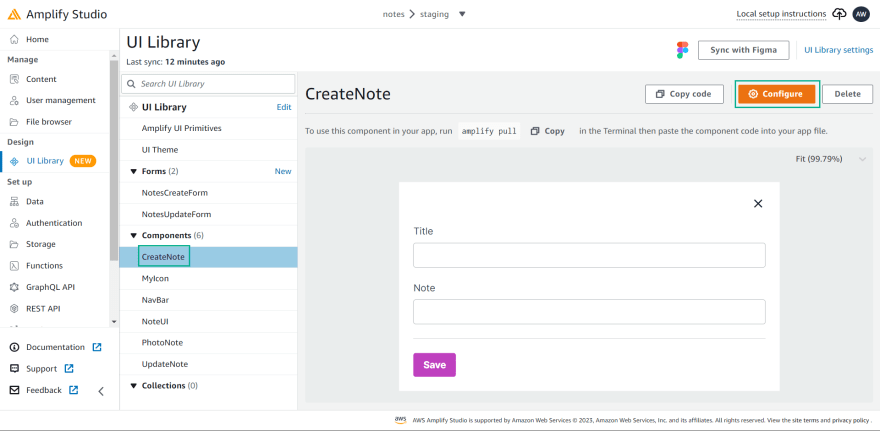
- Prop: `onClick.
- Action:
Create new. - Model:
Note. - Then select
titleinput to fill in the title model field and the like for the text. - The name
TextFieldcomes from Figma - you can rename the elements within it!

Update form
Back to UI Library.
Click UpdateNote , then select Configure. Click Save and add as shown below.

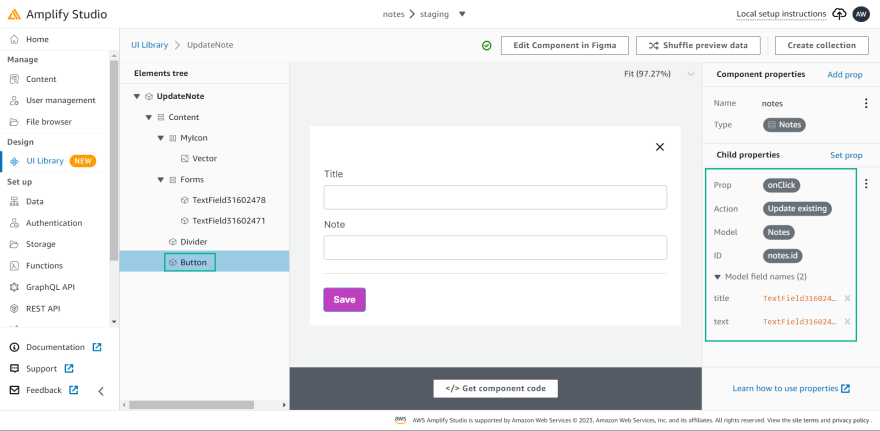
We have now linked the data we created in Amplify Studio with the UI components we created in Figma.
5. Create a collection view
Go to UI Library in Studio. Select NoteUI then enter Configure

Then select Create Collection.

Then change the gallery style to grid and set the number of columns 3 and set the page size 9 which will eventually add 10px to each side of the note.

You can set the sort or filter conditions for your collection on the right side.
6. Setup a Local AWS Amplify Application
Create a React Application
First, create a React app using your command line interface. We will use Create React App (https://create-react-app.dev/) to create a boilerplate React app.
Run npx create-react-app notes. Then change to the created directory, cd notes.
Run Amplify Pull
We will install the AWS Amplify CLI: npm install -g @aws-amplify/cli.
Return to Amplify Studio and click Local Setup Guide. Here you will receive an amplify pull command for your application - the application ID will be specific to your application. Copy this command by clicking on it, then run the command in your CLI.

A screen will appear asking if you want to log in to the Amplify CLI in your browser, select Yes and then you will be asked questions about your application in the CLI.

Press enter to answer each default question.
Open the application code in your text editor. You will notice that a few folders have been created in Amplify Studio.

Amplify Configure
Install Amplify libraries and React components.
npm i aws-amplify @aws-amplify/ui-react
Once installed, open /src/index.js file and add the following above the React native code.
// src/index.js

import { Amplify } from 'aws-amplify'

import config from './aws-exports'

Amplify.configure(config)
Set Up Amplify UI
We have some setup steps to follow in order for the components to render as expected.
Import the component and the Amplify CSS file.
 // src/index.js

 import { AmplifyProvider } from '@aws-amplify/ui-react'

 import '@aws-amplify/ui-react/styles.css'
Then set the AmplifyProvider component as the top-level component for your application according to the existing root.render method:
`
// src/index.js
root.render(
-
)
`

Finally, add the Inter font file to src/index.css:
/* src/index.css */

     @import url('https://fonts.googleapis.com/css2?family=Inter:slnt,wght@-10..0,100..900&display=swap');

We've set up a React app linked to the AWS Amplify backend and configured Amplify's UI components.
7. Using AWS Amplify Studio Components Locally
Run the Create React application development server through the CLI: npm run start. Keep this app running in the background so you can see its changes in the browser.
Go to /src/App.js and remove the return replace boilerplate with React Fragment:
function App() {

      return (

        <></>

      )

    }
You can also delete existing entries.
Add NavBar component to the application.
import { NavBar } from './ui-components'
Then create a component instance in return
    function App() {

      return (

        <>

          <NavBar />

        </>

      )

    }

When you view the NavBar in the browser you will notice that it doesn't span the entire page add the width=100% prop to the element:
```
<NavBar width="100%" />
```
Now render the collection of notes below the title:
```
import { NavBar, NoteUICollection} from './ui-components'

function App() {
  return (
    <>
      <NavBar width="100%" />
      <NoteUICollection />
    </>
  )
}
```

You will notice that the NavBar is really close to the notes, add a bottom margin.
```
<NavBar width="100%" marginBottom='20px' />
```

Add at the end of your index.css file. This will be helpful to make our composition look even better!
```
/* Add to the end of /src/index.css */
.modal {
  position: absolute;
  background-color: white;
  margin-left: auto;
  margin-right: auto;
  width: fit-content;
  left: 0;
  right: 0;
  top: 100px;
  border: .5px solid gray;
}

.container {
  margin: 0 auto;
  max-width: 900px;
}
```

Wrap NoteUICollectiondiv with a class container so that they are displayed in the center of the page:
```
function App() {
  return (
    <>
      <NavBar width="100%" />
      <div className='container'>
        <NoteUICollection />
      </div>
    </>
  )
}
```

You can check the CreateNote form (when it's not hidden) and it will add a new note to your UI!
```
import { CreateNote, NavBar, NoteUICollection, UpdateNote } from './ui-components'

function App() {
  return (
    <>
      <NavBar width="100%" />
      <div className='container'>
        <NoteUICollection />
      </div>
      <div className='modal' style={{display: 'none'}}>
        <CreateNote />
      </div>
      <div className='modal' style={{display: 'none'}}>
        <UpdateNote />
      </div>
    </>
  )
}
```
We have now created the basic user interface for our application.
8. Modify AWS Amplify Studio Generated Components in Code
First, we will create state fields to know if each modal is displayed or not. We'll also create a status field to store which notes should be updated.
```
import { useState } from 'react'

function App() {
  const [showCreateModal, setShowCreateModal] = useState(false)
  const [showUpdateModal, setShowUpdateModal] = useState(false)
  const [updateNote, setUpdateNote] = useState()
...
```
Open the /src/ui-components/NavBar.js file. You will notice a Button child component with getOverrideProps inside it.

The second argument getOverrideProps is the Figma key, in this case Button31632483 is .
You can pass the overrides prop to instances of your component, which will contain an object. Key will be the key of subcomponent, value will be the property we want to override. We will add an onClick button that toggles showCreateModal to true.
    <NavBar

      marginBottom='20px' width='100%'

      overrides={{

        Button31502513: { onClick: () => setShowCreateModal(true) }

      }}

    />
Now we will conditionally expose the CreateNote method to show only when showCreateModal is true. We will also override the X symbol to close the modal. For accessibility, I would also make it a button.
    <div className='modal' style={{ display: showCreateModal === false && 'none' }}>

      <CreateNote overrides={{

        MyIcon: {

          as: 'button',

          onClick: () => setShowCreateModal(false)

        }

      }}

      />

    </div>


Clicking the edit button on the note will show the update method and also set the version of the note we want to update/
      <NoteUICollection overrideItems={({ item, idx }) => {

      return {

        overrides: {

          Vector31472464: {

            as: 'button',

            onClick: () => {

              setShowUpdateModal(true)

              setUpdateNote(item)

            }

          }

        }

      }

    }}

    />

Add an override to UpdateNote to hide the update method when it closes and we will also pass the version of the note that we want to update.
    <div className='modal' style={{ display: showUpdateModal === false && 'none' }}>

      <UpdateNote

        note={updateNote} overrides={{

          MyIcon: {

            as: 'button',

            onClick: () => setShowUpdateModal(false)

          }

        }}

      />

    </div>

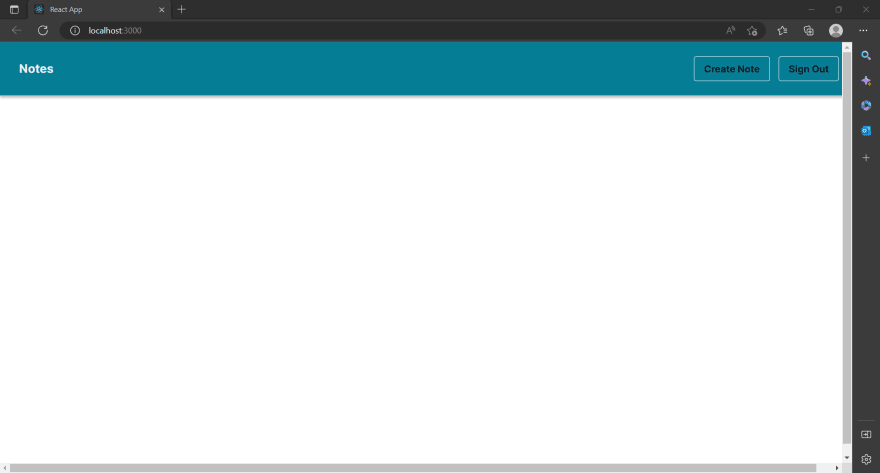
Now our full UI is working as expected.
You can use overrides to customize user interface elements created by AWS Amplify Studio in your own code.
9. Add Authentication to your Application
We'll be adding authentication to our app so users can be created, logged in, and signed out.
We'll be adding both authorization and authentication to this app - let's quickly define both:
Authorization - Allows users to have different actions they can take, e.g. only admins can update blog posts or only data creators can viewable.
Authentication - Make sure someone is what they say, such as by asking them to enter a password.
Instruct
Click Authentication in Setup. You can configure different login mechanisms, properties, password protection, and more. using the form provided. Select the default configuration, then click Deploy.

After your deployment is done, run `amplify pull` in your CLI to synchronize the changes with your local application.
In the App.js component, we will use the WithAuthenticator function to require the user to login to view the page. It will also implement the user creation process.
-
First, import the ingredients:
import { withAuthenticator } from '@aws-amplify/ui-react'
Then on your output line, wrap the Application component in a function:
export default withAuthenticator(App)
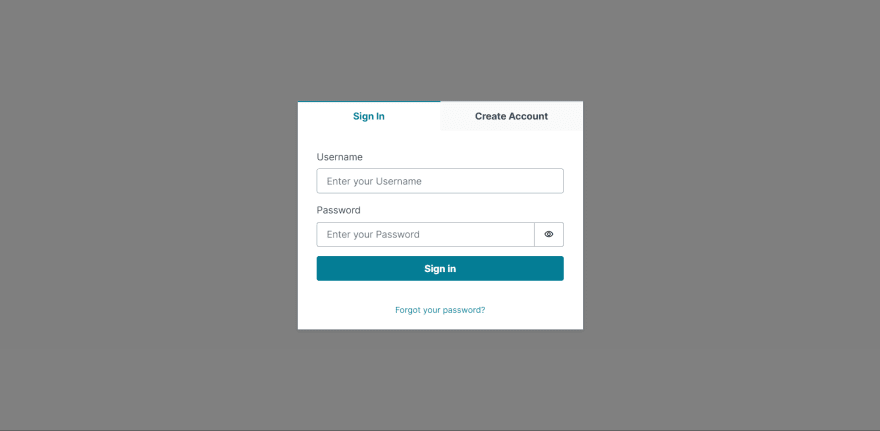
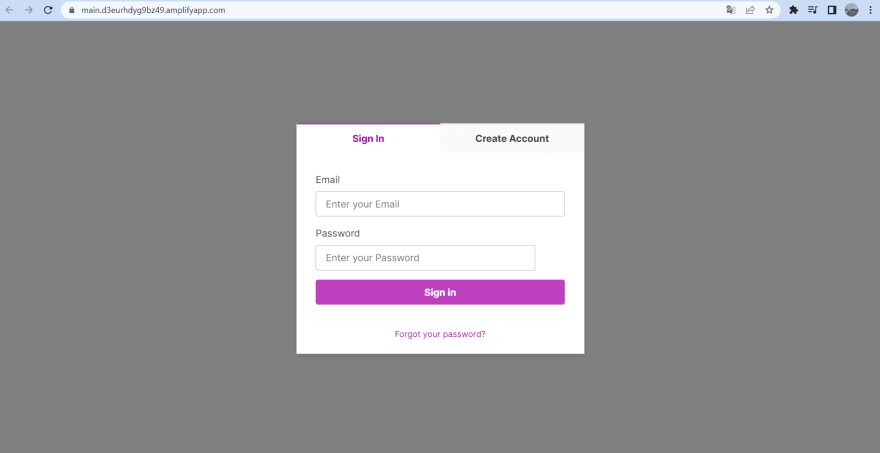
If you return to your app, you'll need to sign in to view your page.
Implement the logout button! The withAuthenticator function passes a signOut function (and user information) to the component it wraps as a prop. Let's destroy it:
function App ({ signOut })
In the NavBar component that runs the function when the Sign Out button is clicked.
    <NavBar

      marginBottom='20px' width='100%'

      overrides={{

        Button31502513: { onClick: () => setShowCreateModal(true) },

        Button31502517: {

          onClick: async() => {

            signOut()

          }

        }

       }}

    />
We now have a full authentication flow for our application.
10. Add owner-based authorization rule
In AWS Amplify Studio, go to the data tab under Setup. Then click the Note model. Enable Enable Owner Authorization. Select all activities. Delete an existing rule.

Then click Save and Deploy.
Once your data updates are deployed, run amplify pull in your CLI to sync your changes locally.
Import the DataStore library:
import { DataStore } from 'aws-amplify'
In the NavBar component, add the following line of code to clear local data before logging out.
    <NavBar

      marginBottom='20px' width='100%'

      overrides={{

        Button31502513: { onClick: () => setShowCreateModal(true) },

        Button31502517: {

          onClick: async() => {

    + await DataStore.clear()

            signOut()

          }

        }

      }}

    />

We now have authorization rules in our application.
11. Add UI Themes to your Project
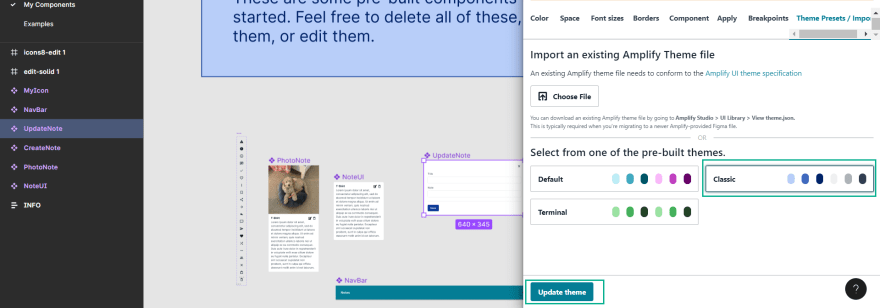
First, install the AWS Amplify Theme Editor Plugin. Then go to your project's Figma file.
Click the Figma icon in the navigation bar, then plugins, then click AWS Amplify Theme Editor.

You will see an interface to change the theme of the application. Choose any color you like, then scroll to the bottom and click Update Theme
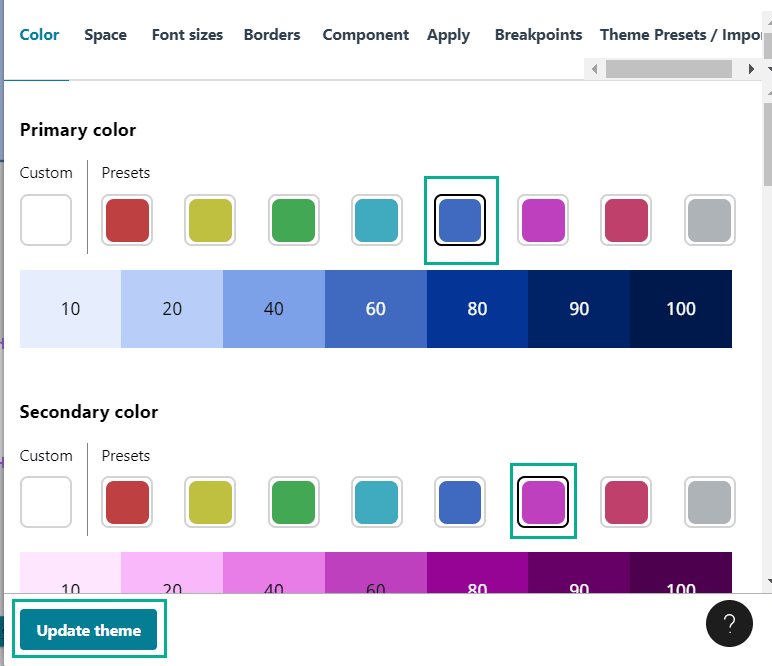
You'll see all your components in the My Components tab updated to match the color theme. You can also do this with spacing, font size, and individual elements.
To sync your changes locally, run amplify pull from the command line in your project. We will need to pass the color theme to the element in the index.js file.
- Enter subject object:
import { studioTheme } from './ui-components' - Then add it as a prop for
AmplifyProvider:<AmplifyProvider theme={studioTheme}>Your color theme should now match the one you set up in Figma! You can now update themes and components in Figma and synchronize them with your local application.
12. Hosting Your First AWS Amplify and React App UI
First, create a GitHub repository for your app.
Go to the new repo page and add a name. Then click Create Repository.

Push your code to GitHub.
`
    git add .

    git commit -m "Amplify Studio tutorial"

    git remote add origin YOUR_REPO_URL

    git push -u origin main
    ```

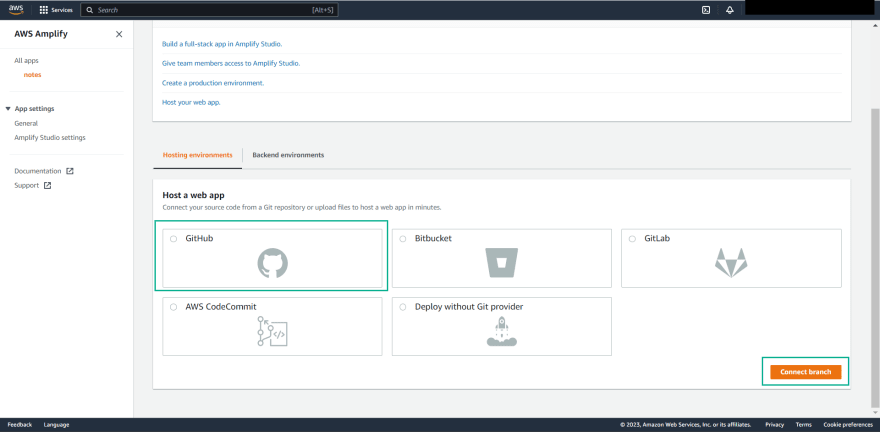
Go to AWS Amplify Console . Select the Amplifier app you're building, then click it. Switch to Hosting environmentstab, select GitHub, then click Connect Branch.
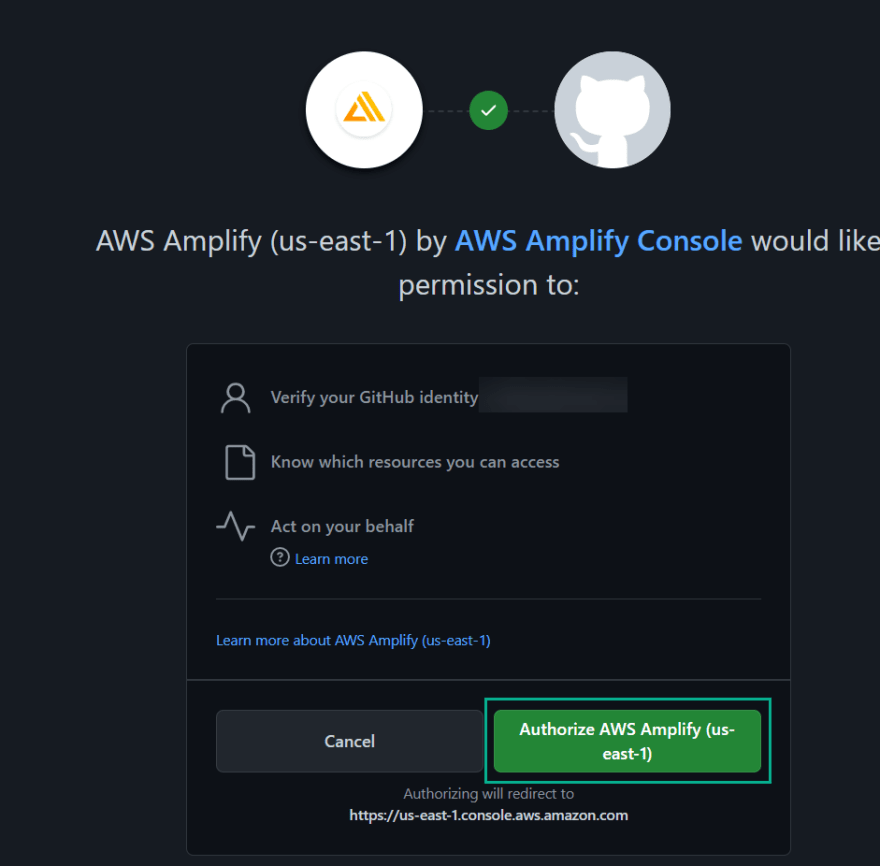
Give GitHub permission when you are prompted.
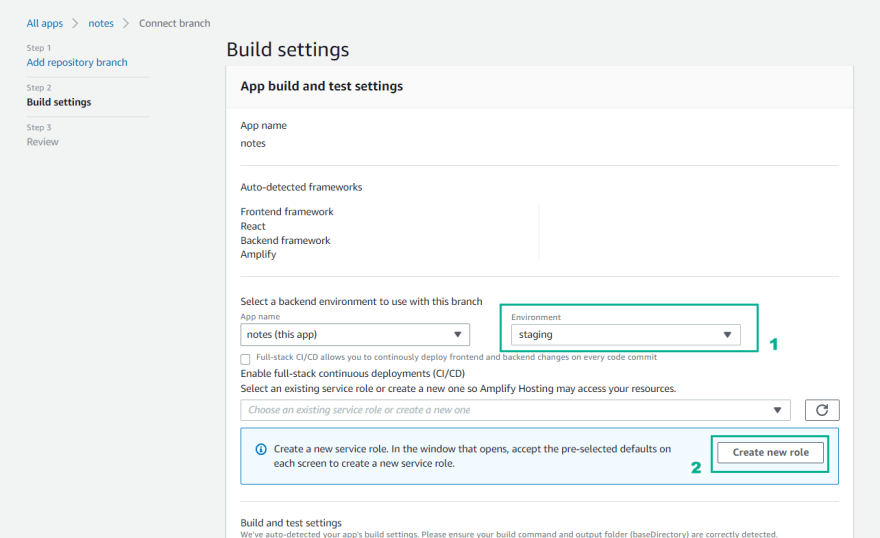
Then in the drop-down list select your repository. Also select the branch you want to deploy to. Then click "Next"

select the "staging" backend environment. Click Create New Role.
Next tap each screen.

Click Create Role

Then return to Amplify's Archive page and select your role Click Next.

Click Save and Deploy.

After a few minutes, you should see a checkbox that says your app is deployed!
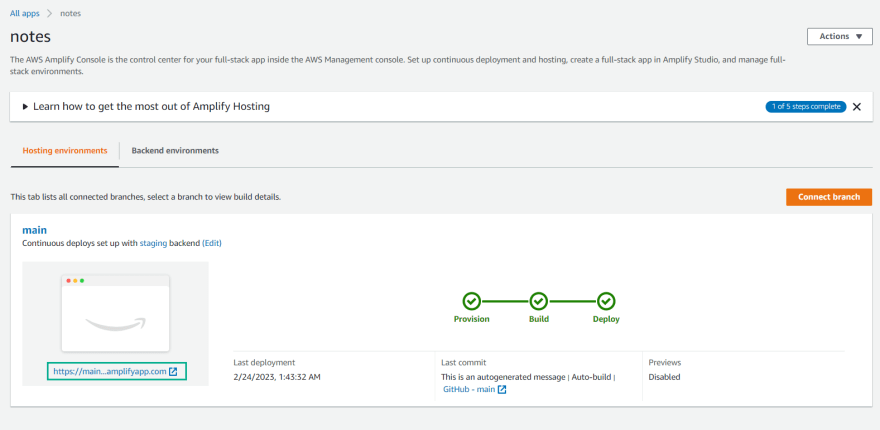
You can click the URL to view or share your app. From here you can add a custom domain, set up pull request previews, and control access.
Now, both your application frontend and backend are deployed to AWS.
13. Resources Delete
First, create a GitHub repository for your app. pricing page .
You can delete an Amplifier resource in two ways. The first is by running amplify delete in the project's directory from your CLI.
The alternative is to go to Amplify Console , select your app, then in the Actions dropdown menu , select Delete App.

Deleting the Amplify app in any way will remove AWS resources from your account.
14. Conclusion
Conclude
You've now built a complete app with authentication, authorization, data, and a React UI built using AWS Amplify Studio.
Next step
To test your skills and keep learning Amplify, you can add more features to this app, for example:
- Add images to your notes. Enable storage via Amplify Studio, then use Amplify JS Library to access the images in your application.
- Turn your app into a Next.js app, then move some of your backend logic to the side. server .
- Write logic and authorization rules so that notes can be shared between users (for example, you can share a to-do list with your significant other).


Oldest comments (2)
Looks interesting! Do you have the Figma URL. I would like to try this project myself. Thanks in advance!