
Recently Amazon released their "no code" platform, Honeycode. The aim is to help non-developers pull together a working application with a WYSIWYG UI and logic that is closer to spreadsheet formulas!
There is a lot of discussion online about the impact "no code", "low code", and "full code" will have, and we will have to see how it plays out as even Gartner predicts that by 2024, 65% of development will be performed on low-code platforms.
Honeycode itself comes with several templates and seems aimed at creating standalone applications, MVPs etc..

Yet, I really want to tie this into our existing systems, allow our non developers to create applications that meet their needs with the data they require. Over the last few bog posts, we looked into exporting data from a database to store in S3, and also how to access the Honeycode API.
Now we will bring this all together into one pipeline!
POC
The aim of this POC is to get users who are created in our existing system, to have them imported into the Honeycode App where a Honeycode user will review them, and we will set some additional attribute data within Honeycode. A simple approve/deny review system.
Architecture
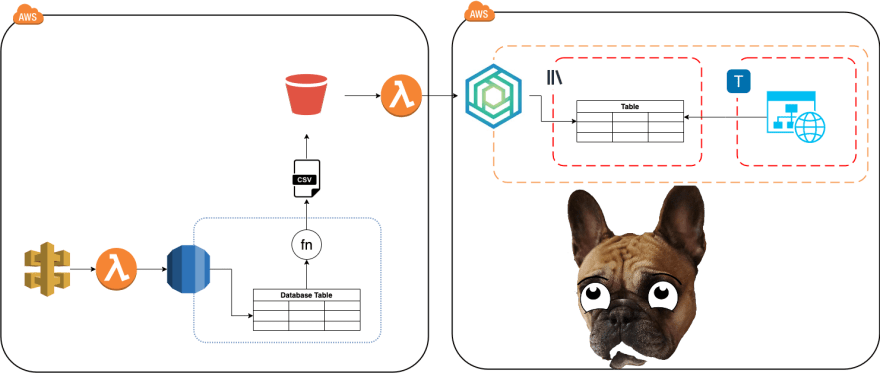
API
We will start off with our existing application in the form of API Gateway, a Lambda, and a Database. This will simply take some JSON input and map it to our database table, won't really go into it, but wanted to provide a more end to end flow.
Database

Sticking with a very simple table here, but it really doesn't matter. The magic is all centered around our database trigger which will kick off our query. We would actually want to add our trigger to all the tables we want to capture an event on. For this test, I'm going to use the following SQL to populate my CSV:
SELECT
  st.id,
  st.name,
  st.email,
  CASE
    WHEN st.email = 'boss@gizmo.codes' THEN 'Boss'
    ELSE 'Pleb'
  END AS "status"
FROM
  sample_table st
Pipeline
Our database trigger will generate the CSV file and upload it to S3. We will utilize the S3 Event Notification feature to call our honeycode lambda. This lambda will be responsible for reading the CSV file off S3, formatting the data, and sending it to our Honeycode table... all the heavy lifting!
Honeycode

The end goal! Within Honeycode we will create an application, build several tables, link those tables to screens.. and see the data sync in real time! The only real design consideration here is to treat the table you are syncing with as if external - don't build any filters etc on to the table, don't update it via the UI. Use it for look ups and save data into other Honeycode tables. There are other projects out there to export Workbook data though if you want that type of functionality!
Step One
Ugh, since I can't provide a way to create this workbook, the next LARGE chunk of this post will be on building up the majority of it!
Honeycode
Lets start at the end and get our Honeycode application up and running! This isn't meant as a tutorial for building a Honeycode application as I've been pretty rough in shoehorning this application into the POC :)
Lets create our Workbook to start off:

This will drop you into an Untitled workbook, and present you with your first table called Table1! Honeycode's UI is pretty straightforward, the navigation consists of the three menu items on the left horizontal bar:
- Tables
- Builder
- Automations
We won't even touch Automations for this pipeline!
Honeycode Tables
We will build the following table structure:
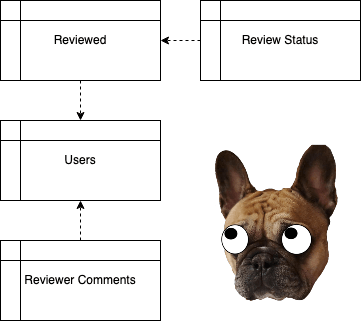
Lets dive into each table quickly so!
Users
The Users table is what we will be writing to from the pipeline, so we wont have it linking out to anything. We don't want Honeycode writing to it etc, as the data is going to be changing.
Lets take Table1 and rename it Users and provide the following columns to it:
- ID
- Name
- Role
We want to keep this in-sync with the query we will later trigger.
Lets put in some dummy data right now to help us with the Honeycode App, and delete the other rows:

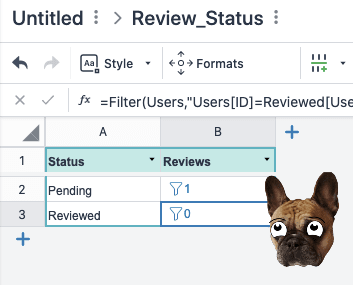
Review Status
We will now track the status of the reviews, and use the status to filter the results in the App so we can choose to see only the non-reviewed rows.
Create a new blank table:
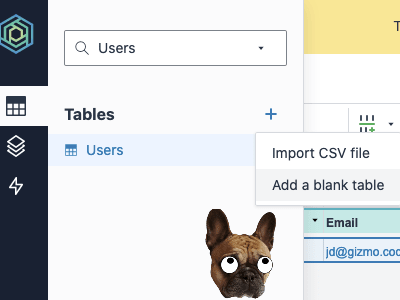
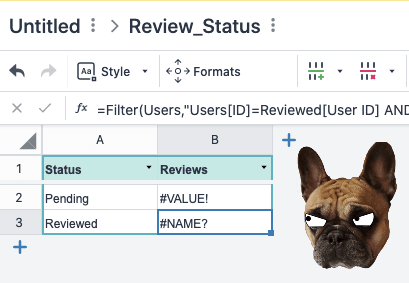
and lets name this Review_Status and provide the following columns:
- Status
- Reviews
Lets enter the following data
| Status | Reviews |
|---|---|
| Pending | =FilterDiff(Users,Filter(Users,"Users[ID]=Reviewed[User ID] AND (Reviewed[Status]=""Approved"" OR Reviewed[Status]=""Denied"")")) |
| Reviewed | =Filter(Users,"Users[ID]=Reviewed[User ID] AND (Reviewed[Status]=""Approved"" OR Reviewed[Status]=""Denied"")") |
Delete the extra column and row :)
These formulas will initial throw an exception, but we will fix that in the next step.
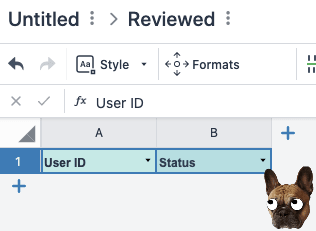
Reviewed
Now to start connecting to the Users table, and save meta-data about the users to a Honeycode controlled table.
Lets create another new table and name it Reviewed and provide the following two columns:
- User ID
- Status
We won't put any data in this table, simply delete the additional column and the empty rows:
And now that we have this table, you can jump back to Review_Status to see that it is working and showing our test Users data as pending!
Reviewer Comments
Our final table, lets add some additional meta data like, who approved the user and maybe allow them to set an optional note!
Create a table called Reviewer_Comments and set the following columns:
- Review Date
- Reviewer
- User ID
- Comment
Delete the empty rows, and finally we wil want to format both Review Date and Reviewer.
Review Date
If you select the Column by A and select Format...:

We want to set the Column Format to be Date & Time and the Column Formula to be =NOW(), click Apply:

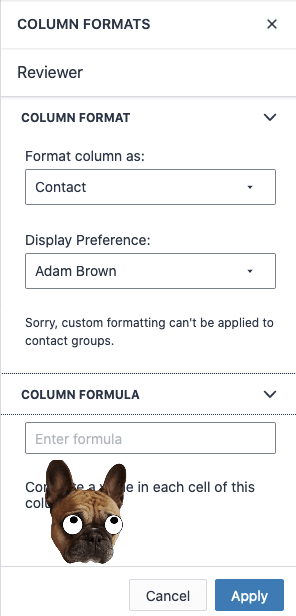
Reviewer
Within Honeycode, the users who will use the web app are known as Contacts. We will configure the column to be a type Contact so that we will get the logged in users details.
Similar to Review Date, select the column to format and this time set Column Format to be Contact and leave the Column Formula blank:
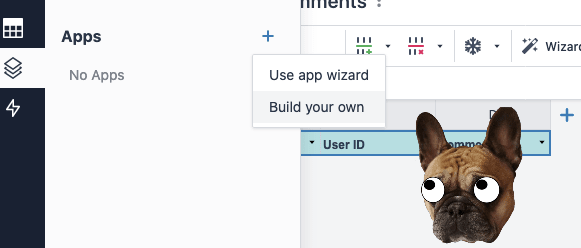
Honeycode App
Lets now build out our UI! Keeping this straight forward, we will only have two screens - a main dashboard screen, and a details sceen!
Select the Builder option from the left menu and click Build your own:
Dashboard
Lets start from the + Add objects in the bottom left:

First add a Button and then also select Column list. For the list, lets take the defaults, while selecting Add a detail screen:

Buttons, all the Buttons
Lets just focus in on our one lonely button... Lets shring it a bit and duplicate it so that we have FOUR buttons, name two of them Pending and two Reviewed:
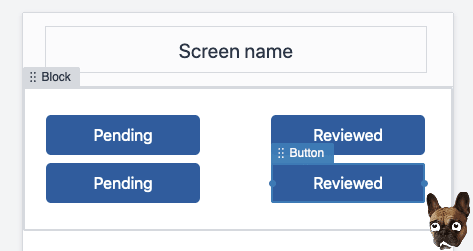
These buttons will control our list, allowing us to filter to Pending users or Reviewed users driven mainly thanks to our Review_Status table.
We want two buttons for each action - while the table is set to pending, we do not want the pending button to do anything. So one button will simply sit there, looking all nice. When the table is showing already reviewed though, we then want the "action" pending button to appear so that it switches up the list when clicked.
To achieve this, we will need some variables...
Variables
To allow us to control the list, we will need two variables.
One variable, the CurrentFilter, will determine WHICH button is showing - the one that performs an action, or just sits there? Another variable, UsersFilter, will actual contain the rows we want displayed.
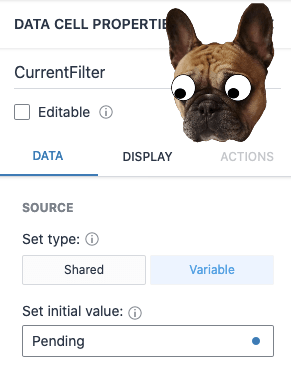
Current Filter
From + Add objects click Data Cell - change the name to CurrentFilter, switch the type to Variable, and set the inital value to Pending. Under the Display tab, change Visibility to =FALSE:
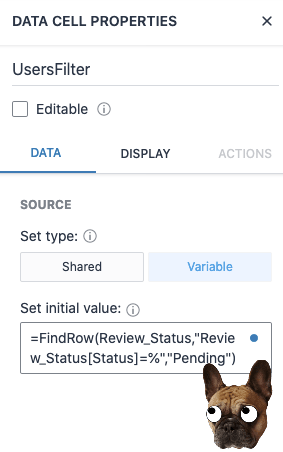
Users Filter
We will default our list to show the pending users on load.
Again we want a data cell so from + Add objects click Data Cell - change the name to UsesFilter, switch the type to Variable, and set the initial value to a formula. This will be: =FindRow(Review_Status,"Review_Status[Status]=%","Pending"). Lets also set the visibility to False under the Display tab:
Connecting Buttons to Variables
If we select View App in the top right, we will see a pretty ugly UI, with our four buttons:
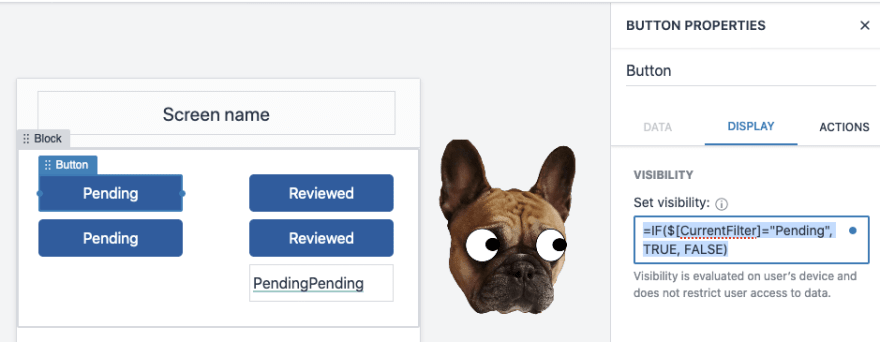
So lets reduce the clutter and implement the button logic. For each of the buttons, we will update the Visibility formula on the Display Tab.
Update the top Pending button to: =IF($[CurrentFilter]="Pending", TRUE, FALSE)
Update the bottom Pending button to: =IF($[CurrentFilter]<>"Pending", TRUE, FALSE)
Update the top Reviewed button to: =IF($[CurrentFilter]="Reviewed", TRUE, FALSE)
Update the bottom Reviewed button to: =IF($[CurrentFilter]<>"Reviewed", TRUE, FALSE)
i.e.
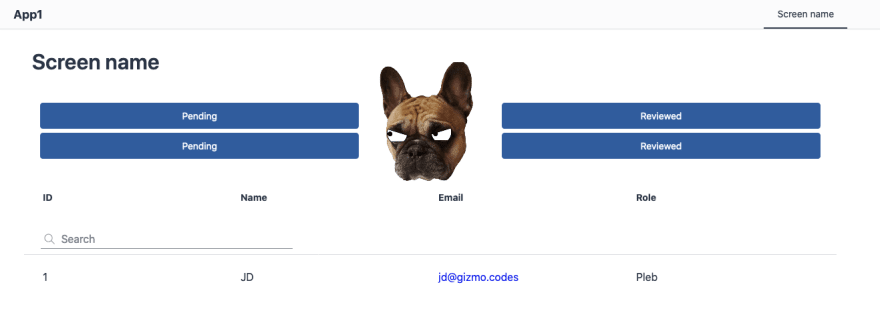
And our App should now only show two buttons:

Button Actions
Lets give our buttons something to do now! You'll have noticed that the button dialog has three options:
- Data
- Display
- Actions
We will give our buttons some quick actions!
Pending Action Button
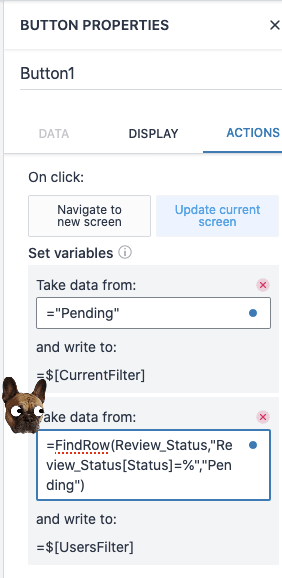
Select the bottom Pending button and go to the Action tab. Under Quick Actions, you want to select Update current screen. You'll be prompted to Set a variable, and choose the CurrentFilter First. We want to populate the Take data from formula with simply: ="Pending".
Hit the Set another (1 variable) and choose UsersFilter. This time we want to populate the formula with =FindRow(Review_Status,"Review_Status[Status]=%","Pending") - identical to the default value we set the variable to initially!
Reviewed Action Button
Select the bottom Reviewed button and go to the Action tab. Under Quick Actions, you want to select Update current screen. You'll be prompted to Set a variable, and choose
the CurrentFilter First. We want to populate the Take data from formula with simply: ="Reviewed".
Hit the Set another (1 variable) and choose UsersFilter. This time we want to populate the formula with =FindRow(Review_Status,"Review_Status[Status]=%","Reviewed")
Connecting Buttons To The Table
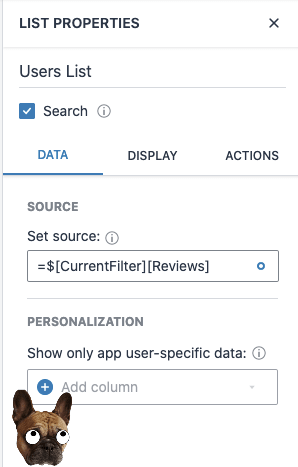
We now have the buttons performing actions, but we don't see anything changing in our app! This is because the table is still sourcing data directly from the Users table. We want to update it to pull actually from our variable!
This is the nice and easy part, select the List from the UI and on the Data tab, lets change the source from =Users to be =$[UsersFilter][Reviews]
Switching back to our App view, we can see the buttons working correctly:
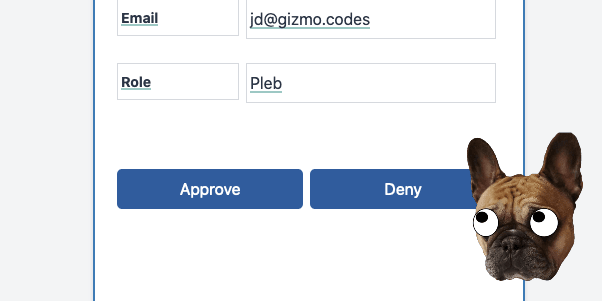
Detail Screen
So our detail screen will save some data into our Honeycode tables, set the comment and the audit data - who did it and when.
Action Section
Ok, so we currently have our pending test user, so lets set it up to review them. From the Builder option, lets switch to the automatically created Users detail screen. Our actions will need buttons, so hopefully you know routine now :) Select + Add objects and pick Button twice. Lets resize them, and change the text so that one says "Approve", and the other "Deny":
Approve Automation
Lets take the Approve button first, select the Action tab and this time we want to Create an automation as we will be saving data to the tables!
We want three actions in total:
- Add a row to
Reviewed - Add a row to
Reviewer_Comments - Redirect back to the Dashboard
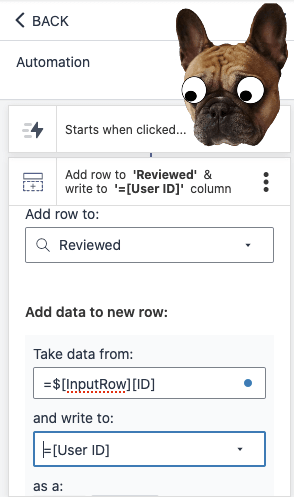
# Adding a Row to Reviewed
Click + Add actions and select Add a row. Choose our Reviewed table from the drop down. Remember, we only have two columns on this table: User ID and Status. The screen currently is showing the User ID, and we can pull that into our "Take data from" formula with =$[InputRow][ID] and then set the column to be =[User ID].
Since we have two columns to populate, lets select + Add another and popuate the options with:
| Take Date From | Write To |
|---|---|
| ="Approved" | =[Status] |
# Adding a Row to Reviewer Comments
Once again, click + Add actions and select Add a row. Choose our Reviewer_Comments table from the drop down. Populate the following columns:
| Take Date From | Write To |
|---|---|
| =NOW() | =[Review Date] |
| =$[SYS_USER] | =[Reviewer] |
| =$[InputRow][ID] | =[User ID] |
# Redirect
Our final action, click + Add actions and select Navigate. Select Screen from the drop-down. And that's our action button complete!

Step Two
Yes.. finally on step 2 - thankfully the rest is more or less automatically deploy-able!
We will want to setup our "existing" infrastructure - an API hitting a database. We then will have a lambda that keeps out Honeycode Users table in sync with a CSV file in S3.
Terrform
You can clone the github repo. There are several variables that we will want to set before executing the terraform script, namely, we need:
- Our Honeycode login
- Our Honeycode password
- The Honeycode Workbook UUID
- The Honeycode Table UUID for the
Userstable
Lets retrieve the Table UUID!
Users UUID
I wrote a little script to help us, and go into more details on it in another blog post if you're interested in it.
Lets kick it off though:
$ cd aws-rds-to-honeycode/query-honeycode
$ npm install
$ node index.js workbooks -u USERNAME -p "PASSWORD"
Workbook Name   Workbook UUID
-------------   -------------
Untitled => arn:aws:sheets:us-west-2:122162422134:workbook:28e53ee7-adcd-4c40-b243-ea289eb954e2
Now taking the Workbook UUID, we can get the Tables UUID:
$ node index.js tables -u  USERNAME -p "PASSWORD" -w "arn:aws:sheets:us-west-2:122162422134:workbook:28e53ee7-adcd-4c40-b243-ea289eb954e2"
Table NameTable UUID
-------------   -------------
Users => b2cdc524-4085-352f-86b9-c7c956eb9da2
Review_Status => 9c83ce89-6172-4968-a4e6-971c1cf121bf
Reviewed => 8d65ae15-1d35-4633-a339-171fa6592ea0
Reviewer_Comments => 9859cdd7-d556-4ad6-9d60-b64dd1f06275
We now have the Users UUID: b2cdc524-4085-352f-86b9-c7c956eb9da2
Workbook UUID
Very similar to before, just run the script to retrieve our Workbook UUID:
$ node index.js workbooks-uuid -u USERNAME -p "PASSWORD"
Workbook Name   Workbook UUID
-------------   -------------
Untitled => 28e53ee7-adcd-4c40-b243-ea289eb954e2
Terraform Variable File
We will want to create a new file in the terraform folder called terraform.tfvars which you want to populate with the following:
honeycode_login    = "USERNAME"
honeycode_password = "PASSWORD"
honeycode_workbook = "WORKBOOK UUID"
honeycode_sheet    = "TABLE UUID"
Last two steps before we deploy, we need to prep our application dependencies:
$ cd aws-rds-to-honeycode/app
$ npm install
$ cd ../lambda
$ npm install
Finally, lets spin up our environment with:
cd ../terraform
terraform init
terraform apply -auto-approve
This will take a few minutes to complete as we wait for the database cluster to stand up.
We should get the following output:
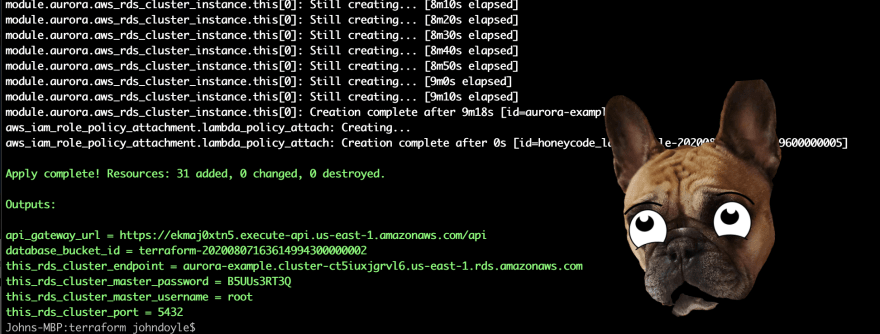
Great, then we are ready to move on :D
Database
We need to grant the database permission to connect to our S3 bucket, we can do this with the following script:
cd aws-rds-to-honeycode/script
./add_role_to_db_cluster.sh
This will take a few minutes to apply, but we can press on! Connect to the database using the URL and credentials you received from the terraform output. See (PostgreSQL Trigger To S3)[https://gizmo.codes/postgresql-trigger-to-s3/] if you are not sure how to connect to the Database.
Once you're connected, we will want to execute the following SQL statements.
CREATE EXTENSION IF NOT EXISTS aws_s3 CASCADE;

CREATE TABLE sample_table (id SERIAL PRIMARY KEY, name varchar, email varchar);
Database Trigger
Now for the black magic, refer back to the terraform output, particularly database_bucket_id. We want to update the trigger code to match this:
CREATE OR REPLACE FUNCTION export_to_s3()
    RETURNS TRIGGER
AS $export_to_s3$
BEGIN
    PERFORM aws_s3.query_export_to_s3(
        'SELECT st.id, st.name, st.email, CASE WHEN st.email = ''boss@gizmo.codes'' THEN ''Boss'' ELSE ''Pleb'' END manager_check FROM sample_table st',
        aws_commons.create_s3_uri(
            'S3_BUCKET_NAME',
            'test.csv',
            'us-east-1'),
        options :='format csv, delimiter $$,$$'
    );
    RETURN NEW;
END;
$export_to_s3$ LANGUAGE plpgsql;

CREATE TRIGGER sample_table_trg
    AFTER INSERT OR DELETE OR UPDATE OR TRUNCATE
    ON sample_table
    FOR EACH STATEMENT
        EXECUTE PROCEDURE export_to_s3();
Excellent! We are done!
Step Three
Lets test this bad boy out!
Refer back to the terraform output again, and find the api_gateway_url. We can make a JSON post call to this and watch it propagate through the system.
I'll first return to Honeycode and delete the test data we had in Users, Reviewed, and Reviewer_Comments.
Then we can call:
$ curl --header "Content-Type: application/json" --request POST --data '{"name": "JD", "email": "pleb@gizmo.codes"}' API_URL/honeycode-sync
We should see our user appear - we can add a few more.
$ curl --header "Content-Type: application/json" --request POST --data '{"name": "Gizmo", "email": "boss@gizmo.codes"}' API_URL/honeycode-sync
$ curl --header "Content-Type: application/json" --request POST --data '{"name": "Swayze", "email": "boss@gizmo.codes"}' API_URL/honeycode-sync
And we are done! Our pipeline is complete with updates taking around 13 seconds from calling the Application, saving to the database, updating S3, pushing the data from S3 to Honeycode, and finally displaying in the Honeycode App.

Step Four
Finally, make sure to tear this all down when you're finished. You don't want public databases left out there and AWS charges on your bill...
$ cd aws-rds-to-honeycode/terraform
$ terraform destroy -auto-accept


Top comments (0)