
Terraform offers a robust, declarative way to describe your cloud infrastructure as code. And unlike some other IaC tools, Terraform also does a decent job comparing differences between your current version of IaC code, the last deployment stored in Terraform state, and the current state of the deployed cloud resources. But when it comes to managing and deploying multiple copies of the same infrastructure, an additional tool is needed. And that tool has the name Terragrunt.
In this article, I assume that you understand the basics of Terraform. If you’d like to check the Terraform basics first, this article is for you (article in Finnish): https://www.nordhero.com/posts/google-cloud-terraformilla/.
Alright. So first, let’s get two acronyms right before moving forward.
IaC means Infrastructure as Code. The idea is that you don’t have to manually log in to the AWS Console and set up the infrastructure by selecting services in the console and clicking the systems up. The manual approach could be acceptable if you only had one environment for testing purposes. But if you would need to set it up again, or if you had more than one environment that should have the same resources and configurations (e.g., development, testing, and production environments), you shouldn’t try to manage those manually. Instead, you probably would like to use an IaC tool like Terraform to set up the infrastructure configurations as code to be deployed quickly and repeatably.
DRY means Don’t Repeat Yourself. The downside of a declarative language like Terraform is that it’s not that easy to manage variations of the same code if you need the deploy the same infrastructure with a few different flavors depending on the use case. You quickly end up making multiple copies of the infrastructure code to manage various similar kinds of deployments. And that’s what Terragrunt is here to solve.
How to keep Terraform code DRY?
The key idea of Terragrunt is to write needed infrastructure code only once utilizing Terraform (TF files) and to separate environment-specific values as variables to be defined in Terragrunt configuration files (HCL files). I prefer a folder structure where I have the Terraform infrastructure code in the project’s infrastructure folder and Terragrunt configurations in the deployments folder.
A typical Terragrunt configuration setup is to save environment-specific configuration files in a three-level folder structure that describes the AWS Accounts, AWS Regions under the accounts, and deployable environments under the regions. Each folder level can contain Terragrunt configuration files for account, region, or environment-specific variables.
The following figure illustrates an imaginary deployments folder setup where one production account has production environments both in the us-east-1 (N. Virginia) and eu-central-1 (Frankfurt) regions and an additional demo environment in the eu-central-1 region. There’s also a staging environment on its own account utilizing the eu-central-1 region and a dev account with a similar setup. As I’m working with both feature development and performance testing, I have two environments deployed on my sandbox account. The sandbox-pekka-perftest environment has production-kind infrastructure resources configured on it — for example, having larger Fargate clusters or heavier EC2 instances with provisioned IOPS SSD volumes. As the performance testing environment has more resources, it also generates more costs. Therefore it is easy for me to tear down the stack when the test session ends and re-deploy it again when needed without affecting the standard sandbox environment residing on the same account and region.
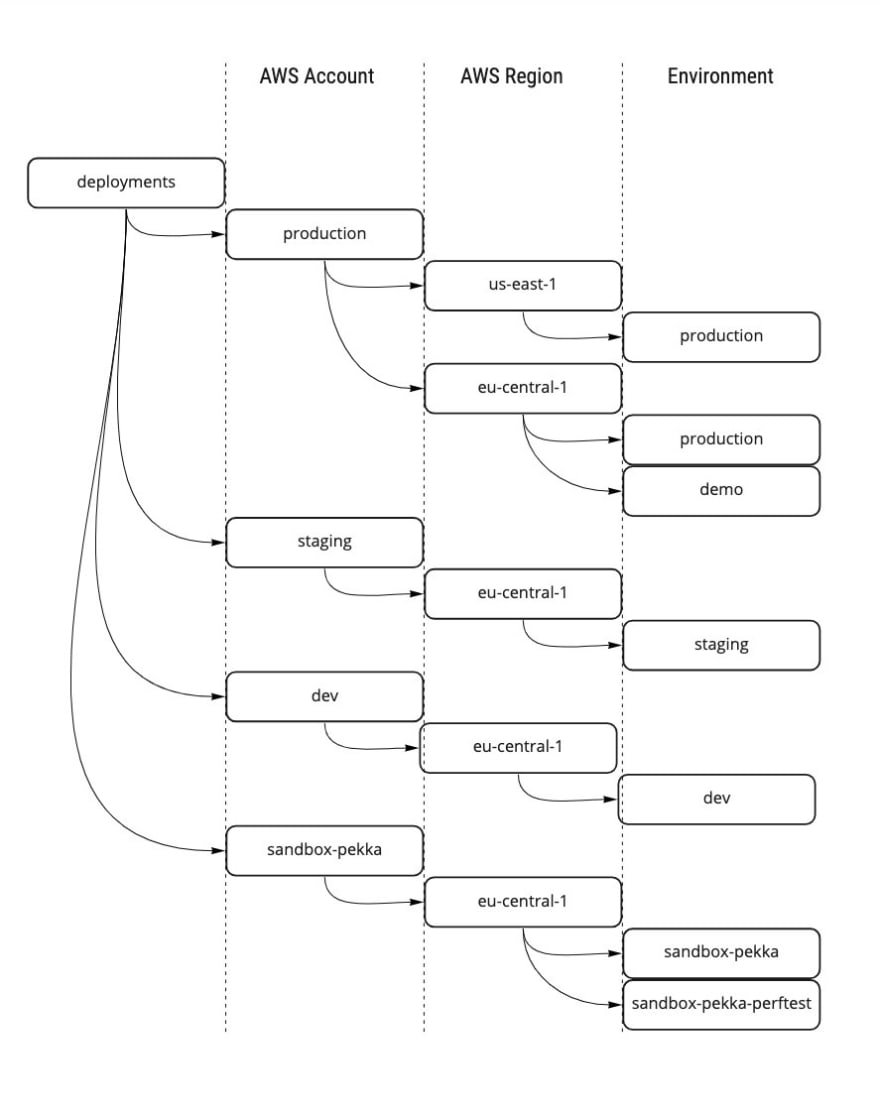
An example deployment folder structure for Terragrunt
Install Terraform and Terragrunt
First, install Terraform on your desktop. I have macOS, and I like to use the Homebrew package manager (https://brew.sh/) for the job, so the commands below use brew. There are multiple ways to install the Terraform on different operating systems, and you can find the right ingredients from https://www.terraform.io/.
Here are the magic commands for macOS/Homebrew installation of Terraform:
brew tap hashicorp/tap
brew install hashicorp/tap/terraform
terraform -version
If you get a Terraform version info, you have succeeded in the installation.
And next one goes for Terragrunt (more installation options at https://terragrunt.gruntwork.io/):
brew install terragrunt
terragrunt -version
If you get the Terragrunt version number, you are good to go to the next phase.
The infrastructure with Terraform IaC
Let’s first create our infrastructure code. In our example I have a small stack including only one S3 Bucket with data encryption utilizing a customer-managed KMS Key. I have included only a few lines of Terraform code here to point out how Terraform works with Terragrunt. If you wish to try out with my example code, you can find the whole Terraform code example in the GitHub repository.
First, create a new folder on your computer for our project (you can name it as you wish) and create a folder infrastructure in the project root. Under the newly created folder, add all needed Terraform files. For example here is the code for the S3 bucket configurations (in file infrastructure/s3.tf):
/******************************
S3 bucket with encryption and public access block configurations
******************************/
# The S3 bucket
resource "aws_s3_bucket" "demo_bucket" {
  bucket_prefix = "${var.name}-${var.environment}-demo-bucket"
}
# Let's make the bucket private
resource "aws_s3_bucket_acl" "demo_bucket_acl" {
  bucket = aws_s3_bucket.demo_bucket.id
  acl    = "private"
}
/******************************
More configurations in the actual file, please check the Github repo.
******************************/
As you see, I have used Terraform variables name and environment in the bucket’s prefix. That will let us automatically change the bucket prefix per environment. And as you might already guess, those variables are managed with Terragrunt.
In addition to utilizing variables in Terraform code, we need to define the variables from Terraform perspective. Create a file named infrastructure/vars.tf:
/******************************
Variables to be used with the infrastructure code
******************************/
variable "name" {
  type        = string
  description = "Name of the company or the platform to build, etc."
}
variable "environment" {
  type        = string
  description = "Name of the environment/stack"
}
/******************************
More variables in the actual file, please check the Github repo
******************************/
Next to the main course!
Set up Terragrunt configurations
Let’s start the Terragrunt part by creating a folder named deployments in the project root. As you remember from the DRY chapter, a typical Terragrunt configuration set has a three-level folder structure: account/region/environment. So, create the folder structure under the deployments folder for your first environment. In my example, I have created a folder structure deployments/sandbox-pekka/eu-central-1/sandbox-pekka.
The deployments/terragrunt.hcl file is a key configuration file for Terragrunt. Please go ahead and create the file with the following contents:
/******************************
TERRAGRUNT CONFIGURATION
******************************/
locals {
  # Load account, region and environment variables
  account_vars      = read_terragrunt_config(find_in_parent_folders("account.hcl"))
  region_vars       = read_terragrunt_config(find_in_parent_folders("region.hcl"))
  environment_vars  = read_terragrunt_config(find_in_parent_folders("env.hcl"))
  # Extract the variables we need with the backend configuration
  aws_region      = local.region_vars.locals.aws_region
  environment     = local.environment_vars.locals.environment
  state_bucket    = local.environment_vars.locals.state_bucket
  dynamodb_table  = local.environment_vars.locals.dynamodb_table
}
/******************************
Configure the Terragrunt remote state to utilize a S3 bucket and state lock information in a DynamoDB table.
And encrypt the state data.
******************************/
remote_state {
  backend   = "s3"
  generate  = {
    path      = "backend.tf"
    if_exists = "overwrite"
  }
  config    = {
    bucket         = "${local.state_bucket}"
    key            = "${path_relative_to_include()}/terraform.tfstate"
    region         = "${local.aws_region}"
    encrypt        = true
    dynamodb_table = "${local.dynamodb_table}"
  }
}
/******************************
Combine all account, region and environment variables as Terragrunt input parameters.
The input parameters can be used in Terraform configurations as Terraform variables.
******************************/
inputs = merge(
  local.account_vars.locals,
  local.region_vars.locals,
  local.environment_vars.locals,
)
The deployments/terragrunt.hcl
- loads account, region, and environment level variables (we will create those files next)
- extracts the variables that are needed in Terragrunt backend configurations
- configures the Terragrunt backend to utilize the state bucket and state lock table
- merges all variables as input parameters to be fed to Terraform.
Next, let’s create the needed files for Terragrunt variables. Please create the following .hcl files and replace the folder names and variable values with your own account/region/environment information:
deployments/sandbox-pekka/account.hcl:
# Set AWS Account -wide variables
locals {
  account_name   = "sandbox-pekka"
  aws_account_id = "REPLACE_WITH_YOUR_ACCOUNT_ID"
}
deployments/sandbox-pekka/eu-central-1/region.hcl:
# Set common variables for the AWS Region
locals {
  aws_region = "eu-central-1"
}
deployments/sandbox-pekka/eu-central-1/sandbox-pekka/env.hcl:
# Set common variables for the environment
locals {
  name           = "nordhero"
  environment    = "sandbox-pekka"
  state_bucket   = "nordhero-terragrunt-demo-state-sandbox-pekka" # Replace with your preferred unique S3 bucket name
  dynamodb_table = "nordhero-terragrunt-demo-locks-sandbox-pekka" # Replace with your preferred dynamodb table name
}
The name and environment variables will be utilized in the Terraform code created in the chapter The infrastructure with Terraform IaC. And the state_bucket and dynamodb_table values will be used to create the Terragrunt state bucket and state lock table for the environment.
And one last thing to the Terragrunt configurations. Create one more folder and file: deployments/sandbox-pekka/eu-central-1/sandbox-pekka/infra/terragrunt.hcl:
/******************************
TERRAGRUNT CONFIGURATIONS
******************************/
/******************************
Include the root terragrunt.hcl configurations gathering together
the needed variables and backend configurations
******************************/
include "root" {
  path = find_in_parent_folders()
}
locals {
  # Expose the base source path
  base_source = "${dirname(find_in_parent_folders())}/..//infrastructure"
}
# Set the location of Terraform configurations
terraform {
  source = local.base_source
}
This is the Terragrunt configuration file that we will execute later on. What it does is that it first takes in the common terragrunt.hcl configurations we created in the deployments folder and then configures the Terraform infrastructure folder to use with the deployment. As you see, it is possible to configure different versions of Terraform code, having different base_source to use with different environments (not that DRY approach, thou). Or, more importantly, you could split your Terraform code into multiple modules and select which modules to deploy to this particular environment. For example, if your full stack includes the OpenSearch service (formerly ElasticSearch), but you don’t need OpenSearch in your development sandbox, you could choose to deploy all other modules but not to deploy the module that contains OpenSearch configurations.
Now we are ready. You should now have the following kind of folder structure and following files in your deployments folder:
- deployments/terragrunt.hcl
- deployments/sandbox-pekka/account.hcl
- deployments/sandbox-pekka/eu-central-1/region.hcl
- deployments/sandbox-pekka/eu-central-1/sandbox-pekka/env.hcl
- deployments/sandbox-pekka/eu-central-1/sandbox-pekka/infra/terragrunt.hcl
Deploying with Terragrunt
Deploying the infrastructure with Terragrunt is very similar to deploying with Terraform. You have the same commands in use. The main difference is that you need to run the Terragrunt commands from the respective deployments/your_account/your_region/your_env/infra folder you wish to deploy. So please cd to your infra folder:
cd deployments/sandbox-pekka/eu-central-1/sandbox-pekka/infra
Before running any Terragrunt commands, we must ensure we have successfully connected to the right AWS Account with AWS CLI. If you don’t already have the AWS CLI configured, please follow the instructions: http://docs.aws.amazon.com/cli/latest/userguide/. After configuring AWS CLI, test the connection by running the following command:
aws sts get-caller-identity
You should get a response containing your UserId, AWS Account Id, and an IAM Role ARN if successfully connected. Check once more that the Account is the one you desire to deploy infrastructure to and that you have the same information in your deployments/your_account/account.hcl file.
Next, we are ready to rock ‘n roll. Let’s first initialize the Terragrunt:
terragrunt init
When running the init for the first time, Terragrunt recognizes that the S3 state bucket does not yet exist and asks whether Terragrunt should create the bucket for you. Please allow Terragrunt to create the state bucket. Terragrunt will automatically create also the state lock DynamoDB table at the same time. When everything is ready, you should receive a green response stating that the backend has been successfully configured to use S3 and that Terraform has been successfully initialized to use the hashicorp/aws provider plugin.
Next, let’s plan our deployment and save the plan in the tfplan file:
terragrunt plan -out tfplan
Terragrunt will now describe the resources it plans to create. Please check that there are six resources to be added and that no errors or warnings have been raised. If everything looks ok, we can next deploy the infrastructure plan saved in the tfplan file:
terragrunt apply "tfplan"
You should now get a green message stating “Apply complete!” with the number of resources created, changed and destroyed.
Congratulations! You have now successfully set up Terragrunt and deployed your first infrastructure stack.
Deploying the infrastructure to another region
Now to the desserts. The benefits of Terragrunt start accumulating when setting up the next copy of the infrastructure. Let’s assume we would like to set up the same infrastructure for the same account but in a different region. The greatness is that we don’t need to touch the infrastructure/*.tf files at all.
What we need to do is:
- Copy the current deployments/your_account/your_region folder and rename the copied folder with the new region name, e.g. eu-north-1
- Edit the deployments/your_account/new_region/region.hcl file and replace aws_region value with the new region name
- Edit deployments/your_account/new_region/your_environment/env.hcl file and replace the state_bucket, and dynamodb_table values with new bucket and table names to store the state of the new environment
- Cd to the deployments/your_account/new_region/your_environment/infra folder and repeat the terragrunt init/plan/apply commands
Now try it yourself!
Last lines
That was a nice ride! We needed to create a bunch of configuration files. Still, in a typical development project where you have multiple sandbox environments and a deployment pipeline with development, staging, production, and demo environments, it starts to pay off quickly. And in real life, you would probably like to automate the deployment pipeline from your source code repository so that, depending on the repository branch, you would automatically select the deployment folder to use with Terragrunt deployment.
NordHero is there to help you set up the infrastructure, manage the multi-environment platforms and automate the deployments with your selected GitOPS platform. Give us a call/email/LinkedIn message if you would like to hear more!
P.S. You can download the whole demo project in the Github repository.


Oldest comments (0)