Hopefully reading my first blog, Fish Cam : Background, Architecture and Hardware, inspired you to start your own exciting ‘pet’ project or maybe you're just playing around. Either way fantastic, so hopefully your got your PI and USB web cam handy and connected up. Don’t worry about connecting the breadboard to the GPIO, I will handle that in another blog. In this blog we will cover installing an OS, settling up AWS IoT Greengrass and connecting it to AWS Systems Manager.
Basics:
One of best features of my PI that I love is that hard disk is a SD disc. This means that you have to flash it with OS image of your liking. However you can buy a few SD discs for under £10 and this means you can keep swapping them. Allowing you to try out few different options plus setups. neat!
There are many options for an OS on a PI, but they need for an ARM variant of Linux 4.4 kernel for Greengrass (more details on requirements here) [https://docs.aws.amazon.com/greengrass/v2/developerguide/setting-up.html#greengrass-v2-requirements]. Raspberry PI OS, formally Raspbian, is the prime choice so that’s what I used for Fish Cam. Now you have choice on edition; easy, medium and hard:
- Raspberry Pi OS with desktop and recommended software: Easy, has lots installed and if you only got one SD plus your are a first timer then it will allow to explore all things PI. However it is very bloated if you just want to do a IoT and/or ML project.
- Raspberry Pi OS with desktop: Medium, this edition has everything you need plus a desktop. Some of you might like to use that as I did starting out. However your need some more kit; a monitor, a keyboard and a mouse. It also effects your remote access options (more on that later)
- Raspberry Pi OS Lite : Hard, This is for more experienced Linux people as basically you only have a command line and no desktop. I love the command line and all the setup of Greengrass and Systems Manager is done via the command line anyway.
To be honest I said LITE was hard but actually it someways it is the quickest and most straightforward. Therefore I used this edition for Fish Cam. To get your PI up and running then need four things (most in the start kit I recommended in Background, Architecture and Hardware)
- The SD card that came with your PI or bought separately.
- A desktop or laptop, I have MacBook Pro with only USB C. I will cover the Mac steps in this blog but same roughly works for other platforms
- A micro micro SD reader.
- Your SD reader might go into a SD port or usb straight but if not an adapter to convert (mine is micro SD to USB 2 so I used a usb 2 -> usb 3 adapter)
Once that’s all plug together and plug into your Mac, then the volume appears Devices on the finder sidebar. If your reusing an SD then your need to format (do not lose anything important in doing so).
Install Raspberry Pi OS
To flash your SD your need to download and run the Raspberry Pi Imager. Selecting the edition you would like and then writing it to the SD.
If your using easy or medium (a desktop edition) then you can do all the network and remote access configuration from the desktop, so eject your SD, put it in your PI, boot your PI and please follow :
https://www.raspberrypi.org/documentation/computers/configuration.html#configuring-networking-2
If your going down the hard edition route your need to create a blank file called SSH with no content and a file called wpa_supplicant.conf at root of your SD (this is the boot partition) containing your WiFi details (see also then guide above):
ctrl_interface=DIR=/var/run/wpa_supplicant GROUP=netdev
country=<Insert 2 letter ISO 3166-1 country code here, I used GB>
update_config=1

network={
 ssid="<Name of your wireless LAN>"
 psk="<Password for your wireless LAN>"
}
Now sometimes you power management can turn off your network connection when idle. Therefore killing your remote access and not allowing you to bring it out of the idle state. So your need to disable this with:
sudo iwconfig wlan0 power off
Note you may need to persist this for reboots and you can find someways of doing this here.
Now you're ready, so eject your SD, put the SD in your PI and boot it.
Accessing my PI
Now basically there are few ways of connecting your PI:
SSH (hard)
The key is to know your IP so you can connect and for those who took ether of the easy or medium options then this shown to you in the desktop editions in wizard when you first boot. However for the hard option (command line only edition) you should able then scan your network and find your new IP address (I used Fing on my iPhone). Then once you know the IP address of your PI then you will be able connect via SSH. I connected from my MacBook into the PI using the PI user and default password. If this is your first connection, the please change your password and I recommend setting up a ssh key. This will give you slick and secure access, more details here
VNC (easy or medium)
If you went for one of the desktop editions then you can also use VNC for remote access and for this I would recommend the creating a cloud account and registering your PI. This means you can then connect from a VNC Viewer on any device. Including from your iPhone on holiday to restart something when the Web Cam stopped working. See here for more details
Python
I am using Python 3.8 to develop some of the features of Fish Cam within Greengrass and all my sensors work with Python Libs. Therefore I installed it from source (up to you what python version to use):
wget https://www.python.org/ftp/python/3.8.12/Python-3.8.12.tgz -o python.tgz
tar -xzvf python.tgz
cd Python-3.8.12/
./configure --enable-optimizations
make
sudo make install
Greengrass
Greengrass is AWS technology that connects devices located at the “edge”; devices in remote locations and that could be low powered up to AWS. This allows you to do lots of things like; collecting sensor data and change the state of device, i.e. powering it on or toggling a switch. For Fish Cam will mainly use it for measuring water temperature, PH and Total Dissolvable Solids (more on how to do this in the future).
AWS has two versions of Greengrass, V1 and V2. For Fish Cam it really did not mater which version I used as both support the features we need. However if your using Greengrass for anything else you may wish to check here. Also if your using Greengrass on certified hardware then you need also beware of what major and minor versions are supported.
Anyway for Fish Cam I went with v2 and followed the AWS guides which are very good. To start with I followed Steps 9, 10 and 11:
https://docs.aws.amazon.com/greengrass/v1/developerguide/setup-filter.rpi.html
I then completed “Set up your environment” Step 4 and all of “Install the AWS IoT Greengrass Core software”:
https://docs.aws.amazon.com/greengrass/v2/developerguide/getting-started.html
My setup command was:
sudo -E java -Droot="/greengrass/v2" -Dlog.store=FILE \
  -jar ./GreengrassCore/lib/Greengrass.jar \
  --aws-region eu-west-1 \
  --thing-name FishCamv2Core \
  --thing-group-name FishCamv2CoreGroup \
  --thing-policy-name GreengrassV2IoTThingPolicy \
  --tes-role-name GreengrassV2TokenExchangeRole \
  --tes-role-alias-name GreengrassCoreTokenExchangeRoleAlias \
  --component-default-user ggc_user:ggc_group \
  --provision true \
  --setup-system-service true
Systems Manager
AWS Systems Manager is not really a service but a suite of services that are aim at managing the OS, remote management above the infrastructure and remote connectivity of your "instances". Here is a AWS guide in how setup Systems Manager up on your PI and the following picture shows the activation screen I used for activating Systems Manager:

Fleet Manager
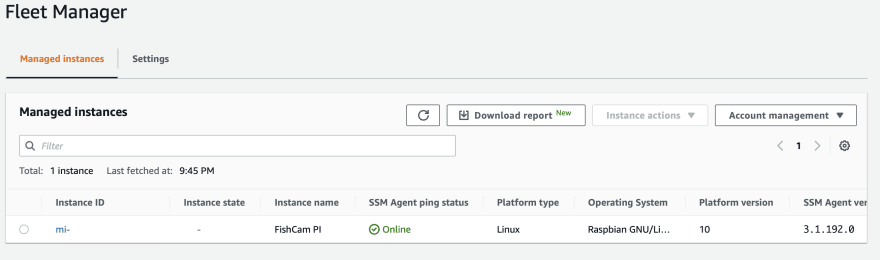
New at re:invent 2020, Fleet Manager allows you to interact and manage one premise servers or remote devices from AWS. By installing the Systems Manager agent on my PI it was automatically enrolled into Fleet Manager. Therefore I decided to take a look around it and what it could do for my PI.
This is the first thing to look at is the main dashboard screen, where you can see an overview of your fleet and then drill into each device:
One of the features of Fleet Manager is that you can browse the files system off the device, create/delete directories, and upload/download files:

Another feature is the ability to monitor system performance from the AWS Console:

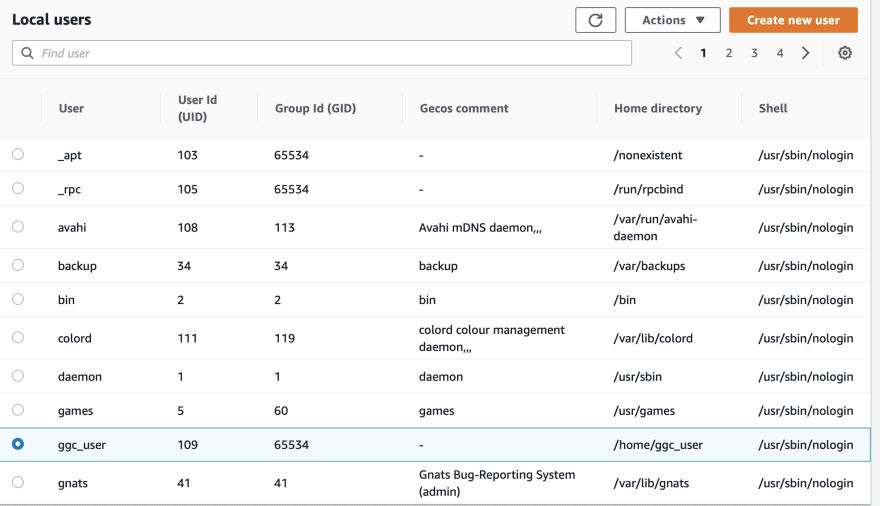
The last main feature of Fleet Manager is ability to manage OS User and Groups from the AWS Console:
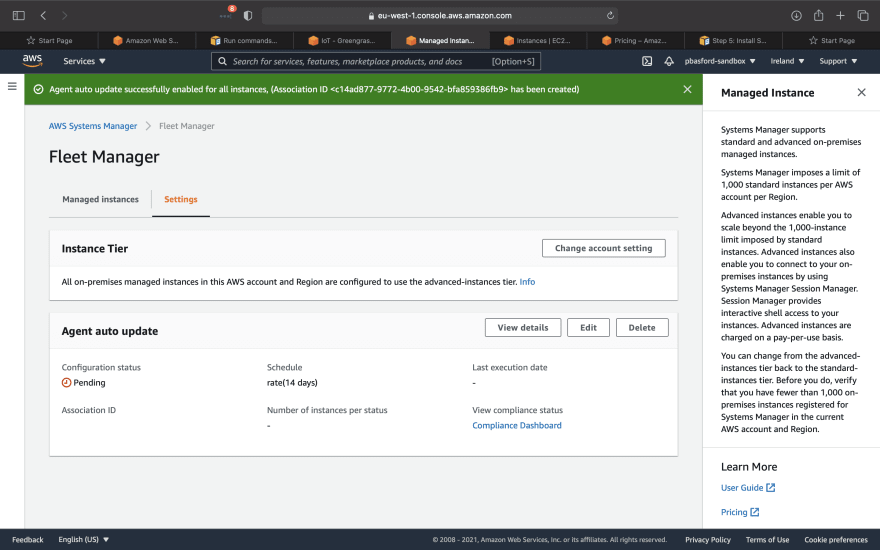
Fleet Manager has two tiers; standard and advance. Advance has the following additional features:
- You need use Session Manager to interactively access on-premises instances.
- You want to use Patch Manager to patch Microsoft applications hosted on on-premises instances (not needed for Fish Cam).
- Need Register more than 1,000 on-premises instances (not needed for Fish Cam).
However the advance tier costs a small amount per hour per instance more, see https://aws.amazon.com/systems-manager/pricing. This can be enabled the settings area in Fleet Manager
Session Manager
Session Manager provides the ability to connect into instances both in AWS and remotely. To connect to remote instances like my PI then your need to enable encryption and advance tier or your get an error like below.
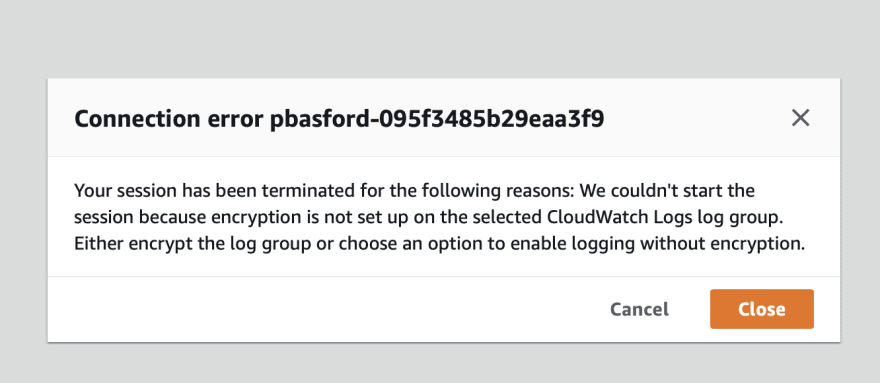
AWS provide some details here and here my guide to it.
KMS
In order connect securely to the instance your first need to create a KMS key and I recommend setting up alias to that easy to reference it and allow for it to rotated, I called mine /fishcam/instances:

KMS Resource Policy
I applied the following key policy to allow the instances role to use the key and for CloudWatch Logs to use it to encrypt the terminal logs:
{
    "Version": "2012-10-17",
    "Id": "key-consolepolicy-3",
    "Statement": [
        {
            "Sid": "Allow access for Key Administrators",
            "Effect": "Allow",
            "Principal": {
                "AWS": [
 "arn:aws:iam::1234567890:role/SandboxLocalAdmin",
               "arn:aws:iam::1234567890:role/FullAdminRole"
                ]
            },
            "Action": "kms:*",
            "Resource": "*"
        },
        {
            "Sid": "Allow use of the key",
            "Effect": "Allow",
            "Principal": {
                "AWS": "arn:aws:iam::1234567890:role/service-role/AmazonEC2RunCommandRoleForManagedInstances"
            },
            "Action": [
                "kms:Encrypt",
                "kms:Decrypt",
                "kms:ReEncrypt*",
                "kms:GenerateDataKey*",
                "kms:CreateGrant",
                "kms:ListGrants",
                "kms:RevokeGrant",
                "kms:Describe*"
            ],
            "Resource": "*",
        },
        {
            "Effect": "Allow",
            "Principal": {
                "Service": "logs.eu-west-1.amazonaws.com"
            },
            "Action": [
                "kms:Encrypt*",
                "kms:Decrypt*",
                "kms:ReEncrypt*",
                "kms:GenerateDataKey*",
                "kms:Describe*"
            ],
            "Resource": "*"
        }
    ]
}
IAM role
I also had to add the following policy to the AmazonEC2RunCommandRoleForManagedInstances role (you may wish to restrict them further for production system):
{
    "Version": "2012-10-17",
    "Statement": [
        {
            "Sid": "VisualEditor0",
            "Effect": "Allow",
            "Action": [
                "kms:*",
                "logs:*"
            ],
            "Resource": "*"
        }
    ]
}
Log Group
Once the KMS key is place then you can create the Log Group with the KMS encryption enabled:

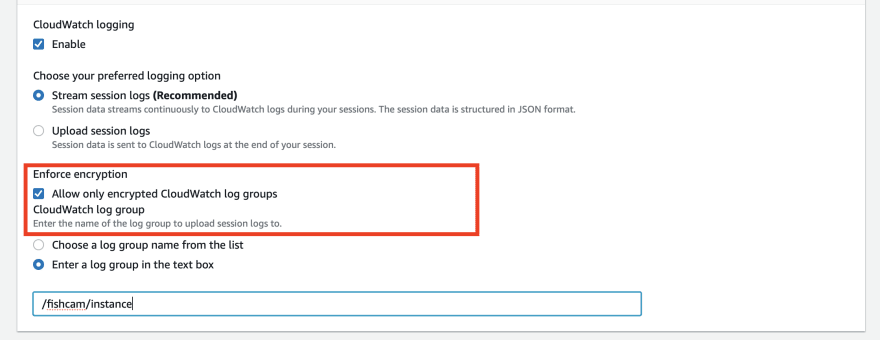
Enable Encryption
Then Session Manger can be configured to use the KMS and the Log Group:
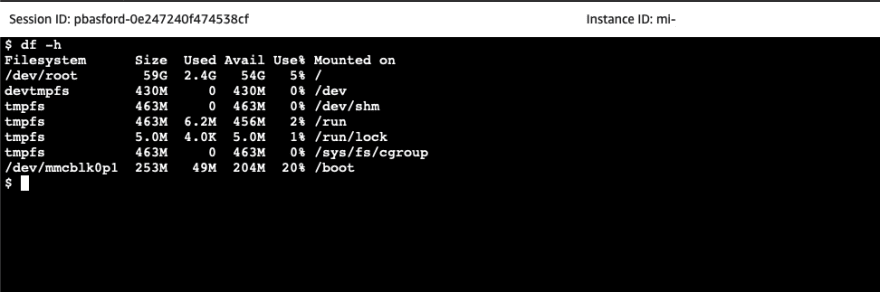
Session Manager Shell
Once this is done then Session Manger will be able to connect:
Run Command
Another feature of Systems Manager is the ability to execute Run Books to patch, install or do common tasks using the RunCommand.

Conclusion
I hoping this blog has showed you how to get your PI up and running. Also all the different ways that you can connect to it and basically now you have your own DeepLens clone to play with and do some fun stuff.
If you want to know how to live stream then here is the next blog in the series https://dev.to/aws-builders/fish-cam-lights-camera-swim-5efe


Latest comments (1)
This is an excellent essay. But for the time being, I'd like to talk about an online fish marketing website. I've had a lot of success with it so far. Go here to learn more. I usually have a seafood platter and have never been disappointed with the service.
Some comments have been hidden by the post's author - find out more