
I remember that when I started with AWS, one of the first things I did was interact with S3 Buckets, back then it wasn't even a big deal to have your Bucket Public so that you could serve your assets without hassles.
Then policies went a bit stricter, I also added Lambdas to the recipe, and whatever was working fine locally, suddenly stopped working when deployed.
In the beginning, I really could not wrap my head around those Permissions: permission assigned to me as Developer, Roles for the Lambdas and Policies attached to the Bucket.
Everything seemed so similar and so complicated.
I wished I took the time back then to start with IAM first, because it is one of the basic services and topics everything else on AWS revolves around.
Since I am preparing for AWS Solutions Architect Certificate, I prepared this write-up / cheat-sheet, which I think is very useful for people just starting out with AWS as well.
IAM - Identity and Access Management
IAM can be defined by its ability to manage, control and govern authentication, authorisation and access control mechanism of identities to your resources within your AWS Account.
The main concepts in IAM are:
- Users
- Groups
- Roles
- Access Policies
IAM USERS
Users are entities that represent a person or a service/application ( like in the case of Service Accounts)
IAM GROUPS
Groups are collections of users and have policies attached to them. They help organise users (into departments or functions - like developers or admins) and simplify access management at scale because when you need to add or remove policies that change is automatically applied to all users in that group.
IAM ROLES
Roles can be assumed by trusted entities - a user or a service can assume a role to obtain temporary security credentials.
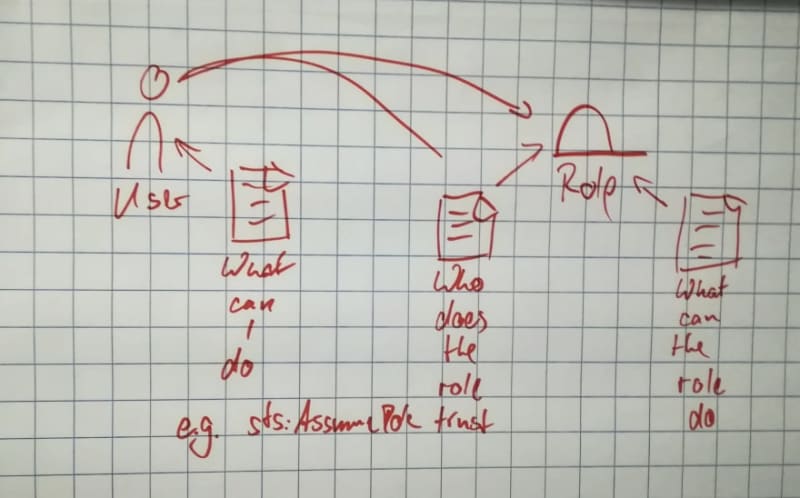
Pic from a workshop I attended some years ago
They can be used to temporarily grant access to some resources that the User ( or the Group to which they belong) does not have normally access to. Or to grant access to resources in other AWS Accounts ( as i explained in this post). Another use case is for example to allow an application to access some resources (because of course you don't want to embed credentials in the software itself, do you!? ( I have a post for this too)
IAM POLICIES
Policies are documents that define permissions.
They can be:
- Customer Managed
- AWS Managed
- Inline
Here there is not much to say other than Inline Policies are embedded within the user, group, or role to which they are applied and in case the user, group or role is deleted, the policy will be deleted too. And they don't scale very well, since you have to edit them individually should something change. Therefore it is advisable to use Managed Policies ( either created by you or AWS)
Depending on how they behave and affect the target you can find:
Identity-Based Policies
They can be applied to users, groups or roles.
They define what action that identity can take on a specific resource.
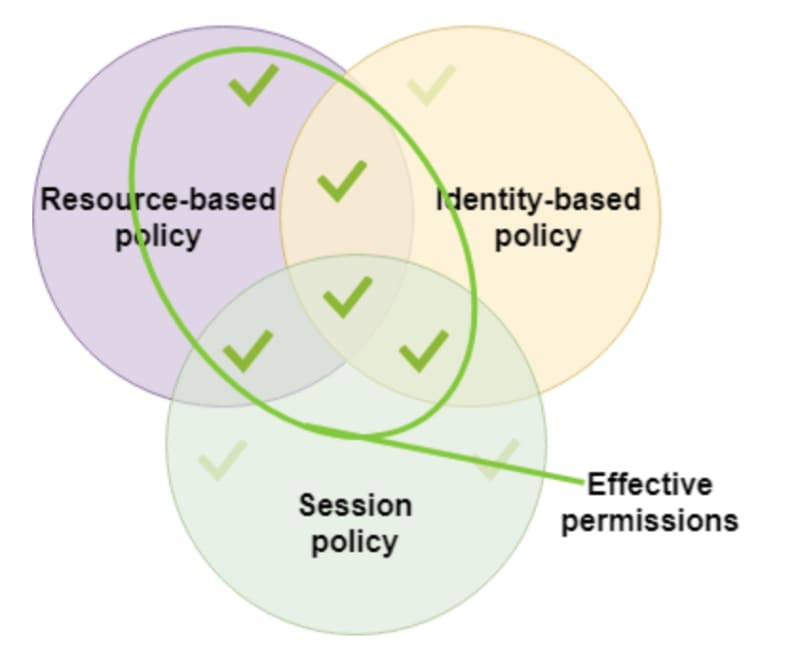
Resource-Based policies
They can be attached to resources and define what action can be taken on that resource by a specific identity (principal).
See them as the 2 sides of the same medal.
The perspective of the identity, and the perspective of the resource.
Session Policies
They are used with AssumeRole api actions.
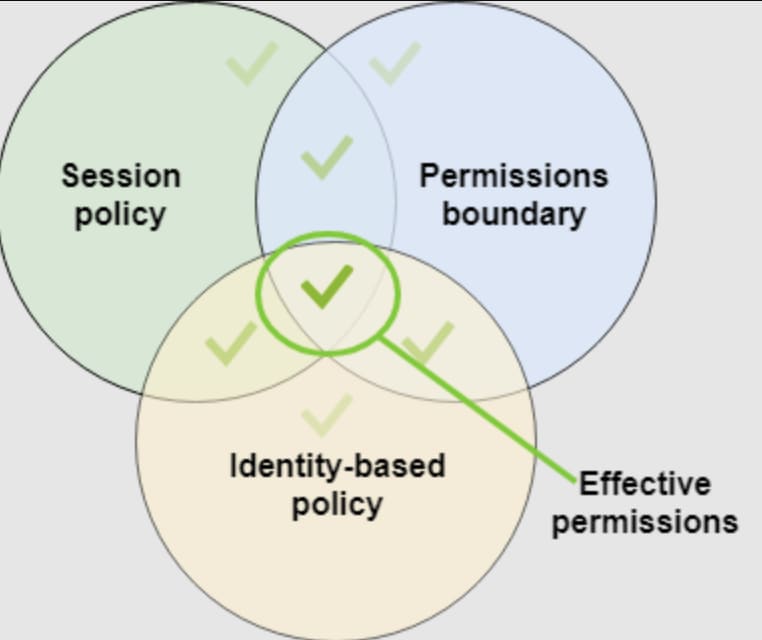
Permission Boundaries
They can be associated with roles or users and set the maximum level of permissions an identity-based policy can an IAM Entity grant.
They don't grant any permission but only act as a guard on other permission policies. (More on this below)
Service Control Policies
AWS Organisation service Control Policies (SCP) specify the maximum level of permission for an organisation. So similar to Permission Boundary but on an Account Level. If your company has multiple accounts you can set up SCPs to define the max permissions on all members of each account.
Anatomy of a IAM Policy
An IAM Policy is a JSON document where one or more Statements are listed.
{
  "Version": "2012-10-17",
  "Statement": [{
     "Sid": "DynamoDBTableAccess",
     "Effect": "Allow",
     "Action": [
        "dynamodb:PutItem",
        "dynamodb:GetItem",
        "dynamodb:Query"
     ],
    "Resource": "arn:aws:dynamodb:YOUR_REGION:YOUR_ACCOUNT:table/NAME"
}]}
A Statement is what defines a specific permission and contains the following:
- Action - define what you can (or cannot, in case of Effect Deny) do to a resource like viewing, creating, editing and deleting.
- Resource - an entity that exists within an AWS Service. it defines what actions are available element specifies the object or objects that the statement covers.
- Effect element is required and specifies whether the statement results in an allow or an explicit deny.
-
Condition element (or Condition block) lets you specify conditions for when a policy is in effect. (for example allow access only from specific IP or if MFA is enabled
"Condition": {"Bool": {"aws:MultiFactorAuthPresent": "true"}}) - Sid - an optional identifier for each statement, can be customised to make each statement, if you have more than one in the same policy, more readable and, well identifiable
- Principal - this is only available/necessary in Resource Based policies, and identifies who is entitled to execute the action on the resource
In the example above we are Allowing a user or application to Query for Items, Get a specific item or Insert an Item on a DynamoTable (every other action on that table will not be permitted).
There are some more Properties that can be used in the JSON document like NotPrincipal or NotAction.
NotAction for example can be used to simplify the IAM Policy and reduce the list of Actions you have to want to allow or deny.
Instead of having:
Action : [
"cloudtrail:CreateTrail",
"cloudtrail:ListTrails",
"cloudtrail:GetTrail",
// and many more
]
you could just specify:
NotAction : [
"cloudtrail:DeleteTrails"
]
It basically lists a limited set of Actions that should not match instead of listing a set of Actions that should.
Honestly, as for all the negated statements and conditions, I find them less readable and more error-prone, maybe it's just me, but they also warn about the risks on the official docs.
actions specified in this element are the only actions in that are limited. This, in turn, means that all of the applicable actions or services that are not listed are allowed if you use the Allow effect.
Since Actions are implicitly denied, and you are defining a policy where you ALLOW ALL BUT. Therefore the inappropriately use of the combination can make the policy too permissive, leading eventually to unauthorised access.
Why risk, just to save a few lines in the policy?
Resource Policies vs Users/Group Policies vs Roles
It is very important to note the distinctions and how useful these different approaches are.
A user might be in the Developers group but might be the only one needing to access a specific resource to execute a specific task for a short amount of time.
We don't want to add an inline policy because that would be bound with that specific user only all the time ( not easily maintainable and not safe - maybe next week another developer will take over that task and need that policy ).
We don't want to allow all the users in the Developers group to have access to that resource, all the time.
Therefore having a Policy attached to a Role is the best option because we can simply edit the trusted relationship to specify who can assume that role and therefore be able to temporarily have the permissions listed in the policy.
On the Trusting entity you need to create a Role, where you specify that a Trusted entity, a user or a group, will be able to act on a specific resource.
But you also need a policy on the Trusted Entity to be able to assume the role.
In other words, the role grants me the permission to do something on a resource, but if I don't have permissions to assume that role, I won't be able to do anything anyway.
I wrote a post explaining roles to access resources cross-account, but idea is the same.
Privilege escalation
As mentioned above, Permission Boundaries are special types of policies which do not grant any permissions, rather they guard that someone cannot be granted permissions higher that a certain level. This is very important to prevent something called Privilege Escalation.
With a permission boundary you can for example define that users created via IAM by a user, will not have higher permissions than the user itself.
Why is this necessary? Because without Permission Boundaries you could overcome the restrictions on your user simply by creating a user which has higher permissions than you have.
Imagine you have full access to IAM, but no access to S3 or EC2 Resources.
If you can create a new user, with S3 access, you could then login with such user and have access to resources that are denied to your own account! Thus escalating your privileges.
How are policies evaluated?
Evaluation logic is as follows:
- By default all requests are denied (implicit deny).
- An explicit allow overrides the implicit deny.
- An explicit deny overrides any explicit allows.
If you have 2 policies which are overlapping, imagine an Identity-Based policy ALLOWING access to S3 buckets and a Resource-Based policy on a specific bucket DENYING access,
the explicit deny on the Resource-Based policy would override the Allow on the Identity-Based policy.
This is the order of Evaluation of the policies:
- Organisational Service Control Policies
- Resource-based Policies
- IAM Permission Boundaries
- Identity-based Policies
If for the Action being taken nothing is specified or an Allow is found, process continues down the chain. If a Deny is found, Action is rejected.
Remember:
Everything is implicitily Denied,
Explicit Deny overrides every explicit Allows!
This short video greatly explains explicit deny and permission boundaries.
Best Practices
- Lock away your AWS account root user access keys
- Grant least privilege access - don't give open policies expecting that they will be restricted later. It will never happen
- Enable identity federation : centrally manage users and access across multiple applications and services. For federation to multiple accounts in your organisation AWS Single Sign On. ( Post coming soon )
- Enable MFA. (you can use Credential Report to export a report of all the users in your AWS organisation and check the status of their credentials, psw expiration, MFA is enabled and so on)
- Rotate credentials regularly
- Enable IAM Access Analyser to analyse public, cross-organisation access. ( see post serverless days workshop)
- Use Permission boundaries to prevent privilege escalation
- Use Roles to delegate permissions


Oldest comments (0)