In the previous article we went over the high-level approach around using AWS DMS and then created the replication instance on which your migration processing will run and then created the source and target endpoints that manage the connection to the source and target databases. The last step is to create the database migration task.
Creating your Database Migration Task
So far, we have defined the resource set that is going to do the work as well as the places where data will be coming from and where it will be going. There is one area that we have not yet defined, and that is the database migration task. This task defines the work that will be done. As part of this task, you can specify which tables to use, define any special processing, configure logging, etc. Let’s take a look at creating one of these tasks.
First, go into the Database migration tasks screen in the AWS DMS console and then click the Create task button. This will bring up the creation screen, with the first section being Task configuration. This section allows you to:
- Provide a Task identifier or name for the task
- Select the Replication instance to use
- Select the Source database endpoint
- Select the target database endpoint
- Select the Migration type
The Migration type is where you tell DMS the kind of work that you want this task to perform. There are three different options that you can select. The first is to Migrate existing data. Using this as a migration type means that you’re looking to do a one-time copy of the data and would be ideal for doing that one-time migration. The next option is to Migrate existing data and replicate ongoing changes. The name pretty much describes what is going on with this approach, and is most appropriate when you need to run both the source and target systems in parallel but want them to stay as updated as possible. This approach is especially common in Data Lake scenarios where data is being moved from a transactional system to an analytics or reporting system. The last migration type option is to Replicate data changes only where you replicate any changes in data but do not perform that one-time migration.
The next major section to complete when creating a migration task is the Task settings. Task settings control the behavior of your task and can be configured through a Wizard or through a JSON editor. We will use the wizard mode so that we can more easily talk about the major settings.
The first item to configure is the Target table preparation mode, or how DMS should be preparing the tables at the target endpoint. There are three options, Do nothing, Drop tables on target, and Truncate. When you select the “do nothing” option then target tables will not be affected. Any tables that do not exist will be created. When you select to drop the tables, then DMS will drop and recreate all affected tables. Truncating means that all tables and metadata remain, but all of the data is removed.
The next item to configure is Include LOB columns in replication. LOB are large objects and you have the option as to whether or not you want to include those object columns in the target data. You have three options, the first of which is Don’t include LOB columns, and the second of which is Full LOB mode; both of which are rather straightforward. The third option is Limited LOB mode. In this mode, DMS will truncate each LOB to a defined size, the Maximum LOB size (kb) value.
You then can configure whether you want to Enable validation. Checking this box will cause DMS to compare the source and target data immediately after the full load is performed. This ensures your data is migrated correctly, but it takes additional time to perform, and thus increases cost. You next can Enable CloudWatch logs. There are also some advanced task settings, but we won’t go into those as part of this discussion.
The next section is Table mappings. This section is where you define the rules about what data is moved and how it is moved. At a high-level, you will create a Selection rule, which determines the data that you wish to replicate, and then you can create a Transformation rule that modifies the selected data before it is provided to the destination endpoint. The table mappings section also gives you the opportunity to use a Wizard approach or a JSON editor to enter all table mappings in JSON. We will walk through using the wizard.
The first step is to select the Add new selection rule button. This expands the selection rule section as shown in Figure 1.
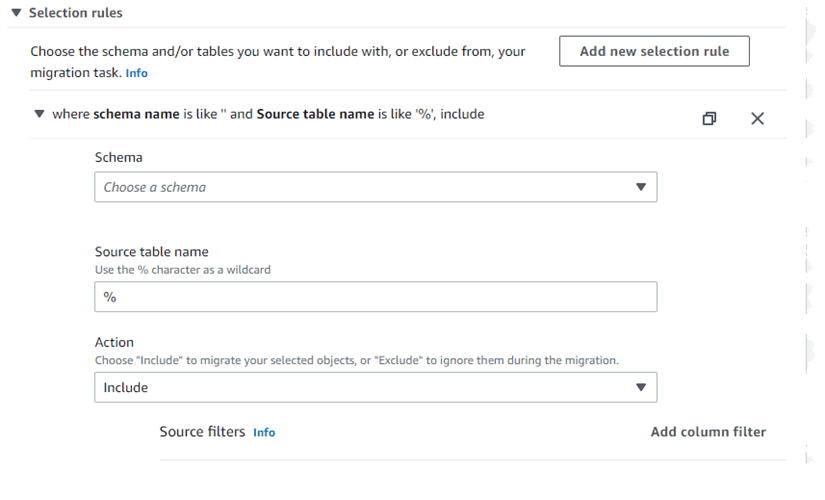 Figure 1. Creating selection rules for a database migration task
Expanding the Schema drop-down will show that there is only one option – to Enter a schema. Selecting this option will add another textbox in which you can provide the Source name. This allows you to limit, by schema, the data that is being selected. You can enter % to select all schemas in the database or enter the schema name. You do the same for the Source table name, entering % if you want all the tables replicated. Once you have those defined, you then select the appropriate Action, to either Include or Exclude the items that fit your selection criteria. You can create as many rules as desired, however, you must always have at least one rule with an include action.
Once you have the selection rule configured you can Add column filter. This allows you to limit the number and type of records. A column filter requires the Column name, one or more Conditions, and then one or more comparative values. You have the following options for the conditions:
- Less than or equal to
- Greater than or equal to
- Equal to
- Not equal to
- Equal to or between to values
- Not between two values
- Null
- Not null
You can create any number of column filters per each selection rule.
Once you have completed your selection rule you can then add one or more Transformation rules. These rules allow you to change or transform schema, table, or column names of some or all the items that you have selected. Since we are simply copying the database across, we do not need to add any of these, especially since any changes will likely break our code!
Your next option is to determine whether you want to Enable premigration assessment run. This will warn you of any potential migration issues. Checking the box will expand the UI and present you with a set of Assessments to run as shown in Figure 2.
 Figure 2. Enabling premigration assessment run on a scheduled task
Once you have all of your selection and transformation rules created, you can select to Start migration task either Automatically on Create, the default, or Manually later. Lastly, add any tags that you desire and click the Create task button.
This will bring you back to the database migration tasks list screen where you will see your task being created. Once created you can either start the task manually or allow it to run itself if so configured. You will be able to watch the table count move from Tables queued to Tables Loading to Tables loaded as they are processed. Returning to the AWS DMS Dashboard will show that there is 1 Load complete as shown in Figure 3.
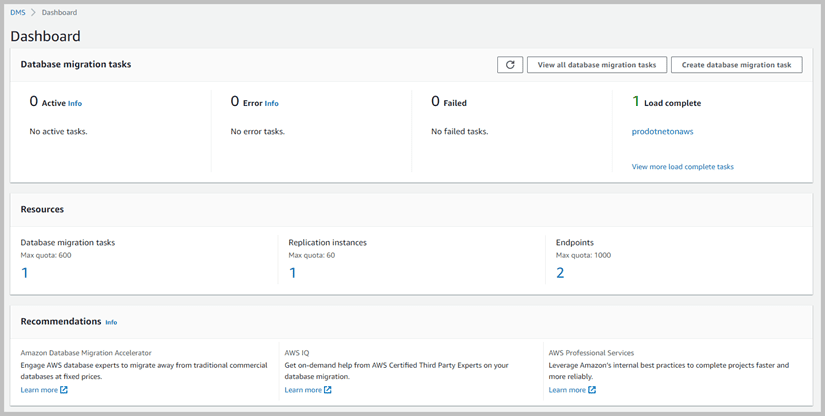 Figure 3. Dashboard showing completed migration task
For those cases where you simply want to migrate data sets with minimal changes other than perhaps renaming some columns, the Database Migration Service works like a dream. Relatively painless to setup and powerful enough to move data between servers, even servers that are of dissimilar types, such as where we just copied data from SQL Server to Amazon Aurora. However, there is a tool that will help you move more disparate data between different database engines. We will take a look at that tool next.


Oldest comments (0)