
In this blog post, we’ll take a look at how you can use Border0 to access your SSH services using your Single Sign-on (SSO) credentials. That means no need to manage, ship, and rotate SSH keys, as well as flexible policies to control who has access to your SSH servers, when and from where. Best of all, your servers can run in a private network, such as behind NAT or a private VPC, and your users will be able to access them without the need for a VPN!
As the threat landscape continues to evolve and the move to the cloud becomes increasingly popular, more organizations are moving away from traditional remote-access VPNs and adopting zero-trust private access solutions. This is due to the need for more granular access to resources that are based on time, identity, and policy rather than trust based on just IP ranges.
SSH is a popular and key technology for providing secure and reliable access to critical systems such as servers, IOT devices, and even containers and network devices such as routers and switches. We’ve come a long way from the old days of Telnet to today’s ubiquitous use of SSH. With this move, all connections are now end-to-end encrypted, and we now have the ability to use key-based authentication. However, there are some remaining challenges. For example, most SSH deployments use static passwords or SSH keys for authentication, which can be stolen or compromised. SSH does not natively provide an easy mechanism for enforcing security policies or monitoring access to systems. It also does not easily support single sign-on (SSO), which can make it difficult for organizations to integrate SSH with their existing identity management systems.
What do we really want?
In today’s world, many of your resources are typically hosted in private or otherwise well-protected networks such as a private VPC. And as a result, it is, by design, hard to access directly from the Internet. We don’t want the bad guys to access our servers! But that also makes it harder for your engineers to access it. What we really want is to access these servers over SSH as if they’re sitting right next to you on the same network. No VPN, no worries about firewall rules, yet, no-one other than your team should be able to communicate with your SSH port. Finally, ideally you can just use your Single sign-on credentials, so there is no need to ship SSH keys around, and certainly no local passwords!
Border0 and SSH access
Using Border0’ anycasted application and identity-aware proxies, it’s super easy to provide zero trust SSH access and provide a user-friendly experience. Making it easier for users to access the systems they need, when they need it, and no matter their location, while still maintaining a high level of security.
Using Border0, we can solve the above challenges and more in just a few minutes. Let’s imagine a scenario where we have a VM in a private network that we’d like a few folks to have access to. In the example below, we’ll show you how to use Border0 to make your SSH service available; It will take just one minute!
Check out the demo!
.
The easiest way to get started is to have this script do the work for you.
curl -s https://download.border0.com/install.sh | sudo bash
What does this install script do, you ask? It will download the Border0 CLI client and install a few dependencies to get you going. The script will then ask you to log in to the Border0 portal with your admin credentials. That’s a one-time task because the next thing the install script will do is create a Border0 API token, which it will use going forward. Next up, it will create the SSH Service in the Border0 platform and connect this machine to the Border0 cloud. Finally, the script will install a systemd unit and start the new service. Done!
You’ve now made this server available over SSH through the Border0 platform. This means you get a lot of extras!
‣ This machine can run in a private network (vpc). All it needs is outbound network access, such as through a NAT gateway. Or just block incoming SSH traffic.
‣ It runs its own SSH daemon that’s only accessible over the Border0 tunnel. Ie. no SSH port accessible from the Internet
‣ You can log into this machine using your existing SSO account, for example, using your Gmail or GitHub account!
‣ You can now use a policy to define who has access to this machine under what conditions (who, when, from where, etc.). By default, we attach the default organization-wide policy, but you can customize this for your needs.
Ok, let’s try and log in using the following:
border0 client ssh

In the example above, I used the border0 CLI client. This allows me to discover all services I have access to quickly. I could also have used the Border0 desktop app, or If you prefer to use the regular OpenSSH client, check the instructions here.
Session logs and session replay
We saw how easy it is for an administrator to make SSH services available to your team and coworkers. Accessing an SSH server using just your SSO credentials kinda feels like magic, right?! An additional benefit is that we now know exactly who (what Single Sign-on identity) accessed your service.
It gets better; you can now easily control and see who accessed what SSH service, and you can also replay the actual SSH session!
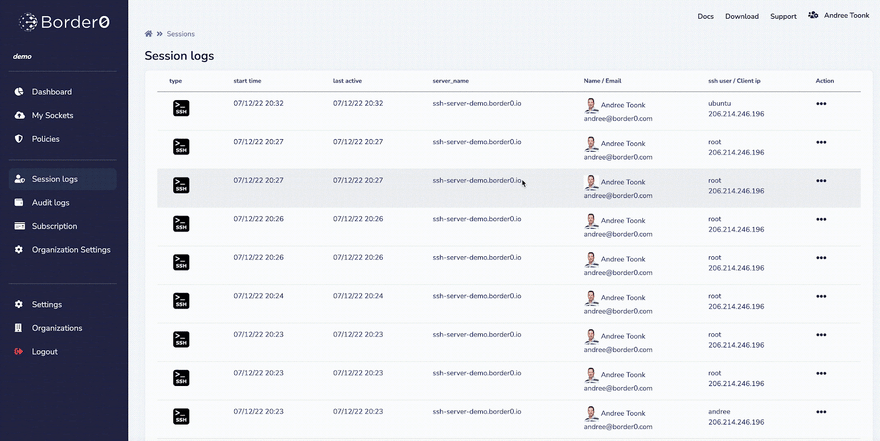
The image below shows the administrator view. First, we see all the sessions to the SSH services in this organization. After selecting a particular SSH session, we can now replay that session and see a replay of the user’s session. It’s just like watching a movie! This allows us to track exactly what happened during a session, which can be a powerful tool!
Wrap up
In this blog post, we saw how we can make SSH services easily available without the need for a VPN and login to these servers using our existing single sign-on credentials, such as your Google or GitHub account.
And while the workflow for the SSH clients, such as the engineering teams, remains largely the same. There are various new powerful features for administrators. Using the Border0 Policy, it’s easy to provide authorization rules based on SSO identities, time of day, dates, IP addresses, and geolocation. Finally, the administrator now has one place to see all sessions to your services and the ability to replay SSH sessions.
We believe this is a powerful set of features for teams that seek to enhance their security and protect against increasingly sophisticated threats. By providing continuous monitoring, continuous enforcement of security policies, and a more user-friendly experience, SSH access using Border0 is the next evolution in secure access!
Hopefully, this demonstrates how easy it is to get started with Border0. We invite you to give it a spin yourself and sign up for our free, fully-functional community edition here! Finally, don’t forget to check our documentation for more examples and information.


Oldest comments (0)