
Welcome my fellow hipsters!
In my previous story, we saw how to debug the JHipster generators (If you don’t already read it. It could be useful for understanding the debugging with VSCode).
But sometimes it’s not enough, especially if you want to deal with JHipster blueprints.
Let me introduce what blueprints are and how to efficiently develop them when using the VSCode debugger.
Enjoy!
Introduction to Blueprint
A JHipster blueprint is a Yeoman generator that is composed from a specific JHipster sub-generator to extend the functionality of that sub-generator. The blueprint can override any defined getter of the sub generator and provide its own templates and functionality.
https://www.jhipster.tech/modules/creating-a-blueprint/
In other words, a blueprint is a way to make your own version of JHipster. For example, JHipster-vuejs is a popular blueprint which redefined the whole client part to add VueJs as client framework.
I wrote a sample blueprint which only extends JHipster generators and adds some specific features to match with a company needs like:
- Use the company logo and CSS
- Personalize some config stuff
- Update POM.xml
Why debugging a blueprint
When you start creating a blueprint, it’s always difficult to understand what your code really does. Does this behavior come from JHipster? From yeoman? Do I write something wrong? etc…
Debugging is the best way to master what your application does.
Of course, even if you debug your application a lot, I always suggest you to keep writing unit tests.
Configure your VSCode
Add a new task
Tasks allow you to define a routine which can be launch before a debug session. It’s important for us because dealing with npm package in dev mode can be very annoying: you need to link your blueprint once before using it.
In your .vscode/tasks.json please add this configuration where debugVcCodeFolder is where you will generate your future JHipster application and generator-jhipster-myBlueprint is your blueprint name.
{
    // See https://go.microsoft.com/fwlink/?LinkId=733558
    // for the documentation about the tasks.json format
    "version": "2.0.0",
    "tasks": [
        {
            "label": "link generator",
            "type": "shell",
            "command": "cd /tmp/debugVsCodeFolder && npm link generator-jhipster-myBlueprint"
        }
    ]
}
Add a new debug config
If you followed my last story you probably know what I’m talking about. Otherwise create a new launch.json file in the .vscode folder, like this.
{
    "version": "0.2.0",
    "configurations": [
        {
            "type": "node",
            "request": "launch",
            "name": "Debug my blueprint",
            "preLaunchTask": "link generator",
            "program": "${workspaceFolder}/node_modules/generator-jhipster/cli/jhipster.js",
            "args": [
                "-d",
                "--skip-checks",
                "--skip-git",
                "--skip-cache",
                "--skip-install",
                "--blueprint",
                "myBlueprint"
                ],
            "console": "integratedTerminal",
            "cwd": "/tmp/debugVsCodeFolder"
        }
    ]
}
“preLaunchTask” refer to our previous task added. Before each debug launch, we play this task. Obviously, it can be optimized to avoid doing a link if the folder already exists.
“program” is the JHipster version from our blueprint node_module. Be sure to do an npm install before.
“cwd” is our working folder, put the same value as we set in the tasks.json.
Let the debug shine!
Add breakpoints, launch our debug configuration (in the debug panel) and let the magic works.
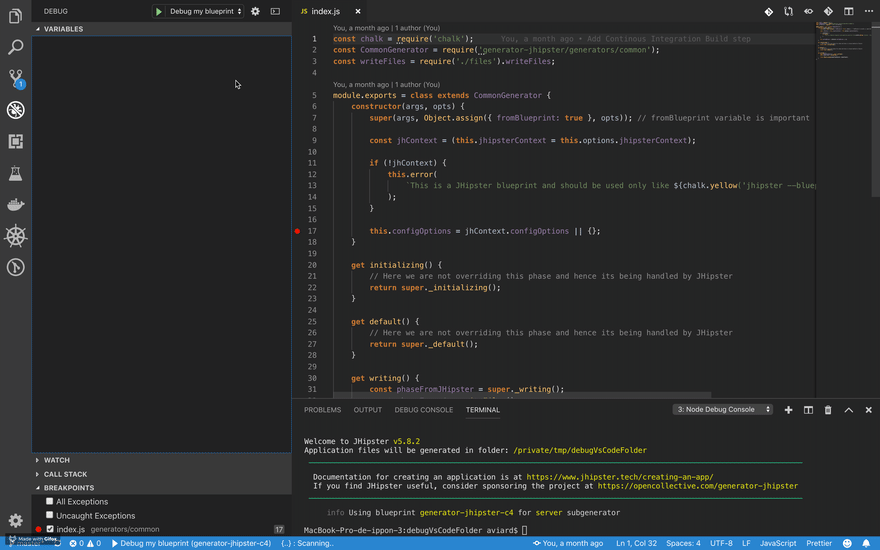
Congratulations! You have just debugged your own JHipster blueprint.
Conclusion
We saw how to add a task to link our blueprint and how to debug it.
I hope this article will help you with your blueprint development.
Don’t hesitate to follow me on twitter @avdev4j and see us on Github: https://github.com/jhipster.
Have fun with JHipster!


Top comments (0)