
Hey guys, today I'll try to explain to you in the most easy way possible how to create forms with Flutter.
Before we start we need to know....
Why we should use forms
Forms help us in automating the manipulation of our inputs For example with only on trick we could validate all our inputs without extracting every single one!
But... how forms work?
I will use two important features about the forms, the validate and save methods.
As I said before about automating, the validate method once called it will validate all our inputs by calling the validator inside each Input.
The same thing applies for the save method, it will call all the onSaved functions inside each Input.
It seems obvious but every input must be inside the form Widget.
I simple summary about what I have just said :D

Time to show something
We start by using our form widget and put inside it all our inputs.
Forms needs a GlobalKey so we can identify it when needed.
import 'package:flutter/material.dart';

void main() {
  runApp(
    MaterialApp(
      home: Scaffold(
        body: MyForm(),
      ),
    )
  );
}

class MyForm extends StatefulWidget {

  @override
  _MyFormState createState() => _MyFormState();

}

class _MyFormState extends State<MyForm> {

  final _keyForm = GlobalKey<FormState>(); // Our created key

  @override
  Widget build(BuildContext context) {

    // The form widget
    return Form(
      key: _keyForm,

    );

  }

}
It's time to create the fields that we want to add to our cool form!
Let's suppose that we want 3 fields...
- name
- password
To add these field we will use a simple widgets that will provide us with the basic graphics of the material design, this widget is called TextFormField.
The field that will contain our password will have an extra property "obscureText" to show the black dotted chars instead of the actual visible password. 😉️
Only for style purpose we add a hint text so the user knows what to insert in that field 😁️
class _MyFormState extends State<MyForm> {

  final _keyForm = GlobalKey<FormState>();
  final _name = TextEditingController();
  final _password = TextEditingController();
  final _email = TextEditingController();

  @override
  Widget build(BuildContext context) {

    return Form(
      key: _keyForm,
      child: Padding(
        padding: const EdgeInsets.all(20),
        child: ListView(
          children: [
            Container(
              padding: const EdgeInsets.symmetric(vertical: 20),
              child: Text('Some inputs...'),
            ),
            TextFormField(
              controller: _name,
              decoration: InputDecoration(hintText: 'Insert your name.'),
            ),
            TextFormField(
              controller: _password,
              obscureText: true,
              decoration: InputDecoration(hintText: 'The password to log in.'),
            ),
            TextFormField(
              controller: _email,
              decoration: InputDecoration(hintText: 'E-mail to use for log in.'),
            ),
          ],
        ),
      ),
    );

  }
}
Wait.. User class?
We will create a simple user class only for the purpose to show how we can save our user his properties are not final... 😵️
class User {
  String name;
  String password;
  String email;

  User({ this.name, this.password, this.email });
}
Now it's time to validate and save
Now it's time to add the famous validator and onSaved explained at the beginning
Now it'll look like this..... 👇🏻️
return Form(
  key: _keyForm,
  child: Padding(
    padding: const EdgeInsets.all(20),
    child: ListView(
      children: [
        Container(
          padding: const EdgeInsets.symmetric(vertical: 20),
          child: Text('Some inputs...'),
        ),
        TextFormField(
          controller: _name,
          decoration: InputDecoration(hintText: 'Insert your name.'),
          validator: (value) {
            if (value.isEmpty) return 'You have to insert a name';

            return null;
          },
          onSaved: (newValue) => _newUser.name = newValue,
        ),
        TextFormField(
          controller: _password,
          obscureText: true,
          decoration: InputDecoration(hintText: 'The password to log in.'),
          validator: (value) {
            if (value.length < 7)
              return 'Password must have at least 6 chars.';

            return null;
          },
          onSaved: (newValue) => _newUser.password = newValue,
        ),
        TextFormField(
          controller: _email,
          decoration:
              InputDecoration(hintText: 'E-mail to use for log in.'),
          validator: (value) {
            if (!value.contains('@gmail.com'))
              return 'Only gmail emails allowed.';

            return null;
          },
          onSaved: (newValue) => _newUser.email = newValue,
        ),
      ],
    ),
  ),
);
As you saw in the first image now when i will call the .validate() method it will call all the validators inside all our inputs and when i will call the .onSaved() method it'll do the same thing for the onSaved functions.
Now the last step is to add a button 'SAVE' that will call our function so we can execute those methods.
  void _saveForm(){

    if(_keyForm.currentState.validate()){

      _keyForm.currentState.save();

      print(_newUser.name);

    }

  }

  @override
  Widget build(BuildContext context) {
    return Form(
      key: _keyForm,
      child: Padding(
        padding: const EdgeInsets.all(20),
        child: ListView(
          children: [
            Container(...),
            TextFormField(...),
            TextFormField(...),
            TextFormField(...),
            RaisedButton(
              child: Text('SAVE'),
              onPressed: () {
                _saveForm();
              },
            )
          ],
        ),
      ),
    );
  }
}
Time to test 😃️
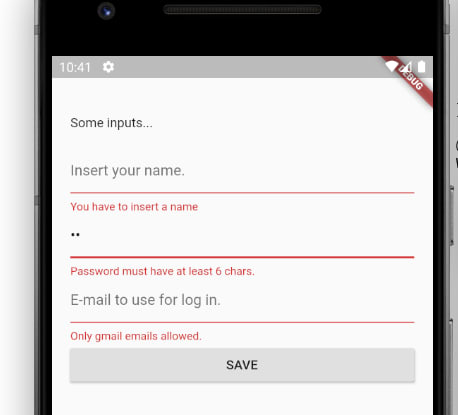
The only thing that we have to do now is to click into the "SAVE" button.
The save button will call the _saveForm() function where...
We will check if _keyForm.currentState.validate() gives back true. In this case it's not since one or more of them are wrong.
As you can see it's working well, it shows the related errors if we are not in line with the validator.

But... if the validate check gives us true we will enter the if statement and run currentState.save() that will run the save function inside all our inputs.
After that when we will print _newUser.name we will get the updated Instance.
As you can see in the image in the right it's all working fine!
time to say goodbye
I hope that you enjoyed this article :D
If you think that I have to made other articles like this one let me know in the comment section.
If you think that I have said some wrong stuff let me know so i can improve my skills.
Thank you so much for you time, and keep learning stay positive with your attitudes.
If you are interest we make youtube video and articles consider to subscribe for more things like that, se you next time!
Bye 👋️


Top comments (1)
There's an error on your article: _newUser instanciation happens nowhere in your code and in place of the User instance variables, you declare _name, _password and _email private variables in the _MyFormState class. Please correct the code !
Anyway, thank you for your article !
Regards,
Jean-Pierre