
🚀 What is a PWA?
Before we get going on seeing how to build a SvelteKit PWA let's run it back a little and first look at what a PWA is. A Progressive Web App (PWA) is an app built to work with HTML, JavaScript and CSS but with the functionality of a native app. Features include responsiveness and offline availability as well as the possibility to install the app. You can test a site's PWA capability in Lighthouse.
For all of those mentioned features to work, we need to add some additional super powers to our SvelteKit app. These include icons of various sizes and a manifest file which contains the app name, colours and some other properties. As well as those items, we also need to define a service worker to perform background caching and do the groundwork to make the app available offline.
In this post we will look at how to use the PWA functionality in the MDsveX starter blog. After that we will look at what is under the hood, so you can set up an existing project as a PWA. If that all matches what you were looking for, why don't we get cracking?
🧱 Create a SvelteKit PWA using the MDsveX Starter
I have just added PWA functionality to the MDsveX starter. All you need to do is customise the website configuration file with with site's name and theme colours, then run a script to generate all the different icon sizes automatically. Here is exactly what you need to do in five simple steps. If you are looking for a more general SvelteKit Tutorial or how to get started with SvelteKit I have a couple of posts you will appreciate.
SvelteKit PWA using the MDsveX Starter">
- We are using the MDsveX starter. Start by cloning the repo and installing packages. I use
pnpm, though if you prefer npm just swap outpnpmfornpmin the commands below:
git clone https://github.com/rodneylab/sveltekit-blog-mdx.git my-new-mdsvex-blog
cd my-new-mdsvex-blog
pnpm install
cp .env.EXAMPLE .env
pnpm run dev
After cloning the repo and installing packages, these commands create a .env file from the template provided and fire up the dev server. You can change the server port in package.json if you already have an app running on port 3000 (the default port).
- Now you need to customise the configuration file with the details of your app. The website configuration file is in your project at
src/lib/config/website.js. This file contains data which are used for SEO as well as the parameters needed for our Progressive Working App. More sensitive data can be pulled from the.envfile when needed. Having said that, for the progressive app customisation, we shouldn't have anything secret. Go ahead and customise the file (lines7–11):
const facebookPageName = import.meta.env ? import.meta.env.VITE_FACEBOOK_PAGE : '';

const website = {
  author: 'Rodney Johnson',
  ogLanguage: 'en_GB',
  siteLanguage: 'en-GB',
  siteTitle: 'SvelteKit Blog Mdx',
  siteShortTitle: 'SvelteKit Blog',
  icon: 'static/icon.png',
  backgroundColor: '#1b4079',
  themeColor: '#d62828',
In the previous step we set the location for our icon file to
static/icon.png. There is already a dummy file in that location. Replace the dummy file with your own PNG logo. I recommend you go for a 512 px × 512 px file. All other needed file sizes will be generated automatically in the next step.Next we will generate new icon files in all the sizes needed for our PWA. These are generated using the sharp plugin, which is very efficient. As well as the icons, we will generate the
manifest.json file. Run the command:
pnpm run generate:manifest
This command triggers a script which is in the file generate-manifest.js in the project's root folder. The script runs automatically before the site is built by default. You might find this useful while you are still setting up the site and changing a lot of parameters. You can remove this step in the build process if you want to by changing line 6 of package.json from npm run generate:manifest && svelte-kit build simply to svelte-kit build. Anyway you should now have icons and the manifest. Take a look at static/manifest and check the parameters have been updated with your site's parameters. Here is an example file:
{
  "name": "SvelteKit Blog Mdx",
  "short_name": "SvelteKit Blog",
  "start_url": "/index.html",
  "background_color": "#1b4079",
  "theme_color": "#d62828",
  "display": "standalone",
  "icons": [
    {
      "src": "icons/icon-128x128.png",
      "sizes": "128x128",
      "type": "image/png",
      "purpose": "any maskable"
    },
    {
      "src": "icons/icon-144x144.png",
      "sizes": "144x144",
      "type": "image/png",
      "purpose": "any maskable"
    },
    {
      "src": "icons/icon-152x152.png",
      "sizes": "152x152",
      "type": "image/png",
      "purpose": "any maskable"
    },
    {
      "src": "icons/icon-192x192.png",
      "sizes": "192x192",
      "type": "image/png",
      "purpose": "any maskable"
    },
    {
      "src": "icons/icon-256x256.png",
      "sizes": "256x256",
      "type": "image/png",
      "purpose": "any maskable"
    },
    {
      "src": "icons/icon-512x512.png",
      "sizes": "512x512",
      "type": "image/png",
      "purpose": "any maskable"
    }
  ]
}
Next look in static/icons you will see your icon in the various pixel sizes.
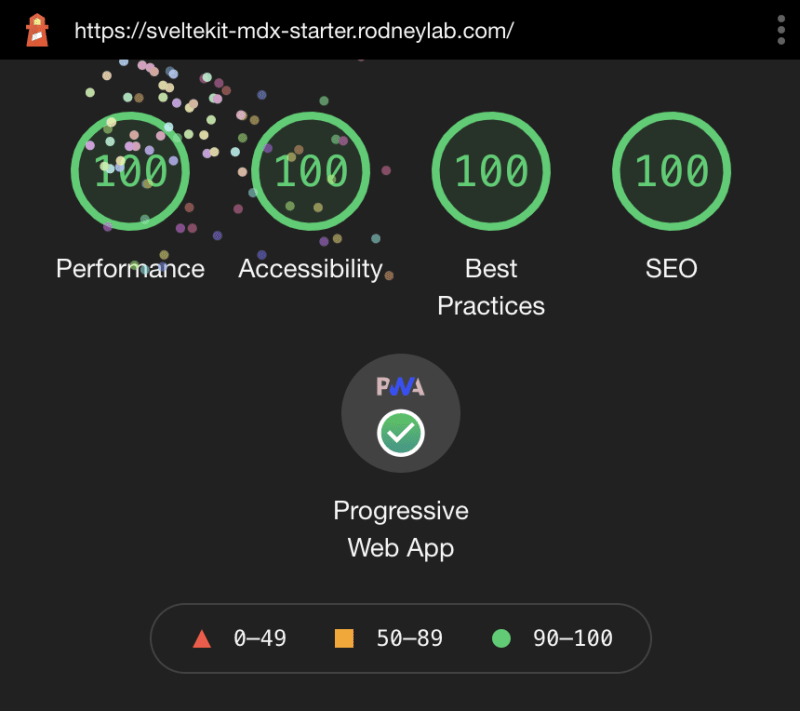
- As ever, we need to check that all of this is working before we deploy. This is easy to do with Lighthouse in the Chrome Developer Tools. First build the site and generate a preview site (stop the dev server first if this is running):
pnpm run build
pnpm run preview
Finally in Chrome Browser, go to localhost:3000. Next go to the View menu and find Developer then click Developer Tools find Lighthouse (you might need to expand the list, it is in the same menu as Elements and Console). Once you have Lighthouse open click Generate Report. It might take a couple of minutes to run. You should have big green tick (check mark) under PWA when the results do show up.
Note to get 100 for Best Practices in the latest version of Chrome you will need to set Content Security Policy to enable mode. By default it is set to report only mode in the template. It is really easy to switch modes, just edit two lines in src/hooks.js:
// 'Content-Security-Policy-Report-Only': csp,
'Content-Security-Policy': csp,
You just comment out line 85 and uncomment line 86.

I hope you find that helpful and see how easy it can be to set up a PWA in SvelteKit. If you are interested, we will have a quick look under the hood next to see what makes the PWA work.
🔧 What's under the Hood?
There are a few elements needed to create a SvelteKit PWA successfully. In this section, we look at them one, by one.
Manifest and Icons
As mentioned earlier, a script generates the manifest.json file and icons automatically. There is nothing magic or too special here, but let me know if you would like some clarification on any aspect. I include the code here in case you want to work something similar into one of your projects.
import fs from 'fs';
import path from 'path';
import sharp from 'sharp';
import website from './src/lib/config/website.js';

const __dirname = path.resolve();
const iconsDirectory = path.join(__dirname, 'static/icons');
const manifestFile = path.join(__dirname, 'static/manifest.json');

const { backgroundColor, icon, siteShortTitle, siteTitle, themeColor } = website;
const DEFAULT_SIZES = [128, 144, 152, 192, 256, 512];

const iconImage = sharp(icon);

const resizeIcon = async ({ size, path }) => {
  await iconImage.resize(size).toFile(path, (err) => {
    if (err) {
      console.error(err);
    }
  });
};

const main = async () => {
  try {
    const { height, width } = await iconImage.metadata();
    const maxSize = Math.min(width, height);
    const sizes = DEFAULT_SIZES.filter((element) => element <= maxSize);

    const manifest = {
      name: siteTitle,
      short_name: siteShortTitle,
      start_url: '/index.html',
      background_color: backgroundColor,
      theme_color: themeColor,
      display: 'standalone',
      icons: sizes.map((size) => {
        const path = \`icons/icon-\${size}x\${size}.png\`;
        resizeIcon({ size, path: \`static/\${path}\` });

        return {
          src: path,
          sizes: \`\${size}x\${size}\`,
          type: 'image/png',
          purpose: 'any maskable',
        };
      }),
    };

    fs.writeFileSync(manifestFile, JSON.stringify(manifest, null, 2));
  } catch (error) {
    console.error(error);
  }
};

console.log('Generating manifest.json');
fs.mkdir(iconsDirectory, { recursive: true }, (err) => {
  if (err) {
    return console.error(err);
  }
});

main();
HTML head
There are two elements which you need to add to you page HTML head section on all pages. First is the theme colour which the browser uses to change the address bar to match your site's colour theme. Finally, there is an icon which iOS uses as the Home Screen icon when the user installs your app:
<script>
  import website from '$lib/config/website';
  const { themeColor } = website;
</script>

<svelte:head>
  <meta name="theme-color" content={themeColor} />
  <link rel="apple-touch-icon" href="/icons/icon-192x192.png" />
</svelte:head>
This component is included in page layout templates. Because we wrap these elements in a <svelte:head> element, SvelteKit works them in the HTML head section of our page.
Service Worker
The final element is the service worker, which does all the heavy lifting for us in terms of caching data needed for the app to be available offline.
import { build, files, timestamp } from '$service-worker';

const worker = self;
const CACHE_NAME = \`static-cache-\${timestamp}\`;

const to_cache = build.concat(files);

worker.addEventListener('install', (event) => {
  console.log('[ServiceWorker] Install');

  event.waitUntil(
    caches.open(CACHE_NAME).then((cache) => {
      console.log('[ServiceWorker] Pre-caching offline page');
      return cache.addAll(to_cache).then(() => {
        worker.skipWaiting();
      });
    }),
  );
});

worker.addEventListener('activate', (event) => {
  console.log('[ServiceWorker] Activate');
  // Remove previous cached data from disk
  event.waitUntil(
    caches.keys().then(async (keys) =>
      Promise.all(
        keys.map((key) => {
          if (key !== CACHE_NAME) {
            console.log('[ServiceWorker] Removing old cache', key);
            return caches.delete(key);
          }
        }),
      ),
    ),
  );
  worker.clients.claim();
});

self.addEventListener('fetch', (event) => {
  console.log('[ServiceWorker] Fetch', event.request.url);
  if (event.request.mode !== 'navigate') {
    return;
  }
  event.respondWith(
    fetch(event.request).catch(() => {
      return caches.open(CACHE_NAME).then((cache) => {
        return cache.match('offline.html');
      });
    }),
  );
});
Note in line 4 we use the build date in our cache name. This helps us identify when the cached data is stale. Let me know if you would like more detailed explanations on anything here. I based this code on Pedro Sonzini Astudillo's Svelte service worker.
🙌🏽 Open Graph SEO in SvelteKit: Wrapup
That's it for this post. We have seen:
- what a PWA is,
- how to create a SvelteKit PWA using the MDsveX starter,
- what's under the hood in the starter's PWA code.
As always suggestions for improvements, together with requests for explanations and feedback are more than welcome. Also let me know what other fetaures you would like implemented on the starter.
🙏🏽 SvelteKit PWA: Feedback
Have you found the post useful? Would you like to see posts on another topic instead? Get in touch with ideas for new posts. Also if you like my writing style, get in touch if I can write some posts for your company site on a consultancy basis. Read on to find ways to get in touch, further below. If you want to support posts similar to this one and can spare a couple of dollars, rupees, euros or pounds, please consider supporting me through Buy me a Coffee.
Finally, feel free to share the post on your social media accounts for all your followers who will find it useful. As well as leaving a comment below, you can get in touch via @askRodney on Twitter and also askRodney on Telegram. Also, see further ways to get in touch with Rodney Lab. I post regularly on SvelteKit as well as other topics. Also subscribe to the newsletter to keep up-to-date with our latest projects.


Top comments (0)