
🚀 Before we get going
Before we get going on this post about Open Graph SEO in SvelteKit, I should mention this is the second post in a series on SvelteKit SEO. The first post included an introduction to SEO in general and also some details on how to add Twitter metadata to your SvelteKit site pages. This time we will look at Open Graph meta, which is great for optimising how your page looks when it is shared on Signal, Wire, WhatsApp and Slack.
Using Open Graph metadata we can specify which images to display on social media shares as well as customise the text that appears on the sharing card. You have probably seen memes about social media apps doing poor crops of shared images. By using Open Graph meta, we preselect an image which is nicely cropped and avoid a poor reflection on our brand. Here is what we are aiming towards:
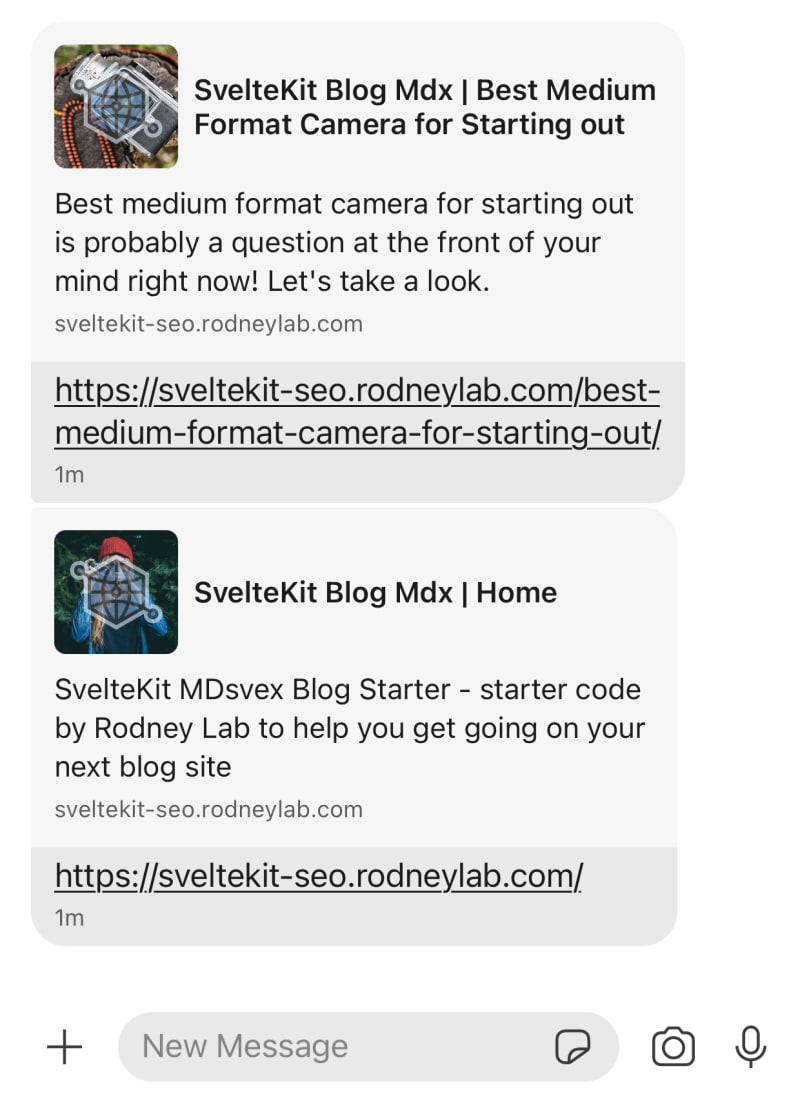
This is a screenshot from the Signal messaging app, showing some shares of pages from our test site. I added the Open Graph logo overlay in the image itself, just to make it easier to which images are used where. The Signal App uses our preferred titles and descriptions as well as the nicely cropped square image because we include the right Open Graph meta. Now you have an idea of what we can achieve shall we take a look at how to do it?
🧑🏽🎓 Open Graph Metadata
Let's start by looking at some general Open Graph tags you can use on any page of your site. Following that we look at some more specific to blog posts. Finally we will look at nailing Open Graph SEO SvelteKit social images.
Although Open Graph protocol was developed at Facebook, it has become widely adopted and is used by other apps (as we saw with Signal above). The Twitter tags we looked at in the earlier post look similar to Open Graph ones. In fact the Twitter protocol is loosely based on the Open Graph one. As mentioned in the previous SvelteKit SEO post, you can omit some of the Twitter tags if you include the equivalent Open Graph Tag. As an example you can drop the second tag below and Twitter would knows to use the first one:
<meta property="og:title" content={pageTitle} />
<meta name="twitter:title" content={pageTitle} />
General Open Graph Meta
The Open Graph tags you would use on any page of your site are:
og_site_name: This is just the name of your site.og:locale: This is the language the shared page is written in. If you skip it, Facebook will assume content is written in American English (en_US), so Americans can leave this one out. If you do need this tag, it should be inlanguage_TERRITORYformat. I write my posts in British English so useen_GB.og:url: The url of the shared page.og:type: Usearticlehere for blog posts andwebsitefor other website pages.og:title: This is an SEO title and will typically be show in the share card. We can set this it to the page title used in the HTML head section (we discussed this in the earlier SvelteKit SEO post).og:description: You can set this to the page's meta description (see previous post).fb:app_id: Although you might see this on other pages, it is no longer best practise to include it. It is safe to ignore the warning when testing with Facebook Sharing Debugger (explained in more detail further down).
Article Open Graph Meta
We will take a look at how to integrate that meta into your SvelteKit site in a moment. First, though, here are some additional metadata you can use on article or blog post pages:
article:publisher: if you have a company Facebook page, set this to the URL of your Facebook company page.article:author: similar to publisher above, but this time you use the personal Facebook page of the author.article:published_time: use the ISO 8601 date and time format. I set this to the time the article was first published. You generate a date in the right format from the terminal with thedatecommand. To make life easier, I added the alias code below into my~/.zshrcfile and then just type the commandtimestampwhenever I need to invoke it:
function timestamp {
        ts=$(echo -n $(date +"%Y-%m-%dT%H:%M:%S.000%z"))
        echo -n $ts | pbcopy
        echo \$ts
}
This also copies the timestamp to the clipboard. Keen to hear other methods you have for generating timestamps.
-
article:modified_time: what you would expect it to be (also in ISO 8601 format).
🖼 Open Graph Images
The world of Open Graph images is not a simple one. You can include multiple images in the meta (this is in addition to the Twitter one we looked at previously), however the order you include them in can affect which ones are used. This is because there is a patchwork of policies on which Open Graph image to use for different apps. Taking this into account, the best strategy is probably to optimise for the apps most used by your audience.
I found what works well for me is to use a Facebook optimised image first and then a square one afterwards. For the first one, I use a 1200 px × 627 px image. Wire and Facebook use this. The second is a square, 400 px × 400 px image. WhatsApp and Signal pick the square image. Telegram, Slack and Discord use the Twitter image. You may get slightly different results if you change the order you include the tags in. Let me know if there's a popular app I have forgotten to mention. We will see how to include the meta next.
🖥 Open Graph SEO in SvelteKit: The Code
So we've gone through what we need to include. Let's look at an example of how we code it up. We will look at a blog post. To make it more concrete we will use the SvelteKit MDsveX blog template.
Step zero is to create the images. You can generate them automatically, though I prefer to crop them myself in a photo editing app to ensure I get a good crop. If you are cropping images automatically, be sure to check the auto images look good. For the test site I used images with no text. For your own site you might want to generate a set of template images (one for each aspect ratio) then programmatically add text to customise them for each page or blog post. Be sure to use the Rainbow tool to make sure you have a decent contrast ratio between any text and the background image if you do this.
Next we crack open some code. To specify which images we want to appear in social shares we use the frontmatter section of each blog post's markdown file:
ogImage: 'https://rodneylab-climate-starter.imgix.net/best-medium-format-camera-for-starting-out-open-graph.jpg?ixlib=js-3.2.1&w=1200&h=627&s=3bd576df666fae35a312ed02425aac25'
ogSquareImage: 'https://rodneylab-climate-starter.imgix.net/best-medium-format-camera-for-starting-out-open-graph-square.jpg?ixlib=js-3.2.1&w=400&h=400&s=ab8c1d3f5139d9f48578baba97549f14'
twitterImage: 'https://rodneylab-climate-starter.imgix.net/best-medium-format-camera-for-starting-out-twitter.jpg?ixlib=js-3.2.0&w=800&h=418&s=5a4968759b838f0209894062d815e045'
categories: ''
tags: ''
---
I am using Imgix to host the images,but you can host them anywhere you like. The images we specify in each post's markdown are used in the BlogPost template where they are passed to the SEO component along with other metadata from the frontmatter:
<script>
  import readingTime from 'reading-time';
  import BannerImage from '$lib/components/BannerImage.svelte';
  import SEO from '$lib/components/SEO/index.svelte';

  export let post;

  const timeToRead = Math.ceil(readingTime(post.body).minutes);
  const {
    datePublished,
    featuredImage,
    featuredImageAlt,
    featuredImageSrc,
    featuredImageSrcset,
    lastUpdated,
    ogImage,
    ogSquareImage,
    postTitle: title,
    seoMetaDescription: metadescription,
    slug,
    twitterImage = null,
  } = post;

  const ogImageObject = ogImage
    ? {
        url: ogImage,
        alt: featuredImageAlt,
      }
    : null;
  const ogSquareImageObject = ogSquareImage
    ? {
        url: ogSquareImage,
        alt: featuredImageAlt,
      }
    : null;
  const twitterImageObject = twitterImage
    ? {
        url: twitterImage,
        alt: featuredImageAlt,
      }
    : null;
  const bannerImageProps = {
    featuredImage,
    featuredImageAlt,
    featuredImageSrc,
    featuredImageSrcset,
  };
</script>

<SEO
  article={true}
  {slug}
  {title}
  {datePublished}
  {lastUpdated}
  {metadescription}
  {timeToRead}
  ogImage={ogImageObject}
  ogSquareImage={ogSquareImageObject}
  twitterImage={twitterImageObject}
/>
<BannerImage {...bannerImageProps} />
You will see we build up image objects containing the image and it's alt text to pass to the SEO component. We have included a fallback in case the images and alt were not given in the original markdown file. The next step in the chain is the SEO component which passes the relevant meta to its OpenGraph component:
<script>
  import website from '$lib/config/website';
  import { VERTICAL_LINE_ENTITY } from '$lib/constants/entities';
  import OpenGraph from './OpenGraph.svelte';
  import Twitter from './Twitter.svelte';

  const {
    author,
    facebookAuthorPage,
    facebookPage,
    ogLanguage,
    siteLanguage,
    siteTitle,
    siteUrl,
    twitterUsername,
  } = website;

  export let article = false;
  export let lastUpdated;
  export let datePublished;
  export let metadescription;
  export let slug;
  export let timeToRead = 0;
  export let title;

  const defaultAlt =
    'picture of a person with long, curly hair, wearing a red had taking a picture with an analogue camera';

  export let ogImage = {
    url: 'https://rodneylab-climate-starter.imgix.net/home-open-graph.jpg?ixlib=js-3.2.1&w=1200&h=627&s=81c4407df7d9782806b78d698dbcbc75',
    alt: defaultAlt,
  };
  export let ogSquareImage = {
    url: 'https://rodneylab-climate-starter.imgix.net/home-open-graph-square.jpg?ixlib=js-3.2.1&w=400&h=400&s=f98299427341f6f66d1c2460bad224e2',
    alt: defaultAlt,
  };
  export let twitterImage = {
    url: 'https://rodneylab-climate-starter.imgix.net/home-twitter.jpg?ixlib=js-3.2.0&w=800&h=418&s=1b08b7276d34486234a4e2c1ccb49a74',
    alt: defaultAlt,
  };

  const pageTitle = `${siteTitle} ${VERTICAL_LINE_ENTITY} ${title}`;
  const openGraphProps = {
    article,
    image: ogImage,
    squareImage: ogSquareImage,
    metadescription,
    ogLanguage,
    pageTitle,
    siteTitle,
    siteUrl,
    ...(article ? { datePublished, lastUpdated, facebookPage, facebookAuthorPage } : {}),
  };

  const twitterProps = {
    article,
    author,
    twitterUsername,
    image: twitterImage,
    metadescription,
    pageTitle,
    timeToRead,
    url: `${siteUrl}/${slug}`,
  };
</script>

<svelte:head>
  <title>{pageTitle}</title>
  <meta name="description" content={metadescription} />
  <meta
    name="robots"
    content="index, follow, max-snippet:-1, max-image-preview:large, max-video-preview:-1"
  />
  <html lang={siteLanguage} />
</svelte:head>
<Twitter {...twitterProps} />
<OpenGraph {...openGraphProps} />
Open Graph SEO in SvelteKit: The Svelte OpenGraph Component
The final piece of the puzzle is the OpenGraph component itself. This includes all the meta tags we mentioned above:
<script>
  export let article = false;
  export let datePublished;
  export let lastUpdated;
  export let facebookAuthorPage;
  export let facebookPage;
  export let image;
  export let squareImage;
  export let metadescription;
  export let ogLanguage;
  export let pageTitle;
  export let siteTitle;
  export let siteUrl;
</script>

<svelte:head>
  <meta property="og:site_name" content={siteTitle} />
  <meta property="og:locale" content={ogLanguage} />
  <meta property="og:url" content={siteUrl} />
  <meta property="og:type" content={article ? 'article' : 'website'} />
  <meta property="og:title" content={pageTitle} />
  <meta property="og:description" content={metadescription} />
  {#if image}
    <meta property="og:image" content={image.url} />
    <meta property="og:image:width" content="1200" />
    <meta property="og:image:height" content="627" />
    <meta property="og:image:alt" content={image.alt} />
  {/if}
  {#if squareImage}
    <meta property="og:image" content={squareImage.url} />
    <meta property="og:image:width" content="400" />
    <meta property="og:image:height" content="400" />
    <meta property="og:image:alt" content={image.alt} />
  {/if}
  {#if article}
    <meta property="article:publisher" content={facebookPage} />
    <meta property="article:author" content={facebookAuthorPage} />
    <meta property="article:published_time" content={datePublished} />
    <meta property="article:modified_time" content={lastUpdated} />
  {/if}
</svelte:head>
We include the two images mentioned earlier. In the generated page you might get problems generating WhatsApp social images if, in the page's HTML head section, the Open Graph image tags come after the first <style> tag. I checked the generated code and this is not an issue here, using SvelteKit. If you are using other frameworks though, and have WhatsApp issues, it is worth checking and re-ordering the elements if needed.
💯 Open Graph SEO in SvelteKit: Test
As always our last step is to test this all works. As with the Twitter meta, there is a tool for checking Open Graph meta. This is the Facebook Sharing Debugger. To use it, you will need to have a Facebook account and to log in.
You can ignore the warning about the missing fb:app_id property (see above).
🙌🏽 Open Graph SEO in SvelteKit: Wrapup
That's it for this post. We looked at:
- what Open Graph SEO meta you should include in your website pages and posts,
- how to generate Open Graph SEO in SvelteKit,
- testing you Open Graph metadata.
In the previous post on SvelteKit SEO, as well as an introduction to SEO in general, we looked at adding SEO meta for Twitter, which is used for Twitter, Slack and other apps. In the next post in the series we will step up a gear and look at the more advanced Schema.org meta you can start including on your site pages. SchemaOrg is a protocol designed to let browsers understand what a website page is about. Using it can lead to higher ranking in Google and more prominent display of your page in search results pages. Looking forward to running through this!
You can see the code for the story so far on the Rodney Lab Git Hub repo.
🙏🏽 Open Graph SEO in SvelteKit: Feedback
Please send feedback! Have you found the post useful? Would you like to see posts on another topic instead? Get in touch with ideas for new posts. Also if you like my writing style, get in touch if I can write some posts for your company site on a consultancy basis. Read on to find ways to get in touch, further below. If you want to support posts similar to this one and can spare a couple of dollars, rupees, euros or pounds, please consider supporting me through Buy me a Coffee.
Finally, feel free to share the post on your social media accounts for all your followers who will find it useful. As well as leaving a comment below, you can get in touch via @askRodney on Twitter and also askRodney on Telegram. Also, see further ways to get in touch with Rodney Lab. I post regularly on SvelteKit as well as other topics. Also subscribe to the newsletter to keep up-to-date with our latest projects.


Top comments (0)