In case it helped :)
![]()
We will cover briefly:
- What is MVVM
- Using MVVM in Flutter
- Extending MVVM with Repository and Services
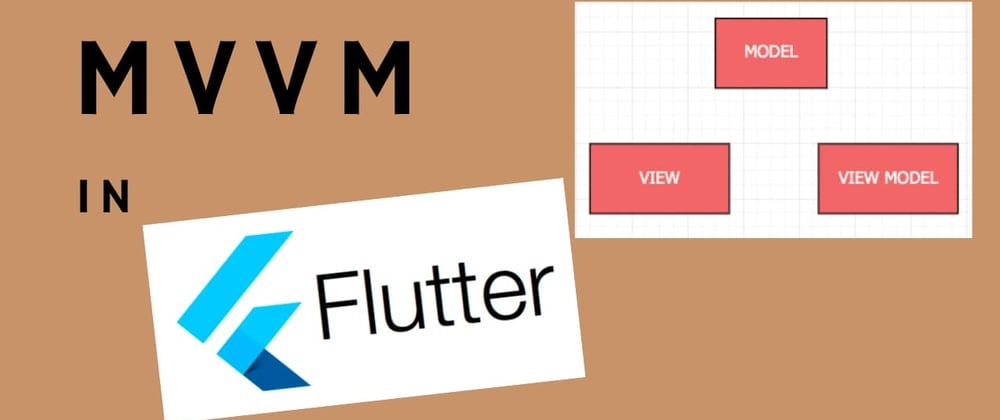
What is MVVM
Model-View-ViewModel (MVVM) is a software architectural pattern that supports the separation of the UI (which is View) from the development of the business logic or the backend logic (Model). The view model inside MVVM is the bridge responsible for the conversion of data in a way that behaves in accordance with the changes happening on the UI
In addition, to know about the responsibilities of the three components, it’s also important to understand how the components interact with each other. At the highest level, the view “knows about” the view model, and the view model “knows about” the model, but the model is unaware of the view model, and the view model is unaware of the view.

There are several advantages of using MVVM:
- Separation of Concerns: It is a design principle for separating a computer program into distinct sections such that each section addresses a separate concern. A concern is anything that matters in providing a solution to a problem.
- Improved Testability
- Defined Project Structure
- Parallel development of UI
- Abstract the View, thus reducing the quantity of business logic required in the code behind it
Some disadvantages of using MVVM:
- It has a slightly steep learning curve. How all the layers work together may take some time to understand.
- It adds a lot of extra classes, so it’s not ideal for low-complexity projects.
Since architectural or design patterns are platform-agnostic, they can be used with any framework, in our case Flutter.
Components
Model: This is basically the domain model or the model which represents the data from your backend (aka data access layer). Models hold information, but typically don’t handle behavior. They don’t format information or influence how data appears. The Model in the MVVM design pattern represents the actual data that will be used in application development
View: This is basically the only part of the application users actually interact with. For instance, the user presses the button, scrolls the list, edits the settings, etc and these events are then forwarded to the view model which then does the processing and returns the expected user response (which is some form of UI). It’s important to remember the View isn’t responsible here for handling the state.
A
Viewshould be as dumb as possible. Never put your business logic inViews.
View Model: The ViewModel acts as an intermediate between the View and the Model, in such a way that it provides data to the UI. The ViewModel may also expose methods for helping to maintain the View’s state, update the model based on the action’s on a View, and trigger events on the View. For Flutter, we have a listener called ChangeNotifier that allows ViewModel to inform or update the View whenever the data get updated.
The ViewModel has basically two responsibilities:
- it reacts to user inputs (e.g. by changing the model, initiating network requests, or routing to different screens)
- it offers output data that the View can subscribe to
In summary, the ViewModel sits behind the UI layer. It exposes data needed by a View and can be viewed as the source our Views go to for both data and actions.
What is ChangeNotifier?
ChangeNotifier is a class that provides change notifications to its listeners.
As per the official documentation
A class that can be extended or mixed in that provides a change notification API using VoidCallback for notifications.
It is O(1) for adding listeners and O(N) for removing listeners and dispatching notifications (where N is the number of listeners).
There are several ways to consume the change notifier in Flutter.
- Using
.addListenermethod, as the ChangeNotifier is a type of Listenable. - Using the combination of
ChangeNotifierProvider, Consumer, and Provider. These all capabilities are provided to us by the Provider package.
We will use approach 2
In the real world, other classes can listen to an ChangeNotifier object. When the change notifier gets updated values, it can call a method called notifyListenersand then any of its listeners will receive the updated val
class Person extends ChangeNotifier {
  Person({this.name, this.age});
  final String name;
  int age;

  void increaseAge() {
    this.age++;
    notifyListeners();
  }
}
void main() {
  runApp(
    ChangeNotifierProvider(
      create: (_) => Person(name: "Joe", age: 28),
      child: MyApp(),
    ),
  );
}
Inside the app, any class that listens to this Person will be notified in case the age changes. Internally, notifyListeners calls the registered listeners.
Using MVVM in Flutter
Flutter is declarative in nature. This means that Flutter builds UI by overriding your build methods to reflect the current state of your app:
UI = fn(state)
According to the Flutter documentation, the state is described as “ data you need to rebuild your UI at any point in time.”
A state can either be contained in a single widget, known as a local state. Flutter provides inbuilt classes and methods to deal with self-contained states like StatefulWidget and setState.
However, a state that has to be shared across different widgets is known as an app state. It is at this point we introduce state management tools.
We will be using Provider for the state management.
Let’s say you were to architect an application that includes only the below screen. How would you do?
Hint: Using MVVM

- Each screen should comprise its own folder. Create a folder called
homewhich contains a view calledhome_view
Naming convention: Each screen is called view and the file is suffixed with _view The view will be listening to the changes happening on the view model, using the Consumer
- Each view should have a view model associated with it. Create a file called
home_view_modelwhich will be responsible for accepting the user interactions, processing them by running some business logic, and finally responding back.
Naming convention: Each screen has a view model associated with it and the file is suffixed with _view_model The view model notifies the changes to the UI (if any) using the notifyListeners
- Assuming the button calls some API (more on that later) and responds back with some response. This response should be converted as a model suffixed with
_modeland returned from the view model to the view.
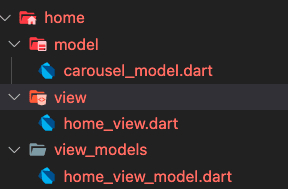
This is the basics of MVVM, as we can see in the screenshot above. This can be replicated for all the screens of your app. Now, let’s see slight addition on top of this structure.
Extending MVVM with Repository and Services
In the real world, our app needs to interact with APIs or 3rd party integrated services. So here we introduce something called as Repository .
A repository pattern provides an abstraction of data so that your application can work with a simple abstraction that has an interface. Using this pattern can help achieve loose coupling. If implemented correctly, the Repository pattern can be a great way to ensure you follow the Single Responsibility Principle for your data access code
Some benefits of using the Repository pattern:
- Separate the business logic for accessing external services.
- Makes mocking easier and allows to do unit tests.
- We can easily switch data sources without doing time-consuming code changes
Some disadvantages of using the Repository pattern:
- Adds another layer of abstraction which adds a certain level of complexity making it overkill for small applications.
Continuing with the previous example, let’s say our button needs to call an API, let’s implement it using Repository pattern.
Dart has no interfaces like Java but we can create it with an abstract class. We begin by creating an abstract class that defines the interface for our home_repo
abstract class HomeRepository {
  Future<CarouselModel> fetchData();
}
This abstract class helps to create a boundary, and we are free to work on either side of that boundary. We could work on implementing the home repository (
recommended), or we could just use the implementation directly in our app (not recommended).
Here, the HomeRepository has only one method which is fetchData and this method returns the response as a model called CarouselModel
Next, let’s implement the HomeRepository
class HomeRepositoryImpl extends HomeRepository {
  @override
  Future<CarouselModel> fetchData() async {
    await Future.delayed(const Duration(milliseconds: 1800));
    final resp = await rootBundle.loadString('assets/data/first_screen.json');
    return carouselModelFromJson(resp);
  }
}
Inside the method fetchDatawe introduce a delay and then load the data from the assets which is a JSON file. This delay is basically a substitute for calling the API, but I hope I am able to convey my thoughts to the reader.
As your application grows, you may find yourself adding more and more methods to a given repository. In this scenario, consider creating multiple repositories, and keeping related methods together.
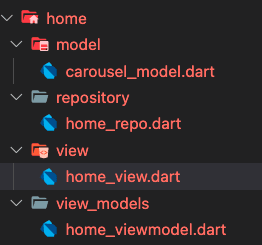
So till now, we have
-
carousel_modelrepresenting the Model (M) -
home_viewrepresenting the View (V) -
home_view_modelrepresenting the View Model (VM) -
home_reporepresenting the Repository
Register the Repository
Since our repository is ready, now we need to figure out how to register it and make it available inside our app. This is the time we introduce another concept called DI aka Dependency Injection. We make use of the package get_it As per the documentation:
This is a simple Service Locator for Dart and Flutter projects with some additional goodies highly inspired by Splat. It can be used instead of
InheritedWidgetorProviderto access objects e.g. from your UI.
GetIt is super fast because it uses just an Map<Type> inside which makes access to it O(1). GetIt itself is a singleton so you can access it from everywhere using its instance property (see below).
We install get_it it by including it inside the pubspec.yaml as
dependencies:
  get_it: ^7.2.0
Typically at the start of your app, you register the types that you want later access from anywhere in your app. After that, you can access instances of the registered types by calling the locator again.
The nice thing is you can register an interface or abstract class together with a concrete implementation. When accessing the instance you always ask for the interface/abstract class type. This makes it easy to switch the implementation by just switching the concrete type at registration time.
We create a file called as locator.dart inside which we will instantiate the object of get_it
final GetIt locator = GetIt.instance;
void setupLocator() {
  locator.registerFactory<HomeRepository>(() => HomeRepoImpl());
  // Alternatively you could write it
  GetIt.I.registerFactory<HomeRepository>(HomeRepoImpl());
}
As Dart supports global variables we assign the GetIt instance to a global variable to make access to it as easy as possible.
Although GetIt is a singleton we will assign its instance to a global variable locator to minimize the code for accessing GetIt. Any call to locator in any package of a project will get the same instance of GetIt.
Next, we use the locator and use the registerFactory to register our HomeRepository
Provider as an alternative to GetIt
The provider is a powerful alternative to GetIt. But there are some reasons why people use GetIt for Dependency injection:
- Provider needs a
BuildContextto access the registered objects, so you can’t use it inside business objects outside the Widget tree or in a pure dart package. - The provider adds its own Widget classes to the widget tree that are no GUI elements but are needed to access the in Provider registered objects.
Testing Repository
You can implement unit testing for different elements of your Flutter applications, such as widgets, controllers, models, services, and repositories. It’s possible to unit-test repository-based Flutter codebases with the following strategies:
- Implement a mock repository class and test the logic
- You don’t need to implement mock classes by yourself — the Mockito package helps you to generate them quickly and automatically.
Integrate Repository in ViewModel
Now comes the time to use the Dependency Injection. But before that let’s see what is it.
When class A uses some functionality of class B, then its said that class A has a dependency of class B.
Before we can use methods of other classes, we first need to create the object of that class (i.e. class A needs to create an instance of class B).
So, transferring the task of creating the object to someone else and directly using the dependency is called dependency injection.

Benefits of using DI
- Supports Unit testing.
- Boilerplate code is reduced, as initializing of dependencies is done by another component (
locatorin our case) - Enables loose coupling.
Drawbacks of using DI
- It’s complex to learn, and if overused can lead to management issues and other problems.
- Many compile time errors are pushed to run-time.
Coming back to our application, let’s see how we integrate.
class HomeViewModel extends ChangeNotifier {
  HomeViewModel({
    required this.homeRepo,
  });
  final HomeRepository homeRepo;
}
Here, we create a constructor inside our HomeViewModel and specify the homeRepo as our required parameter. This way we direct that whosoever needs access to our view model will first have to pass the homeRepo
Initialize the service locator
You need to register the services on app startup, so you can do that in main.dart
Replace the standard
void main() => runApp(MyApp());
with the following:
import 'locator.dart';

void main() {
  // INIT SERVICE LOCATOR
  setupLocator();

  runApp(MyApp());
}
This will register any services you have with GetIt before the widget tree gets built.
And if we recall, our homeRepo was registered inside the locator So in order to declare our view model, we follow this
Future<void> main() async {

  setupLocator();
  runApp(
    MultiProvider(
      providers: [
        ChangeNotifierProvider(
          create: (_) => HomeViewModel(repo: locator<HomeRepo>()),
        ),
      ],
      child: MainApp(),
    ),
  );
}
Inside our main we call the setupLocator which is the method that comprises all the registered dependencies under locator.dart
Next, inside our MultiProvider, we specify the HomeViewModel under the ChangeNotifierProvider
ChangeNotifierProvider creates a ChangeNotifier using
createand automatically disposes it when it is removed from the widget tree.
Using ViewModel inside the View
We have our repository registered and passed as a required parameter to our view model. Let’s see how to use the view model inside our view.
There are two ways to access the view model inside the view
- Using the
Consumer<T>widget. - Using the
Provider.of<T>(context).
late HomeViewModel viewModel;
@override
void initState() {
  viewModel = Provider.of<HomeViewModel>(context, listen: false);
  WidgetsBinding.instance.addPostFrameCallback((_) {
    viewModel.fetchData();
  });
  super.initState();
}
We instantiate the viewModel using Provider. of inside the home_view
The Provider.of<T>(context) is used when you need to access the dependency but you don’t want to make any changes to the User Interface. We simply set the listen: false signifying that we don’t need to listen to updates from the ChangeNotifier. The listen: false parameter is used to specify whenever you're using Provider to fetch an instance and call a method on that instance.
Note: We can also use the below
viewModel = context.read<HomeViewModel>();
For reacting to the changes which happen to viewModel we use the Consumer when we want to rebuild the widgets when a value changes. It is a must to provide the type so that the Provider can understand which dependency you are referring to.
Consumer<HomeViewModel>(
    builder: (_, model, child) {
     // YOUR WIDGET
    },
    child: // SOME EXPENSIVE WIDGET
)
The Consumer widget doesn’t do any fancy work. It just calls Provider.of in a new widget, and delegates its build implementation to the builder.
The Consumer widget takes two parameters, the builder parameter and the child parameter (optional). The child parameter is an expensive widget that does not get affected by any Change in the ChangeNotifier.
This builder can be called multiple times (such as when the provided value change) and that is where we can rebuild our UI. The Consumer widget has two main purposes:
- It allows obtaining a value from a provider when we don’t have a BuildContext that is a descendant of said provider, and therefore cannot use Provider. of.
- It helps with performance optimization by providing more granular rebuilds.
Unit tests for the view model (Optional)
You can mock dependencies by creating an alternative implementation of a class by making use of the Mockito package as a shortcut.

What are Services
Services are normal Dart classes that are written to do some specialized task in your app. The purpose of a service is to isolate a task, especially third-party packages that are volatile, and hide its implementation details from the rest of the app.
Some common examples you might create a service to handle:
- Using a 3rd party package, for instance, read and write to local storage (shared preferences)
- Using Cloud Providers like Firebase or some other third-party package.
Let’s say you’re using package_info to get the package details of your app.
You use the package directly inside the app and after some time you found an even great package. You go through and replace all the references of package_infowith the new package some_great_package. This was surely a waste of your time and effort.
Let’s say the product owners found, that no user was using this feature, instead, they request a new feature. You go through and remove all the references with the some_great_package This was again a waste of your time and effort.
The point is when you have tight coupling to some function scattered around your code, it makes it difficult and error-prone to change.
Clean coding takes upfront time and effort but will save you more time and effort in the long run.
This is where services come in. You make a new class and call it something like PackageInfoService. The rest of the classes in the app don’t know how it works internally. They just call methods on the service to get the result.
abstract class PackageInfoService {
  Future<String> appVersion();
}
class PackageInfoServiceImpl implements PackageInfoService {
  @override
  Future<String> appVersion() async {
    final packageInfo = await PackageInfo.fromPlatform();
    String version = packageInfo.version;
    String build = packageInfo.buildNumber;
    return 'v$version ($build)';
  }
}
- This makes it easy to change. If you want to switch
package_infoto asome_great_packagejust alter the code inside the service class. Updating the service code automatically affects everywhere the service is used inside the app. - Supports swapping around implementations. You can create a “fake” implementation that just returns hard-coded data, while the other team is finalizing/developing the service implementation.
- Sometimes the implementation may rely on other services. For example, you
xyzServicemight use a service for making a network call to get other types of data.
Register your service
Using a service locator like GetIt is a convenient way to provide services throughout your app
- We use the
locatorto register ourPackageInfoService - We will be registering
PackageInfoServiceas a lazy singleton. It only gets initialized when it’s first used. If you want it to be initialized on app startup, then useregisterSingleton()it instead. Since it’s a singleton, you’ll always have the same instance of your service.
void setupLocator() {
locator.registerLazySingleton<PackageInfoService>(() =>
PackageInfoServiceImpl());
}
Using the service
Since we registered the service using the GetIt, we can get a reference to the service from anywhere in the code
class MyClass {
  PackageInfoService packageService = locator<PackageInfoService>();
}
Then you can use it within that class like this:
packageService.getSomeValue()-
packageService.doSomething(someValue)
Unit tests for the service (Optional)
You can mock dependencies by creating an alternative implementation of the service class by making use of the Mockito package.
Brief:
- A
repositoryis for accessing objects in a collection-like manner. - A
serviceis a class with methods for executing business logic, that may coordinate various other services (such as multiple repositories) to perform a single action or get a single result.
In case it helped :)
![]()


Oldest comments (2)
simple explained, thank you
I think this wonderfully explains about MVVM with flutter. Excited to put it into action soon!