Dealing with Apple is a pain, ask any devs around. So I'll be writing a quick guide to setup Apple Sign in a couple of minutes (depending on Apple 🤷♂️)

├── Setting Up Developer Portal
├── Setting Up React.js
├── Setting Up Node
├── Setting Up React-Native
Setting Up Developer Portal:
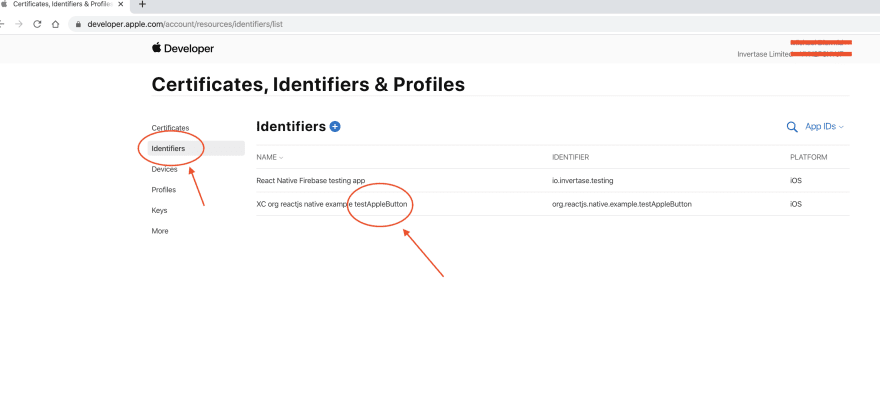
First, sign in to the Apple Developer Portal and enroll if you have not already, and then click on Certificates, Identifiers and Profiles.

Setting up App ID
From the sidebar, choose Identifiers then click the blue plus icon.

PS. If you have already set up your react-native-app you'll see a different screen. Choose the right Bundle ID only and go to Adding Sign-in Capability.
Choose App ID
Now, Choose App IDs in this first step.

Now, choose a description and Bundle ID for the App ID. It is best when it’s a reverse-dns style string. So my suggestion, if www.example.com is your web-app URL, com.example.app can be your Bundle ID.

Add Capability
You’ll also want to scroll down through the list of capabilities and check the box next to Sign In with Apple and Enable it as Primary App ID.
![]()
Setting up Service ID
Now Go ahead and create a new identifier and choose Services IDs.

In the next step, you’ll define the name of the app that the user will see during the login flow, as well as define the identifier which becomes the OAuth client_id.
You can set it as app.example.com as com.example.app is used for Bundle ID.
PS. Make sure to also check the Sign In with Apple checkbox.

You’ll also need to click the Configure button next to Sign In with Apple in this step. This is where you’ll define the domain your app is running on, as well as define the redirect URLs used during the OAuth flow.

PS. Apple doesn’t allow localhost URLs in this step. You have to use a real domain here or use Ngrok.
Go ahead and click Save and then Continue and Register until this step is all confirmed.
Setting up Private Key
You actually have more steps to do generate Key. Either follow the guide by Aaron Parecki or hop on:
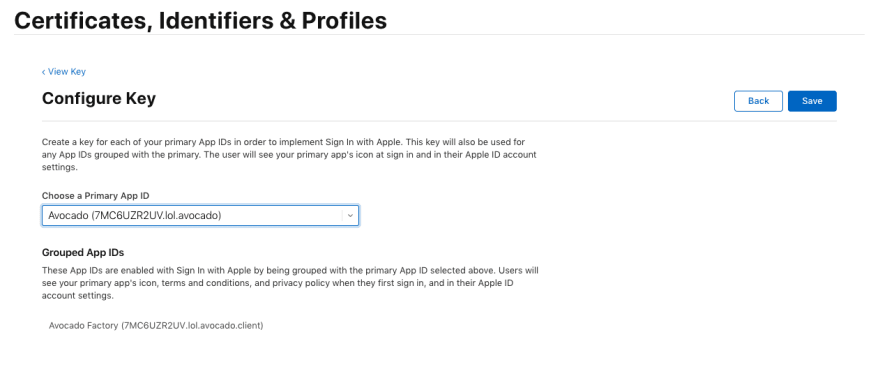
Back in the main Certificates, Identifiers & Profiles screen, choose Keys from the side navigation.

Click the blue plus icon to register a new key. Give your key a name, and check the Sign In with Apple checkbox.

Click the Configure button and select the primary App ID you created earlier.
Apple will generate a new private key for you and let you download it only once. Make sure you save this file because you won’t be able to get it back again later. Then, press Done.

Setting Up React.js:
Damn, long process right? Bare with me, now is the easier part. The first thing you need to do is add the apple script. We use scriptjs for that.
Init AppleID
scriptjs.get('https://appleid.cdn-apple.com/appleauth/static/jsapi/appleid/1/en_US/appleid.auth.js', () => {
  const params = {
    clientId: 'app.example.com',
    redirectURI: 'https://www.example.com/apple/callback',
    scope: 'name email',
  };
  window.AppleID.auth.init(params);
});
SignIn AppleID
Next, create a button with onClick function <button onClick={() => window.AppleID.auth.signIn()}/>

It'll open the Apple View, it's different on Safari however, but I'll be attaching the Screenshot of other browsers here:


Now, after continuing, it'll forward a POST request 🤦♂️. We know to handle it inside React/Next is a task on its own.
Setting Up Node:
So, we define the route /apple/callback on the backend and redirect to /app route being handled in the frontend.
app.use('/apple/callback', function(req, res) {
  console.log(req.body);
});
Handling JWT
We have the id_token and code inside body. If you want to validate the user using code, please follow the guide by Arjun Komath
cause we'll only be using id_token.
You have two ways of getting the user. Since the id_token is just a jwt we can:
- Extract the JWT
- Validate the JWT
Extract JWT
const getAppleUserId = async token => {
  const parts = token.split('.');
  try {
    return await JSON.parse(new Buffer(parts[1], 'base64').toString('ascii'));
  } catch (e) {
    return null;
  }
};

app.use('/apple/callback', function(req, res) {
  const user = await getAppleUserId(req.body.id_token);
  console.log(user);
});
Validate the JWT
import axios from 'axios';
import NodeRSA from 'node-rsa';
import jsonwebtoken from 'jsonwebtoken';

async function _getApplePublicKeys() {
  return axios
    .request({
      method: 'GET',
      url: 'https://appleid.apple.com/auth/keys',
    })
    .then(response => response.data.keys);
}

const getAppleUserId = async token => {
  const keys = await _getApplePublicKeys();
  const decodedToken = jsonwebtoken.decode(token, { complete: true });
  const kid = decodedToken.header.kid;
  const key = keys.find(k => k.kid === kid);

  const pubKey = new NodeRSA();
  pubKey.importKey(
    { n: Buffer.from(key.n, 'base64'), e: Buffer.from(key.e, 'base64') },
    'components-public'
  );
  const userKey = pubKey.exportKey(['public']);

  return jsonwebtoken.verify(token, userKey, {
    algorithms: 'RS256',
  });
};

app.use('/apple/callback', function(req, res) {
  const user = await getAppleUserId(req.body.id_token);
  console.log(user);
});
Where,
-
_getApplePublicKeysis just fetching the multiple keys fromhttps://appleid.apple.com/auth/keys. - Decode the
id_tokento extract the kid and extract the exact key which matches thekidofid_token. - Build the RSA and verify the
jwt.
Forwarding to Frontend
Then, you can forward the user details by sending the data as:
app.use('/apple/callback', function(req, res) {
  const user = await getAppleUserId(req.body.id_token);
  res.redirect(303, 'https://www.example.com/app?user=${JSON.stringify(req.body.id_token)}');
});
Now, define a route /app inside react.js and then, on useEffect or componentDidMount just use query-string to get the user.
const user = queryString.parse(location.search).user;
console.log(JSON.parse(user));
PS. You can also set the cookie on the backend and parse it using react-cookie.
Setting Up React-Native:
It's fairly simple on the react-native though with the introduction of react-native-apple-authentication package.
You can just follow the Initial-Setup Guide or hop on:
Add Sign-in capability
Taking into consideration that you already have Target setup on XCode with bundle id com.example.app, just add the Sign In with Apple capability inside:

PS. You need a valid team, however, once you set it you will see a screen similar to this:

Now, if you have not followed the guide from above you need to have your AppID setup in Identifiers. Follow the guide above for AppID only and come back here.
Note: Enable the APP ID as a primary if not already and click the Save button.
Now that you have everything set up, just add the package:
yarn add @invertase/react-native-apple-authentication
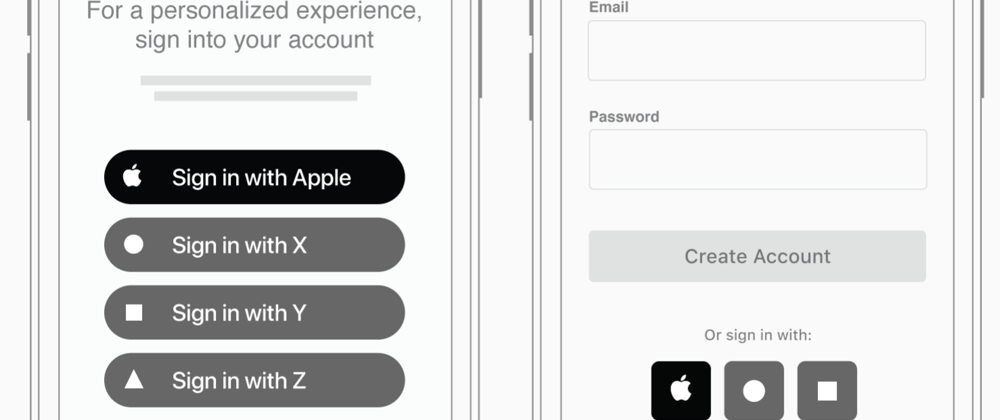
And then use the AppleButton where you can add custom-styles as well. On pressing the button, we call a function to extract the identityToken with scope of for email and name.
import { Platform } from 'react-native';
import appleAuth, {
  AppleButton,
  AppleAuthRequestScope,
  AppleAuthRequestOperation,
} from '@invertase/react-native-apple-authentication';

const appleAuth = () => {
  const token = appleAuth
    .performRequest({
      requestedOperation: AppleAuthRequestOperation.LOGIN,
      requestedScopes: [
        AppleAuthRequestScope.EMAIL,
        AppleAuthRequestScope.FULL_NAME,
      ],
    })
    .then(
      res => {
        return res.identityToken;
      },
      error => {
        console.log(error);
      }
    );
  console.log(token);
  // TODO: Send the token to backend
};

export const appleButton = () => {
  return (
    <>
      {Platform.OS === 'ios' && (
        <AppleButton
          buttonType={AppleButton.Type.CONTINUE}
          onPress={() => appleAuth()}
        />
      )}
    </>
  );
};
Now that we have the token, we send it to our node-backend. However, above we are handling for the condition of callback_url and POST Request. Here, we'll use the same logic of getAppleUserId, so we'll just send the token to /apple/login backend route as:
import HttpStatus from 'http-status-codes';

app.use('/apple/login', function(req, res) {
  const user = await getAppleUserId(req.body.token);
  res.status(HttpStatus.OK).json({ user });
});
Where,
-
getAppleUserIdis defined above. Just have a look at it where we eitherextractorvalidatethejwtand extract the data.
Next, we forward the user back to react-native-client.
Conclusion
Setting it up is definitely not easy and requires patience. It took a lot of time for us as well and we intend to solve it for you. There might be some grammatical mistakes or logic issues here and there, do let me know if you find it.
Thanks for giving this a read. We will continue to keep you posted on the updates and cool stuff.
Until next time 👋


Top comments (7)
Great write up. Thank you, @aryaminus .
I will add a tad more information. When the Apple Sign In was introduced, developers had the option of receiving
id_tokenandcodevia URL fragment or query, besidesform_poston the redirect URL.But then Apple has changed it. Now,
id_tokenandcodeare only sent viaform_postto the redirect URL.Another tidbit is that you can get a "Sign in with Apple" button, which conforms to the Apple human interaction guidelines by adding a
divwith id"appleid-signin". Apple's JS will automatically replace it with a button.Hi how to handle the form_post ?
i try to fetch the redirect URL, but nothing is shown on console
Wow. Great content. Thanks for taking your time to post it!
you made my day! Thanks!
Hey is there a way to handle this in a popup rather than going to their site ?, I need to handle some state and this logic won't help me :((
Hi Mihir!
You have to add
usePopup: trueinside the params object passed toAppleID.auth.init.If the signIn function started the authorization process, the function returns a promise object that resolves if the authorization succeeds, or rejected if fails.
try {const data = await AppleID.auth.signIn()
} catch ( error ) {
//handle error.
}
Hope this helps!
Nice article @aryaminus .
As I need to know is there any whole project you posted anywhere because it will help to know more about the execution flow. If yes please share it.