
Many variables — such as your users' device type and configuration, external hosting services, and third-party libraries — can impact an application's performance. Without a performance monitoring system in place, numerous problems can arise. These issues could even mean that users stop using your application.
AppSignal provides application performance monitoring (APM) — with features such as error tracking, performance monitoring, host monitoring, anomaly detection, and uptime monitoring — to help you track errors and monitor your app's performance.
In this article, we will set up AppSignal for a NestJS application and give some tips for tracking errors using AppSignal.
Let's get started!
Initializing a NestJS Application
NestJS is a framework for building Node.js server-side applications. NestJS is built with Typescript and supports Typescript right out of the box, but it still enables developers to write pure JavaScript code. It provides a layer of abstraction over HTTP server frameworks like Express (the default) or Fastify and exposes the API so developers can integrate many of NestJS’ third-party modules.
You can install a NestJS TypeScript starter project on your machine by running the following:
git clone https://github.com/nestjs/typescript-starter.git sample_app
cd sample_app
npm install
Configuring AppSignal for NestJS
If you don’t have an AppSignal account, create one, then run the command below to install and configure AppSignal in your app.
npx @appsignal/cli install
This will install the necessary packages and you'll be asked for a configuration method. Select the Using the appsignal.cjs configuration file option.
The CLI tools will generate a configuration file named appsignal.cjs in the src/ directory.
The configuration that's generated includes:
- a valid Push API key
- an application name
- setting
activeto true
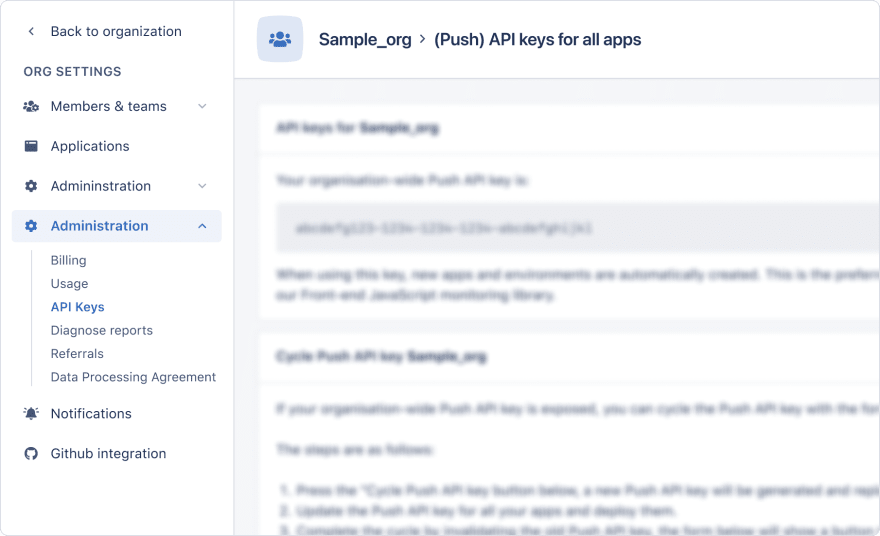
You can get the Push API key from your AppSignal account by clicking through to Organization Settings → Administration → API Keys.
In this article, we will call our application "sample_app".
NestJS Error Tracking with AppSignal
The AppSignal for Node.js package automatically instruments NestJS. This command starts the application in development mode with hot code reloading and uses --require to preload appsignal.cjs at startup:
npx nest start --watch --exec "node --require ./src/appsignal.cjs"
You should add the --require flag to any script that starts your app. For our demo, we'll only add it to start:dev:
You can also include the command above as a script in your package.json.
{
  "scripts": {
    // ...
    "start:dev": "nest start --watch --exec \"node --require ./src/appsignal.cjs\""
    // ...
  }
}
Then start your application by running the command.
npm run start:dev
AppSignal tracks any errors raised by your NestJS application and will start collecting metrics immediately.
To test this, update the getHello() method in the app.service.ts file to raise an error.
// src/app.service.ts
import { Injectable } from "@nestjs/common";

@Injectable()
export class AppService {
  getHello(): string {
    throw new Error("SOME SAMPLE ERROR");
    // return 'Hello World';
  }
}
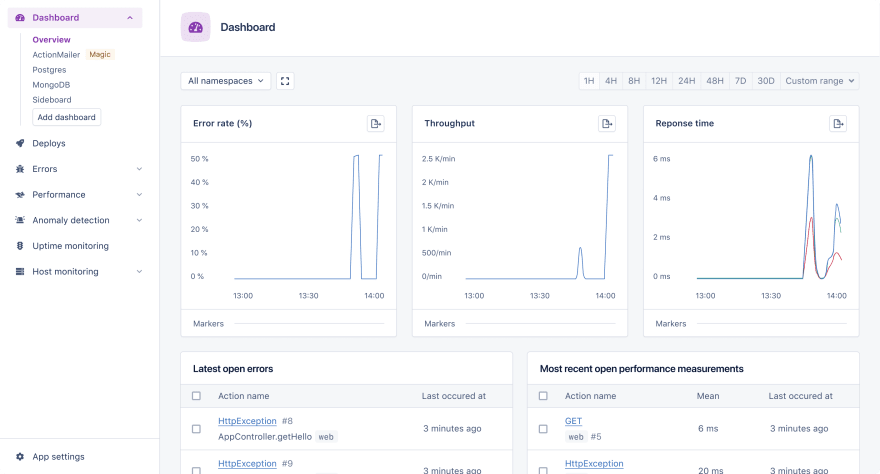
Then open http://localhost:3000 in your browser, so your application raises an error. Go to your dashboard on AppSignal and click on Overview:

AppSignal's error tracking provides different insights that help keep your application under control. The dashboard overview gives simple but powerful visuals for important metrics like:
- Error rate
- Throughput
- Response time
- Worst 10 hosts by
And more!
When you click on an error listed in the Latest open errors section, this opens a page that contains further details to help with debugging.
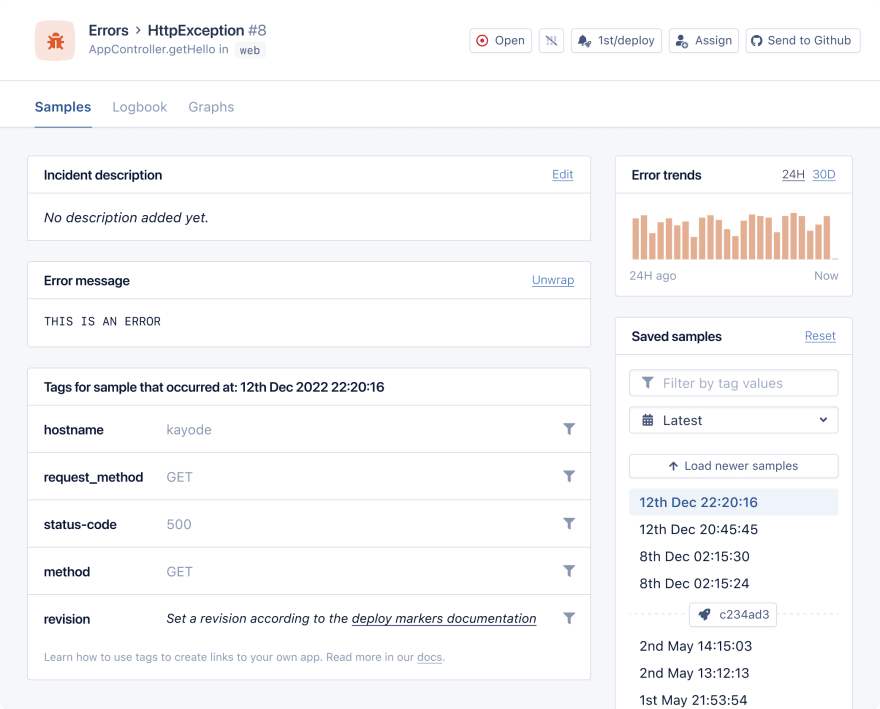
Using this information, you can:
- see the host's state on the day the error occurred
- find out more about the request environment or request headers
- backtrace the error via its callstack, etc.
You can also integrate personal issue trackers or GitHub to assign issues and manage errors.
Read more about AppSignal for Node.js.
Handling Errors with AppSignal
There are situations where you'll want AppSignal to ignore some errors raised by your application — for instance, exceptions raised by bots using your app.
To do this, you can add the ignoreErrors property to the configuration object in appsignal.cjs. ignoreErrors takes an array of specific error names.
const { Appsignal } = require("@appsignal/nodejs");

new Appsignal({
  // ...
  ignoreErrors: ["SpecificError", "AnotherError", "SomeError"],
});
To handle exceptions in your application, use the sendError method provided by the @appsignal/node package to record an incident.
NestJS has a built-in exceptions layer that automatically processes unhandled exceptions in your app. It catches unhandled errors and sends appropriate user-friendly responses. As we've seen, such errors are also tracked and reported by AppSignal.
You may want full control over the exceptions layer to customize the content of the response you send to the client. You can use the ExceptionFilter class from @nestjs/common for this.
Create a new file called appsignalexception.filter.ts in the src/exception_filters/ directory and copy the code below into the file.
import {
  ExceptionFilter,
  Catch,
  ArgumentsHost,
  HttpException,
} from "@nestjs/common";
import { sendError } from "@appsignal/nodejs";
import { Response } from "express";

@Catch(HttpException)
export class AppSignalExceptionFilter implements ExceptionFilter {
  catch(exception: HttpException, host: ArgumentsHost) {
    const ctx = host.switchToHttp();
    const response = ctx.getResponse<Response>();
    const status = exception.getStatus();

    sendError(exception);

    //  handle the exceptions however you want: logging, additional info, HTTP response, etc.
    response.status(status).send("handle the error however you may want");
  }
}
The AppSignalExceptionFilter extends the ExceptionFilter class, overriding the catch method.
In the app service, update your app.service.ts file, so getHello raises an HttpException.
import { HttpException, Injectable } from "@nestjs/common";

@Injectable()
export class AppService {
  getHello(): string {
    throw new HttpException("THIS IS AN ERROR", 500 /* status code */);
  }
}
In the app's controller, make use of the exception filter by updating the app.controller.ts file.
import { Controller, Get, UseFilters } from "@nestjs/common";
import { AppService } from "./app.service";
import { AppSignalExceptionFilter } from "./exception_filters/appsignalexception.filter";

@Controller()
@UseFilters(new AppSignalExceptionFilter())
export class AppController {
  constructor(private readonly appService: AppService) {}

  @Get()
  getHello(): string {
    return this.appService.getHello();
  }
}
When you run the application, AppSignal will track incidents sent by the sendError method (see the 'latest open errors' part of the screenshot below):
Invite Team Members and Set Up Alerts for Errors in AppSignal
AppSignal can be utilized to manage a collaborative workflow including:
- assigning tasks to team members
- sending specific notifications to some team members
To add team members to your AppSignal application, click the App settings button on the bottom-left of your dashboard.
Then Team Permissions → Manage this team → Invitations.
AppSignal also provides a notification system that can send alerts via email and integrates with many communication tools like Slack, Discord, Microsoft Teams, etc.
AppSignal's alerts can be configured to suit your organization's workflow. For instance, if you mainly use Slack and email, you can configure your alert settings to send uptime monitoring alerts to every team member's emails and send error tracker metrics to a particular Slack channel.
Click on App settings and the Notifications option to access the configuration panel.
You can add integrations based on your workflow and configure older integrations.

AppSignal can also offer webhooks for notifications so you can create workflows, functions, and operations to handle the incidents occurring in your application. Read the docs to find out more about AppSignal webhooks.
Enable Uptime Monitoring in AppSignal
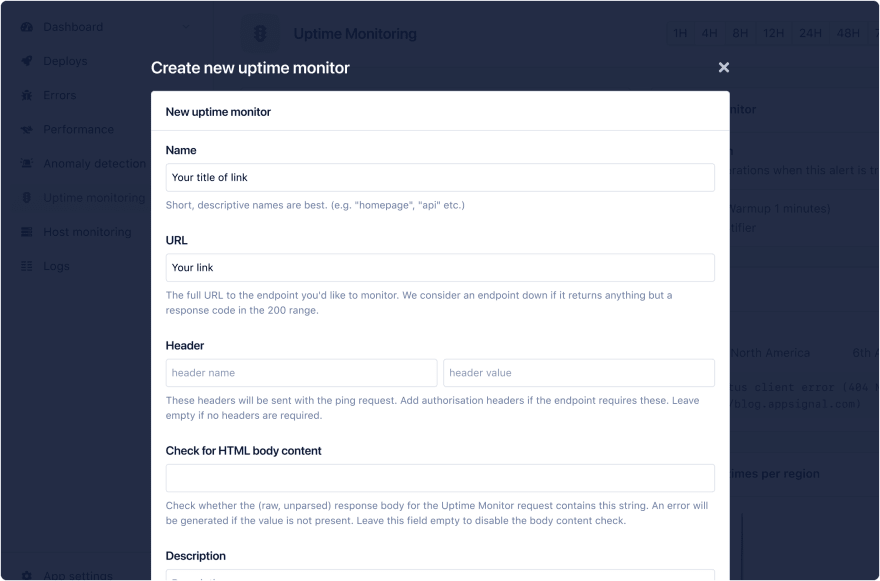
AppSignal’s uptime monitoring monitors when your application is down and alerts you. It checks URLs you provide and logs a given endpoint's performance in different regions.
AppSignal pings the given URL in multiple regions worldwide, and if there’s no response within 30 seconds from a region, it considers the application down in that region.
To create an uptime monitor, click the Add uptime monitor button on the Uptime Monitoring page and provide the necessary information.
Read more about uptime monitoring in AppSignal.
Check out Monitoring Your NestJS Application with AppSignal to learn more.
Wrapping Up
In this article, we installed AppSignal for a NestJS application. Then we explored how to:
- track errors and dig into error details
- set up alerts from AppSignal to track errors in a way that suits your workflow
- enable uptime monitoring for different URL endpoints
Happy debugging!
P.S. If you liked this post, subscribe to our JavaScript Sorcery list for a monthly deep dive into more magical JavaScript tips and tricks.
P.P.S. If you need an APM for your Node.js app, go and check out the AppSignal APM for Node.js.


Oldest comments (0)