
Writing tests for an application is the most difficult but necessary element of a development process. Tests ensure correct code maintenance and enhanced code quality.
In this tutorial, we’ll show the best way to handle side effects in your Node.js applications.
But first, let's define side-effects.
What Are Side-Effects?
While it is often a good idea to make your code as side-effect-free as possible, writing code with side effects is inevitable in most projects.
In programming, a function or expression is said to have a side effect if it uses or modifies some state outside of its scope, for example:
- reading/writing data to a file
- making a network request to an API
- calling another side-effecting function
Because of this, the result of calling a function with side effects is non-deterministic. This makes it harder to test the function than testing one that produces the same result, given the same inputs, and which does not modify any state outside its scope.
API Tests and Triggering Side-Effects
API tests assess whether an application is reliable, functional, performant, and secure. Three steps are required to complete these tests:
- Send a request with the required input data.
- Get a response.
- Verify that the response returned the expected output.
Every application has a server that responds to these requests, which can trigger side-effects on the front-end or back-end part of your application (by making API calls to the server or reading and writing to a file/database).
Traditionally, to manage these side-effects, you had to fake the I/O (Input/Output) activities by regularly altering your code to substitute the I/O with stub code.
But there is a better way: use a side-effect library!
What Is a Side-Effect Library?
A side-effect library is a Javascript library that allows you to write all side-effects to a single location and load the real/stub behavior during runtime.
Why Use Side-Effects for Your Node.js App?
There are a few benefits of using a side-effect library to test your Node.js application:
- It allows you to define the side-effects of each operation in your application.
- You don't have to deal with a mock API or set it up regularly.
- You have a single location where all of your app's side effects are stored (in DDD terminology, this is the infrastructure layer).
- Your program will be easy to test.
- You're creating documentation for your app's side-effects by creating the side-effects file.
Prerequisites
Before getting started with this tutorial, ensure you've met the following requirements:
- You have Node.js installed
- You have Postman installed
- You have prior knowledge of Typescript
Configuring Typescript
To demonstrate how you can use side effects in your application, we'll create a Node.js server that will power a todo application and create side effects for the application.
We'll start by configuring Typescript for the project. Install Typescript globally with the command below:
npm install -g typescript
Then create a project folder and a tsconfig.json file for Typescript configuration with the commands below:
mkdir side-effect-demo && cd side-effect-demo
tsc --init
Now, replace the content in the tsconfig.json file with the following configurations.
{
    "compilerOptions": {
      "target": "es2015",                                  /* Set the JavaScript language version for emitted JavaScript and include compatible library declarations. */
      "module": "commonjs",                                /* Specify what module code is generated. */
      "rootDir": "./",                                     /* Specify the root folder within your source files. */
      "outDir": "./dist",                                  /* Specify an output folder for all emitted files. */
      "esModuleInterop": true,                             /* Emit additional JavaScript to ease support for importing CommonJS modules. This enables `allowSyntheticDefaultImports` for type compatibility. */
      "forceConsistentCasingInFileNames": true,            /* Ensure that casing is correct in imports. */
      "strict": true,                                      /* Enable all strict type-checking options. */
      "skipLibCheck": true,

    },
}
Setting Up a Node.js Server
With Typescript configured for the project, we'll initialize a Node.js project with the command below.
npm init -y
The above command will create a package.json file to store your project dependencies. Now install the required dependencies and devDependencies with the command below:
npm i express side-effect-js && npm i -D typescript tsc ts-node-dev @types/express @types/node
Once the installation is completed, create an index.ts file. Update the script in the package.json file with the following configurations.
"scripts": {
  "dev": "ts-node-dev --clear index.ts",
  "build": "tsc",
  "start": "node dist/index.js"
},
Now create an Express server in the index.ts file with the code snippet below:
import express, { Express } from "express";
const app: Express = express();

app.listen(3000, () => {
  console.log("Server is running on port 3000");
});
Then run this command on your terminal to start the server.
npm run dev
This will run the server in development mode and enable hot reloading to reflect recent changes to the application.
Creating Side-Effects
Right now, we should create the business logic for the application. But instead of using the MVC method, we'll use the side-effect approach. To do that, create a new file called side-effect.ts in the root directory of your project. Add this code snippet to the side-effect.ts file.
import SideEffectJS from "side-effect-js";

const todos = [
  {
    id: 1,
    text: "Learn JavaScript",
    completed: true,
  },
  {
    id: 2,
    text: "Learn React",
    completed: false,
  },
  {
    id: 3,
    text: "Learn Redux",
    completed: false,
  },
];

type Todos = {
  id: number,
  text: string,
  completed: boolean,
};
In the above code snippet, we import SideEffectJS, create todos dummy data, and a Todos type which will serve as the model for the todos.
Now, let's create a side-effect, get and create a todo. Every side-effect has a real function, a mock function, and an id. An id must be unique to each side-effect.
//all todos
const getTodosReal = (): Todos[] => {
  return todos;
}
const getTodoMock = (): Todos[] => {
  return todos
}

//create Todo
const addTodoReal = (todo: Todos): Todos[] => {
  todos.push(todo);
  return todos;
}
const addTodoMock = (todo: Todos): Todos[] => {
  todos.push(todo);
  return todos;
}
const AllTodos = SideEffectJS.CreateEffectTyped<Todos, Todos[]>('all-todos', getTodosReal, getTodoMock);
const AddTodo = SideEffectJS.CreateEffectTyped<Todos, Todos[]>('add-todo', addTodoReal, addTodoMock);

export default [AllTodos, AddTodo];
Here, we create real and mock functions to get and create a todo. Then we use CreateEffectTyped to create side-effects for the functions. We also specify the T and R types in the CreateEffectTyped method — the mock and real functions get (T), and the expected results for both the mock and real function (R). Finally, we export the side effects.
Creating API Routes
Now that we have created the side-effects for the application, let's define the API routes to use them. First, we need to import the side-effect module and the side-effects we just created into our root index.ts file.
...
import SideEffectJS from "side-effect-js";
import sideEffect from "./side-effect";
Then we need to load our side-effects, get the side-effects using their respective ids, and assign them to a variable.
...
SideEffectJS.Load(sideEffect);

const getTodos = SideEffectJS.Get('all-todos');
const createTodo = SideEffectJS.Get('add-todo');
Next, we need to define two API routes and call them with the code snippet below.
app.use(express.json());
app.get("/api/todo", async (req, res) => {
  res.json({ data: await getTodos() });
});

app.post("/api/todo", async (req, res) => {
  res.json({ data: await createTodo(req.body) });
});
We parse incoming JSON requests, put the parsed data in req, and define the API routes.
Testing the API for Your Node.js App
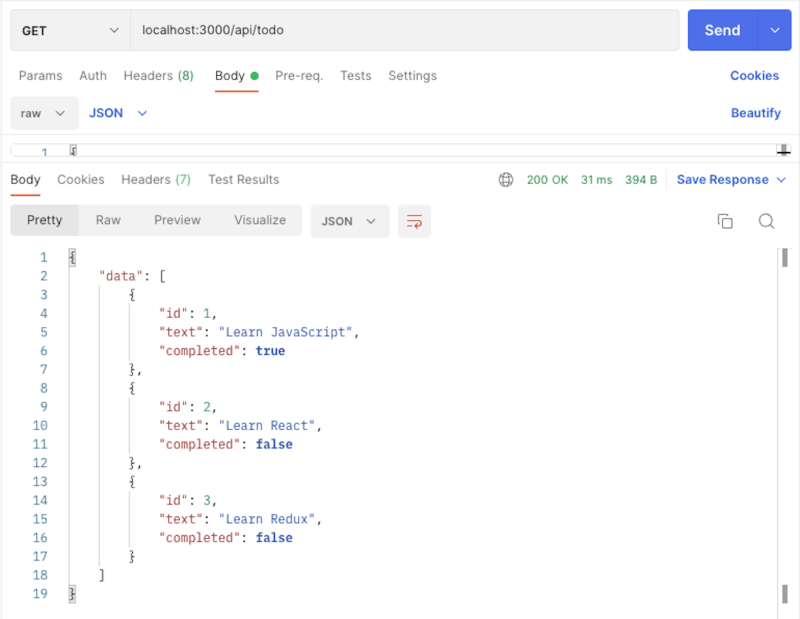
Now that we've created the API for the application, let's test it out. Launch Postman and send a GET request to the URL localhost:3000/api/todo to get the todos.
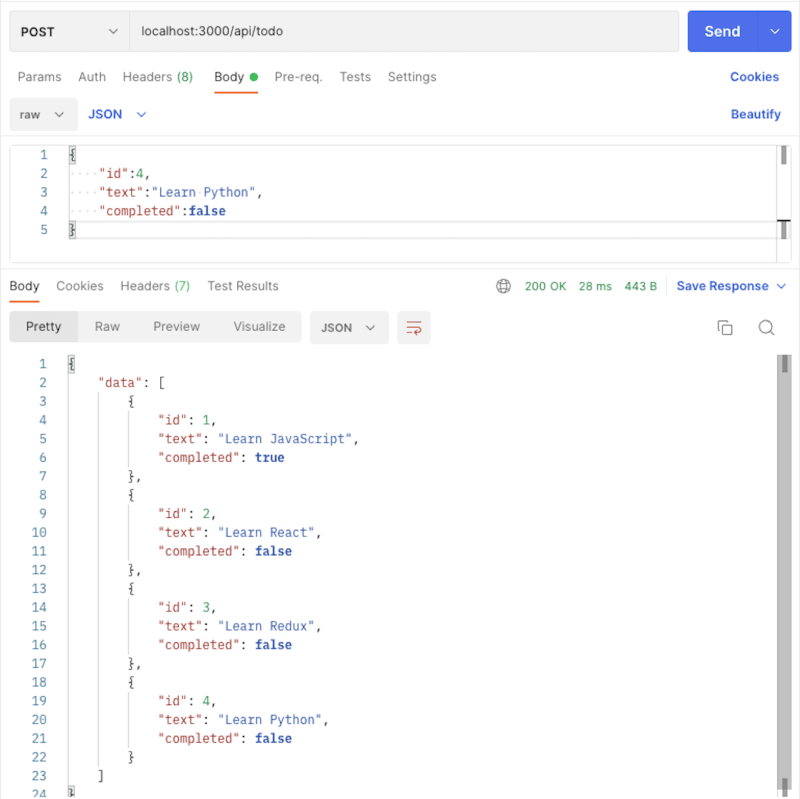
Then send a POST request, and add the following JSON data to the request body.
{
    "id":4,
    "text":"Learn Python",
    "completed":false
}
Wrap-Up: Test Your Node.js App with Side-Effects
In this tutorial, we've learned how to test a Node.js application using side effects. We started by defining a side-effect library and touched on why you would use it. Then we created a todo application.
I hope this post has helped you uncover how best to test your Node.js application. Learn more about side effects from the documentation.
Until next time, happy coding!
P.S. If you liked this post, subscribe to our JavaScript Sorcery list for a monthly deep dive into more magical JavaScript tips and tricks.
P.P.S. If you need an APM for your Node.js app, go and check out the AppSignal APM for Node.js.


Oldest comments (0)