
Introduction
The CNCF has been hard at work over the past few years pushing cloud-native technology to new heights. Many of the graduated projects have become household names for engineers working at all levels. Projects such as Prometheus and Fluentd are being used in production as we speak to solve the most pressing issues at scale.
While we all may know about the graduated projects, I'm here to tell you about a less commonly known project that is currently in the Sandbox stage known as Falco.
About Falco
Falco is a behavioral activity monitor designed to detect anomalous activity in your applications. Using powerful system call capture technology originally built by Sysdig. Falco lets you continuously monitor and detect container, application, host, and network activity, all in one place, from one source of data, with one set of rules.
What kind of behavior can Falco detect?
Falco can detect and alert on any behavior that involves making Linux system calls. Falco alerts can be triggered by the use of specific system calls, their arguments, and by properties of the calling process. For example, you can easily detect when:
- A shell is run inside a container
- A server process spawns a child process of an unexpected type
- A sensitive file, like
/etc/shadow, is unexpectedly read - A non-device file is written to
/dev - A standard system binary (like
ls) makes an outbound network connection
Think of it as a proximity alarm for your infrastructure!
How to use Falco
Falco is deployed as a long-running daemon which you can install as a Debian/rpm package on a regular host or container host, you can deploy it as a container, or you can build it from source.
Falco is configured via (1) a rules file that defines which behaviors and events to watch for and (2) a general configuration file. Rules are expressed in a high-level, human-readable language known as YAML
Falco alerts
When Falco detects suspicious behavior, it sends alerts via one or more channels:
- Writing to standard error
- Writing to a file
- Writing to Syslog
- Pipe to a spawned program. A common use of this output type would be to send an email for every Falco notification.
Installing Falco
Install Falco directly on Linux via a scripted install, package managers, or configuration management tools like Ansible. Installing Falco directly on the host provides:
- The ability to monitor a Linux host for abnormalities. While many use cases for Falco focus on running containerized workloads, Falco can monitor any Linux host for abnormal activity, containers (and Kubernetes) being optional.
Separation from the container scheduler (Kubernetes) and container runtime. Falco running on the host removes the container scheduler from the management of the Falco configuration and Falco daemon. This can be useful to prevent Falco from being tampered with if your container scheduler gets compromised by a malicious actor.
Scripted install
- To install Falco on Linux, you can download a shell script that takes care of the necessary steps:
curl -o install-falco.sh -s https://s3.amazonaws.com/download.draios.com/stable/install-falco
- Then verify the SHA256 checksum of the script using the sha256sum tool (or something analogous):
sha256sum install-falco.sh
It should be: ecd5517492ebb356b820f404aea4afcb9d2d81bf98c55a8174b050c5bbc7092a.
- Then run the script either as root or with sudo:
sudo bash install-falco.sh
Package install
- RHEL
Trust the Draios GPG key and configure the yum repository:
rpm --import https://s3.amazonaws.com/download.draios.com/DRAIOS-GPG-KEY.public
curl -s -o /etc/yum.repos.d/draios.repo https://s3.amazonaws.com/download.draios.com/stable/rpm/draios.repo
Install the EPEL repository:
Note — The following command is required only if DKMS is not available in the distribution. You can verify if DKMS is available using yum list dkms. If necessary, install it using:
rpm -i https://mirror.us.leaseweb.net/epel/6/i386/epel-release-6-8.noarch.rpm
Install kernel headers:
Warning — The following command might not work with any kernel. Make sure to customize the name of the package properly.
yum -y install kernel-devel-$(uname -r)
To uninstall, run yum erase falco.
- Debian
Trust the Draios GPG key, configure the apt repository, and update the package list:
curl -s https://s3.amazonaws.com/download.draios.com/DRAIOS-GPG-KEY.public | apt-key add -
curl -s -o /etc/apt/sources.list.d/draios.list https://s3.amazonaws.com/download.draios.com/stable/deb/draios.list
apt-get update
Install kernel headers:
Warning — The following command might not work with any kernel. Make sure to customize the name of the package properly.
apt-get -y install linux-headers-$(uname -r)
Install Falco:
apt-get install -y falco
To uninstall, run apt-get remove falco
Config Management Systems
You can also install Falco using configuration management systems like Puppet and Ansible.
Puppet
A Puppet module for Falco, sysdig-falco, is available on Puppet Forge.
Ansible
@juju4 has helpfully written an Ansible role for Falco, juju4.falco. It’s available on GitHub and Ansible Galaxy. The latest version of Ansible Galaxy (v0.7) doesn’t work with Falco 0.9, but the version on GitHub does.
Running Falco as a service
Once you’ve installed Falco as a package, you can start the service:
service falco start
The default configuration logs events to syslog.
The current version of Falco is available as the falcosecurity/falco:0.18.0 container. Here’s an example command to run the container locally on Linux:
docker run \
  --interactive \
  --privileged \
  --tty \
  --name falco \
  --volume /var/run/docker.sock:/host/var/run/docker.sock \
  --volume /dev:/host/dev \
  --volume /proc:/host/proc:ro \
  --volume /boot:/host/boot:ro \
  --volume /lib/modules:/host/lib/modules:ro \
  --volume /usr:/host/usr:ro \
  falcosecurity/falco:0.18.0
By default, starting the container will attempt to load and/or build the Falco kernel module. If you already know that the kernel module is loaded and want to skip this step, you can set the environment variable SYSDIG_SKIP_LOAD to 1:
docker run ... -e SYSDIG_SKIP_LOAD=1 ... falcosecurity/falco:0.18.0
Example Behavior
Here is an example of a type of behavior that Falco can detect. In this case, notifying when a shell is run in a container, which you could then follow up on by taking action through serverless (FaaS) frameworks, or other automation.
- macro: container
  condition: container.id != host

- macro: spawned_process
  condition: evt.type = execve and evt.dir=<

- rule: run_shell_in_container
  desc: a shell was spawned by a non-shell program in a container. Container entrypoints are excluded.
  condition: container and proc.name = bash and spawned_process and proc.pname exists and not proc.pname in (bash, docker)
  output: "Shell spawned in a container other than entrypoint (user=%user.name container_id=%container.id container_name=%container.name shell=%proc.name parent=%proc.pname cmdline=%proc.cmdline)"
  priority: WARNING
Taking Action: Setting up alerts with Slack
Now that you've gotten Falco up and running, why don't we try and generate some dummy events and simulate a potential action we would have Falco take when triggered. In this scenario, we are going to use a handy daemon that the team at Sysdig created called falcosidekick. What it does is it essentially takes Falco event data and forwards it to different outputs.
Add config
You'll need to add a bit of config (adapted to your environment) to your falco.yaml :
json_output: true
json_include_output_property: true

program_output:
  enabled: false
  keep_alive: false
  program: "jq '{text: .output}' | curl -d @- -X POST https://hooks.slack.com/services/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"
Running falcosidekick
To get started, let's go ahead and pull the image from Docker Hub:
docker pull falcosecurity/falcosidekick:2.11.0
You'll have to explicitly append a tag to the command since for whatever reason there is no latest tag in the repo.
Next, you'll obviously want to run the image, specifying either env variables or a config file in a .yaml format. The command using env variable should look something like this:
docker run -d -p 2801:2801 -e SLACK_WEBHOOKURL=XXXX -e DATADOG_APIKEY=XXXX falcosecurity/falcosidekick:2.11.0
If you decide to go with a config file, you can find a sample file here.
Pushing dummy event data to Slack
Before we push any data, you'll want to create a sandbox workspace and app with incoming webhooks enables as described here.
Once you have your webhook from that setup, go ahead and run the Falco Event Generator image to begin generating dummy events to alert Slack:
docker pull sysdig/falco-event-generator
docker run -it --name falco-event-generator sysdig/falco-event-generator
It is strongly recommended that you run the event generator in a container as it modifies files and directories below /bin, /etc, /dev, etc.
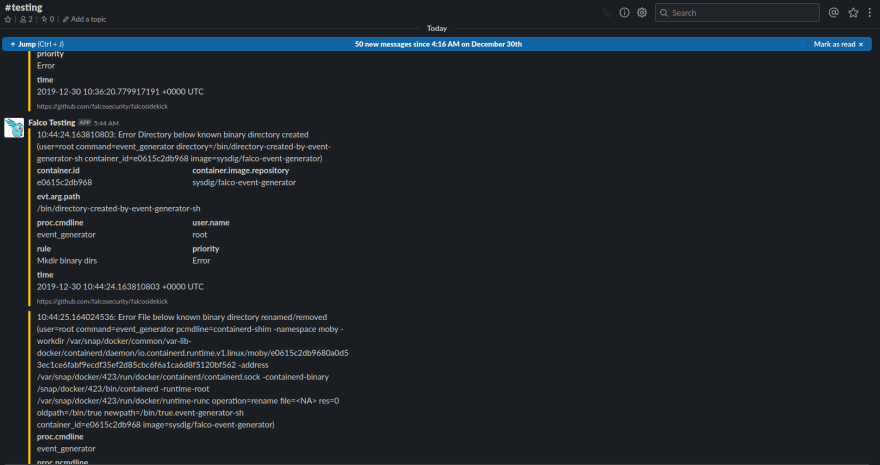
Once you've gotten that spun up, you should see the event being generated to Slack, like in this screenshot:
All Done!
Well, there you have it! You've now gotten a crash course in Sysdig's real-time threat monitoring framework and alerting solution. I found this to be a really cool tool for the DevSecOps landscape and I'm even thinking about trying to spin up an Alexa skill for alerts with this. My mind is buzzing thinking about the applications. It really is like a proximity alarm for your infrastructure.


Top comments (0)