INTRO
Ok we made pure GTK keyboard with GTK buttons in previous post. Maybe it is a good idea to compare two ways of developing a small keyboard.
Now we gonna make the same using external markdown file, let’s call it grid.ui and it is too huge to post it here. You can just grab it from my github.
If you are rookie like me you can ask “why should we use extra file if we can use GTK only?” I guess we may have at least two reasons:
1) It helps to move some part of GUI stuff to the markdown file to make our code easy to read.
2) Some functions work different in different cases, and it’s interesting how we can use it.
By the way: pure GTK buttons are not scalable by default, but this ones are.
Some things I’ve explained in the previous post, so I just show you what we need in our project.
Open Cargo.toml and add list of crates
[dependencies]
gtk = "0.15.5"
glib = "0.15.10"
chrono = "0.4.19"
We won’t change main.rs file
use gtk::prelude::*;

mod buttons;

fn main() {
    let application =
        gtk::Application::new(Some("com.github.gtk-rs.examples.grid"), Default::default());

    application.connect_activate(buttons::build_ui);
    application.run();
}
We are starting buttons.rs with only few lines of code.
use gtk::prelude::*;
use gtk::{ApplicationWindow, Builder};
pub fn build_ui(application: >k::Application) {
let glade_src = include_str!("grid.ui");
let builder = Builder::from_string(glade_src);
let window: ApplicationWindow = builder.object("window").expect("Couldn't get window");
window.set_application(Some(application));
// We are gonna add our buttons and functions here
window.show_all();
}
If you cargo run it you will see all the elements attached to the grid, because all of them are created in a markdown src/grid.ui file. All we need – just connect this file
let glade_src = include_str!("grid.ui");
Then send glade_src to Builder as a string slice &str.
let builder = Builder::from_string(glade_src);
And connect to ApplicationWindow
let window: ApplicationWindow = builder.object("window").expect("Couldn't get window");
One more time:
1) Create markdown file with all elements you need
2) Bind it to variable
3) Send this variable to GTK builder
4) Connect it with ApplicationWindow
Let’s look at pure GTK again (do not add this code into our current project)
    let window = gtk::ApplicationWindow::new(application);
    window.set_title("Studying GTK");
    window.set_default_size(200, 120);
    let grid = gtk::Grid::builder()
        .margin_start(7)
        .margin_end(7)
        .margin_top(7)
        .margin_bottom(7)
        .halign(gtk::Align::Center)
        .valign(gtk::Align::Center)
        .row_spacing(7)
        .column_spacing(7)
        .build();
    window.set_child(Some(&grid));
See the difference? We have to create window, then make grid and connect to our window. Let’s get back to our current project.
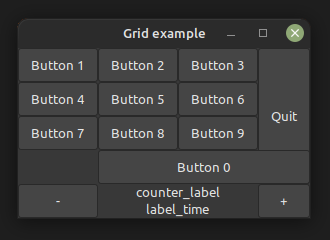
We are using markdown file and it should look like on the screenshot below. This is a bunch of useless buttons because Rust doesn’t know they exist. As I said before – it’s just a string slice of our markdown file content. We have to explain Rust how to use it. And here we need class id.
<object class="GtkButton" id="button0">
Let’s look at it closer in the next chapter.
1. Sliding button
Update your dependencies and let’s connect a grid.
use gtk::glib;
use gtk::prelude::*;
use gtk::{ApplicationWindow, Builder};
use gtk::{Button, Grid};
First we need a variable of type Grid. It calls gtk::Builder and method object() which receives some “grid”. What is that?
let grid: Grid = builder.object("grid").expect("Couldn't get grid");
This is the class and id. Class tells what kind of element it is. Id is a unique identifier of this very element. For example it can be element of type ”GtkGrid” with id “grid”.
<object class="GtkGrid" id="grid">
As you remember we told Builder that our GUI stored inside grid.ui file
let glade_src = include_str!("grid.ui");
let builder = Builder::from_string(glade_src);
Now gtk::Builder can find element by it’s id inside the markdown file and bind function to it. And we gonna do it right now.
Let’s create button0 and call it by id “button0”.
let button0: Button = builder.object("button0").expect("Couldn't get button0");
Now we can add function to it by calling connect_clicked().
    button0.connect_clicked(glib::clone!(@weak grid => move |button| {
        let left_attach = grid.cell_left_attach(button);
        let new_left_attach = if left_attach == 2 { 0 } else { left_attach + 1 };
        grid.set_cell_left_attach(button, new_left_attach);
    }));

    window.show_all();
}
We are using glib::clone! To make a clone and @weak or @strong (looks like both do the same in this case) to tell Rust what type of clone we want to use. Then we are moving type button into closure and returning it at the end with a new position in the grid.
Here we are declaring two variables: left_attach and new_left_attach. After starting the application the first variable contains 1.
The value of new_left_attach depends on if else condition. Each click increases left_attach by 1. As soon as it getting 2, else condition makes it equal 0. Try to change conditions,
<property name="left_attach">1</property>
and button0 width.
Ok, now Button 0 slides right each time we click on it.
2. Numeric buttons
I told you gtk::Builder can bind function to element’s id but it also can send data. Let’s add numeric buttons and made them change their own labels.
Connect buttons using their id
    let button1: Button = builder.object("button1").expect("Couldn't get button1");
    let button2: Button = builder.object("button2").expect("Couldn't get button2");
    let button3: Button = builder.object("button3").expect("Couldn't get button3");
    let button4: Button = builder.object("button4").expect("Couldn't get button4");
    let button5: Button = builder.object("button5").expect("Couldn't get button5");
    let button6: Button = builder.object("button6").expect("Couldn't get button6");
    let button7: Button = builder.object("button7").expect("Couldn't get button7");
    let button8: Button = builder.object("button8").expect("Couldn't get button8");
    let button9: Button = builder.object("button9").expect("Couldn't get button9");
Add some function that gonna set button’s label to numerical letter after button has been clicked on. Notice we don’t have to use curly braces in this case. Also we don’t need glib::clone! because we don’t move any data inside the closure. Method set_label() sets new label.
    button1.connect_clicked( move |button| button.set_label("I") );
    button2.connect_clicked( move |button| button.set_label("II") );
    button3.connect_clicked( move |button| button.set_label("III") );
    button4.connect_clicked( move |button| button.set_label("IV") );
    button5.connect_clicked( move |button| button.set_label("V") );
    button6.connect_clicked( move |button| button.set_label("VI") );
    button7.connect_clicked( move |button| button.set_label("VII") );
    button8.connect_clicked( move |button| button.set_label("VIII") );
    button9.connect_clicked( move |button| button.set_label("IX") );
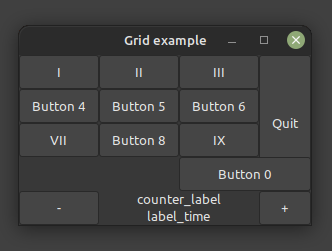
Run and behold! Numeric buttons 1-9 change their labels after first click.
3. Quit button
Another dependency
use glib::clone;
In this case @weak and @strong are the same. Probably. Still not sure how it works.
Declare quit_button with type of Button. Pay attention at object() name! Here we are calling object by it’s id. In previous chapter |button| was a type not a data. But now we need glib::clone! because we move window inside the closure to destroy it.
    let quit_button: Button = builder.object("quit_button").expect("Couldn't get quit_button");
    quit_button.connect_clicked(clone!(@weak window => move |_|
        unsafe {
            window.destroy()
        }
    ));
Let’s compare it with no markdown file project from my previous post (do not add this code into our current project). As you can see, here we are creating button themselves.
let quit_button = gtk::Button::with_label("Quit");
Connecting function,which is completely the same as before…
    quit_button.connect_clicked(clone!(@weak window => move |_|
        unsafe {
            window.destroy()
        }
    ));
and attaching it to grid.
grid.attach(&quit_button, 3, 1, 1, 4);
The difference is: 1) declaring 2) attaching
4. Updating label
Now make label receiving data by clicking button.
Hope you have noticed when we are using external markdown file, type annotations needed. We have to tell to compiler – this is a GTK object of type Label.
let counter_label: gtk::Label = builder.object("GtkLabel_1").expect("Couldn't get GtkLabel_1");
Declaring minus_button and plus_button is the same as before, nothing special.
let minus_button: Button = builder.object("minus").expect("Couldn't get minus");
let plus_button: Button = builder.object("plus").expect("Couldn't get plus");
Functions would be hundred percent the same as we made in pure GTK project.
    plus_button.connect_clicked(glib::clone!(@weak counter_label => move |_| {
        let nb = counter_label.text()
            .parse()
            .unwrap_or(0.0);
        counter_label.set_text(&format!("{}", nb + 1.1));
    }));
    minus_button.connect_clicked(glib::clone!(@weak counter_label => move |_| {
        let nb = counter_label.text()
            .parse()
            .unwrap_or(0.0);
        counter_label.set_text(&format!("{}", nb - 1.2));
    }));
Now buttons work and send data to label.

5. Timer
Bring a new path into scope.
use chrono::Local;
At the end list of paths looks like this.
use gtk::glib;
use glib::clone;
use gtk::prelude::*;
use gtk::{ApplicationWindow, Builder};
use gtk::{Button, Grid};
use chrono::Local;
Declare time variable like we did it on a previous project.
let time = format!("{}", Local::now().format("%Y-%m-%d %H:%M:%S"));
But this part is different!
let label_time: gtk::Label = builder.object("GtkLabel_2").expect("Couldn't get GtkLabel_2");
label_time.set_text(&time);
Just compare with the similar part in previous project (do not add this code into our current project).
let label_time = gtk::Label::new(None);
label_time.set_text(&time);
grid.attach(&label_time, 0, 6, 4, 1);
This is the same as in the case with pure GTK grid.
    let tick = move || {
        let time = format!("{}", Local::now().format("%Y-%m-%d %H:%M:%S"));
        label_time.set_text(&time);
        // What is this?
        glib::Continue(true)
    };
    glib::timeout_add_seconds_local(1, tick);
Now cargo run it and you will see this. All the buttons work fine. Just one little detail left…

6. Entry doesn’t work!
As documented Entry should look like this, but unfortunately, I wasn’t able to get it to work
<object class="GtkEntry">
  <attributes>
    <attribute name="weight" value="PANGO_WEIGHT_BOLD"/>
    <attribute name="background" value="red" start="5" end="10"/>
  </attributes>
</object>
I spend some time trying to solve this riddle. I'll probably come back to this issue later.
CONCLUSION
There are still a few things here that I don't quite understand yet. And also there are some ideas that I can't implement right now. For example a built-in display or a save file button. But I think I will gradually figure this out as well.
Hope this post was useful and educational
Take care


Top comments (0)