
Collecting customer form data is a common task in web development. Contact forms make your site more professional and send a clear signal that you're interested in doing business with your potential clients. The lack of one could make your business seem outdated or unprofessional. People are more likely to patronize your products if you're highly accessible. This is a great way to increase your business's visibility.
Other reasons to implement a contact form:
- It makes your site more professional
- Security
- Makes yourself more reachable
- Automate email responses
Today, we will be learning how to insert customer form data into a MySQL database using HTML and PHP. We will be creating an HTML form and a PHP script to insert the data into the database using phpMyAdmin.
Prerequisites:
Instructions:
As an example, the first thing we will need to do is create our HTML form. An HTML Form is a document that stores information about the user's interaction with a website. The form is a way for the user to send information to the database.
<form action="/action_page.php" method="POST">
  Form Elements...
</form>
The action attribute tells the form where to send the data. The method attribute tells the form how to send the data.
Connecting to the Database
A database is a collection of data. It is a way to store and retrieve data from a computer or server.
Xampp stands for "Extended Apache MySQL Platform". It is a free and open-source software that allows you to run a database server on your computer. It utilizes MySQL, Apache, PHP and Perl as its database engine, and it is free to use.
Example PHP Code:
<?php

// Set your connection variables
$servername = "localhost";
$username = "username";
$password = "password";
$dbname = "database_name";

// Create connection
$conn = new mysqli($servername,
    $username, $password, $dbname);

// Check connection
if ($conn->connect_error) {
    die("Connection failed: "
        . $conn->connect_error);
}
// Insert into appropriate table
$sqlquery = "INSERT INTO table VALUES
    ('John', 'Doe', 'john@example.com')"

// If the connection is successful, run the query
if ($conn->query($sql) === TRUE) {
    echo "record inserted successfully";

// If the query is not successful, display the error message
} else {
    echo "Error: " . $sql . "<br>" . $conn->error;
}
?>
Processing form data:
We can collect the form data submitted through our HTML form that we're going to create. We can use the $_REQUEST variable to collect the data.
<?php

if ($_SERVER["REQUEST_METHOD"] == "POST") {

    // collect value of input field
    $data = $_REQUEST['val1'];

    if (empty($data)) {
        echo "data is empty";
    } else {
        echo $data;
    }
}

// Closing the connection.
$conn->close();

?>
Setting up your Xampp Server
In order to successfully connect to the database and send over our form data, we need to set up our Xampp server to accept the incoming data:
- First we need to start our Xampp server.
- Navigate to
localhost/phpmyadmin. - Create a database name of
SampleDBand a table name ofSampleTable. - Create our HTML and PHP files in our Code Editor. I am using Visual Studio Code.
- Submit our data through the form we created.
- Check the results and verify that all data was successfully inserted.
Process:
First, you'll want to make sure that you already have XAMPP Server installed on your local machine. Once it's installed, let's begin by first opening up our Xampp application. In my case, I am using a Macbook Pro so things may look a little different if you're using Windows or another operating system. You'll want to make sure you have the following services running when you open up your Xampp application:
- MySQL Database
- Apache Web Server

Now we can navigate over to localhost/phpmyadmin and create a database and table.
- Click on
Newand then type in the name of your Database. We are going to name our databaseSampleDB. Once complete, go ahead and click theCreatebutton.

Next we can create the table we want to use named SampleTable. Make sure to set the number of columns to 5. Once complete, click the Create button.
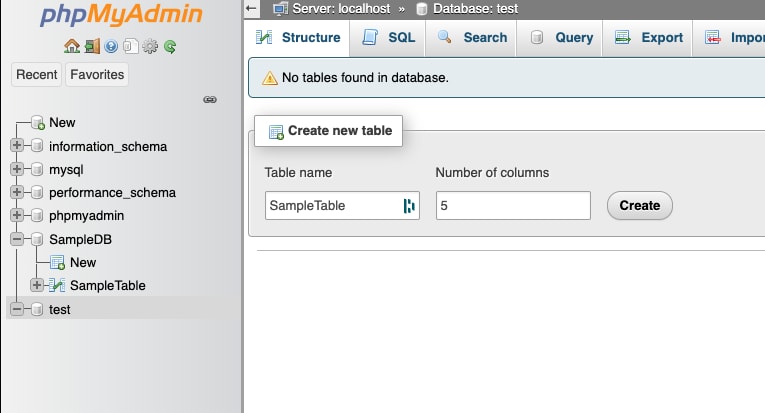
Now that our Database and Sample table is created, we can enter our columns and click on save.
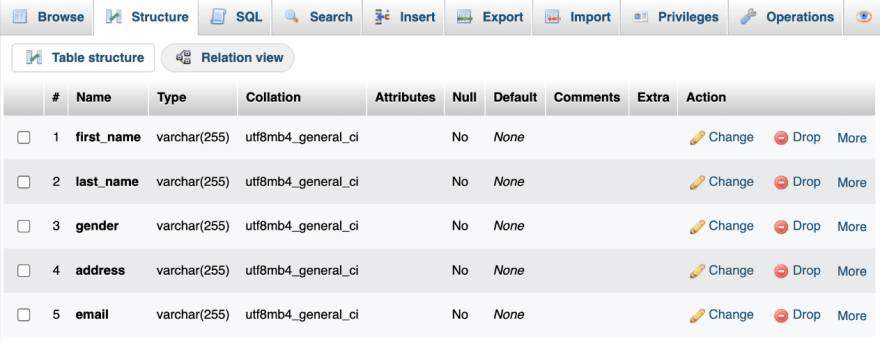
Make sure you enter the correct data type for each column.
first_namelast_namegenderaddressemail
Also, make sure to add the appropriate type of VARCHAR to each item as well.
Create the html form
Now it's time to create our HTML form. We will be using this form to send the data to our database.
Filename: index.php
<!DOCTYPE html>
<html lang="en">
   <head>
      <title>Sample Form</title>
   </head>
   <body>
      <center>
         <h1>Storing Form data in Database</h1>
         <form action="insert.php" method="post">
            <p>
               <label for="firstName">First Name:</label>
               <input type="text" name="first_name" id="firstName">
            </p>
            <p>
               <label for="lastName">Last Name:</label>
               <input type="text" name="last_name" id="lastName">
            </p>
            <p>
               <label for="Gender">Gender:</label>
               <input type="text" name="gender" id="Gender">
            </p>
            <p>
               <label for="Address">Address:</label>
               <input type="text" name="address" id="Address">
            </p>
            <p>
               <label for="emailAddress">Email Address:</label>
               <input type="text" name="email" id="emailAddress">
            </p>
            <input type="submit" value="Submit">
         </form>
      </center>
   </body>
</html>
Create the php script
Now we need to create our PHP script. This is the script that will process our form data and insert it into our database.
Filename: insert.php
<!DOCTYPE html>
<html>
<head>
<title>Insert Page page</title>
</head>
<body>
<center>
<?php
// servername => localhost
// username => root
// password => empty
// database name => staff
$conn = mysqli_connect("localhost", "root", "", "sampleDB");
// Check connection
if($conn === false){
die("ERROR: Could not connect. "
. mysqli_connect_error());
}
// Taking all 5 values from the form data(input)
$first_name = $_REQUEST['first_name'];
$last_name = $_REQUEST['last_name'];
$gender = $_REQUEST['gender'];
$address = $_REQUEST['address'];
$email = $_REQUEST['email'];
// We are going to insert the data into our sampleDB table
$sql = "INSERT INTO sampleDB VALUES ('$first_name',
'$last_name','$gender','$address','$email')";
// Check if the query is successful
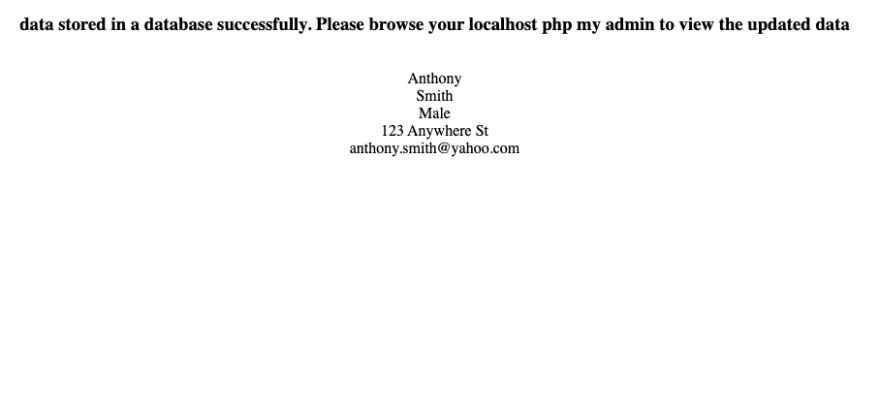
if(mysqli_query($conn, $sql)){
echo "<h3>data stored in a database successfully."
. " Please browse your localhost php my admin"
. " to view the updated data</h3>";
echo nl2br("\n$first_name\n $last_name\n "
. "$gender\n $address\n $email");
} else{
echo "ERROR: Hush! Sorry $sql. "
. mysqli_error($conn);
}
// Close connection
mysqli_close($conn);
?>
</center>
</body>
</html>
Great! Now we can submit our form data to our database but first we need to save our index.php and insert.php files inside of our htdocs folder located inside our Xampp directory.
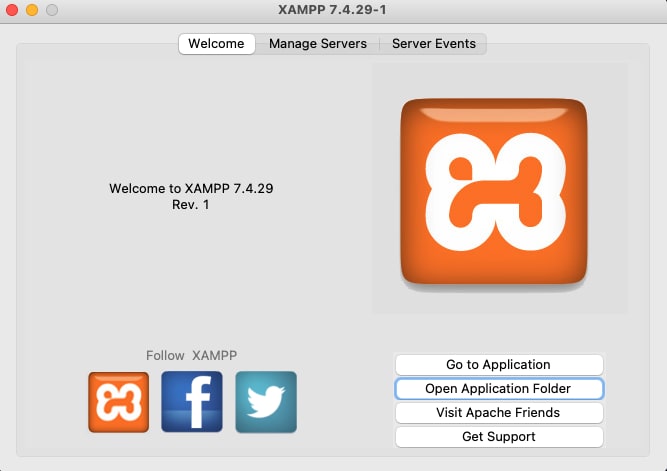
HTDOCS Folder
We can access this folder by opening up our Xampp application and then clicking on Open Application Folder.
This will open up our Xampp files directory. Navigate to the htdocs folder and copy your index.php and insert.php files directly into this directory. This will overwrite the existing file. Now we can head over to localhost/index.php to fill out the form submit it to our database.

Fill out the form and then click submit. Great! it looks like our data has been successfully stored in our DB.
Head over to localhost/phpmyadmin and select your database to ensure that our data was successfully inserted.

Conclusion
You have just completed the basic steps to store data in a database using HTML and PHP. You can now use this method to create any kind of form you like and attach it to a phpMyAdmin database.
🤝 Thank you so much for taking time out of your day to read this Article! I hope it helped you out and you learned something new today! Please leave a comment if you have anything you'd like to add. I'd love to hear from you!


Latest comments (3)
Hi Anthony,
I tried your "cod" several times and I get an error:
"Fatal error: Uncaught mysqli_sql_exception: Table 'sampledb.sampledb' doesn't exist in C:\xampp\htdocs\1234\fm\insert.php:36 Stack trace: #0 C:\xampp\htdocs\1234\fm\insert.php(36): mysqli_query(Object(mysqli), 'INSERT INTO sam...') #1 {main} thrown in C:\xampp\htdocs\1234\fm\insert.php on line 36"
XAMPP Version: 8.2.0
Control Panel Version: 3.3.0 [ Compiled: Apr 6th 2021 ]
So the thing is your computer is unable to find sampledb.sampledb (The database that the author created in his own computer). That is why insert.php page is unable to find a database to insert data into...
The solution is very simple, got localhost/phpmyadmin and create a new database - sampledb and a new table inside it - sampledb.
This will hopefully solve your issue !
I'm getting the same error. Did you manage to resolve this?