There are three main things to focus to improve the usability of a static blog. Though I have written this with Lektor in mind, most of techniques are generic to any static blog generator.
- Performance
- SEO
- Accessibility
Performance
Static blogs are fast by default. We can improve the page load times further by implementing some optimization techniques. I use Varvy to identify potential improvements. A few other popular websites you may find useful are listed.
Common suggestions, which I apply to my blog, include
- minifying static resources
- enabling gzip compression
- using HTTPS
Minification
Minification is the process of compressing static files to reduce the file download size. For example, the following JavaScript snippet is 540 bytes.
var myModule = (function() {
    'use strict';

    var _privateProperty = 'Hello World';

    function _privateMethod() {
        console.log(_privateProperty);
    }

    return {
        publicMethod: function() {
            _privateMethod();
        }
    };
}());

myModule.publicMethod();                    // outputs 'Hello World'
console.log(myModule._privateProperty);     // is undefined protected by the module closure
myModule._privateMethod();                  // is TypeError protected by the module closure
When compressed, it is shrunk to 215 bytes.
var myModule=function(){"use strict";function o(){console.log(e)}var e="Hello World";return{publicMethod:function(){o()}}}();myModule.publicMethod(),console.log(myModule._privateProperty),myModule._privateMethod();
This is a 60% reduction in download size or bandwidth costs, however you would like to call it.
I use an unofficial plugin lektor-minify to do this. To use this plugin, install it with the lektor plugin command.
lektor plugins add lektor-minify
To see the minification in action, run the following command.
lektor build -f minify:html,css,js
Open the output folder and check the HTML files. All static files are compressed. For css and js files, associated .min.css and .min.js files are created and for html files, the content of the html file is minified into the same file. Separate .min.html file will not be generated.
I include the above line in gitlab-ci.yml. It is executed just before the built content is deployed to the server.
image: python:3.6
pages:
 script:
 - pip install lektor
 - lektor build --output-path public -f minify:html,css,js
 artifacts:
   paths:
   - public
 only:
 - master
GZIP compression
Apart from minifying files, we can take care of one more level of compression. Gzipping a file compresses it to .gz file format which browsers can unpack on receipt.
If we are using a web server to serve our blog, then we can tell the web server to gzip our pages and return to the client. Since I use gitlab pages for deployment, gzipping of all content is done when the blog is being deployed.
To do this, I add the following shell command into our gitlab-ci.yml.
gzip -k -6 -r public
Here is the full example.
image: python:3.6

pages:
  script:
  - pip install lektor
  - lektor build --output-path public -f minify:html,css,js
  - gzip -k -6 -r public
  artifacts:
    paths:
    - public
  only:
  - master
This will run the gzip command after the build step is complete. Now, when a client requests for a page at the URL, /blogpost-url-123/, server returns /blogpost-url-123/index.html.gz. Browser understands this file and does an additional step of unpacking it before rendering it.
We can check the amount of compression using the website checkgzipcompression.com.
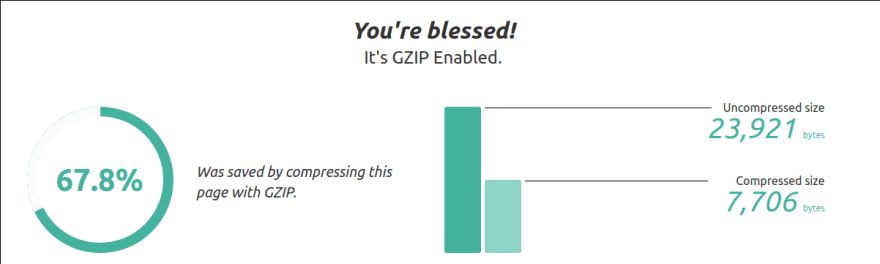
As is evident here, I got 70% savings on one of my large blog posts.
While these are the main things I implement for improving performance, I also implement a few other things based on the insights website optimization tools provide. One of them I use often is using compressed images.
SEO
SEO, which stands for Search Engine Optimization, is an optimization that improves the visibility of your website or blog posts on various search engines like Google, Bing and DuckDuckGo. An article written on a specific topic will reach more people when it is optimized for search engines.
SEO is a vast and an ever changing topic and cannot be comprehensively covered in this article. However, let us look at some popular techniques including
- adding meta information
- structuring content
- using HTTPS
Lektor does not provide any SEO options by default. Let us take a stab at these three things.
Adding Meta information
There are variety of ways to provide metadata or meta information about an article or a webpage.
Meta tags
There are many meta tags, but the following are the most important, IMHO.
- title - like title tag, but for crawlers
- author - indicate the author of the content
- copyright - copyright content on your webpage
- description - summarize the content of the webpage
- keywords - like tags, but for crawlers
In case of Lektor, I create a property on the associated model and then use it on the template. For example, to have a meta tag for description on articles, first I add a field on the blog-post.ini model:
[fields.metadesc]
label="Meta Tag: Description"
type = string
This metadesc field is available for use in templates. So I add the following markup in the head of relevant template.
<meta name="description" content="{{ this.metadesc }}" />
Since this is a field, it appears on the admin.

Meta Description field in Lektor Admin
Here is a full example with all the above meta tags.
<meta name="title" content="Improving usability of static blogs | Animesh Bulusu" />
<meta name="author" content="Animesh Bulusu" />
<meta name="copyright" content="Animesh Bulusu" />
<meta name="description" content="Optimizing my static blog for SEO and performance" />
<meta name="keywords" content="seo, optimization, optimize, static blog, lektor, performance optimization, meta tags, metadata, 2019, accessibility, performance, animesh bulusu, animesh.blog, animesh bulusu blog" />
Note: Meta tag keywords is not considered useful anymore. I was not aware of this as I added these features in between 2016 and 2017. I left it in case one would like know about it.
Canonical URLs
A canonical URL is required to indicate that a particular webpage is the original source. This can be useful for two things.
- When we cross post our content into other content aggregators like DEV.TO and Medium, it will add a link at the end of the article, something to the effect of "This blog post is originally from: https://animesh.blog/improving-usability-of-static-blogs"
- When we have multiple copies of an article, we could designate one article as canonical. This way search engines know that the article with canonical URL is the original and do not punish the article.
In the markup, I add the following tag.
<link rel="canonical" href="{{'.'|url(external=true)}}" />
This generates the absolute URL for the current page and is rendered as follows.
<link rel="canonical" href="https://animesh.blog/improving-usability-of-static-blogs/" />
Robots.txt
Add this file at the root of your directory to indicate whether you want your content to be indexed or not. This is in my robots.txt file. First line tells the crawler that my blog is available for indexing. The second line tells the crawler that I disallow crawling of the static folder.
User-agent: *
Disallow: /static/*
Sitemap
In the robots.txt file, add a reference to a sitemap.xml file like this.
Sitemap: https://animesh.blog/sitemap.xml
This sitemap.xml file can be generated when the site is built. I use this sitemap from Lektor documentation.
<?xml version="1.0" encoding="UTF-8"?>
<urlset xmlns="http://www.sitemaps.org/schemas/sitemap/0.9">
  {%- for page in [site.root] if page != this recursive %}
  <url><loc>{{ page|url(external=true) }}</loc></url>
  {{- loop(page.children) }}
  {%- endfor %}
</urlset>
It recursively generates the links for all the webpages on my blog, which is useful for crawlers.
<urlset>
  <url>
    <loc>https://animesh.blog/</loc>
  </url>
  <url>
    <loc>https://animesh.blog/improving-usability-of-static-blogs/</loc>
  </url>
</urlset>
It is also helpful to add a link to a generated sitemap the main page of your blog. Checkout my sitemap page.
Structuring content
Headings
Use heading tags such as h1, h2 and h3, but remember to have only one H1 tag per page. The h1 tag should contain the words most relevant to your article.
Semantic Tags
Use semantic tags such as the following to structure your content.
- header
- main
- nav
- footer
- article
Friendly URL
The gist of this technique is to have a URL that is relevant to the article.
Let us say you are writing an article on how to learn react.js
A URL like
https://mydomain.tld/how-to-learn-react/
is a better URL than
https://mydomain.tld/article?id=203
Using HTTPS
This is an area that feels like it is a performance thing rather than a SEO thing. It is a performance aspect in reality. However, the use of HTTPS has become common place these days due to efforts of Google. Originally, search engines have started ranking sites without HTTPS lower. Browsers vendors have more recently begun highlighting the sites not using HTTPS as "Not secure". Due to this, having HTTPS on a website has become an SEO thing.
Among other things HTTPS mainly guarantees two things, identity and data integrity.
An SSL certificate tells the browser that the information it receives is indeed from the originating party. A HTTPS connection prevents a hijacker from reading the data transferred from the server to user. A HTTPS connection also prevents the hijacker from tampering the data in transit. This type of attack is called MITM. HTTPS makes it harder to perform MITM attacks.
There is a class of malicious activity whereby an ISP injects code or ads into your connections. This is possible if your connection to a website is unencrypted. HTTPS prevents this.
Setting up an SSL certificate has been easier for at least two years now, thanks to Let's Encrypt.
Accessibility
Accessibility is a development practice that makes the browsing of a webpage easier for people with disabilities. Again like SEO, accessibility is an ocean of a topic. It is, however, of great importance that many organizations make it a legal requirement to make their web products accessible. So, IMHO, it is worth a consideration.
My personal opinion is that it is a moral obligation and should be taken into consideration when building a new blog. It is easier to fall into the trap of thinking that your blog isn't as important. Moreover adding all the extra stuff just takes time, doesn't it? It does take time, but it is your blog. There is no rush to implement everything right this moment. Keep adding things as you find time. Boy scout rule does apply here very well.
Here are a few things I have managed to implement, though not to my full satisfaction. All of these are quite easy to implement.
- skiplinks - these are indicators of where the actual content starts
- alt text for images and videos - screen readers would use this information to announce what the media is about
- page title - this is useful for a number of scenarios
- logical structure - the navigability of the site when structured logically provides a better experience to users using a screen reader.
- page language
- meaningful tab order - having this maintains a linear or logical navigation for users who are keyboard-only or use screen readers
- focus indication - indication of where the focus is when content is accessed by keyboard
- color contrast - users with poor eyesight or low vision will have a better experience if this is taken into account
Rather than recommending a specific learning resource for these individual items, I would encourage reading the WCAG checklists and the levels of compliance first and only then reach for learning on specific items.
I have recently become aware of this checklist as part of a work project. Only then, I have been able to form an internal expression on how these seemingly small things do wonders to your readers. This helped me pull this article out of draft status after more than a year.
Ending note
To improve the usability of a static blog further, one could invest time to
- implement responsive web design
- convert to a PWA
A PWA might be an overkill for most static blogs. However, responsive web design is a must-have if you are building your blog today. I have implemented responsive design with media queries and some flexbox.
Feel free to inspect, view-source or view the full source on gitlab.


Top comments (0)