Originally published at https://samvloeberghs.be on June 14, 2019
Target audience
This article and guide on setting up a simple memory cache for an Angular Universal website or application is targeted to developers that are optimizing their server for better performance. The goal is to avoid rerendering the page of the application on the server if there is no need to. Instead we will cache the previously generated content and serve it from the cache on subsequent requests.
This concept is of course not limited to Angular applications or any other web-application framework or technology for that matter. It is a widely adopted common practice for server optimization to minimize the load on the processor. The concepts explained can easily be adopted to your framework or technology of choice.
Our example application
To explain the basics and prove the concept we have to consider an example application, like for example my simple blog. This Angular Universal implementation has some static pages containing the content in their components, and dynamic pages, loading blogposts from a JSON datasource into their components.
We have for example the static /about route and a dynamic blogpost route /posts/scroll-to-top-on-angular-router-navigation. Angular Universal is capable of knowing when the application and blogpost is completely generated. As soon as the application is stable, the static HTML is retrieved and send back as the response of the request.
Simple diagram for basic rendering

The diagram above shows the most basic example of the Angular Universal rendering flow. Let's go trough the steps shown:
- The browser requests a specific page from your server, for example the dynamic page /posts/scroll-to-top-on-angular-router-navigation.
- The server receives the request and renders the Angular application by fetching the content from the JSON datasource.
- The renderer outputs the static HTML and the server returns this in the response to the browser.
Code for basic rendering
The code for this basic rendering case is available trough the Angular CLI. The official documentation on the Angular website will get you going really fast. For the sake of this tutorial, the following code is the most important ones for our usecase:
// basic-angular-universal-server-setup.ts

// These are important and needed before anything else
import 'zone.js/dist/zone-node';
import 'reflect-metadata';

import { renderModuleFactory } from '@angular/platform-server';
import { enableProdMode } from '@angular/core';
import * as express from 'express';
import { join } from 'path';
import { readFileSync } from 'fs';

// * NOTE :: leave this as require() since this file is built Dynamically from webpack
const { AppServerModuleNgFactory, LAZY_MODULE_MAP } = require('../../../dist/samvloeberghs/server/main');
const { provideModuleMap } = require('@nguniversal/module-map-ngfactory-loader');

// Faster server renders w/ prod mode
enableProdMode();

// Express server
const app = express();
const PORT = 80;
const DIST_FOLDER = join(process.cwd(), 'server', 'samvloeberghs');

app.set('view engine', 'html');
app.set('views', join(DIST_FOLDER, 'browser'));

// serve static files from /browser
app.get('*.*', express.static(join(DIST_FOLDER, 'browser')));

// Our index.html we'll use as our template
const template = readFileSync(join(DIST_FOLDER, 'browser', 'index.html')).toString();

app.engine('html', (_, options, callback) => {
  renderModuleFactory(AppServerModuleNgFactory, {
    document: template,
    url: options.req.url,
    extraProviders: [
      provideModuleMap(LAZY_MODULE_MAP),
    ],
  }).then(html => {
    callback(null, html);
  });
});

const ngApp = (req, res) => {
  const config = {
    req,
    res,
    preboot: true,
    baseUrl: '/',
    requestUrl: req.originalUrl,
    originUrl: 'https://samvloeberghs.be',
  };

  res.render('index', config);
};

app.get('*', ngApp);

// Start up the Node server
app.listen(PORT, () => {
    console.log(`Node server listening on port ${PORT}`);
});
res.render will return a 200 response automatically, with the static HTML of the server-side rendered page of your Angular application. Later we will learn how we can hook into this.
The rest is all Express framework and Universal configuration. If you want to learn more about the code and configuration shown above, please follow any tutorial to setup your first Universal application in NodeJS. You can also find some relevant links in the "Further reading" section at the end of the blogpost.
Why cache?
The content of our example routes or pages is very unlikely to change often, so there is absolutely no need to render the Angular application each time the page gets requested. We can simply cache the generated HTML on the first time visit, store it in a memory cache and retrieve it when the next visitor hits your website.
As soon as the content changes, we need to clear the cache and let the cache get regenerated. This can happen the first time your updated page gets a visit, but other strategies are possible as well.
A simple memory-cache implementation
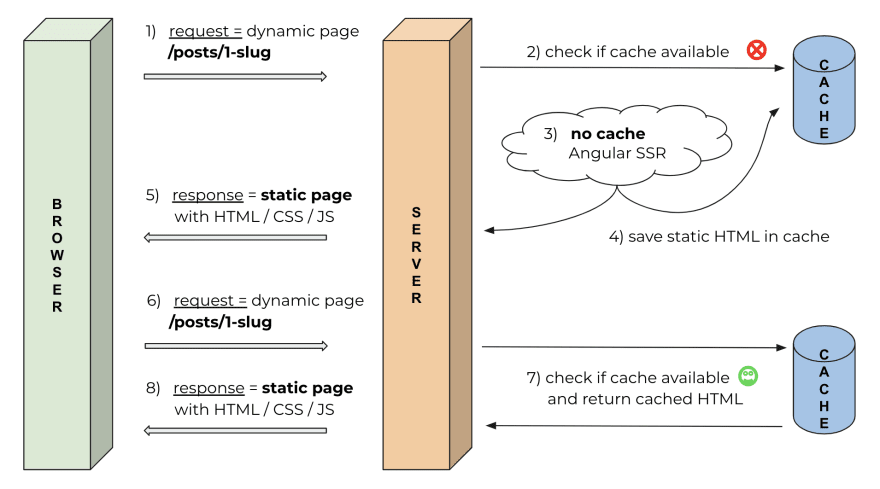
Let's extend our previous diagram for basic rendering with Universal with a simple cache mechanism. The diagram above visually shows us what we need to do to, but let's go through it step-by-step:
- The browser requests a specific page from your server, for example the dynamic page /posts/scroll-to-top-on-angular-router-navigation.
- The server checks if there is a cached version of the page available. The first time we visit the page, there is no cached version.
- The server receives the request and renders the Angular application, by fetching the content from the JSON datasource.
- The server outputs the static HTML and stores it in the cache.
- The server returns the same static HTML as the response to the browser.
- The next visitor visits the exact same page.
- You could already have seen it coming, the server checks again if there is a cached version available and reads it from the caching registry.
- The server returns the cached static HTML as the response to the browser.
As you can see, this is no rocket science. It's just a little bit of extra fun work, implementing our simple cache and adapting the basic code for server side rendering. In the next sections we will learn that the extra code to reach this goal is minimal and easy to set up.
Our simple in-memory caching mechanism
First of all, let's see how our cache implementation would look like. We need a simple CRUD interface to be able to update, read and delete our cache entries. By using the package memory-cache we receive the required functionality out of the box! The API is as clear as it can be:
// memory-cache-interface.ts

const cache = require('memory-cache');

// set or overwrite a value in the cache
cache.put('foo', 'bar');

// retrieve value from the cache
const cachedValue = cache.get('foo');

// delete key from cache
cache.del('foo');

// clear cache completely
cache.clear();
Code for cached rendering
As previously mentioned, res.render is where the rendering magic happens. By default res.render('index', config) returns the static HTML on the response. res.render also accepts an optional callback we can implement with our custom behavior. We can extend the highlighted ngApp function from our basic example without caching:
// simple-cache-setup.ts

const ngApp = (req, res) => {
  const config = {
    req,
    res,
    preboot: true,
    baseUrl: '/',
    requestUrl: req.originalUrl,
    originUrl: 'http://localhost:80',
  };

  const allowedPages = ['/', '/about', '/contact'];

  if (allowedPages.includes(req.originalUrl)) {
    const entry = cache.get(req.originalUrl); // check if we have a cache entry
    if (entry) {
      res.send(entry);                        // send the cache entry
    } else {
      res.render('index', config, (err, html) => {
        cache.put(req.originalUrl, html);     // save the HTML in the cache
        res.send(html);
      });
    }
  } else {
    res.render('index', config);              // just render with no cache
  }
};
Let's go trough the code and explain what is going on:
- Line 13 is a first check to see if we should leverage the cache for this specific request by checking if the requested URL is allowed for caching.
- Next we check if there is a cache entry for this request. If so we return the cached HTML.
- If we don't have a cache entry for this request, we continue with normal Universal SSR and we save the result HTML in the cache before we return it as the response.
Cache only the existing pages
Be careful with what you cache! You should only cache the pages that actually exist on your application or website, or make sense to cache. So avoid the caching of non-existing pages. This could potentially lead to a memory-issue on your server..
The only thing a malicious visitor has to do is visit an unlimited amount of unexisting variants (/about1, /about2, ... ) of an existing page (/about) and your (memory) cache will get flooded with 404 not found pages. Consequently your server will become very slow and might eventually even crash.
A simple way to mitigate this risk is by using (a variant of) your sitemap.xml to whitelist the allowed pages. This is implemented on line 11-13 of the code shown above. In this case we are only allowing the /, /about and /contact pages to be cached.
Possible extensions and improvements
The concepts explained above only touch the basics of implementing a caching strategy and infrastructure. There are several improvements possible that I will explain briefly.
- Generate your static versions at build time
- Create an interface for your cache
- Use a separate caching layer
- Server-side render only specific pages
- Use a file based cache instead of memory cache
Generate your static versions at build time
Instead of letting the first visitor of your website be responsible for generating the first cached version of specific pages, we can generate the static versions of all the pages of our application at build time.
We can do this for example after generating our sitemap.xml. At that point we know all the available urls of our application/website and we can generate the static versions of those pages and put them in the cache.
Create an interface for your cache
Maintaining the cache of a small website like this one is easy. Everytime a new version is available, I clear the cache completely. The first visitor of a specific page is now responsible for creating the cached version.
In bigger applications an interface to dynamicaly update and clean the cache is required. For example, when using a CMS to add a page or blogpost you can trigger a cache-request right after saving the content. If you delete a page, you can whipe out the cache, to make sure your visitors are not seeing a page that is already deleted.
Be sure to implement some security on this interface. You don't want somebody malicious messing with your cache.
Use a separate caching layer
In this example we have implemented caching at the level of the serving application. This couples our server software directly to the caching infrastructure. A more advanced approach would be to install a caching layer right before the application server.
This can either be a completely different (virtual) machine, or run as an extra service on the same machine as the one running our Node.js Express server. This way we can decouple our caching infrastructure completely from our serving application.
Server-side render only specific pages
In some cases it might not be required to SSR and cache all pages of your application. You might have a public facing part of your application and a private part that requires a login. The content of the private part could be very volatile, so caching is perhaps not the best option there.
// selective-ssr-and-cache.ts

// Our index.html we'll use as our template
const template = readFileSync(join(DIST_FOLDER, 'browser', 'index.html')).toString();

app.engine('html', (_, options, callback) => {
  renderModuleFactory(AppServerModuleNgFactory, {
    document: template,
    // ...
  }).then(html => {
    callback(null, html);
  });
});

const cache = require('memory-cache');

const ngApp = (req, res) => {
  const config = {
    // ...
  };

  const allowedPages = ['/', '/about', '/contact'];

  if (allowedPages.includes(req.originalUrl)) {
    // ...
  } else {
    res.send(template); // just return the template
  }
};
We did not change much compared to the caching example. The only thing we now do is return the original template directly, imported on line 2, in case of a request that should not be SSRed and cached. This is your original index.html file, so returning this as the response to the browser will just make the browser bootstrap your Angular application.
Use a file based cache instead of memory cache
Using a cache that lives in the memory is just one option. If for some reason you don't have much RAM available, but you have plenty of disk space, you could opt for a cache living on the file system. Entries would then just be like static HTML files saved on the disk. The only drawback I see is the potential extra I/O overhead reading and writing a file introduces.
Conclusion
Setting up a simple memory cache is no rocket-science and requires minimal changes to our Universal setup. The basic idea of using a memory cache is easily extended to for example a file cache. Adapting it to your needs is easy because we can hook in to the rendering process.
We have to remember this is a very basic setup that requires extension and improvements if we are going to use this on bigger applications and projects.
Further reading
- Server-side Rendering (SSR): An intro to Angular Universal
- Angular Universal & Server-side rendering Deep-Dive
- Manage your sitemaps - Build and submit a sitemap
Special thanks to
for reviewing this post and providing valuable and much-appreciated feedback!
Originally published at https://samvloeberghs.be on June 14, 2019


Oldest comments (0)