
JavaScript, as in both the language and its ecosystem, has changed a ton since it first came out in 1995. Now the language is being used to make much bigger tools and web apps on both the frontend and backend, and for these big projects in JavaScript, people import a lot of different third-party code. These dependencies can be things like libraries of convenient JS functionality like Lodash, frameworks like React, Angular, or Vue, code for automated testing like Mocha or Jest, and even code that adds to the JavaScript language itself, such as Flow for giving JS the static types you would get in a language like C++ or Go.
Because of all this complexity, it’s gotten cumbersome and error-prone for your HTML to import all the JavaScript you’re using with a stack of <script> tags like:
<script src="path/to/lodash.js"></script>
<script src="path/to/my-helper-functions.js"><script>
<script>
  // This code can now use functions from lodash.js and
  // my-helper-functions.js
</script>
This may be easy to manage when you have just two scripts to import, but what about twenty, or hundreds? Building a stack of hundreds of <script> tags and importing them in the right order takes a whole lot of thinking and would be a headache to maintain as your list of dependencies grows and changes.
Luckily, managing the tangled web of relationships between dependencies is the kind of thinking that the robots are awesome at. So for making big professional web apps, an automated build process is a must, and webpack is a really popular tool for handling that. It constructs a dependency graph for your JavaScript, CSS, and more, outputting single-file bundles of code, so you could do things like import all the JavaScript you need with just ONE <script> tag!
For this tutorial, we’re going to make a webpack build for a small web app and then we’ll see how to use webpack to set up automated tests as well.
Making the app
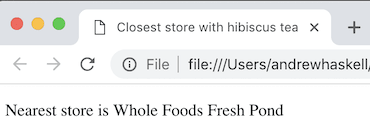
For this sample app, we’re going to make a map for sloths to find local stores in Cambridge that carry hibiscus tea. Because every sloth at the Cambridge Fresh Pond knows that hibiscus tea is the best kind of tea to slow down with!

To follow along, make a directory named something like webpack-mocha-tutorial, make an app/src directory inside it, and run npm init or yarn init. The code for the app is here, and the repository’s commit history is written to follow the tutorial, so I’ll link to each commit to follow the code changes, except commit 1 which was just setting up the repo.
The basic structure of the app will look like this:
- You have a file
app/src/distance.jsthat exports a function that runs the distance formula (really we should be using the great circle distance formula for geographic coordinates), and a function that tells us which point out of an array of points is closest to you
// distance takes in two points, represented as objects with
// numeric x and y values and returns the distance between them
//
// [TODO] Use great-circle distance, not 2D distance, which we're
// only using to keep the code in this tutorial short
function distance(p2, p1) {
  let yDist = p2.y - p1.y;
  let xDist = p2.x - p1.x;
  return Math.sqrt(Math.pow(yDist, 2) + Math.pow(xDist, 2));
}
// sortByDistance takes in your location and an array of points
// and returns the array of points sorted
function sortByDistance(myPt, points) {
  return points.sort(
    (pt1, pt2) => distance(pt1, myPt) - distance(pt2, myPt));
}
- And you have a file called
app/src/page.jswhich uses the code indistance.jsto get nearest store out of a list and then display that on the page
let stores = [
  {name: "Cambridge Naturals",     x: -71.1189, y: 42.3895},
  {name: "Sarah's Market",         x: -71.1311, y: 42.3823},
  {name: "Whole Foods Fresh Pond", x: -71.1420, y: 42.3904},
];
let here = {name: "You are here",  x: -71.1470, y: 42.3834};
let nearest = sortByDistance(here, stores)[0];
document.getElementById("nearest-store").innerHTML = nearest.name;
- Finally, you have your HTML web page,
index.html.
<!DOCTYPE html>
<html>
  <head>
    <title>Closest store with hibiscus tea</title>
  </head>
  <body>
    <p>Nearest store is <span id="nearest-store"></span></p>
    <script src="app/src/distance.js"></script>
    <script src="app/src/page.js"></script>
  </body>
</html>
The overall directory structure is:

If you open index.html in your browser, you’ll see that from the Fresh Pond, the nearest place to get hibiscus tea is the Whole Foods near the rotary.
So as you can see, distance.js defines our distance functions, then page.js runs with them, putting the result of the sortByDistance function into the DOM. But if you look at the dependencies between your files, your page.js file depends on your distance.js file, but not the other way around (commit 2).
So you’ve got a setup where you basically have one JavaScript file, page.js, at the base of the dependency graph. So it would be really nice if you could just have index.html import one JavaScript file with one <script> tag. With webpack, you can do just that!
Enter webpack
As I mentioned at the beginning, webpack is a tool that lets you take all the code that you need for your web app and convert it to one production-ready bundle. To get it, use npm or yarn to install it:
yarn add --dev webpack webpack-cli
With that command, you now have webpack and its command line tool in your node_modules and can run it with the webpack command line tool. But before we can make this webpack build run, we need to have our page.js file actually import the code in distance.js. So we have distance.js export its functions by adding the line:
module.exports = {distance, sortByDistance};
And to have page.js use the exported sortByDistance function we add the line:
import {sortByDistance} from "./distance";
Cool, we have our JavaScript dependencies connected. Now let’s use webpack to build our app! Run this command:
npx webpack app/src/page.js
And you should now see a new file, dist/main.js, which contains all your code from page.js and distance.js. Now have index.html import dist/main.js instead of your scripts in app/src by changing your HTML like this:
<!DOCTYPE html>
<html>
  <head>
    <title>Closest store with hibiscus tea</title>
  </head>
  <body>
    <p>Nearest store is <span id="nearest-store"></span></p>
    <!--We're now importing our JavaScript from main.js-->
    <script src="dist/main.js"></script>
  </body>
</html>
Now open the file in your browser, you should still have code that works. That main.js file has all the code in distance.js and page.js, so you can import everything from one file!
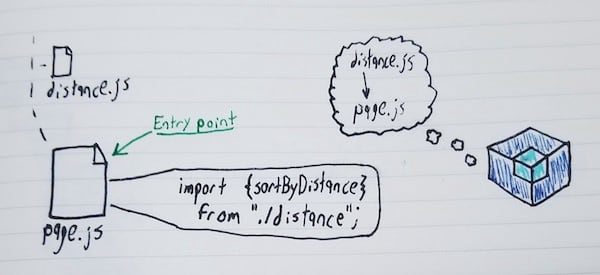
The way that works is, with the command npx webpack app/src/page.js, you’re specifying that the starting point, or in webpack terminology the entry point, of your JavaScript code is page.js. So webpack reads page.js and in that file, it sees the line import {sortByDistance} from ./distance. Now it knows that page.js has distance.js as a dependency. From all the dependencies in your code, webpack builds a dependency graph and uses that to know construct your bundle JavaScript file, dist/main.js. (Commit 3)
By the way, this also works with having your code import third-party dependencies in your node_modules too. Let’s try doing the DOM manipulation with jQuery instead of document.getElementById. First install jQuery:
yarn add --dev jquery
Then update page.js to include and use jQuery:
import {sortByDistance} from "./distance";
import $ from "jQuery";
let stores = [
  {name: "Cambridge Naturals",     x: -71.1189, y: 42.3895},
  {name: "Sarah's Market",         x: -71.1311, y: 42.3823},
  {name: "Whole Foods Fresh Pond", x: -71.1420, y: 42.3904},
];
let here = {name: "You are here",  x: -71.1470, y: 42.3834};
let nearest = sortByDistance(here, stores)[0];

// Now we're getting nearest-store with jQuery
$("#nearest-store").html(nearest.name);
Now your dependency graph is:

And if you do npx webpack app/src/page.js and reload index.html, although your dist/main.js’s file size is much bigger from containing code from jQuery, your web app still works!
Before we continue, go into your package.json file and add these three lines:
"scripts": {
  "build": "webpack app/src/page.js"
}
Now if you’re running your webpack build, you can do so by just typing yarn build instead of having to memorize npx webpack app/src/page.js. Besides being easier to type, if your build command changes, you can just update that line of the package.json file with the new build command, and then you can still build the app with yarn build instead of you and your engineering team getting used to running a new command. Commit 4
Configuring webpack with a webpack.config.js file
What you were seeing with that command npx webpack app/src/page.js was the default behavior of webpack. If you run webpack [entry-file.js], then webpack constructs a dependency graph from that entry file and outputs a bundle file in dist/main.js. But you can control where your entry and output points are if you configure webpack with a config file. Put this code into a file in your webpack-mocha-tutorial directory called webpack.config.js:
module.exports = {
  entry: __dirname + "/app/src/page.js",
  output: {
    path: __dirname + "/dist/",
  }
}
Now if you run npx webpack or you can do the same build as before, without specifying your entry point in the command line arguments because that’s now in webpack.config.js! So that also means you can update your package.json file’s build script to just:
"build": "webpack",
If you were to change the output path in your webpack config file to something like __dirname + "/somewhere_else", then running the yarn build command again would put the bundled file in somewhere_else/main.js. Commit 5
But a webpack config file isn’t just for setting up where your entry and output files are. You also can set up what webpack does when it encounters different kinds of files in the dependency graph by using loaders, which are basically JavaScript programs that transform your code in some way. For example, you could have a rule in your webpack config file saying that if webpack encounters a TypeScript file in its dependency graph, that file is sent through a loader that converts it from TypeScript to regular JavaScript.
The loader we’re going to use is the Babel loader. If you haven’t used it before, Babel is a tool that takes JS code that uses modern features and converts it to a backward-compatible equivalent. This lets your app work on older browsers, or more generally on browsers that don’t yet support some new JavaScript features. After all, some sloths using our app haven’t updated their browsers since 2009. And one part of the code we wrote wouldn’t work on a 2009 browser:
return points.sort((pt1, pt2) =>
  distance(pt1, myPt) — distance(pt2, myPt));
We’re using an arrow function and those haven’t been invented yet. So let’s use the babel-loader to send this arrow function into the past! First run:
yarn add --dev babel-core babel-loader@7.1.5 babel-preset-env
Then in your webpack.config.js, add this code to the module.exports object:
module: {
  rules: [
    {
      test: /\.js$/,
      exclude: ["/node_modules/"],
      use: [
        {
          loader: "babel-loader",
          options: {
            presets: ["env"],
          },
        },
      ],
    },
  ],
},
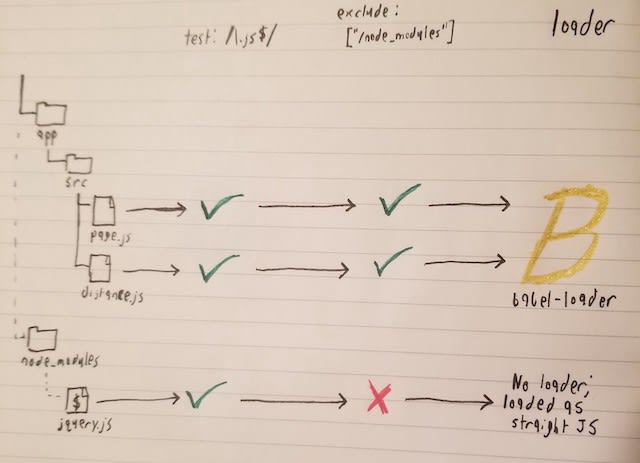
This adds a new rule to our webpack builds. If webpack encounters a file in the dependency tree that ends with .js (like distance.js) and that file isn’t in node_modules (like jQuery), then our rule applies to that file.
Any file that matches this rule is then passed through all the loaders in the rule’s use array (which in our case is only babel-loader). So distance.js and page.js are run through babel-loader, causing distance.js’s arrow function to be removed, and then webpack continues on its merry way building your bundle. Meanwhile when webpack encounters jQuery, it just loads that code as it is without any loader since jQuery is in the node_modules directory.
If you run yarn build and go into the source code for dist/main.js, the code that corresponds to your sort function now uses the function keyword rather than an arrow function! Commit 6
Before:

After:

The highlighted code is our sortByDistance function in the bundled dist/main.js. So now we’ve got our app late 00s-ready! But to keep this code maintainable, we should write some tests for it.
Adding some test coverage to our build
Let’s add some test coverage to our distance.js file. We’ll be using Mocha, a test suite-based tool for writing tests, and Chai as our assertion library, so run this command:
yarn add --dev mocha chai
Then make a new app/test directory, and a new file, app/test/distance.test.js, containing this code:
import {expect} from "chai";
import {distance, sortByDistance} from "../src/distance";
describe("distance", function() {
  it("calculates distance with the good ol' Pythagorean Theorem", function() {
    let origin = {x: 0.0, y: 0.0};
    let point = {x: 3.0, y: 4.0};
    expect(distance(point, origin)).to.equal(5);
  });
});
describe("sortByDistance", function() {
  it("sortsByDistance", function() {
    let places = [
      {name: "Far away", x: 100, y: 50},
      {name: "Nearby", x: 20, y: 10},
    ];
    let origin = {name: "Origin", x: 0, y: 0};
    let sorted = sortByDistance(origin, places);
      expect(sorted[0].name).to.equal("Nearby");
      expect(sorted[1].name).to.equal("Far away");
    });
});
We have our test functions for our distance and sortByDistance functions asserting that the distance function calculates the distance formula, and the sortByDistance function sorts arrays of coordinates using the distance formula, using Mocha test suites and Chai assertions. Pretty standard test setup.
However, if we run mocha app/test/distance.test.js, we’ll get an error that our JavaScript is invalid because it contains the import keyword, which Node doesn’t currently support. But what if we got around this limitation by using webpack to manage the dependencies of our test code? (Note: This could also be trivially fixed by just using require instead of import in our test files, but you’d also have a build process for test code if you’re testing things like Flow-typed JavaScript that uses type annotations, or Vue.js web apps that use .vue files since both of those need to be transpiled to regular JS).
Our testing flow to do this would be:
- Have webpack build dependency trees starting from our test files, rather than one of our application files.
- webpack would then produce a JavaScript file containing all our test code and its dependencies with no
importkeyword - We then do our tests by running Mocha on that JavaScript file
which looks like this:
As you can see, this also means we’re gonna be making two separate builds. One that has our application code as the entry point and the dist folder as the output directory, and the other that our test files as the entry point and test-dist as the output directory. So let’s update our webpack config file to support this second build:
let glob = require("glob");
let entry = __dirname + "/app/src/page.js";
let outputPath = __dirname + "/dist/";
if (process.env.TESTBUILD) {
  entry = glob.sync(__dirname + "/app/test/**/*.test.js");
  outputPath = __dirname + "/test-dist/";
}
module.exports = {
  entry: entry,
  output: {
    path: outputPath,
  },
  // rest of webpack config file stays the same
What does this do? On the fifth line, we have an if statement that we run if we have a non-blank value for our environment variable TESTBUILD. So if we ran TESTBUILD=true webpack, then we would enter that if statement, but we wouldn’t if we just run npx webpack.
Inside that if statement, we change which JS file is our entry point. Instead of our output path going to the dist folder, it goes to the test-dist folder. And instead of app/src/path.js as our entry, our entry point is now the array of all files matching the glob expression app/test/**/*.test.js. In other words, that’s all files that are:
- in a path under the
app/testdirectory and - have a path that ends with .
test.js
We pass our new entry point and output path into the module.exports object, and webpack runs with that to make our test build. As you can see, webpack configuration is regular JavaScript, so we can use Node’s standard library and if statements to configure it like JavaScript. Run TESTBUILD=true npx webpack and you should see a test-dist directory. And if you run npx mocha test-dist/main.js, you should see your tests run!

Finally, in the “scripts” section of your package.json add this line:
"test": "TESTBUILD=true webpack && mocha test-dist/main.js && rm -rf test-dist"
This means that now when you run yarn test, you make your test-dist build with webpack, then you run Mocha on that build, and finally, rm -rf test-dist deletes the test-dist directory since we’re done using it. Commit 7
Source-mapping our test code
Now we’ve got our test build, but there’s one thing that could get annoying when we’re testing our code. If we’re running Mocha on our test-dist/main.js file and one of our tests fails, what will it look like? Let’s make our distance formula test fail in app/test/distance.test.js:
describe("distance", function() {
  it("calculates distance with the good ol' Pythagorean Theorem", function() {
    let origin = {x: 0.0, y: 0.0};
    let point = {x: 3.0, y: 4.0};
    expect(distance(point, origin)).to.equal(2071);
  });
});
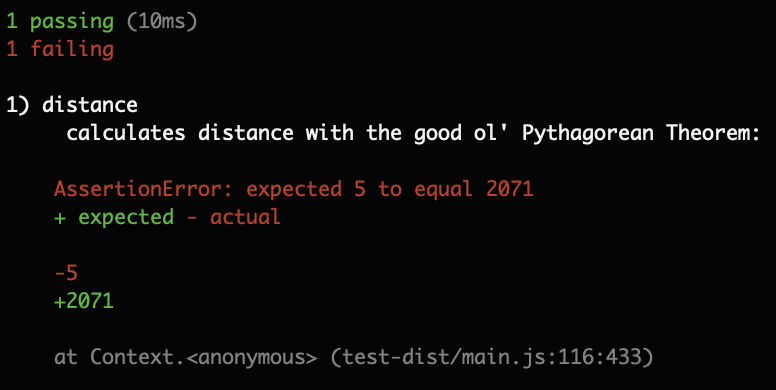
Run yarn test and you should get this:
Output of our test now that test is failing
The test fails, but you can’t see which line of your original test code that was, and if you have a lot of tests for your web app, that failing line 116 of your test can get hard to find.
Lola the Micropanda looking for the failing assertion on line 116 of test-dist/main.js
The failing code is on line 8 of app/test/distance.test.js, but we’re running Mocha on test-dist/main.js, so from Mocha’s perspective, the failing assertion is on line 116. Luckily, webpack supports source maps, which can tell you which line of code corresponds to a bug. A source map is like a decoder ring in a specially marked cereal box, and you take your decoder ring and bundled main.js file to get back the original lines of code that correspond to the bundled code. Part of this complete breakfast, and now part of this complete webpack config! Update the if statement in your webpack.config.js file:
let entry = __dirname + "/app/src/path.js";
let outputPath = __dirname + "/dist/";
let devtool = "";
if (process.env.TESTBUILD) {
  entry = glob.sync(__dirname + "/app/test/**/*.test.js");
  outputPath = __dirname + "/test-dist/";
  devtool = "source-map";
}
Then in the module.exports object in there add the line:
devtool: devtool,
Now in your test builds, your test-dist directory will contain a source map file. Run npx webpack TESTBUILD=true and your test-dist directory will have a main.js.map file as well as the main.js bundle.
For Mocha to use that source map when it runs tests, we need to install just one more package:
yarn add --dev source-map-support
Now to use it, we just need to update the Mocha script in the scripts.test section of our package.json:
TESTBUILD=true webpack && mocha test-dist/main.js --require source-map-support/register && rm -rf test-dist
That flag in Mocha, --require source-map-support/register has Mocha require the source-map-support package, which means Mocha will use the source map if it’s available. So now if you run yarn test, when you get a failed assertion, you’ll know what line it’s on and can fix the code!

Lola concurs that source maps are indeed, where it’s at! (Commit 8)

So now you have a setup for both your regular distribution builds and a test build, with source mapping. From here on out, there’s loads more ways you can build on this, like chaining multiple JavaScript loaders together to process your code in a pipeline, or running webpack as a dev server to instantly see the effects of your code changes on the final webpack build, so keep trying our different packages to compose in the webpack.config.js file for your app because we’ve only scratched the surface.
Until next time, STAY SLOTHFUL!
Sloth picture was taken by Jenny Jozwiak and is licensed under CC BY 2.0


Top comments (2)
Congratulations on the immense effort of putting this to "paper". This is a very detailed and step by step tutorial.
Thanks that was what I was going for! Did a lot of blog hopping to figure out how to compose parts of a web app together with webpack, so I wanted to make something easy to follow with not a ton of dependencies introduced at a time