If you're getting started with web accessibility, you'll want to understand what exactly the results and end goal are to accessibility work. Accessibility work takes many forms such as making sure your design has good color contrast, has a consistent layout, works well with keyboard and mobile navigation, and is usable with tools like screen readers. All this work is ultimately toward your app being usable to as many people as possible.
In this tutorial, I'd like to zoom in on testing one of these aspects of accessibility: screen reader usability. Some people who might use screen readers, plus keyboard navigation are:
- Someone who is blind or visually impaired
- Someone who got their pupils dilated for an eye exam
- Someone who navigates the web best with audio
- Someone with motor impairment that causes difficulty using a mouse
We'll look at two technologies in this tutorial so you can see firsthand how your app works on a screen reader. They are the screen readers themselves, and the accessibility tree.
By the way, while I've read a lot about accessibility, I'm still fairly new to it. If you are experienced in it and know other great tools and techniques for manual accessibility testing, though, I would love to learn the tools you use, so you're more than welcome to share them in the comments!
A poll made of divs
To show the effects of accessible coding techniques, let's start by writing code for an app that isn't accessible: a poll made of divs. First up, let's make the HTML:
<div id="inaccessible-poll">
  <h1>Pick your favorite programminng language</h1>
  <div id="options">
    <div id="go-div" class="language"
      onclick="selectLanguage('go-div')">Go</div>
    <div id="javascript-div" class="language"
      onclick="selectLanguage('javascript-div')">JavaScript</div>
    <div id="ruby-div" class="language"
      onclick="selectLanguage('ruby-div')">Ruby</div>
  </div>
  <button>Vote</button>
</div>
Each div of class language will be like a button; you click on it to select the language you want, which is handled with the selectLanguage JavaScript function, that looks like this:
var selectedLanguage = null;

function selectLanguage(language) {
  if (selectedLanguage != null && selectedLanguage != language) {
    document.getElementById(selectedLanguage).classList.remove('selected');
  }
  selectedLanguage = language;
  document.getElementById(selectedLanguage).classList.add('selected');
}
Finally, here's some CSS for styling the buttons, lighting them up in their programming lanugage's color when a user clicks on them:
#options {
  display: grid;
  grid-template-columns: repeat(5, 1fr);
  column-gap: 20px;
  margin-bottom: 20px;
}

#go-div.selected {
  background-color: cyan;
}

#javascript-div.selected {
  background-color: #fff94a;
}

#ruby-div.selected {
  background-color: rgb(255, 21, 21);
}

.language {
  padding:       20px;
  border-radius: 20px;
  border-color:  black;
  border-style:  solid;
  text-align:    center;
  font-weight:   bolder;
  font-family:   sans-serif;
}

button {
  font-size: 24px;
  padding: 6px;
}
The final product looks like this:

However, if you're using a screen reader, this app isn't accessible. But don't take my word for it, let's try out this app using a screen reader!
Testing our app with a screen reader
Let's start by setting up a screen reader to test our app.
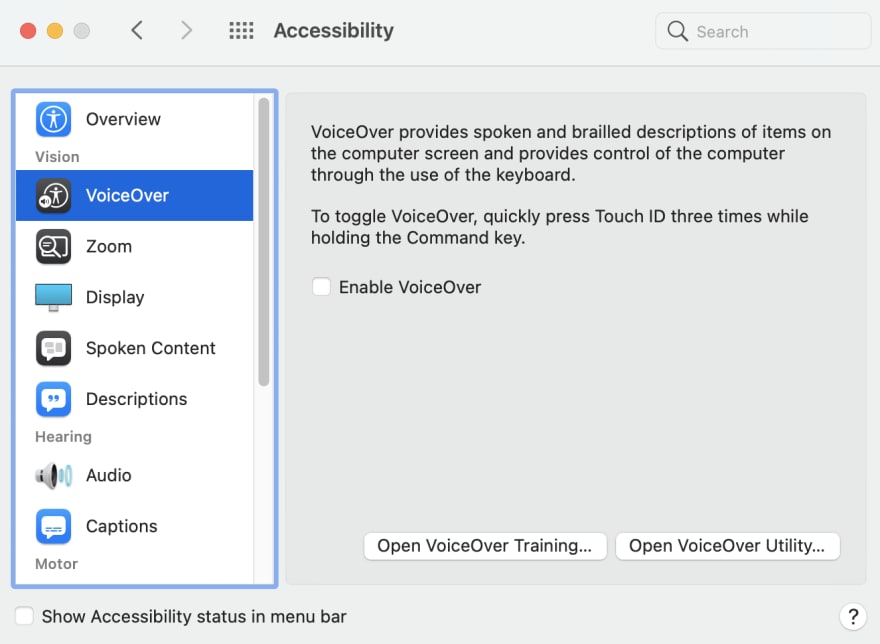
If you use a Mac, go to Settings > Accessibility (icon looks like a person on a blue background), then in the left bar under Vision, select VoiceOver, and check off the box Enable VoiceOver.
You can also find a tutorial on how to use it under the button "Open VoiceOver training".
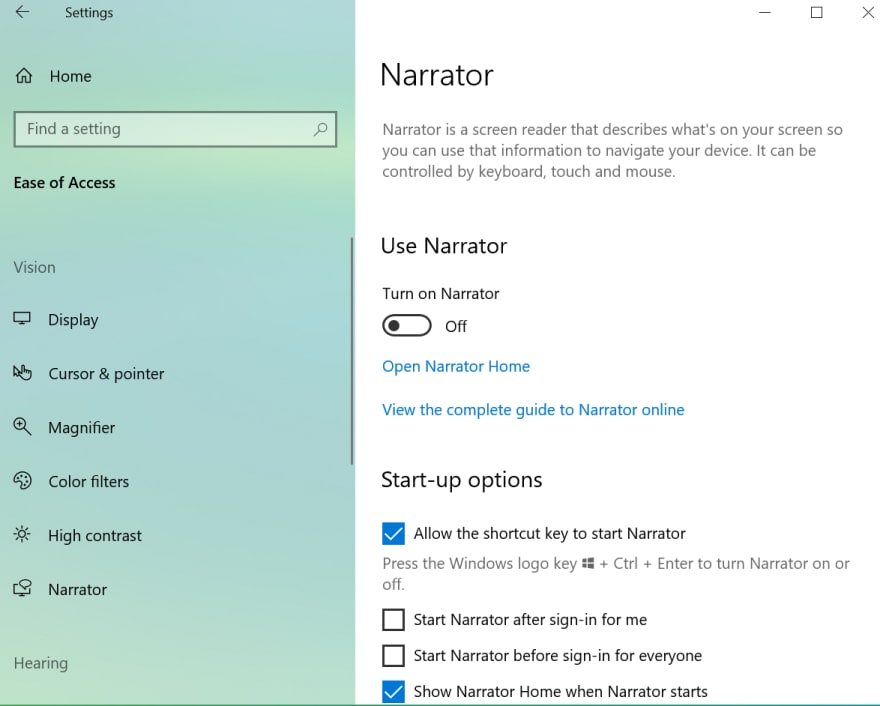
If you use Windows, the built-in screen reader is Narrator, which you can get to with Settings > Ease of Access > Narrator. However, NVDA and Jaws are more popular. After this paragraph is a screenshot of where to turn on Narrator. You can get NVDA at https://www.nvaccess.org/download/ and Jaws at https://www.freedomscientific.com/products/software/home-licenses/.
Now that you've got a screen reader, open the webpage in your browser and navigate to the poll options.
Navigating through the HTML elements is done with Ctrl+Option+Right Arrow on a Mac's VoiceOver, Caps Lock+Right Arrow on Windows Narrator, or Down Arrow on NVDA.
On VoiceOver, what I hear hopping through each element is:
- The header to pick your favorite programming language
- The names of each programming language
- and finally, the word vote, with an indication that you're on a button
Our programming language divs are clickable (with Control+Option+Space on VoiceOver, Caps Lock+Enter on Narrator, or just Space on NVDA). However, notice that except on NVDA, the only HTML element where the screen reader actually tells us we can give input is the vote button.
Why don't all our screen readers know that, even though we gave our divs onclick handlers?
For that information, we need to look at the accessibility tree.
Reading the accessibility tree
In addition to a DOM (document object model) tree for representing HTML and converting it to the user experience you get in a browser, there's another, related tree: the accessibility tree.
It's built from the DOM, and just like how the DOM tree creates the browser's visual user experience, the accessibility tree is read by accessibility technologies to make the user experience someone gets with tools like screen readers.
To start looking at the accessibility tree for a DOM element, right-click it and go to inspect element. Then in Chrome Developer Tools, click the Accessibility sub-tab of the Elements tab, and you'll see where your element is on the accessibility tree.

Each object in the accessibility tree has a name, role, and optionally a state and description. So let's say you're looking at the accessibility tree object for Go. Its tree will look like this:
generic
  generic
    generic
      text "Go"
Each word generic represents an accessibility tree object whose role is "generic". Because a div HTML element is designed to play an arbitrary role in HTML, nothing about the div inherently tells the accessibility tree that our div is a piece of clickable input.
In fact, if you look at the third generic item, which corresponds to the actual button, you also won't find a state, even though in practice the state of one of our buttons is either selected or not selected.
Since we have a list of programming languages and we're only selecting one of them, the role we want our selections on the accessibility tree to have is radio. If the accessibility tree has an item with that role instead of the generic role, then screen readers will know to treat it as radio button input where you can only select one item in a group. There's three ways we can accomplish this:
- Use standard radio buttons.
- Give our divs the
radioARIA role, and write the JavaScript to support the functionality a user would expect from a regular radio button when navigating with a keyboard. - Get accessible HTML components from a framework or code library that does the JavaScript that the second bullet point mentioned.
While the first one isn't as flashy, it keeps the code simple to start with, so let's take a look at that.
NOTE: If you want to see an example of the JavaScript for implementing the radio button role for divs, the World Wide Web Consortium has an example here. By the way, they also write the Web Content Accessibility Guidelines, which are the standard for accessible web apps.
Switching to radio buttons
While they might not look so exciting out of the box, an advantage of using built-in HTML elements is that a lot of them are designed so the accessibility tree, and in turn screen readers, automatically knows what to do with the elements.
This is called semantic HTML, and you can also find it on other HTML elements such as headers, and nav bars, and h1-6 tags.
To see this, let's see what our screen reader experience is like if we use radio buttons instead of divs.
<form id="accessible-poll">
  <fieldset>
    <legend>Pick your favorite programming language</legend>
    <div class="language-radio">
      <input id="go" type="radio" name="language" value="go" />
      <label for="go" class="language-label">Go</label>
    </div>
    <div class="language-radio">
      <input id="javascript" type="radio" name="language" value="javascript" />
      <label for="javascript" class="language-label">JavaScript</label>
    </div>
    <div class="language-radio">
      <input id="ruby" type="radio" name="language" value="ruby" />
      <label for="ruby" class="language-label">Ruby</label>
    </div>
  </fieldset>
  <button>Vote</button>
</form>
We wrap our radio buttons in a fieldset so that they're grouped together, and give it a legend so the group of inputs is described on the screen reader. I also use a label for each radio button to associate the text with the radio button, as well as to make clicking the text count as selecting the radio button.
Hopping through the items on VoiceOver, I get:
- The note to pick your favorite programming language and the indication that you're in an input group
- The names of programming languages, and the indication that each item is one of three radio buttons
- The indication you're at the end of the input group
- and finally, the word vote, and the indication you're on a button
Not only that, but if I select a language, like Go, and then visit that radio button again on VoiceOver, the screen reader tells me that it's selected.
Before we look at the accessibility tree to see why a screen reader is now able to tell the user they're in a radio button group, there's just one other thing to do. I don't want it to be a takeaway of this tutorial that you need to sacrifice a visually appealing user experience to make your app accessible for screen readers. So let's add some CSS to make the radio button user experience look similar to the div user experience.
fieldset {
  display: grid;
  grid-template-columns: repeat(5, 1fr);
  column-gap: 20px;
  margin-bottom: 20px;
  border-width: 0;
}

legend {
  font-family: sans-serif;
  font-size:   18px;
}

.language-radio {
  padding: 20px;
}

#go:checked + label {
  background-color: cyan;
}

#javascript:checked + label {
  background-color: rgb(250, 244, 72);
}

#ruby:checked + label {
  background-color: rgb(255, 21, 21);
}

.language-label {
  font-family:   sans-serif;
  font-size:     20px;
  text-align:    center;
  font-weight:   bolder;
  border-radius: 20px;
  border-color:  black;
  border-style:  solid;
  padding:       20px;
}
Sweet, now let's check out the accessibility tree!
The accessibility tree for our radio input
Right click on the fieldset and click inspect element, and you'll see an accessibility tree that looks like this:
form
  group
    Legend
    generic
    generic
    generic
There's three generics, one for each div wrapping the radio buttons.
But click on one of the generics in the accessibility tree, say, the one corresponding to the Go button, and you'll see an accessibility tree that looks like this:
form
  group
    generic
      radio "Go"
As you can see:
- The outermost div's role is now "form", from the built-in
<form>HTML element - The built-in
<fieldset>HTML element made the outermost div's role intogroup, indicating we're on a group of related inputs - The div surrounding each radio button still has the role generic since it's a div and we didn't give it any ARIA attributes
- The radio button under the div, though, has the role
radio, so the screen reader knows you're on a radio button
Not only that, but in the section titled Computed properties, you can see that:
- The radio button's name is "Go"
- Its role is "radio"
- It's
focusable, so you can reach it by pressing tab - It's not yet checked
- And it's labeled by the
<label>tag next to it
Select the Go radio button, look at it in the accessibility tree again, and now its state is checked!
As you can see, the accessibility tree is useful for taking a closer look at what accessibility technologies like screen readers work with to build a keyboard and audio user experience. So when you're testing how a blind or visually impaired user would use your web app, the technologies your computer and browser already had pre-installed can go a long way!
Shoutout to Tim Ringenbach for peer-reviewing my post, and to my mom for letting me borrow her Windows computer for trying out Windows screen readers!


Oldest comments (1)
Nice article, quick suggestion though - add inline codepens / jsfiddles so people can test this for themselves.
Also with a quick 5 minute fiddle to your CSS you can make something that mirrors your first design that doesn't have any visible radios and yet is still accessible. - obviously not production ready but you get the idea.